Showing posts with label soymilk. Show all posts
Showing posts with label soymilk. Show all posts
Thursday, May 11, 2017
MAKING AN EASY, INEXPENSIVE CRUELTY-FREE AND PALM OIL-FREE VEGAN BUTTER-Y SPREAD

Note: see this new post for the easy updated recipe.
But what do I mean by "cruelty-free"? Read on...

Here's the "but" part-- My "Buttah" is made with oil and cocoa butter (organic and steam-deodorized so that it doesn't smell like chocolate). It only needs a small amount of cocoa butter compared to liquid oil (which makes the fat profile healthier than most spreads). But cocoa butter, and especially organic and fair trade cocoa butter, is getting more and more expensive and the steam-deodorized organic block type that I have purchased in the past is getting hard to find. With our low Canadian dollar, it is really expensive!
I have some of that cocoa butter left and I will use it for "Buttah" to use occasionally in (and on) special baking. (I use oil- sometimes frozen-- and much less than most recipes call for, in my pie crust.) But I wanted a spread for toast or pancakes, and no commercial vegan spread that I can find does not contain palm oil or a derivative or two.
One day it occurred to me that I should try the old method (which I believe originated with Seventh Day Adventist vegans many years ago) of making a vegan mayonnaise by drizzling oil into some soymilk while blending, then adding the appropriate seasoning. Evidently, the natural lecithin in the soymilk enables the oil and soymilk to coagulate into a creamy, spreadable mass. (I had made this in the past, but now use my very lowfat vegan mayo, which can be made with only 1/4 cup oil for a slightly-over-2-cup batch, or with 1/4 cup of certain seeds and/or nuts instead of extracted oil.)
So, I tried making a "butter-y" spread using that method, adjusting the flavoring, of course, and adding a bit of liquid lecithin and vegetable gum powder to make it less apt to separate. It worked! This new spread looked to be a winner-- a.) inexpensive, b.) quick and easy to make, c.) keeps well, and d.) tastes yummy, with a good mouthfeel.
But I wanted to also make a soy-free version for anyone allergic to soy, so I tried it with almond milk and also with a low-fat coconut-based unsweetened creamer, and it didn't work as well, simply because only soymilk contains the lecithin that seems to be the key to thickening this product. However, with slightly more lecithin and vegetable gum (guar or xanthan), which I included to keep it it from separating so easily, it worked out reasonably well. (Update: NON-SOY VARIATION:
Instead of soymilk, use Silk or So Delicious Coconut Creamer (Original), which are both cruelty-free, or you can use a creamy sort of plant-based milk that has a pleasant taste. (Rice milk is too thin). NOTE: Silk and So Delicious brands use cruelty-free coconut products.
The recipe can be found here:
http://veganfeastkitchen.blogspot.com/2019/05/newly-revised-easier-cheaper-cruelty.html
Truth to tell, I prefer not to use coconut oil very often, despite the craze for it, because of the saturated fat. (No, I am not convinced that saturated fat is good for us! See this article and this one, and also this column from vegan RD Ginny Messina.) There are also many concerns with coconut oil producion, of which most people are not aware.
 |
| Photo from this article |
Please read the info in WHY CRUELTY-FREE COCONUT OIL? at the bottom of this post. And see this article for a list of cruelty-free brands of coconut products and other products that contain coconut oil. Silk and So Delicious brands use cruelty-free coconut products.
WHY CRUELTY-FREE COCONUT OIL?
See this article for a list of cruelty-free brands of coconut products and other products that contain coconut oil.
See photographs at this article: "Life in chains: Heartrending pictures of caged Indonesian monkeys being sold to coconut farmers"
See photographs at this article: "Life in chains: Heartrending pictures of caged Indonesian monkeys being sold to coconut farmers"
Published earlier this year, the most comprehensive article I read, Pay Coconuts, Get Monkeys, gives us an idea of what life is like for these monkeys, how valuable they are economically, and how legal loopholes enable trainers and “zoos” to essentially get away with animal abuse and neglect.
Early on in the piece a man called Noi Petchpradab, who has been training macaques to harvest coconuts for thirty years, was interviewed and discusses daily life for these working monkeys: "When they are not working, the animals are chained to tree stumps, which Mr. Noi said is due to their aggressiveness. They are given three daily meals, consisting of rice mixed with Lactasoy milk."
The article also goes on to say:
 |
| Photo from this article |
"Due to their ability to work for long hours, the macaques are capable of collecting 600-1,000 coconuts per day, compared to only 100-200 for humans. On a few occasions, he admitted, the monkeys are so tired they faint.
VIDEO: https://youtu.be/8gWEsNL-RJc
VIDEO: https://youtu.be/8gWEsNL-RJc
This practice will surely continue as long as there is both a market for coconut oil and consumers who are ignorant to the fact that this is even happening. Also, there will always be an economic incentive for people in these areas to use monkeys as performers as long as tourists are willing to spend money to visit them."
More articles:
http://www.crueltyfreekitty.com/news/monkeys-harvesting-coconuts-thailand/
http://www.eatplantsnotanimals.com/animal-related-issues/uk-companies-confirmed-to-not-use-coconuts-picked-by-monkeys/
http://animalplace.org/did-a-monkey-pick-your-coconuts/
https://www.elephantjournal.com/2016/10/is-your-coconut-oil-cruelty-free/
Sincerely,
More articles:
http://www.crueltyfreekitty.com/news/monkeys-harvesting-coconuts-thailand/
http://www.eatplantsnotanimals.com/animal-related-issues/uk-companies-confirmed-to-not-use-coconuts-picked-by-monkeys/
http://animalplace.org/did-a-monkey-pick-your-coconuts/
https://www.elephantjournal.com/2016/10/is-your-coconut-oil-cruelty-free/
 |
| Monkey being sold in Indonesia; photo from this article |
 |
| Tourists photographing monkeys made to perform; photo from article in Bangkok Post |


Friday, February 26, 2010
IN WITH THE NEW-- A NEW CAT COMPANION, AND SOME NEW & USEFUL KITCHEN ITEMS...
Isis, the 5-year-old female tortoiseshell cat who adopted us recently:
Isn't she a beauty? She's a big cat, bigger than our male cat, Ringo.

Ringo (the one with his mouth open) in a typical pose, with his sister Tina, who unfortunately passed away last year.
Isis has been quite aloof, but last night she actually jumped up on our bed while DH was reading and sniffed his nose and purred! A first!
A little history: she began hanging around our place a few months ago and, eventually, when we began to see her regularly, I started feeding her outside. In time, she let me pet her while she was eating. We leave a window open for the cats all the time (we live in the country on an island, so we don't worry about locking things!), and we found out that she was coming in and sleeping in the house at night. DH saw her jump out the window one morning. Evidently, the other cats didn't chase her off. Eventually, he got her to stay and eat in the kitchen, and that was that. She was skittish and not terribly friendly, but she stayed.

Our friends Fireweed and Mike, who run the island's spay/neuter and release program for feral cats and strays, took her to the vet who does work for them at a discount. The vet discovered that she was spayed already, about 5 years old, and had an identity tattoo deep inside her ear (we'd missed it). Via the tattooed number, he ascertained that she belonged to a family who lives in Vancouver and has a summer home on our island, and they were contacted. Evidently, she had run away in August (they think because they got a new dog), and they had put up notices with her picture, but no one had reported seeing her. She had been a totally indoor cat in the city and quite overweight, we found out later. The weight was useful for her because she ended up on her own for about 4 months! Somehow, with no outdoor "smarts", she made her way clear across the island to us, and in very good shape!
We also found out that her name was "Isis", which I thought was very fitting, since she obviously thinks she's a goddess!
We wanted to keep her, especially since we knew that our lovely old girl Sinéad was probably going to leave the world sometime soon. Also, all of our cats have "found" us and we really felt that she had chosen us. However, when the family phoned us, they said they wanted her back, so we sadly but readily agreed to keep her safe until they came to the island in a couple of weeks or so. But, to make a long story short, they came, checked us out, and said that we could keep her if we wanted her, because she really disliked the dog! Of course, we said yes! So, she is slowly establishing her place in the house and getting to know us better, and we hope that she will be here for many years!
I wonder if she chose us because there were other cats here and so she figured she'd be welcome?
*******************************************
MY NEW (INEXPENSIVE) AND USEFUL KITCHEN ITEMS
1st new item: My new Danish Dough Whisk

I ordered this from BreadTopia
 for the very reasonable price of $8 US!! This is the large one-- they also have a smaller one
 that would be useful for smaller batches of dough or batter, and, especially, sourdough starter. They were friendly and prompt, and their shipping cost, even to Canada, was very low.
I purchased this dough whisk to use on my no-knead bread doughs (see the Bread category on my Recipe Pages list on the right hand side of the page), and it works really well for that, and is easy to clean. Evidently, you can use it for muffin and quick bread batters (probably good for gluten-free bread batters, too), biscuit and soda bread doughs, and even cookie dough-- anything from a thick batter to a real dough! Eric at BreadTopia says, "It's perfect for mixing heavy dough prior to kneading. Way better than a spoon and much easier to clean." It's such a nice, old-fashioned tool. I love it!

**************************************************************
2nd new item: a jelly bag (or jelly strainer) on a metal stand, which I bought to strain homemade soymilk!

The one thing I don't look forward to when I make my homemade soymilk is straining it. But, I like my milk smooth, so I want it strained well. I thought the gold coffee filter, which is often recommended, was very slow and tedious, so I got rid of mine. The mesh strainer that comes with the SoyQuick machine is just not quite fine enough for me and doesn't hold much, so I use it for other things. Consequently, I have been using cotton cloth, which works well, but it takes quite a while for the milk to go through and you have to squeeze and twist the soy pulp (okara) in the cloth by hand to get all the milk out. Then you have to clean the cloths.
On another post, Pat Meadows told me that she uses a "Chinois", or a conical strainer, to strain her soymilk with ease. (These are sometimes called "China caps", and what Pat actually uses is an "8-inch Extra Fine Mesh Bouillon Strainer".) She writes: "I picked this particular one because it has extra fine mesh and it is LARGE. It's made of stainless steel. This is the perfect tool for the job, in my opinion. WHOOSH and most of the soymilk has gone through; a quick press with an oversized rubber spatula or wooden paddle, and the rest goes through. Time spent standing at sink: about one minute."
I still intend to get one of those at a later date because it would be so streamlined! Pat paid $20 on sale, but the same strainer is $28.40 now and they can go up to about $35. Then you have to add shipping costs (unless I can find one here or in Vancouver). Unfortunately they don't ship to Canada, and I haven't been able to find anything in that price range in Canada (I tried ebay, but what I could find had to be shipped from the US at a rate of over $20 shipping!), so I'm going to see if I can have it shipped to a friend in the States who I am going to visit soon.
If you do buy a conical strainer, opt for extra-fine mesh, NOT perforated steel.

I couldn't fit it into my budget just now, so I thought an old-fashioned jelly bag might work similarly well for the time being. I ordered one from a Canadian (BC) company, KitchenNiche.ca, for $10 and received it very fast. (You can get one from amazon online, but kitchen stores should have them, too.)
It works much better than a regular strainer, or a cloth-lined colander! I think that is the fastest I have ever made soymilk! The conical shape helps the milk drain out quickly and, though I tried squeezing the last bit out, it really wasn't necessary. I strained one batch (I had made 2 at once), dumped out the okara and poured in the next one. It went so fast and the clean-up is also fast and easy!


The cloth was cleaned and dried in a jiffy and I put it back on the stand. I'm just going to leave it set up, covered with a plastic bag, and stored on a shelf, so that I don't have to re-assemble it each time I use it.
online, but kitchen stores should have them, too.)It works much better than a regular strainer, or a cloth-lined colander! I think that is the fastest I have ever made soymilk! The conical shape helps the milk drain out quickly and, though I tried squeezing the last bit out, it really wasn't necessary. I strained one batch (I had made 2 at once), dumped out the okara and poured in the next one. It went so fast and the clean-up is also fast and easy!
The cloth was cleaned and dried in a jiffy and I put it back on the stand. I'm just going to leave it set up, covered with a plastic bag, and stored on a shelf, so that I don't have to re-assemble it each time I use it.
UPDATE Ap. 12, 2010: The jelly bag is started to fray and tear a bit, so I'm anxious to get the extra-fine-mesh conical strainer I ordered! (See picture above.) Otherwise, I would have to buy a few new bags to have on hand.
*****************************************************
The 3rd NEW item: English Muffin Rings


I wanted to make no-knead English muffins, but knew that the dough would be so slack that you would need the rings (which are probably actually crumpet rings) to hold the nice round shape. I have only tried them once and I didn't like the particular recipe that I used, so I'm going to work on one and will post it when I'm satisfied! But the rings worked just fine!
Cheers!

*****************************************************
The 3rd NEW item: English Muffin Rings
I wanted to make no-knead English muffins, but knew that the dough would be so slack that you would need the rings (which are probably actually crumpet rings) to hold the nice round shape. I have only tried them once and I didn't like the particular recipe that I used, so I'm going to work on one and will post it when I'm satisfied! But the rings worked just fine!
Cheers!
Tuesday, July 10, 2007
FOOD PHOTOS AND EXPERIMENTS FROM THIS WEEK
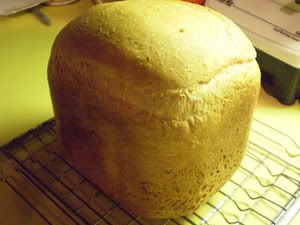
I made the following white bread loaf (it does have some oat bran in it) just as an experiment to see how little yeast I could get away with (most bread machine recipes call for WAY too much yeast, which does NOT improve the flavor!). For this loaf, I used only 1/2 tsp. yeast in total. I made a sponge (loose batter) with all of the water, yeast and some of the flour and let it rise in the ABM container for 6 hours, before adding the remaining ingredients and baking it. Look how it rose! The crust was nice and crunchy.
It tasted good for white bread, but was actually a little TOO fluffy for my liking! Here's the recipe:
Printable Recipe
BRYANNA’S “NOT QUITE WHITE” BREAD MACHINE BREAD
2 lb. (sponge method)
This can be used as basic bread for many variations. NOTE: This is the machine I have.
Sponge:
Mix for 5 minutes on dough cycle, then unplug and leave overnight, or for 6-12 hours:
1 and 1/2 c. water
1/2 tsp. dry active baking yeast (or 1/3 tsp. instant yeast)
2 c. unbleached flour (use bread flour in USA)
After rising the sponge, add:
4 tsp. brown sugar
2 T. plus 2 tsp. oil
1 and 3/4 tsp. salt
2 c. unbleached flour (use bread flour in USA)
1/3 c. whole wheat flour (or oat bran)
Set on the Basic Cycle, Dark Crust. Check the dough during the first knead to make sure that it is neither too dry, not too wet. If it’s too dry, add water by the tablespoonful, letting it knead in, until it looks right. If it’s too wet, do the same with flour.
If you want a more attractive top crust to the bread, 5 minutes before the bread is due to bake (I set my kitchen timer to remind me of this), you can make a decorative slash in the top of the bread with a razor blade, and you can also glaze the bread with some soymilk, using a pastry brush, or sprinkle the top with flour.
Cover the “window” in the top of your machine with foil, so that the top of the bread will brown properly. Remove the bread immediately from the machine when done, placing on a rack to cool thoroughly. This will insure a crisp crust.
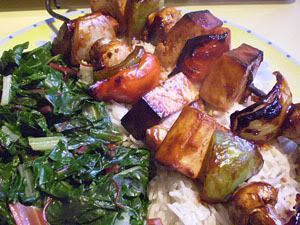
Dinner the other night was Swiss chard from our garden (yum!) and tofu kebabs with peppers, mushrooms and onion. I had soaked the extra-firm tofu cubes in the Breast of Tofu (or Crispy Marinated Tofu from World Vegan Feast) marinade for several days, anticipating a meal such as this. I just threaded them on skewers with the veggies, slathered on barbecue sauce (my Bourbon BBQ Sauce ) and grilled them, serving them on a bed of Basmati rice.

I just had to post yet another picture of a wonderful organic, fair-trade soy cappuccino made with my homemade soymilk! I always get such lame foam when I order soy cappuccinos in restaurants! I'm wondering if it's maybe because I use a cheap plunger-type milk foamer? I'm thinking that maybe foaming with steam dilutes the foam???
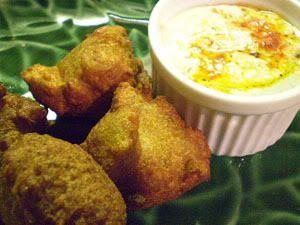
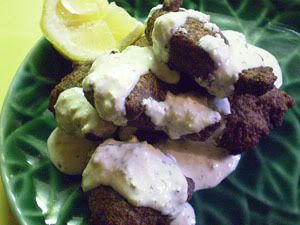
Last, but not least, two incarnations (above)of my experiments with Egyptian Felafel (ta’amiyya), which is made with fava or broad beans instead of chickpeas. Spice Island Vegan raved about the recipe from Canadian author Habeeb Salloum's EXCELLENT books, "From the Lands of Figs and Olives" and "Classic Vegetarian Cooking from the Middle East & North Africa".
I have a hard time getting dried favas, but I often use split yellow peas instead of dried favas in soups, etc., because, when they cook down to a puree they taste very similar. So, I substituted split yellow peas (cup for cup, and I did soak them) in the felafel recipe and it was great. However, next time I go to Vancouver I will get some fava beans and compare. These felafel are very light, quite different than the chickpea ones. Actually, I could not shape the batter-- it was too runny-- so I just dropped little spoonfuls of it into the oil.
Enjoy!

Monday, July 2, 2007
ICED CHOCOLATE CHAI!

This isn't my recipe-- it's adapted from a recipe in Canadian House and Home. It looked good and I've been meaning to try it for a couple of weeks, so we had it last night for dessert. Their recipe called for Darjeeling tea, which I didn't have, so I used Ceylon orange pekoe.
ICED CHOCOLATE CHAI FOR TWO
This was very refreshing, creamy, and not too sweet. An interesting variation on traditional chai! You can multiply this.
1 cup water
2 orange pekoe tea bags (a good strong, aromatic one-- OR, for caffeine-free, use plain Rooibos tea
 )
)1/ 3" stick of cinnamon
6 cardamom pods

5 whole cloves
2 cups soy milk
 or almond milk
1 Tbs. organic unsweetened cocoa powder

1 1/2 Tbs. sugar
ice cubes
In a small stainless steel pot, simmer the water, tea bags and spices for 10 minutes, covered. Meanwhile, whisk the cocoa, sugar and soy or almond milk together (if you heat it a little in the microwave, the cocoa will mix in better). Add this to the tea mixture after it has simmered 10 minutes, and then simmer on low 10 minutes more. Strain through a sieve
 and chill the mixture. Serve in two tall glasses over ice cubes.
Enjoy!
Subscribe to:
Posts (Atom)