Showing posts with label pizza. Show all posts
Showing posts with label pizza. Show all posts
Thursday, April 13, 2017
TIME AND ENERGY-SAVING STOVETOP PIZZA (MADE WITH NO-KNEAD DOUGH)


You can make the no-knead dough the day before or a week before and the cold dough will be easy to handle. I've never made pizza so fast and with less fuss and bother than this, and I have made alot of pizza in my time. It's perfect for 2-4 people.
And I love that I don't have to have the oven on for so long-- saves energy.
*****************************************************************
Printable Copy
This method may take a bit of adjustment, depending on your stove burners. I have an electric stove and the burners tend to be VERY hot, so I was not going to heat the pans any higher than on medium heat. (More details below.) It's also worth remembering that cast iron heats faster and retains heat longer than a pizza stone.
NOTE: If you have time to do a trial run with one piece of dough , it might be helpful, so that you can see how the dough responds to 3-4 minutes cooking on your particular burners (with the lid on the pan), and then you can adjust the heat accordingly.

So, when you are ready to make pizza....
1.) Have your toppings ready (and you want to go easy on the toppings): I saute some thinly sliced onions, peppers and mushrooms, and a bit of vegan sausage, thinly sliced, and then I use Daiya mozza shreds (but use any kind of vegan melty cheese you like) and a bit of Go Veggie! soy parmesan. For the sauce, use whatever kind you like. If I'm in a hurry, I just use some bottled tomato passata with basil and add a bit of salt and garlic to it.
2.) Measure out the dough (see info below and recipe links) and have your rolling-out set-up ready and waiting.
3.) Now pre-heat your skillets: I use well-seasoned cast iron skillets. I have read that you can use a heavy stainless steel skillet as well, and I would think that you could use a carbon steel skillet, too, since you can actually season both of those pans just like cast iron. See the end of the blog post for how to season all these types of skillets.
The first time I made the stovetop pizzas, I heated my pans at medium heat for 5 minutes on the two largest burners (#5 for the front one, and #4 for the back burner, which is very hot). It worked okay, but the bottoms burned a bit. The second time, I turned the front one to #4 and the back one to #3, which worked better.) PS: I didn't grease the pans at all.
You can heat the pans while you roll out the dough.
WARNING: I use silicone hot handle covers on the handles of my skillets, but you will still need really good oven mitts when moving these hot pans around.
4.) Move the top rack of your oven to about 4-5 inches below your oven broiler and turn the broiler to high. You will be quickly broiling the top of the pizzas after stovetop cooking.
5.) I used 6 oz. of cold dough for each personal pizza, rolled out to fit an 8-inch cast iron skillet. The no-knead dough should be fresh out of the refrigerator (after at least an all-night stay) and will need a good sprinkling of flour all over before rolling out on a piece of baking parchment or a silicone mat.
I used the no-knead version of my 3/4 whole wheat flatbread dough, or you could use my 100% whole wheat no-knead flatbread dough-- both doughs will keep refrigerated for a week or two. Or use your own favorite dough.


6.) Quickly place the rolled-out dough into the hot pans. Quickly spread with some of your sauce (dump about 3 tablespoons in the center of the dough and spread it outwards in a circular motion with the back of a soup spoon), top with a small handful vegan cheese shreds, a sprinkle of vegan parm and a handful of your toppings. Drizzle with a bit of olive oil from a squirt bottle, if you like. Cover with a lid and let cook for about 3 more minutes.
NOTE: If you are making 2 more pizzas, you can roll out the dough during this cooking time.
7.) Lift the lid and check the bottom of the dough-- it should be lightly browned with maybe some dark spots. If it's burning, the heat is too high-- you might want to move the pan off the heat for the last bit of cooking.
8.) Finishing off: now, you can slightly brown the top and melt the cheese thoroughly by moving the pans from the stovetop to the top rack of your oven, under the broiler. 1 or 2 minutes under the broiler should do it-- watch carefully.

Remove the skillets to the stovetop again and use a large spatula to move the pizzas to racks or plates. Repeat with more dough, etc, if you are making a couple more pizzas.
INSTRUCTIONS FOR SEASONING SKILLETS, AND KEEPING THEM SEASONED, SO THAT THEY ARE VIRTUALLY NONSTICK
Instructions for seasoning a carbon steel skillet here, here and here.
here and here.
Instructions for seasoning a cast iron skillet here.
If your cast iron skillet is really a mess, here is one way to restore it. If it is a rusty mess, it needs to be stripped and re-seasoned. I had an old pan like this and I did not want to use lye or oven cleaner to scrub it. I used the self-cleaning oven method described at the beginning of this article. This treatment stripped it right down to the grey iron. Then I did thorough oven-seasoning-- rub oil on all parts of the pan, including the handle; make sure there is no dripping oil; bake at about 350 degrees F for 1 hour; cool completely; repeat 3 more times. This may seem excessive, but you can do it when you are baking something at the same time, and the pan was like new!
To keep your cast iron pans well-seasoned, after cooking, add some HOT water to the pan (do not use cold) and let them soak for a few minutes. Then clean with a scrub brush (no stainless steel scrubbers, please!). Anything is stuck, use the edge of a plastic (not metal) dough scraper or the special polycarbonate pan scraper that Lodge sells for this purpose.

Dry the pan thoroughly. Rub a little oil all over the inside of the pan. Rub it in well and don't leave any excess oil. Place over low heat on the stove for 5-10 minutes. Let it cool and store.
PS: You do not need to use an expensive oil like flax oil, or even coconut oil. Your favorite neutral smelling/tasting oil will do just fine.
Enjoy!


Monday, February 1, 2016
NO-KNEAD PIZZA DOUGH BAQUETTES
 |
| Photo by Dianne Radmore/Fireweed |
A LITTLE EXPERIMENT THAT WENT QUITE WELL: NO-KNEAD PIZZA DOUGH BAQUETTES--
I had some leftover no-knead pizza dough in my refrigerator yesterday. We had our fill of pizza for a while, so I considered freezing the dough, but then thought, "Why not try making a couple of baguettes out of it?" Why not, indeed. It's a similar simple dough (see the recipe for the dough at the end of this post).
I have a baguette pan, but it has a hook on one end, which makes it difficult to place inside even my largest roaster.

I decided to line the baguette pan with 3 layers of foil, line the troughs with baking parchment and let the dough rise in that setup (for about 2 hours because the dough was cold).

When I heated up the oven (to 450 Degrees F), I also heated up my big rectangular granite ware roaster.

I stretched and folded the refrigerated dough a few times before shaping it into two loaves.

When the time came to bake, I slid the foil form out of the baguette pan onto the bottom of a baking sheet and then carefully slid that into the shallow bottom of the hot roaster.


The foil kind of spread outward at this point, so I quickly rolled up some more foil into two long "sausages" and used those to prop up the outside edges of my makeshift baguette pan liner (I saved all this foil for another use, BTW).
I scored the tops of the dough with a serrated knife before baking, but not deeply enough, evidently, because you couldn't see the scoring at all after it was baked (I'll use a razor blade on the soft dough next time). However, as you can see, it turned out well, had wonderful flavor (it was in the refrigerator for 2 nights), and disappeared very fast with a vegan stew I made for friends who came for dinner.
 |
| Photo by Dianne Radmore/Fireweed |
I'll be doing this again!
Printable Copy
BRYANNA'S NEAPOLITAN-STYLE NO-KNEAD PIZZA CRUST ( or about 4 baguettes)
Servings: 36
Yield: makes about six 11"-square pizzas
This is our current favorite pizza dough-- partly whole wheat and no oil added, but very tender.
6 cups unbleached white flour or unbleached bread flour (use bread flour in the USA-- Canadian all-purpose unbleached flour has the same gluten content as USA bread flour)
1 1/2 cups whole wheat pastry flour
1 Tbsp sea salt (fine)
3 cups warm water
1 Tbsp instant yeast
In a large bowl, mix together the two flours and the salt.
In a 1-quart/L container, sprinkle the yeast into the water and let sit for a few minutes. Stir and pour into the flour mix. Have ready another large bowl, oiled lightly.
Stir the mixture with a Danish dough whisk or large spoon. Use your hands to mix/knead in the last bit of flour. Using a dough scraper, scoop the dough into the oiled bowl. Cover and let rise at room temperature for 2 or more hours (this is flexible). Refrigerate in the same bowl, either covered, or placed inside of a food-safe plastic bag (it won't touch the dough if the bowl is big enough), or in a covered container such as a dough bucket or large storage container. Place in the refrigerator.
You can keep the dough in the refrigerator for about 2 weeks, although, in my experience, it gets kind of "soggy" by then. It does taste marvelous after a long stay in the refrigerator!
Make as many pizzas as you like (refrigerate any leftover dough again) as usual and bake at the highest heat your oven can reach (500-550 degrees F) for 8-10 minutes, using a baking stone or cast iron skillet heated up in the oven as it comes up to temperature.
See these blog posts for tips about rolling out and baking pizza:
http://veganfeastkitchen.blogspot.ca/2006/05/vegan-pizza-night.html
http://veganfeastkitchen.blogspot.ca/2011/10/cast-iron-skillet-pizza-perfect.html
Nutrition Facts
Nutrition (per 1/6th of one square 11-inch pizza): 93 calories, 3 calories from fat, less than1g total fat, 0mg cholesterol, 189.1mg sodium, 47mg potassium, 19.6g carbohydrates, 1.2g fiber, less than 1g sugar, 3g protein.
Enjoy!

Thursday, June 13, 2013
FLATBREAD REVISITED-- *100%* WHOLEWHEAT THIS TIME, NO-KNEAD, & MAKES FAB BURGER BUNS, TOO
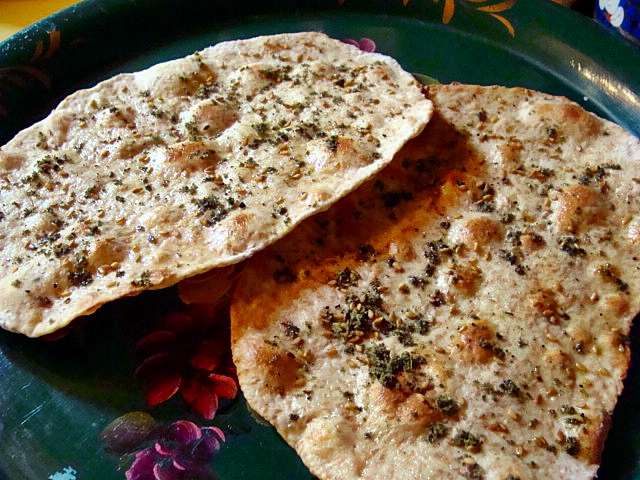 |
| Cracker Bread |

So, I've been at it again and I'm really, really pleased with the results. The pizza was great (and I am picky about pizza crust!), the pita puffed nicely, and the flatbreads were wonderful for wraps and even cracker bread. We were particularly happy with the burger buns. I don't like heavy buns and these were just light and tasty enough (with a slightly crispy bottom) to compliment the burger rather than dominate it.
 |
| Burger with Carrot Fries |
I hope you'll try this dough (see all the photo ideas in the last post, too) and invent your own flatbreads, wraps and buns.
Printable Recipe
BRYANNA’S EASY NO-KNEAD REFRIGERATED 100% WHOLE WHEAT NO-KNEAD FLATBREAD (& PIZZA, BUN) DOUGH (recipe can be doubled, etc.)
Yield: This recipe makes about 3 large pizzas; or 8
large wraps/flatbreads; or 12 pita or small flatbreads; or 11 hamburger buns; or
16 dinner rolls; or 22 cracker breads
3 3/4 cups whole wheat flour (you can use
white whole wheat flour, if you have it)
1/2 Tbs fine sea salt
1 3/4 cups lukewarm water
2 tablespoons mashed potato flakes or 1
tablespoon potato flour or starch
2 tsp organic sugar
1 tsp instant or dry active yeast
2 Tbs olive oil
Mix
together the flour and the salt in a medium bowl or dough-rising
bucket—preferably with a lid—with a whisk.
In a smaller bowl, or a measuring pitcher, mix the water, potato flakes, sugar and yeast. Let stand for a couple of minutes.
NOTE: I know that you don’t have to do this with instant yeast, but Master Baker Peter Reinhart says (in his book “Peter Reinhart’s Artisan Breads Every Day”, pps 12-13): “...I’ve discovered that waking up the yeast in lukewarm water allows it to ferment more effectively during the cooldown phase in the refrigerator. It also makes it possible to put the dough in the refrigerator as soon as it’s mixed rather than having to wait for it to rise. The warmer dough and activated yeast have plenty of time to rise as the dough cools, so the dough is ready to use right from the refrigerator, without the wake-up time required in many of the recipes I’ve developed...Another benefit of this method is that it’s the same whether you use instant or active dry yeast...”
Add the oil to the yeast mixture and pour into the flour mix. With a wooden spoon or dough whisk, stir into a rough dough. If it’s a bit too hard to stir, just knead it very briefly in the bowl til it all comes together. Cover with the lid or place the bowl inside of a large food-safe plastic bag (use a twist-tie, but make sure the bag “poofs” up over the bowl a few inches) and let it rise on your kitchen counter until doubled in size.
Now, you can “knock it back”, as Brits say (poke it until it collapses), cover again as above and refrigerate for up to two weeks, or you can use it right away. (Tip: Refrigerated dough is easier to handle.) You can use some of it right away, and keep the remaining dough in the fridge for other uses—that’s the beauty of this recipe!
If you are using refrigerated dough, there is you don’t need to bring the dough to room temperature before shaping—another plus! But your oven or pan must be hot, or at least heating up while you shape the flatbreads. Flatbreads can rise for a few minutes, but pizza should immediately be topped and placed in a very hot oven (500-550ºF).
TIP: I generally shape flatbreads on a piece of baking parchment spread over the surface I’m using, or on a silicone mat. You can get away with less flour that way. Parchment is handy because, if your dough sticks to it just cut away the excess around your flatbread and bake it with the parchment attached! It will come away just fine after baking. I generally top pizza dough which is on parchment and then transfer the pizza (using a pizza peel) to the hot pan or stone in the oven, parchment and all!

BASIC
FLATBREADS:
NOTE: Even though this is a yeast dough, you can use thin flatbreads like a
tortilla or sandwich wrap, or a stuffed bread.
Pinch or cut off 12 golf-ball-sized pieces of the dough for pita or flatbreads.
(For
larger wraps or flatbreads, cut into 12 equal pieces; OR for very thin
flatbread or cracker bread, cut into 22 pieces, approx. 1.5 or 1.6 oz. each.)
Roll them to less than 1/4” thick—they can be round, oval, or odd-shaped; it doesn’t matter!
For cracker bread, roll as thin as possible without tearing-- an oval shape about 8-inches long is good for these. (See Pita and Pizza entries below for tips and resources re rolling out the dough.)
Now, you “bake” them in a hot skillet on the stovetop on at a time.
They cook very quickly, so it doesn’t take long. (I often quickly make 2, 3 or 4 for lunch or breakfast with my refrigerated dough and it takes only minutes once you’ve done it a few times.) Flip them over for a minute or two if you want both sides to be more crispy.
To cook on top of the stove, heat a heavy cast iron skillet or griddle or hard-anodized skillet (9-12”) over high heat until the pan is very hot. (You can turn on your stove fan or open a few windows!)

Flip
one flatbread at a time onto the hot skillet and cook a minute or two, until
it’s bubbling up and has brown spots on the bottom. Flip it over and cook until
there are brown patches on the second side.
NOTE: You may have to turn the heat down on your stove, or adjust the heat as you go-- stoves vary. You don't want the breads to burn right away. After you've done a few, you'll know how to handle your stove next time!
Alternative method (I prefer this method for thin cracker breads.): You can bake several at one time like pita in the oven, but prick the dough all over with a fork before baking so the dough doesn’t puff up so much. Watch carefully so they don’t burn.
 |
| Rolling out thin dough for cracker bread |


If
you are eating them right away, you can brush or spray each bread with a little
olive oil (infused with garlic is yummy!) and sprinkle with any toppings you
want (see text above). If they are not to be used right away and you want to
keep them softened (for a wrap, perhaps), cool them in an open paper bag.
If you want them crisp, cool on baking racks.
If you want them crisp, cool on baking racks.
********
PITA:
See
this post for shaping and baking:
http://veganfeastkitchen.blogspot.ca/2006/08/5-foods-you-have-to-eat-before-you-die.html Important—don’t
stretch pita dough, just roll it.
If you don’t have a pizza stone, you can use a cast iron skillet or griddle. If you have neither, heat baking sheets in the oven and use those. Cool the pita in an open paper bag so that they stay flexible.
*****

PIZZA:
I generally roll or pat the dough into an
8" circle (on a lightly-floured piece of baking parchment or silicone
baking mat) and then use the weight of the dough to stretch it into a thinner, larger round by draping it over an over-turned mixing bowl. See this post for instructions and a photo, as well as baking instructions: http://veganfeastkitchen.blogspot.ca/2006/0/vegan-pizza-night.html Then I place the dough on
baking parchment which is sitting right on the pizza peel for topping.
To stretch the dough , you drape the dough over an over-turned bowl and gently stretch it until it is the right size, using the weight of the dough stretch it. Work slowly so that you don’t tear the dough. If it does tear, by some chance, you can patch it and seal it again. The pizza does not have to be absolutely round! You can use a rolling pin instead, but Neapolitans are of the opinion that stretching the dough rather than rolling it makes a flatter and less chewy crust.
Here’s a post with instructions for using a cast iron skillet or griddle to make great pizza: http://veganfeastkitchen.blogspot.ca/2011/10/cast-iron-skillet-pizza-perfect.html
******

BURGER
BUNS:
Divide the dough into 11 equal pieces
(about 3 oz. each). Fold down the sides of each pieces and pinch together on
the bottom to make a ball. On floured parchment, use the palm of your hand (oil
your hands first) to press each ball down flat. Now pick up the disc of dough
and turn it, holding the edges, so that it stretches a bit. Lay it down again
and press again.
What you are aiming for is a flat circle of dough about 4-inches across that is slightly concave in the middle.

Rise the buns made from refrigerated dough for about an hour on baking sheets lined with parchment and sprinkled with cornmeal or sesame seeds. When doubled, brush gently with soy or nut milk. Bake at 350 to 400°F (depending on how soft or crisp you want the outside of the buns) for 15-25 minutes. Cool on racks.


NUTRITION
FACTS:
Nutrition
(for 1 of 12 pita or flatbread): 152.5 calories;
17% calories from fat; 3.0g total fat; 0.0mg cholesterol; 285.3mg sodium;
164.0mg potassium; 28.4g carbohydrates; 4.7g fiber; 0.9g sugar; 23.8g net
carbs; 5.3g protein; 2.5 points.
Nutrition
(for 2 slices of one large pizza [cut into 6 ], crust only): 212.2 calories; 16% calories from fat; 4.0g total fat; 0.0mg
cholesterol; 379.8mg sodium; 224.9mg potassium; 39.8g carbohydrates; 6.6g
fiber; 1.2g sugar; 33.2g net carbs; 7.5g protein; 3.8 points.
Nutrition
(for 1 largish flatbread out of 8): 228.7 calories;
17% calories from fat; 4.4g total fat; 0.0mg cholesterol; 428.0mg sodium;
246.0mg potassium; 42.7g carbohydrates; 7.0g fiber; 1.3g sugar; 35.6g net
carbs; 8.0g protein; 4.1 points.
Nutrition
(for 1 of 11 hamburger buns): 166.3 calories; 17%
calories from fat; 3.2g total fat; 0.0mg cholesterol; 311.2mg sodium; 178.9mg
potassium; 31.0g carbohydrates; 5.1g fiber; 0.9g sugar; 25.9g net carbs; 5.8g
protein; 2.8 points.
Nutrition
(for 1 cracker bread or thin flatbread out of 22): 83.2
calories; 17% calories from fat; 1.6g total fat; 0.0mg cholesterol; 155.6mg
sodium; 89.5mg potassium; 15.5g carbohydrates; 2.6g fiber; 0.5g sugar; 13.0g
net carbs; 2.9g protein; 1.3 points.
Enjoy!

Enjoy!
Thursday, June 6, 2013
EASY REFRIGERATED WHOLE WHEAT FLATBREAD (& PIZZA) DOUGH, WITH NO-KNEAD VERSION (AND MY VEGAN RICOTTA RECIPES)
 |
| Zatar Flatbread to accompany soup (I baked the flatbreads in a 500ºF oven (pricked the tops with a fork in a few places so that they wouldn't puff up like pita) until the bottoms were browning a bit, flipped them over, brushed with a little olive oil, and sprinkled with za'atar, then baked just until the edges started to brown a little. (See about za'atar here http://tinyurl.com/mh3pycg ) |
Finally, here is the post on the flatbread dough I've been working on for a few weeks. I haven't exhausted all the possibilities, but enough to give you some ideas. I was first inspired by the recipe in a great book called "River Cottage Veg Every Day". (It's a vegetarian vegetable cookbook-- not vegan, but, as the author writes, if you're a vegan "you know what to do".) Hugh's recipe is with white flour only, but I wanted a mostly-whole wheat one. So, I revised the recipe, using advice from Cook's Illustrated magazine for making a light, tasty whole wheat pizza dough-- which is, basically, use a little unbleached white flour along with the whole wheat, add a tiny bit of sugar (to counteract a slight bitterness in the wheat), and a little bit more oil for a more flexible dough. (I'm going to try it with all whole wheat flour next.)
I've been using this dough quite a bit. It's so easy to make and convenient and quick to make. You can keep it in the refrigerated for a couple of weeks and just use what you need a bit at a time, if you like. I've made flatbread wraps for my husband's on-the-road lunches several times and breakfast wraps, too; flatbreads topped with various things for accompanying soups and salads; pizza for a birthday dinner for six; and stuffed breads, too. Here are some photos and notes, and then the recipe. Have a ball experimenting with this-- everyone I've served my experiments to has been very impressed!
 |
| Pizza! |
 |
| Breakfast Wrap with Tofu/Cashew Ricotta and Peach Jam (see recipe for the ricotta below, plus a recipe for Almond Ricotta and a link to Okara/Cashew Ricotta) |

 |
| My first version-- sauteed leek greens with daiya mozza-- yum! (I baked the flatbreads in a 500ºF oven (pricked the tops with a fork in a few places so that they wouldn't puff up like pita) until the bottoms were browning a bit, flipped them over, sprinkled with Daiya, then Za'atar, then a little olive oil, and baked until the Daiya melted. (see about za'atar here http://tinyurl.com/mh3pycg ) |
*****************************************************************
The following pics are a version of stuffed Piadine (stuffed flatbreads from Romagna called crescione). The dough for these breads is usually unleavened or made with baking powder, but this recipe worked just as well.


 THE RECIPE:
Printable Recipe


To cook on top of the stove, heat a heavy cast iron skillet or griddle or hard-anodized skillet (9-12”) over high heat until the pan is very hot. (You can turn on your stove fan or open a few windows!)


Nutrition (per 1/2 cup): 126.6 calories; 51% calories
from fat; 7.6g total fat; 0.0mg cholesterol; 199.1mg sodium; 229.1mg potassium;
6.4g carbohydrates; 0.5g fiber; 1.7g sugar; 6.0g net carbs; 9.3g protein; 3.1
points.
Piadine stuffed with sauteed garlicky rapini and a smear of Tofu/Cashew Ricotta (see recipe for the ricotta below, plus a recipe for Almond Ricotta and a link to Okara/Cashew Ricotta)
 |
| Sauteed rapini with garlic and a little chile |
 |
| Homemade Tofu/Cashew Ricotta (see recipe for the ricotta below, plus a recipe for Almond Ricotta and a link to Okara/Cashew Ricotta) |
 |
| Stuffing the crescione: |


 |
| You cook these just like the flatbread, but at a slightly lower heat. |
 |
| Mmmmmm! |
Sweet Crescioni-- with peach jam and chocolate!


 |
| Zatar flatbread with Daiya mozza |
BRYANNA’S EASY REFRIGERATED
WHOLE WHEAT FLATBREAD (AND PIZZA) DOUGH, WITH NO-KNEAD VERSION (recipe can be
doubled, etc.)
This recipe makes
about 3 large pizzas, 8 largish wraps or flatbreads, or 12 smaller flatbreads,
wraps or pita. (You could even make simple rolls or breadsticks with this dough, but I
haven’t tried that yet.)
**I include a no-knead version in this recipe, but I have been
using the kneaded version lately because it’s easier to handle (it only needs 5
minutes kneading). The no-knead version
requires more flouring during shaping, and an experienced hand at rolling out well-hydrated
dough.
NOTE: If you prefer to make this with only
unbleached white flour (4 cups), you can omit the sugar and use only 1
tablespoon of oil. See text above for
more info.
3 cups whole wheat flour (you can use white whole wheat flour, if you have it)
1 cup unbleached white flour
1/2 tablespoon fine sea salt
1 3/4 cups lukewarm water
PS: I plan to try this
next time using 3/4 cup pureed cooked or canned white beans in place of 3/4 cup
of the water—I’ll keep you posted!)
2 teaspoons organic sugar
1 teaspoon instant or dry active yeast
2 tablespoons olive oil
FOR NO-KNEAD VERSION:
All the same; the only change is to use only 2 3/4 cups whole wheat flour.
Mix together the 2 kinds of flour and the salt. (Mix in a medium bowl or dough-rising bucket—preferably
with a lid—with a whisk, if using the No-Knead version or kneading by hand; or
in the bowl of your stand mixer if kneading by machine.)
In a smaller bowl, or a measuring pitcher, mix the water, sugar and
yeast. Let stand for a couple of
minutes.
NOTE: I know that
you don’t have to do this with instant yeast, but Master Baker Peter Reinhart
says (in his book “Peter Reinhart’s Artisan Breads Every Day”, pps 12-13): “...I’ve discovered that waking up the yeast
in lukewarm water allows it to ferment more effectively during the cooldown
phase in the refrigerator. It also makes it possible to put the dough in the
refrigerator as soon as it’s mixed rather than having to wait for it to rise.
The warmer dough and activated yeast have plenty of time to rise as the dough
cools, so the dough is ready to use right from the refrigerator, without the
wake-up time required in many of the recipes I’ve developed...Another benefit
of this method is that it’s the same whether you use instant or active dry
yeast...”
Add the oil to the yeast mixture and pour into the flour
mix. With a wooden spoon or dough whisk, stir into a rough dough. If using the No-Knead method, that’s
all you have to do. If you are kneading, either by
hand or by machine, knead about 5 minutes. If using a machine, remove
the dough from the machine bowl and place into a lightly-oiled medium-sized bowl
or dough-rising bucket. Cover with the lid or place the bowl inside of a large
food-safe plastic bag (use a twist-tie,
but make sure the bag “poofs” up over the bowl a few inches) and let it
rise on your kitchen counter until doubled in size.
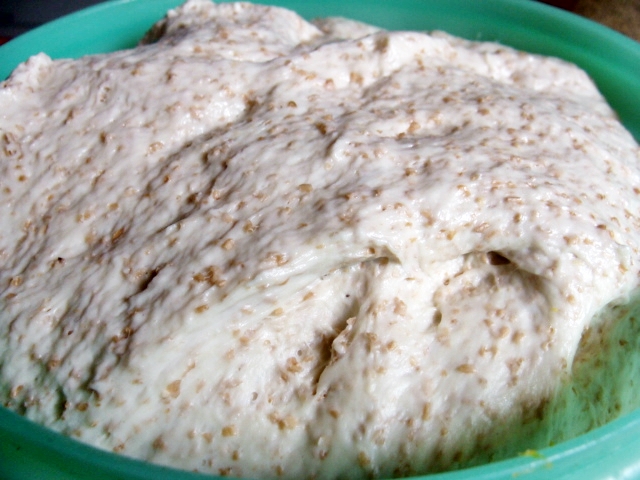
The following pictures are of the No-Knead version:
 |


Now, you can “knock it back”, as Brits say (poke it until it
collapses), cover again as above and refrigerate for up to two weeks, or you
can use it right away. (Tip:
Refrigerated dough is easier to handle if you use the No-Knead version.)
You can use some of it right away, and keep the remaining dough in the fridge
for other uses—that’s the beauty of this recipe!
If you are using refrigerated dough, there is you don’t need
to bring the dough to room temperature before shaping—another plus! But your oven or pan must be hot, or at
least heating up while you shape the flatbreads. Flatbreads can rise for a few
minutes, but pizza should immediately be topped and placed in a very hot oven
(500-550ºF).
TIP: I generally shape
flatbreads on a piece of baking parchment spread over the surface I’m using, or
on a silicone mat. You can get away with less flour that way. Parchment is handy because, if your dough
sticks to it just cut away the excess around your flatbread and bake it with
the parchment attached! It will come
away just fine after baking. I generally top pizza dough which is on parchment
and then transfer the pizza (using a pizza peel) to the hot pan or stone in the
oven, parchment and all!

BASIC FLATBREADS:
NOTE: Even though this is a yeast dough, you can
use thin flatbreads like a tortilla or sandwich wrap, or a stuffed bread (see
Piadine photos above).
Pinch or cut off golf-ball-sized pieces of the dough (or
larger, depending on the size of the flatbreads you want). Roll them to less than 1/4” thick—they can be
round, oval, or odd-shaped; it doesn’t matter! (See Pita and Pizza entries below for tips and resources re rolling out
the dough.) Now, you “bake” them in a hot skillet on the stovetop on at a
time. (I often quickly make 2, 3 or 4 for lunch or breakfast with my
refrigerated dough and it takes only minutes once you’ve done it a few times.)


To cook on top of the stove, heat a heavy cast iron skillet or griddle or hard-anodized skillet (9-12”) over high heat until the pan is very hot. (You can turn on your stove fan or open a few windows!)
Flip one flatbread at a time
onto the hot skillet and cook a minute or two, until it’s bubbling up and has
brown spots on the bottom. Flip it over
and cook until there are brown patches on the second side.

NOTE: You may have to turn the heat down on your stove, or adjust the heat as you go-- stoves vary. You don't want the breads to burn right away. After you've done a few, you'll know how to handle your stove next time!
(Alternative method: You can bake a bunch of them at one time like pita in the oven, but prick the dough all over with a fork before baking so the dough doesn’t puff up so much. Watch carefully so they don’t burn. )
If you are eating them right away, you can brush or spray each bread with a little olive oil (infused with garlic is yummy!) and sprinkle with any toppings you want (see text above). If they are not to be used right away and you want to keep them softened (for a wrap, perhaps), cool them in an open paper bag. To keep them more crisp, cool on baking racks.
(Alternative method: You can bake a bunch of them at one time like pita in the oven, but prick the dough all over with a fork before baking so the dough doesn’t puff up so much. Watch carefully so they don’t burn. )
If you are eating them right away, you can brush or spray each bread with a little olive oil (infused with garlic is yummy!) and sprinkle with any toppings you want (see text above). If they are not to be used right away and you want to keep them softened (for a wrap, perhaps), cool them in an open paper bag. To keep them more crisp, cool on baking racks.
| Nutrition Facts for 12 flatbreads or pitas: (This is about the same calories, etc. as 2 slices of bread.) | ||
Nutrition (for 1 flatbread of 12): 163.2 calories; 15% calories
from fat; 2.9g total fat; 0.0mg cholesterol; 284.6mg sodium; 139.4mg potassium;
30.5g carbohydrates; 4.0g fiber; 0.9g sugar; 26.5g net carbs; 5.3g protein; 2.7
points.
|
********

PITA: See this post for shaping and baking: http://veganfeastkitchen.blogspot.ca/2006/08/5-foods-you-have-to-eat-before-you-die.html If you don’t have a pizza stone, you can use
a cast iron skillet or griddle. If you have
neither, heat baking sheets in the oven and use those. Cool the pita in an open
paper bag so that they stay flexible.
| Nutrition Facts for 12 pita: (This is about the same calories, etc. as 2 slices of bread.) |
| Nutrition (for 1 pita of 12): 163.2 calories; 15% calories from fat; 2.9g total fat; 0.0mg cholesterol; 284.6mg sodium; 139.4mg potassium; 30.5g carbohydrates; 4.0g fiber; 0.9g sugar; 26.5g net carbs; 5.3g protein; 2.7 points. |
*****

PIZZA: I generally roll or pat the dough into an 8" circle (on a lightly-floured piece of baking parchment or silicone baking mat) and
then use the weight of the dough to stretch it into a thinner round by draping
it over an over-turned mixing bowl. Then
I place the dough on baking parchment which is sitting right on the pizza peel
(see paragraph directly above).
See this post for instructions and a photo, as well as baking instructions: http://veganfeastkitchen.blogspot.ca/2006/05/vegan-pizza-night.html You drape the dough over an over-turned bowl and gently stretch it until it is the right size, using the weight of the dough stretch it. Work slowly so that you don’t tear the dough. If it does tear, by some chance, you can patch it and seal it again. The pizza does not have to be absolutely round! You can use a rolling pin instead, but Neapolitans are of the opinion that stretching the dough rather than rolling it makes a flatter and less chewy crust.
See this post for instructions and a photo, as well as baking instructions: http://veganfeastkitchen.blogspot.ca/2006/05/vegan-pizza-night.html You drape the dough over an over-turned bowl and gently stretch it until it is the right size, using the weight of the dough stretch it. Work slowly so that you don’t tear the dough. If it does tear, by some chance, you can patch it and seal it again. The pizza does not have to be absolutely round! You can use a rolling pin instead, but Neapolitans are of the opinion that stretching the dough rather than rolling it makes a flatter and less chewy crust.
Here’s a post with instructions for using a cast iron skillet or griddle to
make great pizza: http://veganfeastkitchen.blogspot.ca/2011/10/cast-iron-skillet-pizza-perfect.html
| Nutrition Facts |
| Nutrition (for 2 slices of one large pizza [cut into 6 ], crust only): 217.6 calories; 15% calories from fat; 3.9g total fat; 0.0mg cholesterol; 379.5mg sodium; 185.8mg potassium; 40.7g carbohydrates; 5.3g fiber; 1.1g sugar; 35.4g net carbs; 7.1g protein; 3.9 points. |
**********************************************************************
MY VEGAN RICOTTA RECIPES:
(Both from my book “Nonna’s Italian Kitchen: Delicious Homestyle Vegan Cuisine” (The Book Publishing Co.,Summertown , TN
NOTE: If you make your own soymilk and/or tofu, or have access to fresh okara (the leftover soy pulp), you might like to try my recipe for Okara/Cashew Ricotta at this post.
Printable Copy
MY VEGAN RICOTTA RECIPES:
(Both from my book “Nonna’s Italian Kitchen: Delicious Homestyle Vegan Cuisine” (The Book Publishing Co.,
NOTE: If you make your own soymilk and/or tofu, or have access to fresh okara (the leftover soy pulp), you might like to try my recipe for Okara/Cashew Ricotta at this post.
Printable Copy
BRYANNA'S RICOTTA DI SOYA (TOFU RICOTTA)
Makes 3 1/2 cups
Makes 3 1/2 cups
This mixture is very similar to the creamy full-fat ricotta
used in Italy ,
which bears little resemblance to the watery, grainy ricotta available to most
North Americans. It's so creamy that you
can use it as a spread on bread, or a filling for crespelle (crepes), or even
in desserts.
2 (12.3 oz.) boxes extra-firm SILKEN tofu, crumbled
1/2 cup + 2 tablespoons raw cashew pieces, ground very fine in a coffee/spice mill or mini-chopper
2 tablespoons
plus 1 teaspoon fresh lemon juice
1/2 teaspoon salt
In a food processor, mix about 3 cups of the crumbled tofu,
the ground cashews, the lemon juice and salt until they are VERY smooth. Then crumble in the remaining tofu and
process again. The resulting mixture
should be mostly smooth, but with a little graininess-- it doesn't have to be
like cream cheese.
Scoop the "ricotta" into a plastic container and
refrigerate. It firms up when chilled.
| Nutrition Facts |
Cooking Tip
For a quick tofu ricotta to use in lasagne or other pasta dishes, you may prefer to use this simple mixture: Mash 1 lb. very fresh drained medium-firm tofu, reduced-fat if possible, with 6 T. soy, nut or rice milk and 1/2 tsp. salt. This makes 2 generous cups.
BRYANNA'S ALMOND “RICOTTA”
makes about 2 1/2 cups Soy-Free
This is a tasty vegan "ricotta"-- the almond milk
has a clean, mild taste.
1 cup hot water
1/2 cup whole blanched almonds
1 cup cold water
4 teaspoons fresh lemon juice
4 tablespoons
cornstarch (if you’re allergic to corn, you can use wheat starch, or use 6 tablespoons white rice flour), [organic cornstarch is available]
1 tablespoons
oil
1 teaspoon maple syrup
1/2 teaspoon salt
Place the hot water and almonds in a blender and blend
until a very smooth "cream" results-- be patient! It cannot be
grainy. Add the rest of the ingredients and blend again well.
Pour the mixture into a medium, heavy-bottomed saucepan and
stir constantly over medium-high heat until it thickens and comes to a boil.
Turn the heat down to medium and cook 1 minute more, stirring.
MICROWAVE OPTION: Pour the mixture into a large microwave-safe bowl or beaker. Cook in microwave oven for 2 minutes at 100% power. Whisk. Microwave 1
to 2 minutes more, or until thickened.
Scrape the mixture into a container and let it come to room
temperature. Beat it with a whisk or electric hand mixer. Cover and chill. When it
is chilled and firm, mash and stir it with a fork, until it has some texture.
Refrigerate.
| Nutrition Facts |
| Nutrition (per 1/2 cup): 137.9 calories; 62% calories from fat; 10.1g total fat; 0.0mg cholesterol; 194.7mg sodium; 107.6mg potassium; 10.0g carbohydrates; 1.6g fiber; 1.6g sugar; 8.4g net carbs; 3.2g protein; 3.3 points. |
***********
Enjoy and have fun inventing your own variations!
Subscribe to:
Posts (Atom)