Saturday, March 30, 2024


BRYANNA'S "FRIED CHICKEN" SALAD
This is a Southern-style salad that is a meal in itself. You can "fry" the Soy Curls® in the oven without fat, or panfry them...it's your choice. (Nutritional info is for Soy Curls® baked in the oven.)
12 oz. reconstituted Soy Curls® (use the largest ones you have) (4 oz. dry, soaked in hot chicken-style vegetarian broth)
(See butlerfoods.com for where to buy or order Soy Curls
in your area. See Cooking Tips, below, for more info.)
whole wheat flour for dredging
1/2 cup soy or nut milk curdled with 1/2 Tbs. vinegar or lemon juice
1/2 cup panko (Japanese breadcrumbs)
1 tsp garlic granules
1/2 tsp dried thyme
1/2 tsp salt
freshly-ground black pepper to taste
Salad:
6 cups organic baby greens
2 cups sliced roasted beets
1/2 cup "Blue Cheese" Sheese, crumbled (an alternative would be Tofu Feta from the Jun/Jul 05 VF)
http://veganfeastkitchen.blogspot.com/2006/09/modernvegan-blt-sandwich-heaven.html
or Tofu Mayonnaise)
http://www.bryannaclarkgrogan.com/page/page/661699.htm #august18,2003
(or use Vegannaise, if you don't mind the calories!)
1/4 cup agave nectar
2 Tbs smooth Dijon mustard
PANKO BREADCRUMBS:
Panko are Japanese breadcrumbs noted for their crunchy texture, which is lighter and crispier than regular breadcrumbs. You can find them in most supermarkets now (look near the fish department in
some stores), or Asian grocery stores. Or but online from many online Asian grocery outlets, such as
http://www.mingspantry.com/
WHOLEWHEAT PANKO BREAD CRUMBS ARE AVAILABLE:
Look for Ian's Whole Wheat Panko Breadcrumbs. Amazon is one venue that sells them online.
TO MAKE YOUR OWN PANKO, see Cooking Tips below.
To cook the Soy Curls®:
Set up shallow bowls with the whole wheat flour, curdled soymilk, and Panko Breading
mixture in a line on your counter (see picture). Dredge the Soy Curls® in flour, then dip
in the curdled soymilk, and then roll in the Panko Breading mixture. Place each piece on
a cookie sheet, not touching the others. Oct/Nov/Dec 07 Vegan Feast 48
Now you can pan-fry the pieces in a little hot oil in a nonstick skillet, cooking until
golden brown on all sides, and draining them on paper towels,
OR you can bake them on dark cookie sheets, sprayed with oil from a pump sprayer (and
spray the top of the Soy Curl® pieces, too), at 500° F for about 10 minutes on each side,
or until golden brown and crispy.
While they cook, assemble the salads, dividing the greens between 4 salad bowls, and
distributing the beets and Sheese evenly around the edges of the bowls. Pile the hot Soy
Curls® in the center of each salad.
Whisk the Dressing ingredients together well and drizzle over the salad. Serve
immediately.
Serves 4
Nutrition Facts
Nutrition (per serving): 362.8 calories; 30% calories from fat; 12.5g total fat; 0.0mg
cholesterol; 898.0mg sodium; 512.7mg potassium; 48.9g carbohydrates; 7.6g fiber; 23.8g
sugar; 41.3g net carbs; 18.3g protein; 7.5 points.
If you used wholewheat panko, the Nutrition Facts are:
366.4 calories; 30% calories from fat; 12.7g total fat; 0.0mg cholesterol; 881.7mg
sodium; 512.7mg potassium; 49.6g carbohydrates; 8.5g fiber; 24.1g sugar; 41.1g net
carbs; 19.0g protein; 7.6 points.
Thursday, June 22, 2023
VEGAN CHOCOLATE HAZELNUT OR PECAN LAVA CAKES
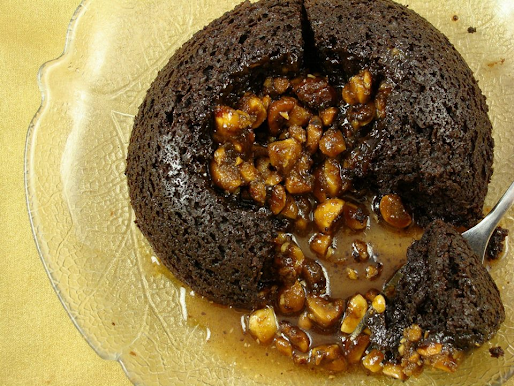
BRYANNA'S HAZELNUT OR PECAN PRALINE LAVA CAKES
These individual cakes usually have a soft center of chocolate fudge that erupts in a rich, dark puddle from the cakes. This recipe is an easier version of the cake that some of you might have seen before, though it is not in any of my books or newsletters. But I decided to try a caramelly hazelnut praline filling. It was a big hit with my guests.
Originally, lava cakes were flourless cakes with a batter based on eggs that formed a molten center when the cakes were baked. More often than not these days, a rich cake batter containing flour is used and a frozen chocolate mixture is placed between layers of batter before baking. This is the type that I started with to make a vegan version of this cake. This batter has very little fat in it, yet is rich, moist, tender and chocolatey. The hazelnut filling tastes rich enough that half a cake is plenty for a serving, along with a scoop of vegan vanilla "ice cream".
Monday, February 13, 2023
MY NEW & EASY CREAMY NO-OIL VEGAN MAYONNAISE
I apologize for not blogging for SO long! I hope to be back more often from now on!
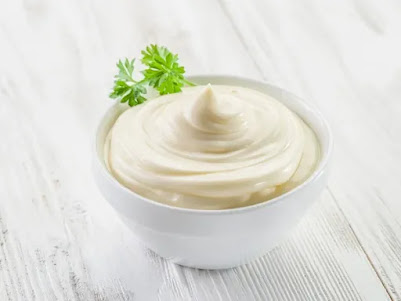
I love mayonnaise, but I am trying to eat less fat. Not "no-fat", but pretty "low-fat". I wanted to make an oil-free version of my older homemade vegan mayonnaise recipe. This is the first recipe I devised, and it turned out to be a winner! If you try the recipe, let me know what you think of it. PS: it's also very inexpensive!
BRYANNA'S NEW & EASY CREAMY NO-OIL VEGAN MAYONNAISE
(This recipe makes a bit over 2 cups & is only 12 calories per tablespoon. In contrast, standard mayonnaise contains 94 calories per tablespoon.)
Mix A:
1 cup plain soymilk
3 T. cider vinegar
1 to 1 1/2 tsp. salt
1/2 tsp. mustard powder
1/4 cup shelled raw sunflower seeds, soaked in boiling water for 5 minutes and drained well.
OPTIONAL: add 1/2 tablespoon nutritional yeast flakes
MIX B:
1/2 cup + 2 T. cold water
1/2 tsp. agar powder (do NOT use agar agar flakes!)
4 T. cornstarch
Cooking instructions:
1.) Place all of the Mix A ingredients into a blender. Blend until very smooth. Set aside.
2.) Microwave option for Mix B (my preference): Mix together the water and agar from Mix B in a 2-to-3 cup microwave-proof bowl, and let sit for a few of minutes. Add the cornstarch and whisk well.
Microwave the mixture on High for 30 seconds. Whisk briefly. (I switch to a silicone spatula after 2 turns in the microwave). Repeat this about three times, or until thick and translucent-- even if this takes more than four 30-second intervals in your microwave. (The microwave method works well with starch mixtures.)
3.) Stovetop instructions for Mix B: In a small saucepan, mix together the water and agar from Mix B, and let sit for a few of minutes. Add the cornstarch and whisk well.
On the stovetop, stir the mixture constantly over high heat until thick and translucent-- not white (you might have to switch to a silicone spatula halfway through).
To Finish: Add the cooked Mix B (either stovetop or microwave version) to the Mix A ingredients in the blender. Blend until smooth and starting to thicken. Scoop into a 3 cup jar and refrigerate. It will thicken up nicely in a few hours.
Enjoy!

Friday, April 23, 2021
NEW, EVEN TASTIER UPDATED VERSION OF MY STEAMED VEGAN "PARMESAN"

This is a new and improved version of the vegan"parm" recipe I posted in November of 2019.
I've been a bit fed up lately with cashews, cashews, cashews when it comes to vegan cheese! For one thing, they are expensive, especially the fair trade, organic variety. For another, they can be ethically compromised (See https://bit.ly/2oLeHgM for more on these issues.) My aim for some time has been to make vegan cheese that is delicious, easy to make, inexpensive and made with easily-obtained ingredients, and without the need for cashews or culturing.
BUT, it was made with white rice flour, which is not particularly low-glycemic (and I have to eat low-glycemic). So, back in 2019, I got a notion to use some sort of bean flour instead, along with some high-resistant-starch potato starch, and it worked beautifully. I added more nutritional yeast, along with some miso (for a fermented flavor), and onion powder and garlic granules. Even better!
My far-away Australian Facebook friend Fran P. was also working on such things and we shared our successes and failures. I hoped (and still hope) to make a cheese that melted, but I'm still working on that. But, in any case, one day I got the idea to grate this very firm, tasty cheese and it seemed to me to be a delicious and much less expensive alternative to commercial vegan "parmesan" products.
In this latest version, I boosted some of the flavor components, and it's even better! My husband was even slicing it and eating it out of hand!
I'm working on some other versions of this type of cheese, but I wanted to share this one with you right now because we're so pleased with it. Let me know what you think!
Printable Recipe
BRYANNA'S NEW UPDATED STEAMED VEGAN "PARMESAN"(Low-glycemic, high in protein and fiber, nut-free, soy-free) April 23, 2021
**Makes enough to fill at least two 142g shaker jars.
Low-Fat Option: I have made this cheese with NO OIL, using 1 cup + 1 1/2 Tbsps. water and it turned out just fine, but may not melt as well.
This very tasty cheese is high in protein from bean flour, and is low-glycemic. It's also a great source of resistant starch (which acts as a soluble fiber). Potato starch [not the same thing as potato flour, BTW] is also very high in resistant starch and makes for a VERY firm cheese, suitable for grating or pulsing in a food processor.
(See https://bit.ly/2PJhaU9 for info on resistant starch, which improves insulin sensitivity, lower blood sugar levels, reduces appetite and has various benefits for digestion.)
Ingredients:
• 1 1/3 cup/124 g chickpea flour (NOTE: I've tried several bean flours and this works best.)
• 1/4 cup/ 41 g slightly packed-down potato starch (NOT potato flour)
• 1 cup water
• 1/4 cup melted refined coconut oil (preferably Fair Trade, organic)
• 2 tablespoons olive oil
• 1 1/2 tsp salt
• 1 tablespoon dark miso
NOTE: dark miso gives a more fermented flavor than the white variety.
• 1 1/2 tsp. smooth Dijon mustard
• 1 tablespoon lemon juice OR sauerkraut juice
• 1/4 cup nutritional yeast flakes
• 1 tsp. onion powder
• 1 tsp. garlic granules
Steps:
1. Pour 2 cups of water into your steamer pot, InstantPot or pressure cooker, equipped with a flat steamer basket in the bottom.
2.Place all the ingredients into the jar of your blender, and blend until it forms a completely smooth, milky mixture, without lumps or visible oil droplets.
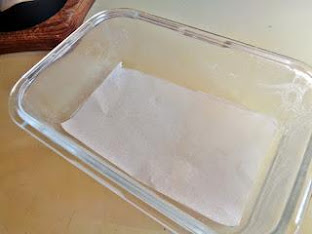
This is the Pyrex mold that I use, lined with cooking parchment
3. Pour the cheese mixture into a greased or parchment-lined Pyrex, metal or ceramicmold. Choose a mold that will hold 2 cups, with about 1/2 inch of “head room”.
Place the mold onto the steamer basket. I fold a long piece of aluminium foil lengthwise into a wide strip and use it to lower the mold onto the steamer basket. This makes it easier to remove the hot mold from its close quarters after it's cooked, too!

4. Steam the cheese for about 45 minutes (or 25 minutes on Steam function in Instant Pot, or pressure cooker). Release pressure in the InstantPot or pressure cooker after cooling down for about 20 minutes.

After the steaming, the cheese will still be a bit soft. Don't worry, it will firm up once it cools. If a thin layer of water dripped onto the cheese from the pot's lid-- drain this off carefully. Let the cheese cool to room temperature and then cover it and put it into the fridge overnight to firm up.


Pulse until they are chopped and then process until it looks like commercial grated parmesan. Scoop the resulting "granules" into two shaker bottles-- I have used two 142g Earth Island/FollowYourHeart Vegan Grated Parmesan-Style Cheese shakers, but you can just use some clean, dry jars and scoop it out. Or, if you prefer, cut the block in half, process one half, and freeze on half, well wrapped, for grating later.

Monday, February 15, 2021
HOMEMADE LOW-SODIUM, LOW-GLYCEMIC ASIAN COOKING SAUCES

I love Asian cooking, but I am following a lower-sodium diet, as well as a low-glycemic one (very little sugar, and only low-glycemic carbohydrates-- you can check out some of my past posts on this subject). Checking out sodium and sugar content on the labels of the bottles of soy sauce and other commercial Asian sauces readily available in supermarkets and specialty stores was quite a shock!


I figured that I could make my own low-sodium soy sauce, since the small bottles of Kikkoman Less-Sodium Soy sauce are expensive, and I can't find larger bottles in my area. I figured that I could somehow make my own and, low and behold, I found an easy recipe online at https://thewoksoflife.com/low-sodium-soy-sauce/, and had all the makings for it.
Mix 1/2 cup regular soy sauce, 1/2 cup Chinese dark soy sauce (which I happened to have in my cupboard), and 1 cup water-- that's it! (Makes 2 cups) Regular Kikkoman soy sauce contains 960 mg sodium per tablespoon, and dark soy sauce contains 870 mg per tablespoon.
**********************

There are many homemade versions of this delicious, spicy sauce online, but I put together a quick and easy mixture, using agave syrup for the sweetener because it is much lower on the glycemic index than sugar (though, you should not overdo any type of sugar).
BRYANNA'S NOT-SO-SWEET THAI SWEET RED CHILI SAUCE
Makes about 1 3/4 cups
1/2 cup UN-salted rice vinegar
1 1/2 tablespoons low-sodium soy sauce
Bring this to a boil, then turn down and simmer for about 5 minutes. Remove the pan from the heat.
Then stir in 1 Tablespoon potato starch mixed with 1 tablespoon COLD water. This will thicken the mixture quickly. Store in a jar or bottle in the refrigerator.

1/2 cup low-sodium vegan "chikn" broth or veggie broth
a good dash of garlic granules
1 tablespoon of dark Chinese (toasted) sesame oil

Enjoy!

Friday, October 9, 2020
DELICIOUS, TENDER LOW-GLYCEMIC WHOLE GRAIN SPELT, OAT, SORGHUM & BEAN FLOUR PANCAKES

Yikes! It's been 5 months since I last blogged! You might have thought that I'd be posting like mad during this pandemic time, when we're pretty much isolating here in the woods. It's not as though I'm not cooking! I cook quite a bit. But I've been mostly revisiting recipes from my own cookbooks and cooking notes, re-discovering (and sometimes improving on) dishes that I developed many years ago. Which has been fun, I must say. But I haven't been inventing new recipes very often, I confess. So, it feels good to post again, with a recipe that I'm quite proud of.
The following combination of flours turned out to be a winner! We were so pleasantly surprised with the wonderful flavor of the pancakes, even without syrup. I don't think I've ever had such tasty pancakes! They are very simple to make-- I hope that you will enjoy them as much as we do.
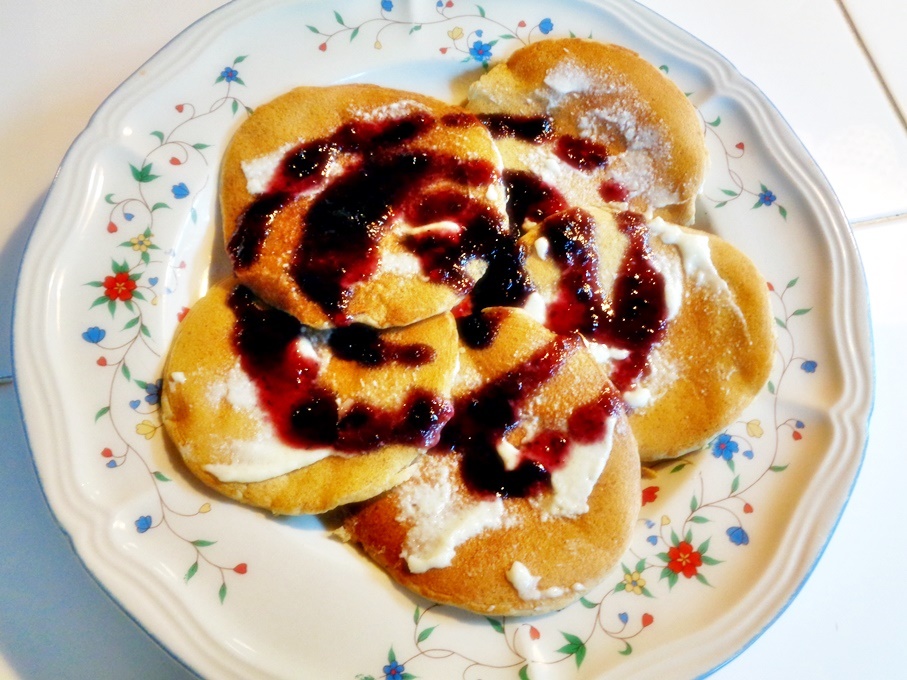
BRYANNA'S DELICIOUS, TENDER LOW-GLYCEMIC WHOLE GRAIN SPELT, OAT, SORGHUM AND BEAN FLOUR PANCAKES
Makes about 24 pancakes (3 to 4-inch size)
NOTE: Nutrition facts below recipe
DRY MIX:
Whisk together in a dry mixing bowl:
1 cup whole grain spelt flour
1 cup oat flour
***(I blend rolled oats in a dry blender to make oat flour.)
1/2 cup bean flour
***(You can use soy, yellow pea, white bean or chana dal flour.)
1/2 cup sorghum flour
***(I blend dry sorghum grains in a dry blender to make sorghum flour.)
2 tablespoons coconut sugar or equivalent of your favorite sugar sub
1 tablespoon baking powder
1 teaspoon baking soda
1/2 teaspoon salt
WET MIX:
Combine in a 4-cup pitcher:
6 tablespoons water
2 tablespoons ground flax (brown or golden)
After 10 minutes, add and whisk:
1 cup soy milk or plain hemp milk
1 1/2 cup water
2 tablespoons oil
2 tablespoons lemon juice or apple cider vinegar
2 teaspoons vanilla extract
METHOD:
Add the Wet Mix to the bowl with the Dry Mix. Combine briefly with a large spoon, medium-sized whisk or a Danish dough whisk.
Cook as for any pancakes-- I make them about 3 inches across. I like to use my old rectangular electric skillet at 400°F (205°C). It will cook 5 to 6 pancakes at a time just perfectly. But a well-seasoned cast iron skillet or griddle over medium heat (heat up for about 10 minutes before cooking) is excellent, as well. Either way, wipe the pan with a bit of oil before heating. Cook the pancakes for about 3 minutes on the first side and about 2 minutes on the second side. Serve immediately with your favorite toppings.
NOTE: For a low-glycemic syrup, I use low-sugar jam mixed with some water to make a syrup.
© 2020 Bryanna Clark Grogan. All Rights Reserved.
| Nutrition Facts | |
|---|---|
| Serving size: 1 pancake | |
| Servings: 24 | |
| Amount per serving | |
| Calories | 51 |
| % Daily Value* | |
| Total Fat 1.9g | 2% |
| Saturated Fat 0.3g | 1% |
| Cholesterol 0mg | 0% |
| Sodium 109mg | 5% |
| Total Carbohydrate 6.7g | 2% |
| Dietary Fiber 0.9g | 3% |
| Total Sugars 1.5g | |
| Protein 2.1g | |
| Vitamin D 0mcg | 0% |
| Calcium 37mg | 3% |
| Iron 1mg | 4% |
| Potassium 143mg | 3% |
| *The % Daily Value (DV) tells you how much a nutrient in a food serving contributes to a daily diet. 2,000 calorie a day is used for general nutrition advice. | |
| Recipe analyzed by | |

Enjoy!

Tuesday, April 28, 2020
A NATURALLY VEGAN RECIPE-- SIMPLE BUT DELICIOUSLY SPICY CHICKPEA & TOMATO SOUP/STEW

Of course, I couldn't resist checking out a few other cookbooks, and found that there are various versions of this dish across the Middle East, some of which are more like a stew. So I wrote down the basic ingredients and the spices and herbs that appealed to me.


2 cups dried chickpeas (garbanzo beans)-- I don't soak them.
6 cups light vegetarian broth
(If you use a stovetop pressure cooker, follow the directions for your pot and cook for 30 minutes. Then let the pressure come down. If you cook them in a pot on the stove, bring to a boil, turn down to a simmer, remove any foam, and simmer for about 1 1/2 hours. )
1 T. olive oil
your favorite crusty bread, in chunks