Showing posts with label sweet potato. Show all posts
Showing posts with label sweet potato. Show all posts
Saturday, April 28, 2018
SPICY SPUR-OF-THE-MOMENT MELANGE OF BLACK BEANS, ROASTED VEGETABLES & SEITAN (OR ALTERNATIVE)


Yesterday, I didn't get around to thinking about what to make for dinner until late afternoon. Rummaging through the fridge for ideas, I saw the black beans that I had cooked the day before, and decided to make a bean stew of some sort, to go with the cooked rice I had in the freezer, and the kale I had picked out of the garden.
Finding some red and green bell peppers, a sweet potato, and some unique new seitan that I made a few days before (see the note about where to find the recipe in the ingredient list of the recipe below) gave me the idea for a spicy black bean and roasted vegetable stew, which resulted in this recipe.
It was a hit-- my husband declared it his favorite bean stew to date! And what's not to like? Spicy, hearty, full of vegetables and protein and good flavors. I hope you'll give it a try.

Printable Copy
BRYANNA'S SPICY SPUR-OF-THE-MOMENT MELANGE OF BLACK BEANS, ROASTED VEGETABLES AND SEITAN (OR ALTERNATIVE)
Serves 6 to 8
Roasted or Broiled Vegetable/Seitan Mixture:
1 large red bell pepper, seeded and cut into approximately 3/4” chunks
1 large green bell pepper, seeded and cut into approximately 3/4” chunks
1 medium sweet potato, peeled and cut into 3/4” chunks
2-3 cups of seitan strips (Or, alternatively, you could use reconstituted Soy Curls™️, smoked tempeh or smoked tofu instead.)
(For the seitan, I used the “Pulled Phauxrk” [pronounced like “fork”] recipe from https://avocadosandales.com/2018/02/06/pulled-phauxrk/, which is amazing!)
about 2 tablespoons of dark sesame oil
smoked sweet or hot paprika
salt to taste
Rest of the Melange:
1 tablespoon olive oil
1 medium onion, chopped
2 large cloves garlic, peeled and minced
4 cups cooked or canned black beans (use 2/ 19 oz. cans), rinsed and drained
2 cups vegan broth
14 oz. whole or diced canned tomatoes and juice (If tomatoes are whole, chop them roughly.)
2 tsp. EACH dried thyme and oregano
1 bay leaf
1 chopped canned chipotle chile in adobo sauce, with the a little of the sauce
(Idea: Freeze the rest of the chiles and sauce in the can in an ice cube tray, then pop the frozen chiles and sauce into a freezer container or bag to use in other dishes.)
liquid smoke to taste (about 1 teaspoon)
Serve with:
steamed rice
braised greens with garlic
Making the Roasted or Broiled Vegetable/Seitan Mixture:
Place the pepper chunks, sweet potato chunks and seitan in a 9 x 13” baking pan and toss with the sesame oil, smoked paprika and salt to taste.
Now, there are two ways to cook the veggie/seitan mixture (well, three ways actually-- you could grill it, but I'll leave that up to you!)-- roasting or broiling. If you want to roast, place the pan in a preheated 450°F oven and roast for about 15-20 minutes, tossing once or twice, or until the vegetables are tender but not falling apart, and a bit browned. If you want to broil (my choice), add a few squirts of water from a squeeze bottle to the pan and place the pan about 4 inches under your broiler coils; turn broiler on to High. Broil until the mixture until the vegetables are tender but not falling apart (adding a few more squirts of water if they are getting too dry), and a bit browned, and the seitan is a bit charred (but not too much!). Remove from the oven and set aside.
To make the Rest of the Melange:
Saute the chopped onions and garlic in the olive oil in your wok or stew pot or large, heavy skillet over medium-high heat until softened and perhaps a bit browned. Another option, which will allow you to proceed with the next part of the recipe, is to cook the onions and garlic in the olive oil in a covered microwave-safe pie pan or casserole with a lid. Cook on High for about 5 minutes, then scrape into your pot or pan.
Add the beans, broth, tomatoes, the Roasted or Broiled Vegetable/Seitan Mixture, thyme, oregano, bay leaf, chopped chipotle chile with its sauce, and the liquid smoke. Mix thoroughly but gently with a large spoon. Bring to a boil, then turn down to a simmer, cover and cook for about 20 minutes. (That's enough time to cook some rice, if you haven't done it already.)

Taste for salt and serve with the rice and braised greens.

Nutrition Facts
Nutrition (per serving): 319 calories, 70 calories from fat, 8g total fat, 0mg cholesterol, 468.2mg sodium, 847.1mg potassium, 45.1g carbohydrates, 13.2g fiber, 7.5g sugar, 20.5g protein, 9.2 points.

Sunday, January 1, 2017
SMOKY VEGAN SAUSAGE AND POTATO CHOWDER

I don't know about you, but, after all the feasting and festivities, we feel like eating pretty simple food. But, given the cold Northern wind blowing here today over the water, it's got to be solid winter food-- solid, but not stodgy. Tonight, of course, we're having my vegan version of Hoppin' John, a New Year's tradition with Southern roots (I do have ancestors who hailed from Virginia). The beans (or black-eyed peas, in this case) are for luck, along with some cooked greens for money, and some corn bread or brown rice (I haven't decided yet).
But, after that, we often have winter soup meals. (I love making soups, in case you hadn't noticed!) So here is a soup that I developed some years ago, but have not ever posted on this blog. It's a creamy chowder-- so warming and satisfing-- but with a few twists. I hope you enjoy it!
BRYANNA'S SMOKY VEGAN SAUSAGE AND POTATO CHOWDER
Serves 6
Can you ever have enough good soup recipes? Not in my book! This recipe uses a bit of smoked salt for extra flavor.
4 cups vegetarian bouillon (I prefer Better-Than-Bouillon No-Chicken Vegetarian OR Better-Than-Bouillon Vegetable broth pastes-- use a little more salt with the vegetable base)
1/2 lb sweet potato, peeled and diced
1/2 lb Yukon Gold potatoes, diced
1/2 cup chopped green onions
1/2 cup diced red bell pepper
1/2 cup diced celery
1 bay leaf
1 tsp smoked salt (or sea salt with a few shakes of liquid smoke)
2 cups frozen corn kernels
2 vegan "Smoked Apple Sausages", sliced (Field Roast or Tofurky brands)
1 1/2 cups non-dairy milk of choice
1/2 cup medium-firm tofu OR firm to extra-firm SILKEN tofu
2 Tbs potato starch
freshly-ground black pepper to taste
Optional:
smoked paprika (pimenton) for garnish
Mix together the broth, sweet potatoes, potatoes, green onions, red pepper, celery, bay leaf, and smoked salt in a medium soup pot. Bring to a boil, then reduce heat to a simmer and cook, covered, until the potatoes are just tender. Add the corn kernels and the sliced sausage and heat through.
In a blender, combine the milk and tofu with the potato starch until smooth. Pour, stirring, into the hot soup. Stir until it thickens (potato starch thickens when mixed with hot liquid-- it doesn't actually have to cook). Add pepper to taste and taste for salt.
Serve hot, sprinkled with the optional smoked pimenton, if you like.
Nutrition Facts
Nutrition (per serving): 248.2 calories; 20% calories from fat; 5.8g total fat; 0.0mg cholesterol; 586.5mg sodium; 558.1mg potassium; 36.2g carbohydrates; 6.9g fiber; 8.2g sugar; 15.8g protein; 4.6 points.
I wish you all a Happy New Year!

Sunday, February 28, 2016
"VEGAN UNDER PRESSURE" REALLY DELIVERS! A REVIEW AND 3 RECIPES

I was very happy to be asked to review Jill Nussinow's brand-new book, "Vegan Under Pressure", especially because I had recently purchased a new Instant Pot IP-DUO60. Jill's book "The New Fast Food" has been a wonderful introduction to healthful, quick, easy and delicious vegan pressure cooking, and I found her cooking time charts the most accurate of many that I had perused. (No more mushy beans!) So, I was excited to see the new book, which had the addition of information on pressure cooking in the increasingly popular Instant Pot.
The book is colorful, with a very pleasant layout and colors that are easy on the eye. In Chapters One and Two, Jill leads you by the hand as you embark on your first encounter with a pressure cooker-- whether it be with an old "jiggle-top" version, a modern stove-top version, an electric pressure cooker, or the Instant Pot (which is a pressure cooker, slow cooker, rice cooker/porridge maker, steamer, yogurt maker, warming device, and it has a sauté/browning function).
I have had some experience with all of those types of pressure cookers over the years and my mother used a pressure cooker sometimes (though I wasn't really paying attention at that point in my life), but I still benefited immensely from reading the introductory chapters. I use all sorts of cooking methods in my kitchen, but find that the pressure cooker or Instant Pot is a great tool particularly for vegans. It makes quick work of cooking your own beans from the dry state, and cooking whole grains and homemade vegan soups and stews.
In Chapter One, Jill first explains how the pressure cooker can not only save you time, but also fuel, calories (most of Jill's recipes are very low in fat), and nutrients (and water, if that's a concern-- you don't need much for many types of food); how it differs from a slow cooker; how a pressure cooker actually works; and the history of pressure cooking.
She also shares how to choose a pressure cooker, the most important features to consider, using stovetop cookers on different types of heat sources, and whether or not it's a good idea to have two pressure cookers; and what size or sizes you might need.
(Observation: I think it would be a great idea to purchase this book before you buy a pressure cooker rather than afterwards, because all of the above information is so important to know ahead of time.)
In Chapter Two, Jill gives you the basics of how different pressure cookers work; what a pressure cooker can do; and everything you need to know about timing; each step of the cooking process; adjusting recipes for electric cookers; adapting slow cooker recipes to the pressure cooker; and notes on vegan ingredients.
Chapter Three is a whole chapter on making your own seasonings-- yay! Subsequent chapters have mouth-watering recipes for Grains; Beans; Vegetables; Soups; Main Courses; Burgers, Patties, and Savory Cakes; Toppers (Sauces, Fillings, and More); Appetizers; and Desserts (Yes!).
The appropriate chapters have really helpful "At-a-Glance" cooking charts for Grains and Rice, Beans, and Vegetables. And, I have to tell you-- I've used charts from other books and ended up with over-cooked food. Jill's charts are much more realistic and accurate.
**I am now a big fan of steaming potatoes in the pressure cooker/Instant Pot, using Jill's timing chart. You put 1/2 to 1 cup of water (I use boiling water from my electric kettle to speed things up) into the pot, add the steaming basket and pile in the potatoes-- peeled or not, whole or cut. Diced potatoes for making fat-free hash-browns under the broiler take 2-3 minutes; large chunks of potatoes for a mash take about 5 minutes; whole large potatoes take about 10 minutes; and so on. This saves alot of fuel (and water) compared to boiling or even steaming potatoes in the usual way on a stove, and you preserve nutrients.
Enough said! On to the recipes I tried...
I chose the following three recipes from the list of recipe choices the publisher gave me partly because of the ingredients I had at my disposal (I live on an island and can't run to a well-stocked store whenever I want), and partly because the recipes appealed to me and seemed appropriate to the season. I used the Instant Pot for all of them
I look forward to trying many of the other recipes in Jill's new book as the seasons roll on.

Sassy Sesame Tofu with Sweet Potato, Carrots, and Sugar Snap Peas
(Photo by Bryanna Clark Grogan)
My Notes on this recipe:
A quick, easy, colorful and tasty meal-in-a-bowl with steamed brown rice or, perhaps, cooked noodles. Jill's method of cooking the tofu in some of the flavorings so that it absorbs flavor is a great idea. Jill's Sweet and Spicy Red Pepper Sauce recipe is in Chapter Three, but I didn't have all the ingredients, so I used a combination of Thai Sweet Red Chile Sauce and Sriracha Sauce instead. You can add more Sriracha at the table if you like it really spicy.
Sassy Sesame Tofu with Sweet Potato, Carrots, and Sugar Snap Peas
Serves 4
This crowd-pleasing recipe is a simple and delicious way to prepare tofu, which gets firmer under pressure and absorbs the flavors of the cooking liquid. It cooks very quickly. It’s best to cook the sugar snap peas on low pressure for just a minute so they don’t become mushy. The sweet and spicy sauce at the end makes it even more special. Serve this over any type of rice or other grain.
2 teaspoons toasted sesame oil
1 medium yellow, white, or sweet onion, sliced from top to bottom to equal about 2 cups
1 carrot, peeled and cut on the diagonal into ½-inch pieces
1 cup diced peeled sweet potato
3 cloves garlic, minced
2 tablespoons sesame seeds
1 pound extra firm tofu, cut into 1-inch cubes
1 to 2 tablespoons tamari [I used 2 Tablespoons-- BCG]
1 tablespoon rice vinegar
⅓ cup vegetable stock
2 cups sugar snap or snow peas, cut in half
2 tablespoons Sweet and Spicy Red Pepper Sauce or Sriracha [I used half Thai Sweet Chile Sauce and half Sriracha-- BCG]
2 tablespoons tahini, optional, for a richer dish [I didn't add this--BCG]
2 tablespoons chopped scallion, for garnish
1. Heat a stovetop pressure cooker over medium heat or set an electric cooker to sauté; add the sesame oil. Add the onion, carrot, and sweet potato and sauté for 2 minutes. Add the garlic and 1 tablespoon of the sesame seeds and sauté another minute. Add the tofu, tamari, vinegar, and stock.


2. Lock the lid on the cooker. Bring to high pressure; cook for 3 minutes. Quick release the pressure. Carefully remove the lid, tilting it away from you.
3. Add the peas and lock the lid back on. Bring to low pressure; cook for 1 minute. (If you do not have a low pressure option, lock the lid on and let sit for 2 to 3 minutes.) Quick release the pressure. Remove the lid, carefully tilting it away from you.

4. Stir in the pepper sauce and tahini, if using. Garnish with the remaining 1 tablespoon sesame seeds and the chopped scallion and serve.
Variations: Use broccoli florets or 1-inch pieces of green or wax beans instead of the peas. Cook at low pressure for 2 minutes with a quick release.
Text excerpted from Vegan Under Pressure, © 2015 by Jill Nussinow. Reproduced by permission of Houghton Mifflin Harcourt. All rights reserved.
**********************

4 C’s Warm Rye Berry Salad; Photo © Lauren Volo.
My Notes on this recipe:
The rye is chewy and even a little sweet-- I found it very pleasant and a great match with the cabbage and caraway/mustard flavoring. Instead of dry-sauteing, I cooked the onion and cabbage in a covered Pyrex casserole in the microwave on High for 5 minutes, then just dumped them into the Instant Pot with the soaked rye berries, caraway seeds, bay leaves, and stock.
I would like to try this with farro or oat groats, which probably would not need to be soaked first.
4 C’s Warm Rye Berry Salad
Serves 4 to 6
This hearty salad tastes great but has very simple ingredients, including cabbage, caraway, carrots, and chives. If you’ve never cooked rye berries before, you might be surprised by their firm texture and amazing flavor. You can also make a salad with other whole grains such as farro, Kamut, spelt, wheat berries, or—if you want it to be gluten-free—whole oat groats.
1 cup chopped red or yellow onion
1½ cups chopped red cabbage plus 1½ cups thinly sliced red cabbage
1 cup rye berries, soaked overnight and drained
1 teaspoon caraway seeds
2 bay leaves
¾ cup vegetable stock or water
2 tablespoons whole-grain mustard [not the sweet kind--BCG]
1 tablespoon date or maple syrup
1 to 2 tablespoons fresh lemon juice
1 medium carrot, grated (½ to 1 cup)
¼ cup chopped fresh chives [my chives are still small, so I used sliced scallion greens-- BCG]
Salt, optional
Lots of freshly ground black pepper
1. Heat a stovetop cooker over medium heat, or set an electric cooker to sauté. Add the onion and the 1½ cups chopped cabbage and dry sauté until the onion starts to look translucent. Add water by the tablespoon as needed to prevent any sticking.
2. Add the rye berries, caraway seeds, bay leaves, and stock. Lock the lid on the cooker. Bring to high pressure; cook for 25 minutes. Let the pressure come down naturally. Remove the lid, tilting it away from you.
3. Carefully remove and discard the bay leaves. Transfer the grain mixture to a large bowl and let cool until almost room temperature. Once cool, drain and discard any remaining cooking liquid.
4. Combine the mustard, date or maple syrup, and lemon juice in a small bowl. Add the dressing to the cooled rye.
5. Stir in the sliced cabbage, carrot, and chives. Add salt (if you like) and pepper to taste. Serve immediately or store in the refrigerator for up to 5 days. Taste and adjust seasonings before serving.
Text excerpted from Vegan Under Pressure, © 2015 by Jill Nussinow. Reproduced by permission of Houghton Mifflin Harcourt. All rights reserved.
***************************

Orange Scented Beet Salad: Photo by Bryanna Clark Grogan
My Notes on this recipe:
This is the first time I have cooked beets for a salad after simply scrubbing them before slicing-- usually I peel them first, or I roast them in foil with the skins on and then peel the skins off under running water. Simply scrubbing them well (I used a new stainless steel scrubber) is a brilliant idea! Another brilliant idea is cooking the beets in some of the flavoring elements (orange juice, vinegar, orange zest) that would ordinarily go into the dressing, which would be added to the beets after cooking. With Jill's method, the beets are infused with some of the dressing flavorings as they cook. Genius!
Orange Scented Beet Salad
Makes four 1-cup servings of beets plus 1/2 cup greens
Cooking beets has never been easier. They become so tender that you don’t even need to peel them if you don’t want to. It’s best to use young beets that are no more than 3-4 inches in diameter.
3 minutes high pressure; 10 minute natural pressure release
1 1/2 pounds beets, about 6 medium
1/2 cup freshly squeezed orange juice (zest oranges before squeezing)
2 tablespoons cider vinegar
3 large slices orange zest
2 tablespoons Sucanat or brown sugar
2 teaspoons Dijon mustard
2 teaspoons orange zest
2 green onions, sliced
2 cups spicy greens like arugula, mustard or a mix, washed and dried [I used kale because that's what I had in the garden--BCG]
1. Scrub beets. Remove tops, stems and tails and cut in half. Then cut into ¼-inch slices.
2. Put the orange juice, vinegar and the large slices of orange zest into the cooker. Add the beet slices. Lock on the lid. Bring to high pressure. Cook for 3 minutes.

3.Let the pressure come down naturally for 7 minutes, then release any remaining pressure.
4. Open the lid, tilting it away from you. Remove the large pieces of orange zest. Stir in the Sucanat and mustard.
6. Remove the beets from the cooking liquid and transfer to a bowl. Let cool for at least 5 minutes.
7. Mix the orange zest and green onions with the beets. Pour the liquid from the cooker over the beets.
8. Spoon one quarter of the mixture onto one half cup of spicy greens on individual salad plates.
9. Or, you may chill the beets, without the zest and green onions, and let sit in the liquid for a day or two.
10. Right before serving stir in the orange zest and green onions.
Excerpted from VEGAN UNDER PRESSURE, (c) 2016 by Jill Nussinow. Reproduced by permission of Houghton Mifflin Harcourt. All rights reserved.
Happy Pressure Cooking!

Monday, November 17, 2014
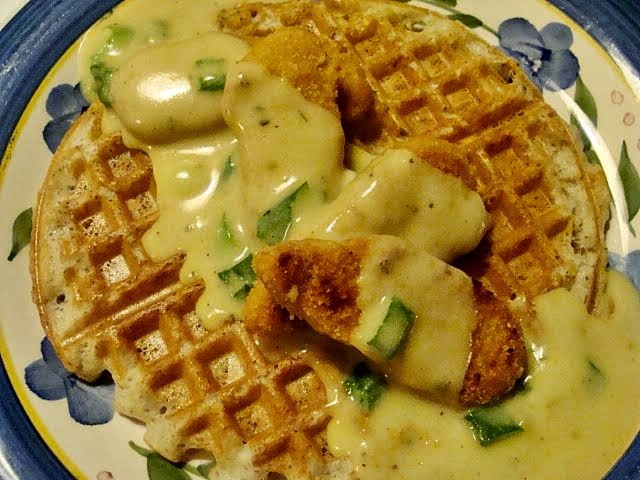
GF & SOY-FREE (OR NOT!) VEGAN SELTZER WAFFLES WITH CRISPY SWEET POTATOES & LIGHT CHIK'N GRAVY

Back in November 2011, I was a bit obsessed with
waffles. While revising my Vegan
Seltzer Waffles (made with club soda, which makes them nice and light), I
decided to also develop a gluten-free and soy-free version, so we were eating waffles for breakfast and dinner quite a lot. Finally satisfied
with both my gluten-free version and my wheat version (probably to my husband’s
great relief!), I began working on a vegan version of “chicken waffles,” a
popular, but very high-fat, restaurant dish. It has always intrigued me, but I
was never satisfied with my attempts at recreating a lower-fat vegan version.
Until I came up with the following recipe that was originally published on a So Delicious coconut milk blog and I'm reproducing here, in a revised (and slightly corrected) format.
There are two different versions of this dish—the
Southern one, which consists of fried chicken pieces on a waffle with hot syrup
poured over the whole she-bang (and now sometimes further “enhanced” with bacon,
for good measure); and the Pennsylvania Dutch version, which is a waffle topped
with strips of boiled chicken and a chicken gravy.
The Southern one sounded a bit over-the-top to me, but
I liked the idea of gravy on a waffle (I do love gravy). The very first attempt
I made was pretty delicious—I combined the Southern and Northern versions and
topped our waffles with some President’s Choice “Meatless Breaded Chicken
Strips” (a Canadian product made by Gardein®, similar to their “CrispyTenders”) and a light vegan gravy. Mmmmm-good! (I’m sure that crispy coated
tofu strips would be good, too.) The gravy was also delicious with Butler SoyCurls®, reconstituted in a vegan “chicken” broth and lightly browned—a more
Northern-style version that would also work with a light seitan or any of the
new commercial vegan “chicken” strips and similar products.

But I couldn’t use any of those products in a gluten-free and soy-free version of the dish, so I was racking my brains for something delicious that would be suitable and satisfying. For three days or more I mulled it over. Finally, the light bulb went off in my head—crispy oven-“fried” slices of sweet potatoes or yams; suitably Southern and full of flavor—just the ticket!
But I couldn’t use any of those products in a gluten-free and soy-free version of the dish, so I was racking my brains for something delicious that would be suitable and satisfying. For three days or more I mulled it over. Finally, the light bulb went off in my head—crispy oven-“fried” slices of sweet potatoes or yams; suitably Southern and full of flavor—just the ticket!
For
the gravy, I started out with a milky Southern biscuit gravy recipe
that I had developed a few years ago, but it seemed too heavy for
this recipe. I revised it, substituting some “chickeny” vegan broth for some of the non-dairy milk and adding some herbs and green
onions. I used a white-rice-based GF flour mix (you can use a commercial one with similar ingredients,if you prefer) instead of the wheat
flour for the thickener, and it made for an exceptionally silky
texture—just what I was hoping for.
I
used Original
So Delicious® Coconut Milk Beverage for
the "milk" in the waffles, the gravy, and as part of the
coating for Crispy Sweet Potato Slices. It provided just the right
amount of richness and flavor, without excessive fat. I hope you’ll
enjoy this recipe as much as we did!
***********
This dish may seem complex at first, but as
you'll see, with all three components, you'll be creating a stupendously
delicious dairy-free (and gluten-free!) meal—or you can enjoy the waffles,
crispy sweet potatoes, or chik'n gravy served with your favorite
accompaniments. And since most of the recipes can be made well ahead of
time, this hearty meal will be a snap to put together when it's time to serve!
BRYANNA'S VEGAN SELTZER WAFFLES WITH CRISPY SWEET POTATOES AND LIGHT CHIK'N GRAVY (GLUTEN-FREE AND SOY FREE—OR NOT!)
Serves 4
For convenience, make the waffles and the gravy ahead of time, and reheat just before serving. If you and your guests have big appetites, use 2 waffles per serving. If not, use one each. It’s a filling and satisfying dish. We like this for supper, but it makes a great brunch dish, as well.
COMPONENT RECIPES:
1.) 4 to 8 Bryanna’s Gluten-Free Vegan Seltzer Waffles (see recipe below)
2.) 1 recipe Bryanna's Light Vegan Southern-Style Chik'n Gravy (see recipe below)
3.) Crispy Sweet Potatoes/Yams (see recipe below)
PUTTING THE COMPONENTS TOGETHER AFTER YOU'VE MADE ALL 3:
While the sweet potato/yam slices bake, you can gently reheat the Chik’n Gravy, either in a saucepan on the stovetop, or in a microwave-proof pitcher in the microwave at no more than 50% power.
Place the already-made waffles on racks on top of baking sheets. Place them in the oven at the same time you turn the yam/sweet potato slices over to crisp the second side. Watch the waffles so that they do not brown. You just want to heat them up and crisp them a bit.
For each serving, place a waffle (or 2) on a heated plate, top each serving with 5 or 6 hot Crispy Sweet Potato/Yam slices, and drizzle with the hot gravy. Serve immediately.

COMPONENT #1:
BRYANNA'S GLUTEN-FREE, SOY-FREE (OR NOT: SEE NOTE) SELTZER WAFFLES
(Serves: 4-8 Yield: Eight 7-Inch Waffles)
BRYANNA'S GLUTEN-FREE, SOY-FREE (OR NOT: SEE NOTE) SELTZER WAFFLES
(Serves: 4-8 Yield: Eight 7-Inch Waffles)
Note: If you don't want or need to make these gluten-free, you
can use my original recipe for wheat-based Seltzer
Waffles.
I use a regular non-stick waffle iron, not the Belgian
type that makes thicker waffles. I have the Cuisinart Traditional waffle iron.
These waffles can be made ahead of time and crisped and heated in the oven
ahead of time, if you wish.
Dry Mix:
1 cup brown rice flour
1/2 cup tapioca flour (or starch)
1/3 cup potato starch (not potato flour)
1/4 cup chickpea flour (known as besan in South Asian
grocery stores)
2 tablespoons coconut flour
1 tablespoon organic granulated sugar, or other
sweetener of choice
1 teaspoon salt
1 teaspoon xanthan gum or guar gum
1/2 teaspoon baking soda
Wet Mix:
Flax Seed "Glop":
1/2 cup So Delicious Original Coconut Milk Beverage + 2 tablespoons golden flax seeds (if using ground flax seed, use 1/4 cup)
1/2 cup So Delicious Original Coconut Milk Beverage + 2 tablespoons golden flax seeds (if using ground flax seed, use 1/4 cup)
Additional Wet Ingredients:
7/8 cup So Delicious Original Coconut Milk Beverage
2 tablespoons vegetable oil
1 tablespoon apple cider vinegar
Seltzer water: 1 1/4 cups (10 oz) club soda
1/2 teaspoon pure vanilla extract (optional)
NOTE: If you are going to eat the waffles immediately after
cooking, adjust your oven rack to the middle position and
heat the oven to 250º F. Set a wire rack in rimmed baking sheet and place the
baking sheet in oven. If they are to be eaten later, simply have some cake
racks ready on your counter.
To make:
Whisk the Dry Mix ingredients together in large bowl
to combine.
In a blender, whiz together the 1/2 cup So Delicious®
Coconut Milk Beverage and flax seeds until the mixture is fluffy, white and
"gloppy" like lightly beaten egg whites. (See photo below.)
.jpg)
Add
the Additional Wet Ingredients and blend briefly to mix well. Turn
the blender off, remove the container from the machine and, with a
slim spatula, gently stir in the club soda.
Immediately
make a well in center of Dry Mix ingredients and pour in the combined
Wet Mix and club soda. Using a small spatula, gently stir until just
combined. The batter should remain slightly lumpy with streaks of
flour.
Heat
your waffle iron, spray with oil from a pump sprayer (or rub with a
little coconut oil), and bake each waffle according
to manufacturer’s instructions (for a 7-inch round waffle I used
1/2 cup batter). In my Cuisinart Traditional waffle iron, I cook them
on the #4 setting until the steam stops pouring from the iron, which
takes about 4 minutes.
Transfer the waffles to a rack in warm oven and hold them for up to 10 minutes before
serving. Or if they are to be reheated later in the day, place them
on cake racks on the counter to cool. To reheat the cooled waffles, place
them on racks on top of baking sheets in a 350º F oven for a few
minutes, until hot and crisp. Any leftover waffles can be frozen in
zipper-lock bags to use as toaster waffles.
***********

COMPONENT #2:
BRYANNA'S LIGHT SOUTHERN-STYLE CHIK'N GRAVY
(soy-free
and gluten-free...or not!)
Servings: 6, Yield 3 cups
Servings: 6, Yield 3 cups
1/3
cup white GF flour mix (recipe here, or use a commercial version with similar ingredients)
(OR if you don't need to make them GF, use unbleached white
flour, but the white-rice-based GF flour mix makes a really silky-textured gravy!)
1/4 cup nutritional yeast flakes
1/2 teaspoon salt
1 1/2 cups water
1 cup So Delicious® Coconut Milk Beverage
1/2 tablespoon low-sodium soy sauce
1/2 tablespoon "chicken-style" vegetarian broth powder or paste
(Use a GF and/or SF version, if necessary—here’s my homemade GF & SF broth powder, but you will need to use 1 tablespoon instead of 1/2 tablespoon.)
1 teaspoon dark sesame oil
1/2 teaspoon dried rubbed sage (not powdered)
1/2 teaspoon dried thyme leaves (not powdered)
1/4 teaspoon freshly-ground black pepper
2 green onions, thinly sliced
Place
the flour, nutritional yeast and salt in a 2-qt. microwave-proof bowl
or pitcher and microwave on high for 2 minutes. Whisk in the water,
So Delicious® Coconut Milk Beverage, soy sauce, broth powder or
paste, sesame oil and herbs.
Cook
in the microwave on High for 2 minutes. Whisk the mixture well.
Microwave again for 2 minutes, or until thickened (microwave once
more if necessary). Whisk again, taste for seasoning, stir in
the sliced green onions and serve hot.
If
making on the stovetop, toast the
flour, yeast and salt lightly in a DRY heavy skillet or saucepan over
medium heat, stirring constantly. Do not brown the flour. Off the
heat, whisk in the water, So Delicious® Coconut Milk Beverage, and
soy sauce, making sure that there are no lumps. Whisk in the broth
powder or paste, sesame oil and herbs. Stir over high heat just until
it starts to boil, then reduce heat to medium and stir for several
minutes, until thickened. Whisk again, taste for seasoning, stir in
the sliced green onions and serve hot.
****************

COMPONENT #3
CRISPY SWEET POTATOES/YAMS
(Note:
the measurements for the following ingredients are approximate)
1 lb. sweet potato (orange-flesh) or yam (white or yellow flesh)
1/2 cup + 1/2 tablespoon white GF flour mix (Or you can use wheat flour instead, if you like.)
1/2 cup So Delicious® Coconut Milk Beverage, Original
1 teaspoon Cajun seasoning (homemade recipe here)
1/2 cup brown rice flour
olive oil in a pump sprayer bottle
Preheat your oven to 500ºF.
Cut the sweet potato/yam into 4 equal quarters,
slicing it in half horizontally and then slicing the halves again in half
lengthwise. You can peel the sweet potato/yam first, or remove the peel after cooking—it’s
up to you.
I microwave the sweet potato/yam (without any water)
in a covered microwave-safe casserole for about 7 minutes. You can also steam them. Just
make sure that you remove them from the heat source when they are just barely
cooked—you can stick a fork in the center, but the flesh is still firm.
Let them cool. (If you have not peeled them
already, run some cold water over the skin side and the peel should come off
easily. If it doesn’t, use a paring knife.) Slice the quarters lengthwise
into about 3/8-inch-thick slices.
Assemble
3 shallow bowls (such as soup bowls) and place the 1/2 cup white GF
flour mix in one; the So Delicious® Coconut Milk Beverage mixed with
the Cajun seasoning and the 1/2 tablespoon white GF flour mix, in the
second bowl; and the brown rice flour in the third.
Have
ready a large baking sheet (dark baking sheets brown foods better),
sprayed with oil from a pump spray bottle. Coat each slice of sweet
potato/yam first with the white GF flour mix, then the So Delicious®
mixture, and then the brown rice flour. Lay each coated slice on the
prepared pan. Place in the preheated oven and bake for about 7
minutes, or until the bottoms are golden and crispy. Turn the slices
over and bake for another 4-5 minutes, or until the bottoms are also
golden and crispy.
****************
PUTTING THE COMPONENTS TOGETHER AFTER YOU'VE MADE ALL 3:
While the sweet potato/yam slices bake, you can gently reheat the Chik’n Gravy, either in a saucepan on the stovetop, or in a microwave-proof pitcher in the microwave at no more than 50% power.
Place the already-made waffles on racks on top of baking sheets. Place them in the oven at the same time you turn the yam/sweet potato slices over to crisp the second side. Watch the waffles so that they do not brown. You just want to heat them up and crisp them a bit.
For each serving, place a waffle (or 2) on a heated plate, top each serving with 5 or 6 hot crispy sweet potato/yam slices, and drizzle with the hot gravy. Serve immediately.
Enjoy!
Wednesday, March 12, 2014
A HEARTY FULL-MEAL-DEAL: SWEET POTATO AND BLACKEYED PEA SALAD

I like combining traditional ingredients (Southern USA, in this case) in untraditional ways. This combo makes a delicious, fiber-and-nutrient-rich, colorful salad, which can serve as a hearty side dish or a meal in itself. It's a wonderful hot-weather dish, of course, but it's also hearty enough for a winter salad and utilizes staples you might have in your kitchen during cold-weather months. The zingy dressing is practically fat-free, too.
Printable Copy
BRYANNA'S SWEET
POTATO AND BLACKEYED PEA SALAD
Serves 6
Serves 6
Salad:
3 cups cooked or canned blackeyed peas, drained
1 lb. orange sweet potato, cooked until firm-tender, peeled, and cubed
1 large green bell pepper, seeded and diced
1 medium red or yellow bell pepper, seeded and diced
6 large red radishes, cleaned and sliced
1 cup diced celery
3 green onions, chopped
Dressing:
1/2 cup aquafaba or Oil Substitute for Salad Dressing
2 tablespoons balsamic vinegar
2 tablespoons olive oil
1 tablespoon soy sauce
1 tablespoon dark sesame oil
1 tablespoon agave nectar
1 tablespoon vegan mayonnaise (homemade or commercial)
1 tablespoon coarse-grained mustard
1/2 tablespoon maple syrup
1 clove garlic, crushed
1/4 teaspoon salt
Whisk, blend or shake all of the Dressing ingredients
together. Mix the salad ingredients in a
large bowl. Add the dressing (you may
not need it all, but add more than you think you need because it soaks up some
of the dressing) and stir well. Refrigerate for several hours and serve with
crisp mixed greens.

Nutrition Facts
Nutrition (per serving): 304.0 calories; 22% calories from fat; 7.7g total fat; 0.0mg cholesterol; 327.1mg sodium; 715.0mg potassium; 51.6g carbohydrates; 10.6g fiber; 10.6g sugar; 9.6g protein, 5.9 points.
Nutrition (per serving): 304.0 calories; 22% calories from fat; 7.7g total fat; 0.0mg cholesterol; 327.1mg sodium; 715.0mg potassium; 51.6g carbohydrates; 10.6g fiber; 10.6g sugar; 9.6g protein, 5.9 points.
Enjoy!
Thursday, December 13, 2012
FROM WORLD VEGAN FEAST, SWEET POTATO AND YUKON GOLD LATKES (POTATO PANCAKES) WITH MAPLE-PECAN GRILLED PEARS
.jpg)
I'm attending a Hanukkah party tonight, which reminded me that there are only three more days left of Hanukkah, and I wanted to share a favorite latke recipe from my book "World Vegan Feast".
According to the Free Dictionary, latke means "A pancake, especially one made of grated potato.[Yiddish, from Ukrainian oladka,]". As you probably know, they are traditional fare in many Jewish homes during Hanukkah, usually fried in plenty of oil to celebrate the miracle of the Hanukkah oil. But what if you are vegan and you are trying to cut back on fat?
Good news-- yes, you can make delicious latkes without eggs and with only a small amount of oil (or even no oil-- see the alternative cooking methods below the recipe). This is my "fancy pants" recipe, but, if you don't want to bother with the grilled pears, you can serve them simply with the traditional applesauce and with Tofu Sour Creme (homemade or commercial) or Cashew Sour Creme. (You could even be a rebel and serve them with cranberry sauce.)
Printable Recipe
BRYANNA'S SWEET POTATO AND YUKON GOLD LATKES (POTATO PANCAKES) WITH MAPLE-PECAN GRILLED PEARS
From my book “World Vegan Feast” © Bryanna Clark Grogan
Serves 4 (Can be Gluten-Free and Soy-Free)
This is a beautiful dish and a luscious combination of cold season vegetables and fruits. It can be the centerpiece for an elegant brunch at any time of the year, but is spectacular for a Hanukkah meal. This recipe can be easily multiplied as needed. The pears can be cooked ahead of time and the pancakes can be made earlier in the day, transferred to baking sheets (any size), covered with plastic wrap and refrigerated until just before cooking and serving.
Maple-Pecan Grilled Pears:
4 medium-sized ripe, but firm, pears, peeled, cored and thinly-sliced
4 teaspoons vegan butter, melted (try my homemade palm oil-free vegan Buttah)
2 tablespoons + 2 teaspoons maple syrup
1/4 cup lightly-toasted chopped pecans
Latkes (Potato Pancakes):
2 2/3 cups shredded peeled sweet potato
2 2/3 cups shredded scrubbed Yukon Gold potato
1 medium onion, shredded
1/2 cup whole wheat flour (or a gluten-free flour mix)
2 teaspoons baking powder
1 teaspoon salt
1/3 teaspoon freshly-grated nutmeg
freshly-ground black pepper to taste
3 tablespoons cooking oil for frying
To Serve:
Tofu Sour Cream or Cashew Sour Cream
Make the Grilled Pears before you start the pancakes. Turn on the broiler in your oven and place the rack on the top setting. You want the pears to be about 3 to 4 inches below the heat source. Transfer the sliced pears to a baking sheet (any size) and toss the slices with the melted vegan butter. Broil the pears until they start to brown around the edges. Stir gently and broil further, but don't burn them or make them too soggy.

Remove from the oven when they look appetizingly “grilled” but still hold their shape, and scoop them gently into a shallow bowl. Drizzle with the maple syrup and add the pecans, folding gently. Set aside.
To make the Latkes (Pancakes): Transfer both the shredded sweet potatoes and potatoes to a large square of cheesecloth (fine mesh, or layers of the coarser kind) or cotton cloth, gather in the corners and squeeze and twist them to remove as much of the liquid you can. This is important!

Transfer the squeezed, shredded potatoes (both kinds) to a large bowl. In a smaller bowl, whisk together the flour, baking powder, salt, nutmeg and pepper. Add this mixture to the potatoes and mix well. (TIP: This mixture is more solid than the traditional egg-y latke batter.)

Divide the potato mixture into 12 equal "balls". Press the balls down on a sheet of baking parchment on your work surface or on a 12 x 17-inch baking sheet, to make pancake shapes.
Heat the half of the oil in a large nonstick, cast iron or hard-anodized skillet and carefully transfer the 6 latkes to the skillet using a thin non-metal spatula-turner. Fry the latkes in the hot oil over medium-high heat until golden and crispy on both sides. Repeat with the rest of the oil and latkes.

Serve the latkes hot and fresh, topped with the Grilled Pears and offer Tofu Sour Cream or Cashew Sour Cream on the side.
ALTERNATIVE FAT-FREE COOKING METHODS:
#1.) You can cook these latkes on several large nonstick, cast iron or hard-anodized skillets, lightly-sprayed with oil from a pump sprayer, over medium-high heat. However, the easiest way is to use a nonstick electric pancake griddle-- this accommodates quite a few pancakes and they cook evenly.
Place 1/4-cupfuls of the potato mixture onto the preheated griddle or skillets. flatten them into thin pancakes with a spatula. Cover pans with lids or foil, or use inverted cookie sheets over the griddle. Cook until the bottoms are golden-brown, then flip them over and cook, uncovered, until the second side is golden-brown. Serve hot.
#2) Preheat the oven to 500°F. Flatten the pancakes as instructed above on nonstick cookie sheets, lightly-sprayed with oil from a pump sprayer, or with cooking spray. Bake them for 15 minutes, then turn the pancakes over and bake 5 or 6 minutes more.
Happy Hanukkah!

Subscribe to:
Posts (Atom)