Sunday, January 28, 2007
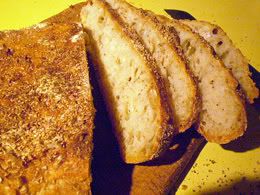
GORGEOUS, HOLEY, CRUNCHY-CRUST NO-KNEAD BREAD!


I'm sure many of you have read all the posts buzzing around late last year about the amazing no-knead bread recipe (often called "pot bread" now!) posted in Mark Bittman's "Minimalist" food column in the NY Times. Well, I belatedly tried it yesterday. (I've been doing the WW Core Plan, so not baking bread very often-- I'm going off it for a few days as I'm in a bread-baking mood!) I was intrigued not only by the success of this very simple, and seemingly resilient, recipe, but by the promise of amost no labor, good flavor, large holes like a real European brick-oven bread, and a super-crispy crust. Crumbs all over the place!
Sounds too good to be true, but many, many bloggers and posters had great success with it, even using slightly different amounts of water, and salt, and a variety of cooking vessels. The science behind it-- Harold McGee author of “On Food and Cooking” (Scribner, 2004-- a book I have on my personal shelf!), says: “It makes sense. The long, slow rise does over hours what intensive kneading does in minutes: it brings the gluten molecules into side-by-side alignment to maximize their opportunity to bind to each other and produce a strong, elastic network. The wetness of the dough is an important piece of this because the gluten molecules are more mobile in a high proportion of water, and so can move into alignment easier and faster than if the dough were stiff.” As well, the long rise produces umami flavor compounds which give the bread outstanding flavor.
In addition to this, the baking in a heavy, covered pot acts like a miniature brick oven, creating steam inside to help the crust get crispy.
So, I started the bread at 7 PM on Friday night. All you do is mix the dry ingredients, including the yeast, and then pour in tepid water, stir briefly until a "shaggy" dough results:

Cover and keep in a warm place for 12-18 hours. I opted for 18 hours, and, since it's not always even heat in our wood-heated house.
So, about 1 PM on Saturday, I took the dough out, and it was quite wet and bubbly, as advertised:

After scooping it out onto floured parchment paper, I let it rest and then shaped it into a "ball" of sorts. There was alot of discussion about rising it the second time. I used a heavy tea towel, well-floured and dusted also with bran, inside of a bowl.

Dough before 2nd rise
I think next time I'll line the vessel I'm rising it in with floured parchment instead of plastic wrap, because it stuck a bit getting it out into the pan. Or, I might get some of those round baskets for raising bread.
I let it rise for 3 hours. half an hour before you put the dough in the pot, you heat the oven with the pot and cover in it, to 450-500 degrees F. Then you up-end the dough into the UNgreased pot (no, it really does not stick!), cover and bake as directed.
It really is simple and easy. You just have to be around during the last part of the process. And the bread is delicious, has holes like an artisan bread, and the best crust I've ever had in 40 years of bread-making, aside from the short time I had a wood-fired outdoor oven! It stayed crispy after it cooled, and I have found that often you'll get a crispy crust in your home oven, after using steam, etc., but then it softens as it cools. Not this time!
I used less water than called for, more salt (many other cooks agreed with me that the salt content was too low), a tiny bit of wholewheat flour, and I used regular dry active yeast, since I didn't have any of the instant yeast called for. I find buy Fleischman's dry active baking yeast in 1 Kg cans for about the same price as one littel jar of yeast. You just use about 1/4 more than you would instant yeast, so I used 1/3 of a tsp. of yeast instead of 1/4 tsp. in this recipe. It worked fine. (Don't be tempted to use more yeast or speed this bread up! The long rising gives it the flavor and texture you want, and makes up for the lack of kneading, as Harold McGee stated above.)
I used a 475 degree oven, but I might try 450 next time. I used a big enameled cast iron pot that I found for $3 at a garage sale:

It worked fine, but was a bit large , so the bread was a bit flat. But that's okay-- I love the crust!
I plan to experiment alot with this method! Last night I put on a version using 1/2 fresh-milled wholewheat bread flour and 2 tsp. salt, and I plan to make a small loaf in a ceramic pot, and some pizza or focaccia with the rest. I want to try doubling and tripling it, experimenting with addition of other grains, herbs, etc; using sourdough starter in place of yeast; making rolls, baguettes and other shapes, and experimenting with different vessels for baking. I will blog the results! Thank you Jim Lahey, of NY's Sullivan Street Bakery, Mark Bittman, and many bloggers who posted their results!
Anyway, here's the recipe, with a few more comments and pictures:

November 8, 2006
NO-KNEAD BREAD
Adapted from Jim Lahey, Sullivan Street Bakery. My comments in italics.
3 cups all-purpose or bread flour, more for dusting (I used unbleached flour, and I used 3 T. of wholewheat flour in place of 3 T. of unbleached
¼ teaspoon instant yeast (I used 1/3 tsp. regular dry active baking yeast)
1¼ teaspoons salt (I used 1 3/4 tsp. sea salt; next time I will use 2 tsp.)
Cornmeal or wheat bran as needed.
1. In a large bowl combine flour, yeast and salt. Add 1 5/8 cups water (I used 1 1/2 cups-- alot of people who tried this did the same) , and stir until blended; dough will be shaggy and sticky. Cover bowl with plastic wrap (I put the bowl inside a small white plastic garbage bag and twist-tied it.). Let dough rest at least 12 hours, preferably about 18 (I raised it 18 hours), at warm room temperature, about 70 degrees. (I placed it in the oven of my well-insulated stove with the oven light on. I had previously heated the oven up just a little, and placed a tea towel on the rack.)
2. Dough is ready when its surface is dotted with bubbles. Lightly flour a work surface and place dough on it; sprinkle it with a little more flour and fold it over on itself once or twice.


(It's quite sticky-- keep your hands and the surface floured; maybe used a bench scraper.) Cover loosely with plastic wrap and let rest about 15 minutes.
3. Using just enough flour to keep dough from sticking to work surface or to your fingers, gently and quickly shape dough into a ball.

Generously coat a cotton towel (not terry cloth) with flour, wheat bran or cornmeal (I used flour and bran, see comments above); put dough seam side down on towel and dust with more flour, bran or cornmeal. Cover with another cotton towel and let rise for about 2 hours. When it is ready, dough will be more than double in size and will not readily spring back when poked with a finger.

Dough ready for oven
4. At least a half-hour before dough is ready, heat oven to 450 degrees (I used 475 this time, but might use 450 next time-- some folks went up to 500; might depend on your oven.). Put a 6- to 8-quart heavy covered pot (cast iron, enamel, Pyrex or ceramic) in oven as it heats. When dough is ready, carefully remove pot from oven. Slide your hand under towel and turn dough over into pot, seam side up; it may look like a mess, but that is O.K. Shake pan once or twice if dough is unevenly distributed; it will straighten out as it bakes. Cover with lid and bake 30 minutes, then remove lid and bake another 15 to 30 minutes, until loaf is beautifully browned. Cool on a rack.
Copyright 2006 The New York Times Company
Servings: 12
Yield: One 1 1/2-pound loaf.
Nutrition Facts (using 2 tsp. salt)
Nutrition (per slice 1/12th of loaf): 120.4 calories; 2% calories from fat; 0.3g total fat; 0.0mg cholesterol; 314.7mg sodium; 42.7mg potassium; 25.2g carbohydrates; 1.1g fiber; 0.1g sugar; 24.1g net carbs; 3.5g protein; 2.2 points.


Happy baking!

Thursday, January 18, 2007
A COUPLE OF OLD FAVORITE FAT-FREE RECIPES
We don't eat fat-free, but I try to keep the fat to a minimum, for various reasons. Here are a coupld of our favorite recipes that are fat-free or made with minimal fat, but still are enjoyable.
With many recipes, you can lower the fat, or even eliminate it, by steam-frying onions, etc., instead of sauteing them. (See the bottom of this post for how to do this.) To do this, use a well-seasoned stir-fry pan (flat-bottomed wok). Alternately, use a heavy well-seasoned cast iron or anodized aluminum skillet, lightly lubricated with about 1/2 teaspoon of oil brushed onto the cold pan with your fingertips. (Stainless steel and carbon steel pans can also be seasoned to have an almost-non-stick surface. Just Google "How to season a stainless steel skillet" or whichever type you want to make nonstick.)
When I do add fat, I tend to use a little bit of dark roasted sesame oil most often, because a little bit adds alot of flavor.

Creamy bean-based broccoli-cauliflower soup with smoked paprika and dill garnish
Printable Recipe
BRYANNA'S CREAMY BROCCOLI-CAULIFLOWER-AND-WHITE BEAN SOUP
Servings: 4
A very simple concept-- you simmer cooked white beans with whatever vegetable you like , then puree it for a thick and creamy soup, without potatoes, starches, butter, cream, or nuts.
1 1/2 cups well-cooked or canned white beans (15 ounce can), rinsed and drained (such as white kidney beans, cannellini beans, navy beans, or Great Northern beans)
1/2 a medium onion, chopped
1 large clove garlic, chopped
1/2 pound fresh broccoli, trimmed and chopped
1/2 pound fresh cauliflower, trimmed and chopped
2 cups chicken-style vegetarian broth (Better Than Bouillon No-Chicken is my favorite)
1/2 teaspoon salt
freshly-ground black pepper to taste
Steam-fry (see the bottom of this post for how to do this) the onion and garlic for 5 minutes over high heat in a large well-seasoned heavy skillet sprayed with a little oil from a pump sprayer, adding drops of water as needed to keep from sticking. (Or cook in a microwave oven in a covered microwave-proof casserole for 3 minutes.) Don't brown the onions.
Add this to the beans, vegetables, broth, and salt in a medium pot. Bring to a boil, cover, turn down to medium-low, and simmer about 10-15 minutes, or until the vegetables are tender.
Puree right in the pot with an immersion/stick blender, OR, with a slotted spoon, transfer all the solids to the food processor or blender and puree until smooth. (Important caution: Leave an escape in the lid for steam, or else hot veggies will explode all over you!). Add a bit of the broth, then stir the pureed mixture back into the pot. Taste for salt and pepper. Garnish each serving with dried dill weed and smoked paprika or sweet paprika.
Nutrition Facts
Nutrition (per serving): 129.7 calories; 3% calories from fat; 0.6g total fat; 0.0mg cholesterol; 268.3mg sodium; 745.3mg potassium; 24.0g carbohydrates; 4.5g fiber; 0.9g sugar; 19.5g net carbs; 9.9g protein; 1.8 points.
*****************************************************************

Blueberry pancakes made with half oat flour and half wholewheat pastry flour
Printable Copy
BRYANNA'S BLUEBERRY-OAT PANCAKES
Servings: 6
Yield: makes about 24 four-inch pancakes
This is a great basic high-fiber, but very light and tender pancake recipe, due to the oat flour and wholewheat pastry flour.
1 1/2 cups oat flour ( you can use 1 1/3 cups rolled oats ground fine in a dry blender or, in batches, in a clean dry electric coffee/spice mill)
1 1/2 cup whole wheat pastry flour (do not substitute ordinary whole wheat flour or the pancakes will be tough)
2 Tbs brown sugar
1 teaspoon baking soda
1 teaspoon baking powder
1 teaspoon salt
1 large pinch nutmeg
1 large pinch cinnamon
2 cups minus 1 Tbs nondairy milk
1 cup water
1 Tbs lemon juice
1 Tbs oil
1 teaspoon vanilla
1 cup small fresh or frozen blueberries, placed in a small sieve over a bowl to drain
In a large bowl, whisk the oat flour, pastry flour, baking powder, baking soda, salt, nutmeg, and cinnamon together well. Add the soymilk, water, lemon juice, oil, and vanilla. Stir briefly, just to mix-- lumps are okay. (This batter is a little more runny than ordinary pancake batter.)
Heat a nonstick electric griddle (which cooks very evenly), or a well-seasoned cast iron griddle or skillet, over high heat. When it's hot (drops of water dance on the surface when sprinkled on, the disappear quickly), turn it down to medium-high (about 325 degrees F for electric griddle). Spray with a little oil from a pump sprayer. Spoon the batter onto the surface, not crowding, because they spread a little. You can make small pancakes, about 4" across , or larger ones, whichever you prefer.
Sprinkle a few blueberries over the top of the pancake immediately after forming the pancake batter in the pan.
When bubbles appear on the tops, flip the pancakes over gently, loosening the bottoms carefully.
When the underside is golden and the inside is cooked (you can check one with a fork to make sure), serve them immediately. Don't overcook these-- they should still be kind of puffy when you take them off the griddle. If you let them overcook, they'll go flat and won't be as light and cakey as they should be. Serve hot with low-sugar syrup or fruit topping, such as low-sugar jam.
Nutrition Facts
Nutrition (per 4 pancakes): 177.2 calories; 19% calories from fat; 3.9g total fat; 0.0mg cholesterol; 566.7mg sodium; 338.2mg potassium; 31.0g carbohydrates; 5.1g fiber; 4.5g sugar; 25.9g net carbs; 6.9g protein; 3.1 points.

BRYANNA’S METHOD OF STEAM-FRYING
Steam-Frying, or Sautéing without Fat (including caramelizing)
Steam-frying simply means sautéing or stir-frying without fat. To do this, use a well-seasoned stir-fry pan (flat-bottomed wok). Alternately, use a heavy well-seasoned cast iron or anodized aluminum skillet, lightly lubricated with about 1/2 teaspoon of oil brushed onto the cold pan with your fingertips. (Stainless steel and carbon steel pans can also be seasoned to have an almost-non-stick surface. (Just Google "How to season a stainless steel skillet" or whichever type you want to make nonstick.)
Heat the pan over medium heat, add the chopped onions or other vegetablesyou are using (sometimes referred to as “aromatics”), salt them lightly to bring out the natural liquids, which helps soften the vegetables, and add one or two tablespoons of liquid (water, low-sodium vegetarian broth, or wine), depending on the amount of vegetables. Do not crowd the pan, or your vegetables will stew. Turn up the heat to high and cook over high heat until the liquid starts to evaporate, stirring with a wooden or plastic spatula or spoon. Keep stirring until the vegetables are done to your liking, adding just enough liquid to keep the vegetables from sticking to the bottom of the pan.
Variations: (PS: I collect Pyrex casseroles, bowls and lids from thrift stores to use in the microwave.)
*To “Micro-Steam-Fry”, use a microwave-safe glass dish, such as a round 10” Pyrex casserole dish or pie plate. Add the chopped onions, garlic, carrots, celery, or whatever vegetables you want to sauté. Cover the dish with a Pyrex lid or microwavable plate, and microwave 5 minutes, or however long it takes to soften them. This method is convenient because you don’t have to watch the vegetables— you can be preparing the rest of the recipe while they cook. Just add the softened vegetables to the recipe. This method is not great for browning, however.
* You can brown, or caramelize, onions without fat perfectly by tweaking the steam-fry method. You will need to use a heavy large, heavy seasoned skillet-- see first paragraph.
Combine your thinly-sliced onions with 1/2 teaspoon salt for each 2 large onions, in medium microwave-safe bowl or casserole. Cover with a microwave-safe plate or lid (not touching the onion), and microwave on high power until onions begin to soften and tips turn slightly translucent, 4 to 6 minutes, stirring once halfway through cooking (be careful of steam). If you cook more than 2 large onions, it will take longer.
Place the cooked onions in your heavy well-seasoned skillet (see first paragraph) over high heat. As soon as the natural sugar in the onions starts to brown on the bottom and edges of the pan, add a little liquid and, using a wooden or plastic spoon or spatuala, scrape up the brown bits, mixing them into the liquids and around into the cooking onions. Keep doing this until the onions are soft and brown as you like them, being careful not to scorch them. You can keep going until the onions are dark brown if you want them caramelized.
Enjoy!
Sunday, January 14, 2007
TENDER ALMOST-NO-FAT CHOCOLATE CUPCAKES-- 4 WW PTS (ICED!)

I've been back on the Weight Watchers Core Food Plan for 5 days now (lost 2 lbs. already!), but DH wanted a sweet treat today! So I got out my very first book "The Almost No-fat Cookbook", and made a slightly changed version of the Light and Easy Chocolate Cupcakes, with my fluffy vegan frosting (low in fat and sugar; not in any of my books). Since I have 35 points per week to play with, 4 points ( actually 3.7) is not bad for a treat!
I prefer not to use artificial sweeteners, Splenda, or stevia, so these cupcakes contain sugar, but no added fat except a little in the icing. I used part whole wheat pastry flour for a little more fiber, and I used brown sugar, coffee, and vanilla for a deeper flavor. (NOTE: it's important to use pastry flour in no-fat baking-- except for yeast breads, of course-- because you want a lower gluten flour for tenderness. Fat coats gluten and makes it tender, so, if you aren't using fat, or are using very little, you want less gluten.)
The cupcakes are tender and light, but remember that fat-free treats don't keep very well, so freeze what isn't being used in a day or two. I had one with my tea for a snack this afternoon-- yum!

BRYANNA'S LIGHT AND EASY CHOCOLATE CAKE (OR CUPCAKES) WITH FLUFFY VEGAN ICING
Servings: 12
Yield: Makes 12 cupcakes
These are easy to make, but tender and moist. Be sure to use pastry flour, since there's no fat in this (see note above in text). You have the option of making a white or cocoa icing. Remember that fat-free treats don't keep very well, so freeze what isn't being used in a day or two
WET MIX:
8 oz medium-firm tofu OR extra-firm SILKEN tofu, drained and crumbled
1 cup brown sugar
1/2 cup water, liquid coffee (can be decaf) or coffee substitute
NOTE: Coffee accentuates the chocolate flavor.
1 Tbs vinegar (I use cider vinegar)
1 Tbs pure vanilla extract
DRY MIX:
3/4 cups whole wheat pastry flour
1/2 cup white pastry flour (preferably unbleached)
6 Tbs organic unsweetened cocoa
1 tsp baking soda
1 tsp baking powder
1/2 tsp salt
BRYANNA'S FLUFFY VEGAN ICING
1/2 cup nondairy milk
2 1/2 Tbs white unbleached flour
1/4 tsp agar powder
1 1/2 Tbs Earth Balance regular
1/2 cup unbleached organic granulated sugar
1/2 tsp pure vanilla extract
1 pinch salt
Light chocolate version: Add
4 tsp organic unsweetened cocoa
Preheat the oven to 325 degrees F. Grease and flour 12 cupcake/muffin cups, or line with parchment tulip baking cups, unbleached paper liner cups, or silicone liners.
Blend the Wet Mix ingredients until smooth. Whisk the Dry Mix ingredients well in a medium bowl. Add the Wet Mix and whisk in just until blended-- briefly. Scoop evenly into the prepared cups. Bake for 20-25 minutes, or until a cake tester comes out clean. Cool on rack for 5 minutes, then carefully remove the cupcakes and place on the rack to cool thoroughly before icing.
BRYANNA'S FLUFFY VEGAN ICING
Whisk milk into flour and agar in small saucepan until smooth (You can use an immersion blender if you wish, or even run it through a regular blender). Heat over medium-high heat, stirring or whisking constantly until it boils and thickens.
MICROWAVE OPTION: Whisk the flour, agar and milk in a microwave-proof bowl. Microwave for 45 seconds, whisk, and repeat twice, or until thick.
Cool thoroughly (place in a small bowl inside of a larger bowl of cold water). It will get quite stiff-- don't worry!
With an electric mixer beat the butter, sugar, vanilla and salt until light and fluffy-- several minutes. Beat in the cooled flour paste (and optional cocoa, if using) with the electric beaters and mix until smooth and fluffy. Chill thoroughly before frosting. Keep the frosted cupcakes refrigerated (covered, so that they don't dry out) until serving time.
Nutrition Facts for iced cupcakes:
Nutrition (per cupcakes): 193.2 calories; 12% calories from fat; 3.0g total fat; 0.0mg cholesterol; 237.1mg sodium; 232.1mg potassium; 39.7g carbohydrates; 2.3g fiber; 26.5g sugar; 37.4g net carbs; 4.2g protein; 3.7 points.
Nutrition Facts for UN-iced cupcakes:
Nutrition (per cupcake): 137.7 calories; 7% calories from fat; 1.5g total fat; 0.0mg cholesterol; 193.4mg sodium; 208.3mg potassium; 29.5g carbohydrates; 2.0g fiber; 17.9g sugar; 27.5g net carbs; 3.6g protein; 2.5 points.
Enjoy!
Thursday, January 11, 2007
MY "WINTER WEIGHT", EXERCISE, AND WHITE BEANS & RAPINI, ITALIAN-STYLE

Well, I have to confess, I'm back on Weight Watchers' Core Food Plan. I've gained it all back! Boy, does it sneak up on you! I blame it on not getting my usual exercise, due to the crazy weather (we had another power outage on Tuesday due to another wind storm, and some snow, though we got far less than Vancouver and the south island), and a wacky ferry schedule with a small ferry (while our big ferry gets refitted) that cuts into my exercise time before I go to work; eating too much over the holidays; and eating too much of my experiments.
What am I going to do about it? 1.) Practice portion control. 2.) Stick to the WW Core Food Plan, which is a very healthful plan, easy to eat vegan, emphasis on veggies, fruits, wholegrains, and vegetarian proteins. 3.) EXERCISE-- dance, get out for walks whenever possible, or use an exercise bike, and get back on my weights regime, using stretch bands, as well.
Otherwise, my mom just gave us a treadmill, so I have no excuse for not exercising. I have to get a book rack for it, though, or it's kind of boring. I have to have it downstairs in my "office" area because it takes up too much room upstairs. I can watch DVD's on my computer down here, or videos on the old TV I use for instructional dance and exercise videos (which is not hooked up to satellite, so I can't watch TV programs on it). The other thing I've started to do to make it go faster is watching YouTube music and dance videos. I can make a playlist of however long I want to work out. I've found some fascinating concert video clips and wonderful bellydance clips, as well.
I also have a mini-trampoline, which I need to start jogging on while watching TV in the evening. And, I hope to start dance classes again soon.

Me dancing at my boss's retirement party a few years ago
As I mentioned the Core Food Plan is big on fiber-rich foods and beans can be eaten frequently, provided they aren't full of fat. (You can have 2 tsp. of oil a day-- anything over that is 1 point per tsp. You get 35 points a week to play with.)
*********************************************
Here's a meal I made for dinner the other day to use up some rapini in the refrigerator. I love the combination of the mild, creamy white beans and the strong-flavored rapini! I am very partial to "bitter" greens such as rapini, and they are a powerhouse of nutrients, too.

Rapini (broccoli rabe or raab)
I used my own home-cooked beans. I soaked them overnight and pressure-cooked them for 35 minutes after draining them and covering them with vegetarian broth, with a chut-up large onion, 3 large cloves garlic, chopped, 2 bay leaves, and a large sprig each of fresh rosemary and sage.

Printable Recipe
BRYANNA'S FAGIOLI CON RAPINI (WHITE BEANS WITH RAPINI)
Serves 6 (Adapted from a recipe in my book "Nonna's Italian Kitchen".
A simple dish with outstanding flavor-- one of my absolute favorites. Dark (roasted Asian) sesame oil takes the place of pancetta (Italian bacon) in this recipe. (I have eliminated the olive oil from the original recipe, to cut down on fat.)
If you have no rapini, curly endive, escarole, turnip greens, or kale can be used instead.
1 lb. rapini (broccoli rabe or raab)
1 T. roasted sesame oil
2 large onions, thinly sliced
3 cloves garlic, chopped
3 c. cooked Great Northern beans (If you use other beans, be sure to see the Important Update at this post.)
OR 2/ 14 oz. cans, drained (you could also use borlotti, romano, cranberry or pinto beans)
salt and freshly-ground pepper to taste
Wash the rapini well and drain it. Remove the tougher bottom parts of the stems, and slice the rapini in 1/2" strips.
Heat the oil in a large nonstick skillet. Over medium-high heat, cook the onions until they are limp; then add the garlic and stir-fry for 30 seconds; then the rapini a little at a time, stirring until it wilts and turns brightly-colored.
Add the beans to the pan and stir them around to heat thoroughly. Taste for salt and pepper.
Serve with crusty wholegrain bread, or spooned over soft polenta. A great winter meal!
Nutrition Facts
Nutrition (per serving): 209.3 calories; 12% calories from fat; 3.1g total fat; 0.0mg cholesterol; 33.0mg sodium; 807.6mg potassium; 35.5g carbohydrates; 8.9g fiber; 2.0g sugar; 26.6g net carbs; 12.4g protein; 3.6 points.
Enjoy!
Sunday, January 7, 2007
A GOOD MEATLESS LOAF (AND CAN BE GLUTEN-FREE)
 |
| A vegan diner meal! |
Printable Recipe (both versions)
BRYANNA’S GOOD VEGAN “MEATLOAF” WITH POTATO AND OATS, VERSION #1, MADE WITH YVES "GROUND ROUND" OR GROUND SEITAN Servings: 8
This recipe makes a good all-around vegetarian “meatloaf”, and the leftovers can be used as vegetarian “crumbles”. You have the option of using veggie “hamburger crumbles", or ground seitan, or TVP, Or a mixture. The scrubbed potato, oatmeal, optional flaxseed and onions make it a fairly high-fiber protein dish. And, by the way, you can halve the recipe, if you like.
The "hamburger" part:
4 c. vegetarian “hamburger crumbles”
OR
ground seitan (NOT ginger-flavored) mixed with 1/4 c. hot vegetarian broth in which you have dissolved 1 tsp. Marmite yeast extract or 2 tsp. dark miso)
The rest of the ingredients:
1 c. raw oatmeal (old-fashioned or quick rolled oats)
8 oz. potato, scrubbed or peeled and grated (this is about 1 1/3 cups grated, or a potato about 4 x2 1/2")
2 medium onions, finely minced (a food processor does this best)
1/4 c. soy sauce
1/4 c. ketchup
1/4 c. nutritional yeast flakes
OPTIONAL: 1/4 c. ground flaxseed
1 tsp. salt
1 tsp. garlic granules
1 tsp. EACH dried thyme and savory
1/2 tsp. EACH dry basil, oregano and sage
1/2 tsp. freshly-ground black pepper
(you can use your own seasonings)
Topping: (optional)
1/2 cup low-sodium ketchup, barbecue sauce, or tomato sauce
Preheat the oven to 400 degrees F.
NOTE: If you want a fine-textured loaf, grind the “crumbles”, the seitan, or the reconstituted soy protein in a food processor or a food mill until ground quite fine. If you want a rougher texture, leave it “as is”.
Mix all of the ingredients together well in a large bowl with your hands.
Press the mixture into an oiled or nonstick 9x5" loaf pan (you can line the bottom with cooking parchment, if you like). Cover with a thin layer of ketchup, barbecue sauce, or tomato sauce, if you like. Bake for 1 hour, covering the pan with foil for the first 1/2 hour. Let the loaf stand 15 minutes; turn out on a plate. This firms up as it cools and can be reheated. Great on sandwiches!
Nutrition Facts (calculated using Yves plain "Ground round" and the optional flaxseeds and tomato sauce topping)
Nutrition (per serving): 217.0 calories; 13% calories from fat; 3.5g total fat; 0.0mg cholesterol; 910.0mg sodium; 786.2mg potassium; 28.6g carbohydrates; 9.3g fiber; 5.2g sugar; 19.3g net carbs; 21.5g protein; 3.8 points.
Nutrition Facts (calculated without the flaxseeds)
Nutrition (per serving): 196.2 calories; 7% calories from fat; 1.7g total fat; 0.0mg cholesterol; 910.8mg sodium; 750.4mg potassium; 27.9g carbohydrates; 7.9g fiber; 6.0g sugar; 20.0g net carbs; 20.8g protein; 3.3 points.
***********************************
(GLUTEN-FREE VERSION)
BRYANNA’S GOOD VEGAN “MEATLOAF” WITH POTATO AND OATS, VERSION #2 MADE WITH TEXTURED SOY PROTEIN Servings: 8
This recipe makes a good all-around vegetarian "meatloaf", and the leftovers can be used as vegetarian "crumbles". The unpeeled potato, oatmeal, and onions add fiber to a normally low-fiber protein dish. Note: All vegetarian loaves are firmer and more appetizing if you let them cool thoroughly, then slice and reheat them, so make this the day before, or early in the day. Good with Rich Brown Gravy, or just ketchup. Leftovers make good sandwiches.
The use of TVP or Soy Curl crumbs (read about Soy Curls here) instead of veggie "ground round" or ground seitan makes this loaf gluten-free.
3 cups dry textured soy protein (TVP or TSP) granules, OR Soy Curl crumbs (see this post about this option)
2 1/2 cups hot water
2 small or 1 large low-sodium GF vegetarian bouillon cube
4 teaspoons gravy browner, such as Kitchen Bouquet (GLUTEN-FREE NOTE: SEE BELOW)
1 tablespoon Marmite yeast extract, OR 2 tablespoons dark miso
1 cup GF old-fashioned oatmeal (rolled or quick oats)
8 ounces new or red potatoes, scrubbed and grated
(this is about 1 1/3 cups grated, or a potato about 4 x2 1/2")
2 medium onions, finely chopped (a food processor does this best)
1/4 cup low-sodium soy sauce (USE WHEAT-FREE TAMARI FOR GLUTEN-FREE)
1/4 cup low-sodium ketchup
1/4 cup nutritional yeast flakes
OPTIONAL: 1/4 c. ground flaxseed
1/2 teaspoon salt
1 teaspoon garlic granules
1 teaspoon dried thyme
1 teaspoon savory
1/2 teaspoon dried basil
1/2 teaspoon dried oregano
1/2 teaspoon dried, crumbled sage
1/2 teaspoon freshly-ground black pepper
Topping: (optional)
1/2 cup low-sodium ketchup, barbecue sauce, or tomato sauce
Preheat the oven to 400°F.
NOTE: If you want a fine-textured loaf, grind the reconstituted soy protein or Soy Curl crumbs in a food processor or a food mill until ground quite fine. If you want a rougher texture, leave it "as is".
Mix the textured soy protein with the hot water in a large bowl, and let stand for about 10 minutes to rehydrate.
Mix all of the rest of ingredients into the textured soy protein or Soy Curl crumbs. Mix it well with your hands.
Press the mixture into a 9 x 5" loaf pan, sprayed lightly with oil from a pump sprayer, or with cooking spray, and lined on the bottom with cooking parchment. Cover the loaf with the ketchup, barbecue sauce, or tomato sauce, if you like.
Bake for 1 hour, covering the pan with foil for the first 30 minutes.
Let the loaf cool thoroughly in the refrigerator before slicing. Reheat if necessary, in the microwave, or by steaming or baking in a covered dish.
Nutrition Facts (calculated using the optional tomato sauce topping)
Nutrition (per serving): Nutrition (per serving): 210.4 calories; 5% calories from fat; 1.3g total fat; 0.0mg cholesterol; 562.6mg sodium; 489.1mg potassium; 29.6g carbohydrates; 3.5g fiber; 4.2g sugar; 26.2g net carbs; 21.6g protein; 3.6 points.
Nutrition Facts (using the optional ground flaxseeds as well)
Nutrition (per serving): 236.2 calories; 11% calories from fat; 3.1g total fat; 0.0mg cholesterol; 564.4mg sodium; 525.0mg potassium; 31.4g carbohydrates; 4.9g fiber; 4.2g sugar; 26.5g net carbs; 22.6g protein; 4.2 points.
NOTE ABOUT KITCHEN BOUQUET:
There evidently are trace amounts of gluten in Kitchen Bouquet and other brands of liquid gravy browner. You might like to try your hand at making it yourself:
BRYANNA'S HOMEMADE "KITCHEN BOUQUET-STYLE" LIQUID GRAVY BROWNER (GLUTEN-FREE, SOY-FREE)
Kitchen Bouquet is a browning and seasoning sauce. It is typically next to the Worchestershire sauce in most stores. Here's how to make it yourself:
1/2 cup brown sugar
2 cups vegetable broth
Put brown sugar in a heavy pan (like a cast iron frying pan) over medium-low heat and let it scorch, slowly stirring all the time. When it turns a dark brown, add the broth and stir well, and then bottle and keep refrigerated..
Yield: 2 cups (32 Tbs.)
Enjoy!

Thursday, January 4, 2007
SOUP IS JUST THE THING! (AND MISO MYSTERIES EXPLAINED)

Barley-Mushroom Soup from my book "The Fiber for Life Cookbook" (recipe here).
I'm sure I'm not the only one who has eaten too much, and too richly over the holidays. This has extended until today, due to company and leftovers! Actually, I didn't even bake very much this year. But I want to start eating lightly, at least for while. The first thing I think of for light meals, especially in the winter, is soup. I love soup, and I have many soup recipes that I've developed over the years. (DH says I could easily open up a soup restaurant!) Soups are so easy to make fat-free, and yet still hearty and full of flavour. They are generally extremely inexpensive to make, and a good way to use up leftovers. Guests love homemade soups (and bread), too, because it seems such a novelty in this age of convenience foods.
 |
| This is a version of miso soup with squash and chard, as well as tofu cubes, onions and mushrooms. |
I would never be without miso in my house. It is one of the great flavor-boosters of vegan cooking, in my opinion. I generally use a brown rice or barley miso which is made the old-fashioned way right here on Denman Island, British Columbia by master miso-makers Yoshi and Susan-Marie Yoshihara. (Update on Shinmeido Miso-- unfortunately, they have retired and have ceased production; fortunately we have stockpiled quite a few containers!) In vegetarian/vegan foods, miso lends a fermented "cheesey" flavor, full of the "fifth flavor", umami, which enhances flavor (read more about umami here, here and here and can also replace salted anchovies or anchovy or fish paste (see this post on that particular subject.
(***If you are allergic to soy, you can use chickpea miso or adzuki bean miso.)
(To find recipes using miso on this blog [and there are lots!], do a blog search in the search bar at the top lefthand corner of the page, or click on "miso" in the "Labels" list at the bottom of this post.)
You can read more about this wonderful food in The Book of Miso by William Shurtleff and Akiko Aoyagi (Autumn Press, 1976). (You can also get an updated version in a combo book with the classic Book of Tofu.) They include a chart explaining the types of miso, their taste and color.

See what I wrote about this book at this post.
You can also go to the good old "Cook's Thesaurus" (bookmark this useful site!) and see some photos of different kinds of miso, which will give you a realistic idea of the colors.
By "light", I mean light brown or yellowish-- not white miso, which is almost sweet; and not dark brown or reddish, which is stronger in taste.The Japanese names which would fit my description are:
Shinshu Miso or Aka Miso (Light Yellow Miso/Rice and Soy): Bright light yellow
Amakuchi Tanshoku Miso, Aijiro Miso or Mochigome Miso (Mellow beige Miso/ Rice and Soy): yellow to tan
Shiro-Kiju Miso (Mellow White Miso/ Rice and Soy): light beige
Amakuchi Mugi Miso (Mellow barley miso): yellowish brown to russet
Here is a site that explain the differences between miso varieties:
Dom's Culture-Foods Site of Asia In-Site
These articles discuss miso nutrition and health benefits:
Wikipedia article about miso
World's Healthiest foods article on miso
Everyone who enjoys miso has their favorite ways of preparing miso soup. I am partial to miso with potatoes, onions and mushrooms. UPDATE: My miso soup recipe is in my new book World Vegan Feast.
Happy New Year!
Subscribe to:
Posts (Atom)