Saturday, November 28, 2009
MY VERSION OF 100% WHITE WHOLE WHEAT SANDWICH BREAD


I haven't been making much bread lately (DH makes most of our bread, and it's delicious!), but I wanted to try out a recipe for a 100% WHITE Whole wheat Sandwich Bread recipe from the Breadcetera blog. So, I put on the poolish starter/pre-ferment Wednesday night and planned to make the bread on Thursday morning. It turned out beautifully, even with my changes (which I'll expand upon below), and with being distracted by a visitor while I was putting the dough together, so I wanted to tell you about it.

WHITE whole wheat flour
There are two types of white whole wheat flour-- soft white whole wheat flour (or white whole wheat pastry flour), which is made with SOFT white whole wheat, and hard white whole wheat flour (which can be used for bread), made with HARD white whole wheat. I grind my own flour in my WonderMill
In Canada (a leading producer of white wheat, BTW), check your health food store, or the internet for organic farm-gate vendors. In BC, you can get organic hard whole wheat flour (they call it "White Whole Wheat, Fresh Fine Grind") from Anita's Organic Mill in Chilliwack, BC. Anita's also sells soft white wheat kernels, to grind your own whole wheat pastry flour, and whole wheat pastry flour, but not the hard white wheat kernel. Here's their "where to buy" page. Their products are excellent!
Before I give you the recipe, I have to tell you what I changed in the original recipe. Steve used King Arthur flour
I weighed all of the ingredients because he gives most of his measurements in grams, but then I measured the weighed-out ingredients in cups and spoons, for those of you (the majority of North American bakers, I suspect) who don't use a scale.
I changed some of the technique, too. A friend popped in when I was putting the dough together, so I was a bit distracted and I just dumped everything (including the poolish starter, or pre-ferment, that I had made the night before) into my Bosch mixer and let it go for 12 minutes on the first setting (the Bosch has a powerful motor, so I rarely put it on the higher settings). My house was warm, so I rose it 50 minutes in the pans instead of 60 (didn't want to risk the bread falling in the oven if I over-rose it). He called for 50 minutes baking at 350 degrees F, but my bread was ready after 30 minutes, so it probably depends on your ingredients and your oven.
It turned out very light in texture and color, almost white (and DH thought a bit too light in texture!), but very tasty and moist.

Anyway, enough said! Here's the recipe!
Printable Recipe
BRYANNA’S VERSION OF 100% WHITE WHOLEWHEAT SANDWICH BREAD
Servings: 26
Yield: 2/ 8x4" loaves
This recipe, an excellent light whole grain loaf, was adapted (veganized, made lower in fat, and simplified) from this recipe.
Poolish (starter or pre-ferment): (make the night before)
1 5/8 cups white whole wheat flour
3/4 cup warm water (185 g)
1 1/4 teaspoon dry active baking yeast
(NOTE: I think I'll only use 1/2 teaspoon dry active baking yeast next time, or 3/8 teaspoon instant yeast.)
Dough:
1 cup + 1 tablespoon warm water (260 g)
1 1/2 teaspoons dry active baking yeast
(NOTE: I think I'll only use 1 teaspoon dry active baking yeast next time, or 3/4 teaspoon instant yeast)
3 1/3 cups white wholewheat flour
all of the Poolish (above) that you made the night before
2 tablespoons soy flour
2 1/4 teaspoons salt (15 g)
2 tablespoons maple syrup
1/4 cup vegan butter (45 g) (such as my homemade palm-oil-free vegan "Buttah")
OPRTIONAL: raw shelled sesame seeds
The night before (I did this just before I went to bed), dissolve the yeast in the warm water for 5 minutes in a medium bowl or container, then stir in the 1 5/8 cup of flour well. (IF YOU USE INSTANT YEAST, just mix everything together—you don’t have to dissolve the yeast.) Cover and let sit in a warm place (about 70ºF) for about 12 hours.
In the morning, dissolve the yeast for the dough in the water for about 5 minutes. (IF YOU USE INSTANT YEAST, just mix it together with the flour in the next step—you don’t have to dissolve the yeast.)
Combine the 31/3 cups flour in a large bowl or the bowl of your stand mixer with the soy flour and salt (and yeast, if you use instant yeast). Whisk the ingredients together well (using the whisk attachment if you are using a stand mixer). Pour the maple syrup into the water/yeast mixture (or just the water if you used instant yeast). Pour this into the flour mixture in the bowl and add the vegan butter, broken into pieces.
If you are using a stand mixer, switch to the kneading attachment, put on the cover and start kneading. I used the #1 setting on my Bosch mixer

With a less powerful mixer, like the inexpensive Kitchen Aid
If you are kneading by hand, mix with a wooden spoon until you can’t stir anymore, then knead in the rest of the flour mixiture and knead the dough for 10 minutes on a clean counter covered with baking parchment (to prevent sticking). Try not to add any extra flour to the dough. (Oil your hands lightly, if necessary.)
Place the dough in a lightly-oiled bowl or container, with room to double, cover with plastic wrap and let rise at about 70ºF for ½ an hour.

After ½ an hour, gently fold the dough over itself, cover and let rise for another ½ hour.

Have ready two 8 x4” pans. (We use the Norpro “dimpled” 4.5"W x 3"D x 8"L loaf pans

Cut the dough into 2 equal pieces (1 ¼ lb. each) and form them into neat loaves. Place them in the pans and press down with your hand to evenly distribute the dough and so that the dough isn’t “humped” in the middle.

Cover and let rise at about 70ºF for 50 minutes or so. Do not over-rise.

After they have risen for about 30 minutes, heat your oven to 350 ºF. Place a shallow baking pan with some hot water in the bottom of the oven while it heats up.
When the oven is hot and the bread has risen, you can make a slash in the top with a very sharp razor blade if you wish, like I did, but you don’t have to.
Spray the tops with water from a spray bottle
Bake for 10 minutes. Remove the pan of water (carefully!) from the bottom of the oven. Bake for 20 more minutes. Mine were done perfectly after 30 minutes.

Remove from pans to racks to cool. Let cool before slicing.
Nutrition Facts
Nutrition (per serving/slice): 105.7 calories; 17% calories from fat; 2.1g total fat; 0.0mg cholesterol; 182.3mg sodium; 66.2mg potassium; 19.0g carbohydrates; 1.4g fiber; 1.0g sugar; 17.5g net carbs; 2.9g protein; 2.0 points.
Enjoy!

Monday, November 23, 2009
IMPROMPTU CHINESE MEAL FOR GUESTS (WITH PHOTOS)
HAPPY THANKSGIVING TO MY AMERICAN FRIENDS! (We Canadians have already had our Thanksgiving-- thus the following non-Thanksgiving-relevant post!) BTW, IF YOU NEED LAST-MINUTE VEGAN THANKSGIVING HELP... Recipe links on this blog.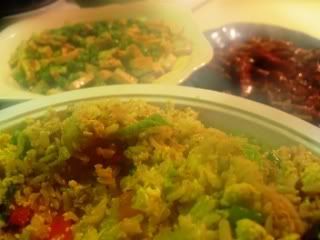
Some steaming hot dishes, ready for the table (photo by Emma-Lena Lezard)
My stepson and his girlfriend Emma-Lena stayed with us for a couple of days and, the first night, I had to plan an impromptu meal. I wanted it to be fun and a little special, because we don't see them very often and Sean always enjoys my cooking. So I searched my refrigerator and quickly planned a Chinese-style meal with 4 dishes. The menu was:
Stir-Fried "Chicken" and Mushrooms in Vegetarian "Oyster" Sauce
(From my Chinese cookbook, except that I used commercial Chinese mock chicken instead of tofu)
Stir-Fried Peas and Tofu
(A simple Cantonese-style dish, also from my Chinese cookbook)
A Broccoli Stir-Fry with red onions, sweet potatoes, and cashews, which I made up on the spot and seasoned with a bottled "Thai Teriyaki Sauce" that someone gave me (Cheating, I know, but it was tasty!)
Fried Rice
(also from my Chinese cookbook, and made with cold cooked brown basmati rice)
I have a small kitchen, and I wanted to be able to sit down and eat with everyone, so I followed my own advice from my cookbook "Authentic Chinese Cuisine for the Contemporary Kitchen":
"A Chinese cook can prepare a six-dish meal in half an hour in a tiny kitchen with no oven. This takes practice, of course, but it is achievable in our modern kitchens. The Chinese cook will stir-fry or deep-fry some of the dishes in turn, transferring the finished dish to a heated serving plate with a cover while the next dish is completed (stir-frying and deep-frying, when all of the ingredients are prepared ahead of time, take only minutes).
However, if the thought of all this last-minute cooking makes you nervous and will keep you from your guests, you must chose your dishes with care and prepare as many things ahead of time as you can. Have all the vegetables chopped and all the cooking sauces mixed."
For a meal like this, I like to do what I do for a cooking class and gather the ingredients for each recipe on a separate tray or cookie sheet, so that I don't mix anything up! (This is what is referred to in cook's parlance as "mise en place", [pronounced [MEEZ ahn plahs], which is a French term referring to having all the ingredients necessary for a dish prepared and ready to combine up to the point of cooking.) I thought it might be instructive for those of you who haven't attempted several Chinese-style dishes in one meal to see this. Here are photos of the mise en place for each dish, and then the finished dish:
Stir-Fried "Chicken" and Mushrooms in Vegetarian "Oyster" Sauce, and the finished dish:

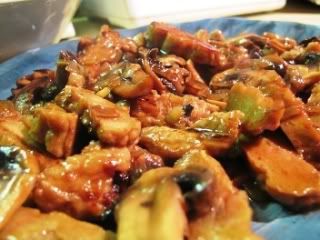
Photo by Emma-Lena Lezard
Stir-Fried Peas and Tofu, and the finished dish:
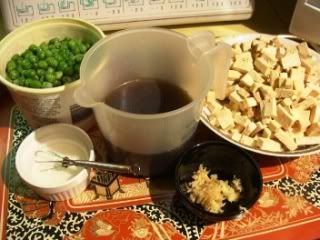

Photo by Emma-Lena Lezard
Broccoli Stir-Fry and the finished dish:
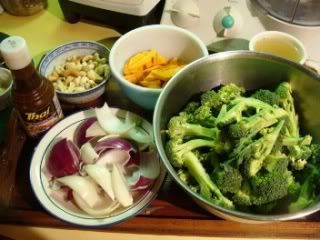
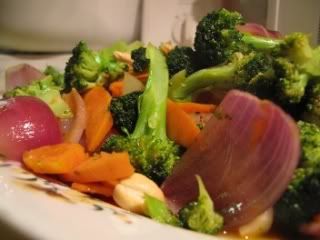
Photo by Emma-Lena Lezard
Fried Rice (with scrambled tofu instead of egg), and the finished dish:
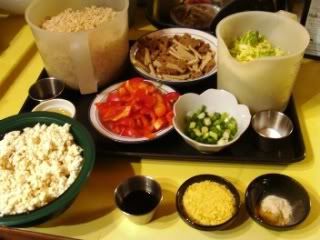
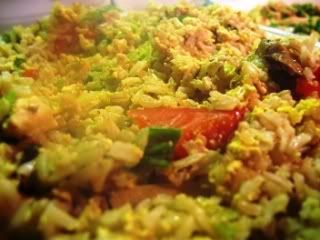
Photo by Emma-Lena Lezard
The cooking went quickly and smoothly, and the dinner, I'm happy to say, was much enjoyed. We had leftover Fried Rice for lunch the next day! (And, BTW, it is much easier to keep your kitchen clean when you use mise en place, especially with rapid-fire cooking like stir-fries. You can wipe up after chopping, put everything away, clean dirty utensils, etc., before you begin the actual cooking. If you don't do this, your kitchen will look like a bomb hit it and you will be frazzled from trying to locate the soy sauce, or a measuring spoon, at the crucial moment!)
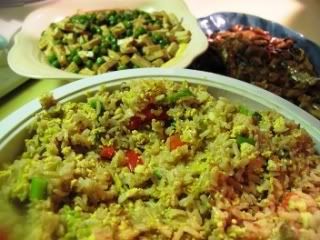
Photo by Emma-Lena Lezard
Enjoy!

Thursday, November 19, 2009
CRAVING VEGAN "SEAFOOD": A QUICK, EASY & SUCCULENT ALMOND MOCK "SHRIMP" CURRY

DH was at work when I had lunch today and I decided to indulge a craving for vegan "seafood" while he wasn't here. Don't misunderstand me-- I wasn't sneaking any goodies while he was slaving away in the bakery! He never liked seafood, even as an omni, and he still hates anything remotely "fishy" (even seaweed!)! But he very kindly brought me a small bag of frozen Chinese mock "shrimp" from West Best Vegetarian store in Vancouver (4934 Victoria Drive, Vancouver, 604-323-2362) when he was over there earlier this month. (They sell Chinese vegetarian "mock meats", etc.. I have since discovered that our favorite Asian store in Nanaimo, Man Lee, now sells mock "shrimp" and some other frozen "mock meats", and they also now have 2 locations, one in the Terminal Mall, and one just across Applecross Road from Costco.)
NOTE ON FINDING MOCK "SHRIMP" OR "PRAWNS": 2 online vendors are Vegieworld.com and Vegecyber. Many Asian markets and some health food stores carry these products in their freezer section.
So today, yet another soaking wet, windy November day (we had no power for a day-- it went on again this morning), I decided to treat myself for lunch and made the following simple Indian-style curry. Mmmmmmm! It would make a good company meal with a vegetable dish to accompany it. And it's low in WW Points, too!

Printable Recipe
BRYANNA'S VEGAN ALMOND MOCK "SHRIMP" CURRY
Servings: 4
This is deceptively fast and easy to make.
Tofu Creme:
1/2 cup extra-firm silken tofu
1/2 cup nondairy milk
Curry:
1 tablespoon olive or peanut oil
1/4 cup ground almonds (if you grind them yourself, use a dry electric coffee/spice grinder)
4 large cloves garlic, minced or crushed
1 large tomato, chopped small, or about 3/4 cup drained, chopped good-quality canned tomatoes
1 teaspoon sugar
1/2 teaspoon cayenne pepper
1/2 teaspoon salt
1/2 teaspoon garam masala or good curry powder
9 1/2 oz Chinese vegan mock "shrimp" or "prawns" thawed (approximately 32) (see Note above recipe)
Garnish:
chopped fresh cilantro or dried cilantro (use about 1/3 as much dried cilantro as you would fresh)
OR you can use fresh parsley instead, if you wish
Blend the tofu and nondairy milk together in a blender, food processor, or with a hand/immersion blender until smooth. Set aside.
Heat the oil in a large nonstick skillet over medium-high heat Add the almonds and stir until the they turn golden-- quickly add the garlic and stir briefly. DO NOT BROWN!
Add the tomato, sugar, cayenne, salt and garam masala. Cook for a few minutes, scraping the pan so the mixture doesn't stick, until the tomatoes soften a but. (Add a bit of water if necessary, but not too much.) Add the mock "shrimp" and then the Tofu Creme. Stir briefly. Lower the heat a little and stir-cook just to heat the shrimp and until the sauce is creamy. The sauce will be thick-ish, and not too wet. There is not a lot of sauce in this recipe and most of it will cling to the "shrimp".
Serve over steamed brown basmati rice, garnished with cilantro or parsley.
Nutrition Facts
Nutrition (per serving): 179.4 calories; 37% calories from fat; 7.8g total fat; 0.0mg cholesterol; 393.0mg sodium; 256.3mg potassium; 10.9g carbohydrates; 1.6g fiber; 3.7g sugar; 9.3g net carbs; 18.5g protein; 3.9 points.
Enjoy!

Sunday, November 15, 2009
COMFORT FOOD DESSERT: VEGAN STICKY TOFFEE PUDDING CAKE


It's been a blustery, soaking-wet few days here on the BC coast, and the other evening we just felt like something hot, gooey and sweet. We decided to use up a few Weight Watcher's points on the following treat, which is a quick and easy, low-fat and vegan version of a popular British dessert, Sticky Toffee Pudding. (I have made a vegan version of that traditional dessert, which is very good but requires more time and steps. The recipe is in my new book "World Vegan Feast")
BRYANNA'S QUICK AND EASY "STICKY TOFFEE PUDDING" CAKE
Servings: 6
Dry Mix:
1 1/4 cups wholewheat or white pastry flour

Mix the boiling water and Earth Balance together. Pour gently over the cake batter and sugar, dribbling it evenly over the batter, not pouring it all into one spot. DON'T MIX THE WATER IN! It looks like a swamp, but, trust me this will be fine!

Bake 35 minutes. The cake will be on top, with a sticky "toffee" sauce on the bottom. Serve warm (maybe with your favorite vegan vanilla "ice cream"??).
VARIATION: For Praline Pudding Cake, omit the dates and use the optional 1/2 cup chopped pecans instead.
Nutrition Facts without pecans:
Nutrition (per serving): 325.8 calories; 7% calories from fat; 2.6g total fat; 0.0mg cholesterol; 133.2mg sodium; 591.1mg potassium; 75.2g carbohydrates; 5.0g fiber; 53.1g sugar; 70.3g net carbs; 4.7g protein; 5.9 points.
Nutrition Facts made with pecans:
Nutrition (per serving): 388.6 calories; 20% calories from fat; 9.2g total fat; 0.0mg cholesterol; 133.2mg sodium; 628.3mg potassium; 76.5g carbohydrates; 5.9g fiber; 53.5g sugar; 70.6g net carbs; 5.6g protein; 7.7 points.

Enjoy!

This version is based on the North American pudding cake, which starts with a thickish batter, over which you sprinkle sugar and then pour hot liquid over the whole thing. After baking, you are left with a light cake floating on top of a gooey sauce. This recipe is not meant to replace the authentic British Sticky Toffee Pudding!
When I first made a pudding cake for DH, he called it Pouding au Chomeur. He’s from Quebec and he said it was a very common everyday dessert and the name translated to "Unemployment Pudding”. Evidently it appeared in many permutations all over North America during the Great Depression of the 1930's-- presumably because it required only inexpensive ingredients and no eggs or even milk. I’ve also heard it called Poor Man’s Pudding, Depression Cake and Depression Pudding. I have a version of the Quebec recipe in my new book "World Vegan Feast".
When I first made a pudding cake for DH, he called it Pouding au Chomeur. He’s from Quebec and he said it was a very common everyday dessert and the name translated to "Unemployment Pudding”. Evidently it appeared in many permutations all over North America during the Great Depression of the 1930's-- presumably because it required only inexpensive ingredients and no eggs or even milk. I’ve also heard it called Poor Man’s Pudding, Depression Cake and Depression Pudding. I have a version of the Quebec recipe in my new book "World Vegan Feast".
Whatever you call it, it’s a great dessert for vegans because of being made without eggs, and you can use water or any non-dairy milk for the liquid in the cake batter. It’s also a great vehicle for experimentation-- witness this version.

BRYANNA'S QUICK AND EASY "STICKY TOFFEE PUDDING" CAKE
Servings: 6
Dry Mix:
1 1/4 cups wholewheat or white pastry flour
(do not use regular wholewheat or unbleached flour or the cake may be tough)
NOTE: Or use your favorite gluten-free and/or low-glycemic flour mix.
1/3 cup brown sugar
2 teaspoons baking powder
1/4 teaspoon salt
Additional:
3/4 cup chopped pitted dates
Optional:
1/2 cup chopped pecans (this isn't traditional, but it's good!)
Wet Mix:
3/4 cup non-dairy milk
1 tsp pure vanilla extract
Topping that turns into Sauce:
3/4 cup brown sugar
1 1/2 cups boiling water
1 tablespoon Earth Balance
Preheat oven to 350 degrees F. Spray an 8" square pan with oil from a pump sprayer
 .
.
Whisk together Dry Mix ingredients in a medium bowl. Add the chopped dates and optional pecans, if you are using them. Mix them in with your fingers so that the dates don't clump up all together.
Whisk together the Wet Mix ingredients in a smaller bowl. Pour the Wet Mix into the Dry Mix and stir briefly just to mix into a batter. Spread into the prepared pan.

Sprinkle the brown sugar evenly on top of the cake batter.
NOTE: Or use your favorite gluten-free and/or low-glycemic flour mix.
1/3 cup brown sugar
2 teaspoons baking powder
1/4 teaspoon salt
Additional:
3/4 cup chopped pitted dates
Optional:
1/2 cup chopped pecans (this isn't traditional, but it's good!)
Wet Mix:
3/4 cup non-dairy milk
1 tsp pure vanilla extract
Topping that turns into Sauce:
3/4 cup brown sugar
1 1/2 cups boiling water
1 tablespoon Earth Balance
Preheat oven to 350 degrees F. Spray an 8" square pan
Whisk together Dry Mix ingredients in a medium bowl. Add the chopped dates and optional pecans, if you are using them. Mix them in with your fingers so that the dates don't clump up all together.
Whisk together the Wet Mix ingredients in a smaller bowl. Pour the Wet Mix into the Dry Mix and stir briefly just to mix into a batter. Spread into the prepared pan.
Sprinkle the brown sugar evenly on top of the cake batter.
Mix the boiling water and Earth Balance together. Pour gently over the cake batter and sugar, dribbling it evenly over the batter, not pouring it all into one spot. DON'T MIX THE WATER IN! It looks like a swamp, but, trust me this will be fine!
Bake 35 minutes. The cake will be on top, with a sticky "toffee" sauce on the bottom. Serve warm (maybe with your favorite vegan vanilla "ice cream"??).
VARIATION: For Praline Pudding Cake, omit the dates and use the optional 1/2 cup chopped pecans instead.
Nutrition Facts without pecans:
Nutrition (per serving): 325.8 calories; 7% calories from fat; 2.6g total fat; 0.0mg cholesterol; 133.2mg sodium; 591.1mg potassium; 75.2g carbohydrates; 5.0g fiber; 53.1g sugar; 70.3g net carbs; 4.7g protein; 5.9 points.
Nutrition Facts made with pecans:
Nutrition (per serving): 388.6 calories; 20% calories from fat; 9.2g total fat; 0.0mg cholesterol; 133.2mg sodium; 628.3mg potassium; 76.5g carbohydrates; 5.9g fiber; 53.5g sugar; 70.6g net carbs; 5.6g protein; 7.7 points.
Enjoy!
Subscribe to:
Posts (Atom)