Showing posts with label umami. Show all posts
Showing posts with label umami. Show all posts
Monday, March 28, 2011
THE FLAVOR-BOOSTING QUALITIES OF ROASTED & BROILED VEGGIES-- A QUICK ONION SOUP AND TOMATO/ONION PASTA

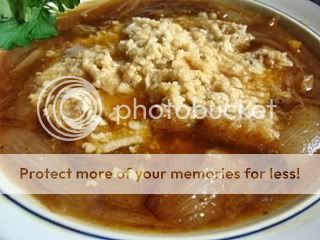
I've said before that I read all kinds of cookbooks, not just vegetarian or vegan ones. Lately, I've been perusing a couple of books by the great British chef and author, Nigel Slater
 . He's not a vegetarian, but he does plenty of tasty and imaginative (but simple) things with vegetables and legumes. He's known for his uncomplicated, even fast, recipes.
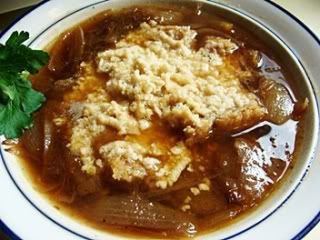
The roasted onion soup recipe caught my eye because I love onion soup, but I don't always have time to caramelize onions, nor do I always have pre-cooked caramelized onions in the freezer. I tried it, with a few changes (noted below)-- it's a winner, rich in flavor and satisfying. "Why didn't I think of this?" kept running through my head!
The methods of roasting, grilling and broiling all bring out the natural sweetness of vegetables and intensify their natural flavors. I even enjoy turnips and rutabagas when they are roasted-- and they are not usually my favorite vegetables! So it makes sense to incorporate roasted and broiled vegetables (I actually find these methods less of a hassle than grilling!) into recipes where you might usually use a stove top method. Browning foods produces umami compounds, which create a "flavor explosion"!
Notice that the roasted onions in the soup recipe are cooked in white wine until the wine reduces almost to nothing. This further increases the flavor. Why? To quote from a past blog post on "synergizing umami": "When you splash some wine into the pan to scrape up the browned bits, you are not only getting the flavors of the wine and the caramelized bits (double umami—8 times the flavor!), but you are also releasing some extra flavors that only alcohol can extract! How neat is that?"
Printable Recipe
VEGAN ROASTED ONION SOUP
Serves 4
Adapted from a brilliant idea/recipe from the great Nigel Slater. I'll make onion soup far more often this way, since it eliminates the time and careful watching of caramelizing onions! The roasting renders the onions every bit as sweet and tender, with a little bit of a “smokey” edge. (My Changes: I cut down on the fat a bit; cut the onions into smaller pieces before roasting; used a whole grain sourdough bread for "croutons" instead of grilled French bread slices; and of course used a vegan broth and vegan cheeses.)
. I'll make onion soup far more often this way, since it eliminates the time and careful watching of caramelizing onions! The roasting renders the onions every bit as sweet and tender, with a little bit of a “smokey” edge. (My Changes: I cut down on the fat a bit; cut the onions into smaller pieces before roasting; used a whole grain sourdough bread for "croutons" instead of grilled French bread slices; and of course used a vegan broth and vegan cheeses.)
4 medium yellow onions, peeled and cut into quarters
2 tablespoons melted Earth Balance (non-hydrogenated vegan margarine) or olive oil
3/4 cup white vermouth or dry white wine (he said "a glass" and this was my interpretation)
6 1/4 cups (1.5 L) dark, rich-tasting vegetarian broth (I used Better Than Bouillon No Beef Broth Paste)
Paste)
(Alternative broth —a homemade brown vegetable stock made with roasted vegetables)
salt and freshly-ground black pepper
Garnish:
cubes of toasted whole grain sourdough bread (a handful per bowl—you’ll need about 3 thickish slices)
grated white vegan cheese (such as Daiya)—about 5 ounces
OPTIONAL: vegan parmesan
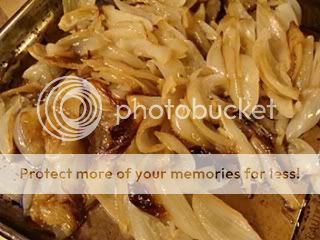
Preheat the oven to 400°F. Spread the onions on a cookie sheet or baking pan and toss with the melted Earth Balance or olive oil. Sprinkle with salt. Bake the onions until the are tender and browned in places. I turned them over when the bottoms started to brown and I separated the layers after a bit, too. This takes about half an hour, but you don't have to stir or watch carefully.
When the onions are done to your satisfaction, cut them into thinner pieces (they don't have to be really thin or even all the same!). Scrape them into a soup pot and add the wine. Bring to a boil and the wine is almost reduced to nothing.
Pour in the broth it and bring to a boil. Turn the heat down and simmer the soup, covered, for about 20 minutes. Taste for salt and pepper.
To serve, ladle the soup into heat-proof bowl and add a fistful of toasted sourdough bread cubes to the top of each bowl. Sprinkle liberally with the cheese (both, if you like) and place the bowls on a cookie sheet and place under a broiler for a minute to melt the cheese. (Or, you can microwave each bowl separately for 30 seconds or so.) Enjoy!
Nutrition Facts
Nutrition (per serving): 340.3 calories; 45% calories from fat; 17.5g total fat; 0.0mg cholesterol; 1216.7mg sodium; 320.2mg potassium; 34.9g carbohydrates; 6.3g fiber; 8.1g sugar; 28.5g net carbs; 6.9g protein; 7.5 points.
*************************************************************
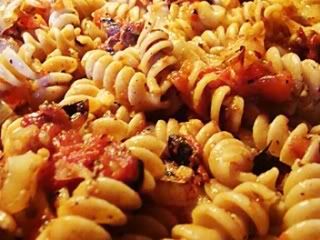
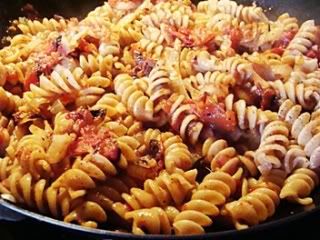
I wouldn't normally use fresh tomatoes at this time of year, but my brother-in-law brought some when he and my sister and my niece visited last week, and I needed to use them up. This is my version of another Nigel Slater recipe.
BROILED ROMA TOMATO AND ONION FUSILLI
Serves 4
Another brilliant idea from the great British cookbook author/chef, Nigel Slater . So simple and tasty! He broiled his veggies separately-- I did them together. He used thyme-- you can use whatever herb you enjoy. I probably used less oil than he would have, judging by his other recipes, and I cut the onions into thinner slices.
. So simple and tasty! He broiled his veggies separately-- I did them together. He used thyme-- you can use whatever herb you enjoy. I probably used less oil than he would have, judging by his other recipes, and I cut the onions into thinner slices.
6 large ripe Roma tomatoes
1 tablespoon fresh herbs-- you can use basil, thyme, oregano, marjoram, or whatever you like (use 1 teaspoon dried if you have no fresh.)
2 tablespoons extra-virgin olive oil
2 medium yellow onions, sliced about 1/4" thick
2 large cloves garlic, minced
10 ounces fusilli  (or rotini
  or gemelli
 ) (you can use a gluten-free pasta, if you wish)
(or rotini or gemelli) (you can use a gluten-free pasta, if you wish)
salt and freshly-ground pepper
vegan parmesan
Cut the tomatoes in half lengthwise and then in 8 chunks. Place them cut-side-down on a baking sheet with sides, leaving room between the chunks. Sprinkle the onions and garlic and herbs in between the tomatoes. Drizzle with the olive oil and sprinkle with salt. Grind plenty of pepper on top. Place the pan under the broiler, about 3-4 inches below the heat source (depending on how hot your broiler element is-- you don't want to burn the vegetables before they are softened!).
While the vegetables broil, boil the pasta in a large pot of salted water for 10 minutes. Check on the vegetables every few minutes and turn them once in a while. The skins of the tomatoes should be blackened at least a bit and the tomatoes should be juicy and soft. The onions should be soft-ish and browned in places, too. Cut the tomatoes up a bit more with a knfe and fork and mix them up with the onions and juices.
Drain the pasta (save a bit of the cooking water) and add back to the pot. Add the broiled mixture and more salt and pepper to taste, if necessary. If the mixture seems too dry, add a bit of the pasta cooking water. Serve with plenty of vegan parmesan.
Nutrition Facts
Nutrition (per serving): 384.7 calories; 18% calories from fat; 8.3g total fat; 0.0mg cholesterol; 21.6mg sodium; 894.3mg potassium; 70.8g carbohydrates; 4.2g fiber; 9.8g sugar; 66.7g net carbs; 13.5g protein; 7.6 points.
Enjoy!

Enjoy!


Saturday, March 6, 2010
FOUR FOOD BOOKS FOR CURIOUS COOKS

I have to confess that I don't have much to blog about this week. It has been a week of dealing with family stuff and not eating anything very exciting! So, I thought I would write a little about some food books I like. I say "food books" because one is about food and cooking, but is not a cookbook, and the others, while cookbooks, have more to offer than simply recipes. From time to time I will blog about a few books on my personal shelves. Here's the first installment:
These are books that I own. (Well, one is on the way-- I'm still using a library copy until the one I bought gets here!) They aren't vegan books (one is pretty much vegetarian), but they are extremely useful to vegan cooks with inquiring minds.

1.)The first one is actually two books in one-- a newer (2001), bound edition of 2 of my favorite books, The Book of Tofu and Miso
 by William Shurtleff and Akiko Aoyagi, put out by Ten Speed Press. I still have the original books, The Book of Tofu
 (Autumn Press, 1975), and The Book of Miso
 (Autumn Press, 1976). Here are my dilapidated copies of these books:
I bought these books before I was even a vegetarian, never-mind a vegan. We were living in Northern BC in a log cabin with no running water or electricity (these were the homesteading days!). Even though we ate meat, I was very interested in soyfoods and seitan. These books, delightfully illustrated by Akiko Aoyagi, provided information about these essential Japanese foods, and their counterpart soyfoods in other parts of Asia. They teach you how to make these foods, as well, and then how to enjoy them in delicious recipes, some Asian and some Western-style. I consider them essential books.
I stumbled upon this newer, bound version, in excellent condition, in a 2nd-hand bookshop in Nanaimo, BC. At $14, it was a steal. It contains more historical research about miso, as well as more on its nutritional value, biochemistry, production, recipes, etc.. There is much more in this edition about Chinese, Korean and Indonesian miso-like preparations. If you find one, buy it!
"William Shurtleff and Akiko Aoyagi spent their formative years on opposite sides of the Pacific, in California and Tokyo respectively. Bill and Akiko began collaborating in 1972, doing research and writing books about soyfoods. They worked together for six years in East Asia, mainly in Japan, studying with top soyfoods researchers, manufacturers, nutritionists, historians, and cooks. William is currently the director of the SoyInfo Center, which he and Akiko founded in 1976 (as the Soyfoods center), and lives in Lafayette, California. A freelance illustrator and graphic designer, Akiko lives and owns her own art business in Walnut Creek, California." Source

2.) The second book is a large tome, the Completely Revised and Updated edition of Harold Mcgee's On Food and Cooking: The Science and Lore of the Kitchen
 (Scribner, 2004). You can ignore all the non-vegan stuff, if you like, but I think it is informative when you are trying to "veganize" recipes, to learn how the animal food that you are supplanting with plant foods works, so that you have a better idea of what to use in its stead. The detailed information about how different starches work is extremely helpful for vegans trying to figure out how to make foods without eggs. There are also great sections on fruits and vegetables, grains (read the section on different types of rice!), flavorings, nuts, different types of batters and doughs, sauces, sugars and chocolate, wine, beer and distilled spirits... There is also a chapter on cooking methods and utensil materials, and the "Four Basic Food Molecules"-- water, fats and oils, carbohydrates, and proteins. For the scientifically-inclined (or perhaps for people like me, who were never very interested in science in school!), there is a "Chemistry Primer".
This may all sound ho-hum, but it is actually very fascinating. You can just pick up the book, open it anywhere, and learn a great deal!
The author, Harold McGee, is an authority on the chemistry of foods and cooking and maintains a website with some interesting articles.

3.) The 3rd book is the one I'm waiting for so that I can take the library copy back! I found a 2nd hand copy on amazon.ca for an excellent price. I have taken it out of the library several times, so I figured that I should own it! The Fifth Taste: Cooking with Umami
 by David and Anna Kasabian (Random House, 2005). It's a small book, and most of the recipes are not vegetarian, but the clear explanations of the how umami, "the fifth taste" was "discovered", why taste and flavor are not the same thing, theories about why umami compounds exist in foods that humans eat, how to find it and how to use it, etc., are both fascinating and essential to creating vegan recipes that fairly vibrate with flavor! At first, it may seem that they talk alot about fermented fish sauce, etc., but just think "naturally-fermented soy sauce" or "miso" whenever that is mentioned! They have similar qualities! (PS: Back in 2006 I wrote this article about umami for vegan cooking. Here's another post I wrote about umami, and this one discusses umami in bread making; this one discusses umami in roasted vegetables; and this one shows how you can substitute miso for anchovies or anchovy paste-- both contain plenty of umami compounds.)
Here's an excerpt from their intro: "Umami has always been there, we have always enjoyed it, we have even craved it, ever since humankind started to eat. Yet we, as Westerners anyway, just didn’t know what it was – let alone what to call it – until recently. Turns out that umami taste is one reason we adore tomatoes, corn,... mushrooms, ... and many other foods spanning cuisines of every culture on earth. These are all foods rich in umami taste. But, as much as umami might take credit for the enjoyment of a particular food, it is just one of many reasons we take pleasure in it. The others include the balance among the other four tastes, the food’s aroma, mouth feel and appearance, and even the sound it makes when you eat it. We’ll investigate these in more detail later..."
Intriguing? Yes, indeed!
The recipes in the book are from a number of famous chefs. Some of the recipes are vegetarian or even vegan, or could be veganized, and some make interesting use of soyfoods.
David Kasabian is a chef and food writer, and Anna Kasabian has written several books and is a regular contributor to Yankee and Coastal Living magazines. She has written extensively for other national and regional publications, including Cooks' Illustrated, Country Living and the Boston Globe. They are husband and wife, business partners and frequent collaborators.

4.) The last book I'm going to talk about is a little book on chocolate that I got out of the library last year and really enjoyed, so I bought it-- Enlightened Chocolate:
 More Than 150 Decadently Light, Easy-to-Make, and Inspired Recipes Using Dark Chocolate and Unsweetened Cocoa Powder, by Camilla V. Saulsbury (Cumberland House, 2007).
 The author is a fitness trainer as well as a cook, so her recipes are "light". I liked her writing and I liked her emphasis on less fat and calories, but maximum flavor. It's a low-fat cookbook that could make a naturally thin person salivate!
The book includes both savory and sweet chocolate recipes, which intrigued me. I love savory recipes with chocolate in them and she includes quite a few from all over the world. A few examples are "Moroccan Chickpea Soup", "Ultimate Black Bean Soup", "Exotic, Spiced Pumpkin Soup", "Braised Mahogany Tofu", "Spanish Black Bean Burgers", and a number of other bean and vegetable recipes. All are essentially vegetarian-- you only need to substitute a good vegetarian broth for the meat or chicken broth.
The publicity for the book reads: "The first compendium cookbook ever that is exclusively devoted to light chocolate recipes using antioxidant-rich dark chocolate and cocoa powder...
In addition, "Enlightened Chocolate" provides a brief history of chocolate as "medicine," as well as easy-to-follow explanations (in lay terms) of the most current scientific information regarding the health benefits of chocolate and cocoa. The role of chocolate flavonols in the promotion of cardiovascular health is elucidated, as is how to select and store chocolate and cocoa powder for maximum flavor and maximum health benefits. Includes 30 small color photographs."
Camilla Saulsbury is a freelance food writer, fitness trainer, recipe developer, and cooking instructor. She has written 10 cookbooks, mostly on baking, and her articles have appeared in many magazines, including this prize-winning couscous recipe in Vegetarian Times.
Last night, DH and I had a chocolate craving and all I had in the house was unsweetened cocoa powder, so I made her version of what we always called "Hot Rods"-- "Chocolate-Oatmeal No-Bakes":

They look like chocolate truffles, don't they?
No peanut butter in these, and very intensely chocolaty! Yum!
Enjoy!

Monday, October 1, 2007
SYNERGIZING UMAMI-- COOKING WITH WINE AND HOW TO MAKE VEGAN FLAVOR EXPLODE!

photo by John Kelly
I was making a quick saute for dinner the other night with my crispy Marinated tofu (Breast of Tofu) and a simple sauce of sauteed chanterelle mushrooms, garlic, herbs, broth, and dry white wine, when it entered my mind that many vegan recipes I see don't utilize wine. Interesting, I thought-- I use it all the time! I thought about this more while I enjoyed the dish with some orzo pilaf-- full-bodied and absolutely smashingly delicious in spite of its simplicity.
I lived in a winery in central California from age four to eleven. My mother had unlimited amounts of excellent wine to cook with, so I developed a taste for the rich flavor that wine lends to food. Later, when I became a vegan, I realized that wine was a powerful flavor enhancer, giving many meatless dishes a character and body that they lacked without it. But I didn’t know why that was so.
I used to think that it was perhaps the fruity flavor and the acidity of wine that worked the magic. But it’s more than that. It's the "fifth flavor"-- umami. (Read all about it here. And about recent umami discoveries further down.) Wine contains umami compounds because it is a fermented substance, and umami is a flavor enhancer. But, beyond umami, wine contains alcohol, and alcohol is a powerful flavor extractor. Some flavor components dissolve in water, and others in fat. But alcohol dissolves not only water-soluble and fat-soluble flavors, but also flavors that dissolve in neither water nor fat.
This capacity is a wonderful boon to low-fat cooks, because, without it, we lose the fat-soluble flavors (which is why fat-free foods often taste boring). No wonder I reach for a wine bottle when a dish is missing that special something!
When you splash some wine into the pan to scrape up the browned bits, you are not only getting the flavors of the wine and the caramelized bits (double umami—8 times the flavor!), but you are also releasing some extra flavors that only alcohol can extract! How neat is that?
What about when the alcohol boils off? Well, take the case of the famous pasta sauce made with tomatoes and vodka. This liquor is rather tasteless, but it does contain a lot of alcohol. The alcohol probably releases some flavor component in the tomatoes (more umami compounds), which releases into the sauce. Then it doesn’t matter if most of it boils off.
Worried about alcohol in your food? I have to tell you that I am not a drinker! I have a very low capacity for alcohol (1 glass of wine is about my limit)-- it makes me sleepy. I have never been drunk, I confess it! And this is in spite of the fact that my mother's California-French-Italian fusion cooking almost always contained wine! We even had sherry in our creamed tuna on toast (a favorite dish in the 1950's-- I'm dating myself...oh, well!). So, obviously, this didn't turn me into a wino!
The rate of alcohol evaporation depends on several factors: the intensity of heat; the length of cooking time; the pot or pan (greater surface area exposed means greater evaporation— for instance, the same dish cooked in a 10-inch skillet will retain more alcohol than that cooked in a 12-inch skillet); exposure to air; other ingredients in the recipe (breadcrumbs, for example, may absorb alcohol and protect it from the heat); and the stage at which the alcohol is added during cooking. In most cases, some alcohol is retained in the dish. Flambéing removes about 25% of the alcohol; simmering on a stovetop for 1/2 an hour evaporates about 65%; 2 and 1/2 hours of simmering removes about 95%.

photo by John Kelly
MORE ABOUT UMAMI IN WINE AND OTHER PLANT FOODS:
Since I wrote the article I linked to above, there has been a lot more research on umami. We get umami compounds (which means “delicious” combined with “essence”, and is used in Japan to describe a food that reaches a state of perfection) in many food-born substances.
From the 1950’s on, umami-triggering nucleotides have been found. In 1998, two leading Japanese researchers, Yamaguchi and Ninomiya, published a list of 39 substances they believed to trigger umami, including amino acids, ibotenic and tricolomic acids, succinic acid, theanine, and an octopeptide (compound of 8 amino acids).
Dr. Shintaro Kodama was the first researcher to discover a quality called synergy in some nucleotides, which dramatically intensified the qualities of umami compounds, thus explaining the “flavor explosion” I mentioned in the article. And we know now that browning protein-rich foods, such as a golden-brown crust on bread, or the aging of wine or vinegar, the brewing of beer, the reducing of stock, the fermenting of a bread starter, etc., etc., produce hundreds of compounds that enhance umami even further, producing complex tastes and aromas. Aged wines, sake and distilled spirits develop more umami compounds and can contribute more than flavor to foods—they contribute balance and enhancement of other flavors.
Some plant foods that are rich in free amino acids and have lots of umami taste when raw are: sea vegetables, corn, peas, tomatoes, mature potatoes, bell peppers, winter squash, nuts and seeds. Other plant foods benefit from cooking or fermenting (such as making cabbage into sauerkraut, or pickling vegetables), which increases the umami taste, or can be paired with stronger umami foods, such as a salad dressing. Soy foods increase in umami taste when they are roasted, cooked, or fermented, because they are one of the most protein-rich foods around. Soy sauce, roasted soy beans, miso and, various other fermented Asian bean pastes, and fermented tofu deliver a great umami punch even when used in small amounts.
Mushrooms and fungi are a great source of synergizing umami, and, generally speaking, the darker the color, the more umami. Dried mushrooms pack an even greater punch. Yeasts (both active and non-active nutritional yeast and yeast extract, such as Marmite), which is also a fungi (and includes sourdough, a natural yeast), have umami compounds. They also act as synergizers. For instance, in a live yeast or sourdough starter, the enzymic action develops the umami in wheat flour to “ripen” the dough and develop its flavor.
I'm sure that there will be more discoveries to come! In the meantime, we can use this knowledge to expandf the flavor possibilities of vegan foods! (Can you tell I get excited about this?)
SUBSTITUTES:
Absolutely can't use wine or other alcohol, even in cooking? I would recommend using a non-alcoholic wine, because it is fermented before the alcohol is removed. It won't have the flavor-releasing qualities of alcohol, but it will contain umami compounds. See http://nypost.com/2015/01/10/non-alcoholic-beer-and-wine-are-hot-but-do-they-taste-good/ But you'll have to contact the manufacturer to find out if any animal products are used in the wine-making process. http://nypost.com/2015/01/10/non-alcoholic-beer-and-wine-are-hot-but-do-they-taste-good/
VEGAN WINE?
For brands, check out http://www.barnivore.com/wine, "Your vegan wine, beer, and liquor guide"

I made this soup for lunch today in a big hurry. It combines umami compounds in mushrooms, bouillon, and white wine for a delicious meal!
Printable Recipe
BRYANNA'S CREAMY POTATO, MUSHROOM AND SPINACH BISQUE (WW CORE PLAN-COMPATIBLE)
Servings: 4
This is something I created on the spur of the moment with things I needed to use up, and I needed lunch FAST. It's delicious with wholewheat sourdough toast. The mushroom broth and wine make this quick soup very flavorful.
2 tsp olive oil
1 medium onion, chopped
2 cloves garlic, chopped
2 cups chopped cremini or portobello mushrooms (scrape the gills out of portobellos with the side of a spoon)
1/2 cup dry white wine (can be non-alcoholic) OR white vermouth
1 cup homemade mushroom broth OR use vegetarian bouillon with 1/2 Tbs. Pistol River Porcini Mushroom Powder added
2 cups non-dairy milk (use a nice, creamy one, or use half non-dairy milk and half vegan creamer)
1 tsp salt
1/2 tsp dried thyme
freshly-ground black pepper to taste
1/3 to 1/2 cup mashed potato flakes (You can buy organic vegan flakes in some HF stores, or from amazon or veganessentials.com [which ships to Canada at a reasonable price].) (1/2 cup makes quite a thick soup) OR, if you have no potato flakes, use 1/2 to 3/4 cup plain mashed potatoes
1/4 cup squeezed, thawed frozen or cooked, chopped spinach OR chard
(I had some home-cooked spinach in the freezer that I used, so I can't tell you how many ounces it was raw, unfortunately. I measured it squeezed quite dry.)
In a small soup pot, heat the oil, and then add the onions and garlic. Stir-fry until the onion starts to soften, and add the mushrooms.
Stir-fry briefly, then add half of the wine and let it cook off. Add the remaining wine, thyme, salt and pepper. Stir in the soymilk, and then the potato flakes, the smaller amount first. Remember that this soup will thicken as it stands. Stir in the spinach, heat through, and serve immediately.
Nutrition Facts
Nutrition (per serving): 118.3 calories; 25% calories from fat; 3.6g total fat; 0.0mg cholesterol; 552.9mg sodium; 450.4mg potassium; 13.1g carbohydrates; 2.3g fiber; 5.3g sugar; 10.8g net carbs; 5.6g protein; 2.2 points.
Salud!

Sunday, January 28, 2007
GORGEOUS, HOLEY, CRUNCHY-CRUST NO-KNEAD BREAD!

I'm sure many of you have read all the posts buzzing around late last year about the amazing no-knead bread recipe (often called "pot bread" now!) posted in Mark Bittman's "Minimalist" food column in the NY Times. Well, I belatedly tried it yesterday. (I've been doing the WW Core Plan, so not baking bread very often-- I'm going off it for a few days as I'm in a bread-baking mood!) I was intrigued not only by the success of this very simple, and seemingly resilient, recipe, but by the promise of amost no labor, good flavor, large holes like a real European brick-oven bread, and a super-crispy crust. Crumbs all over the place!
Sounds too good to be true, but many, many bloggers and posters had great success with it, even using slightly different amounts of water, and salt, and a variety of cooking vessels. The science behind it-- Harold McGee author of “On Food and Cooking” (Scribner, 2004-- a book I have on my personal shelf!), says: “It makes sense. The long, slow rise does over hours what intensive kneading does in minutes: it brings the gluten molecules into side-by-side alignment to maximize their opportunity to bind to each other and produce a strong, elastic network. The wetness of the dough is an important piece of this because the gluten molecules are more mobile in a high proportion of water, and so can move into alignment easier and faster than if the dough were stiff.” As well, the long rise produces umami flavor compounds which give the bread outstanding flavor.
In addition to this, the baking in a heavy, covered pot acts like a miniature brick oven, creating steam inside to help the crust get crispy.
So, I started the bread at 7 PM on Friday night. All you do is mix the dry ingredients, including the yeast, and then pour in tepid water, stir briefly until a "shaggy" dough results:

Cover and keep in a warm place for 12-18 hours. I opted for 18 hours, and, since it's not always even heat in our wood-heated house.
So, about 1 PM on Saturday, I took the dough out, and it was quite wet and bubbly, as advertised:

After scooping it out onto floured parchment paper, I let it rest and then shaped it into a "ball" of sorts. There was alot of discussion about rising it the second time. I used a heavy tea towel, well-floured and dusted also with bran, inside of a bowl.

Dough before 2nd rise
I think next time I'll line the vessel I'm rising it in with floured parchment instead of plastic wrap, because it stuck a bit getting it out into the pan. Or, I might get some of those round baskets for raising bread.
I let it rise for 3 hours. half an hour before you put the dough in the pot, you heat the oven with the pot and cover in it, to 450-500 degrees F. Then you up-end the dough into the UNgreased pot (no, it really does not stick!), cover and bake as directed.
It really is simple and easy. You just have to be around during the last part of the process. And the bread is delicious, has holes like an artisan bread, and the best crust I've ever had in 40 years of bread-making, aside from the short time I had a wood-fired outdoor oven! It stayed crispy after it cooled, and I have found that often you'll get a crispy crust in your home oven, after using steam, etc., but then it softens as it cools. Not this time!
I used less water than called for, more salt (many other cooks agreed with me that the salt content was too low), a tiny bit of wholewheat flour, and I used regular dry active yeast, since I didn't have any of the instant yeast called for. I find buy Fleischman's dry active baking yeast in 1 Kg cans for about the same price as one littel jar of yeast. You just use about 1/4 more than you would instant yeast, so I used 1/3 of a tsp. of yeast instead of 1/4 tsp. in this recipe. It worked fine. (Don't be tempted to use more yeast or speed this bread up! The long rising gives it the flavor and texture you want, and makes up for the lack of kneading, as Harold McGee stated above.)
I used a 475 degree oven, but I might try 450 next time. I used a big enameled cast iron pot that I found for $3 at a garage sale:

It worked fine, but was a bit large , so the bread was a bit flat. But that's okay-- I love the crust!
I plan to experiment alot with this method! Last night I put on a version using 1/2 fresh-milled wholewheat bread flour and 2 tsp. salt, and I plan to make a small loaf in a ceramic pot, and some pizza or focaccia with the rest. I want to try doubling and tripling it, experimenting with addition of other grains, herbs, etc; using sourdough starter in place of yeast; making rolls, baguettes and other shapes, and experimenting with different vessels for baking. I will blog the results! Thank you Jim Lahey, of NY's Sullivan Street Bakery, Mark Bittman, and many bloggers who posted their results!
Anyway, here's the recipe, with a few more comments and pictures:

November 8, 2006
NO-KNEAD BREAD
Adapted from Jim Lahey, Sullivan Street Bakery. My comments in italics.
3 cups all-purpose or bread flour, more for dusting (I used unbleached flour, and I used 3 T. of wholewheat flour in place of 3 T. of unbleached
¼ teaspoon instant yeast (I used 1/3 tsp. regular dry active baking yeast)
1¼ teaspoons salt (I used 1 3/4 tsp. sea salt; next time I will use 2 tsp.)
Cornmeal or wheat bran as needed.
1. In a large bowl combine flour, yeast and salt. Add 1 5/8 cups water (I used 1 1/2 cups-- alot of people who tried this did the same) , and stir until blended; dough will be shaggy and sticky. Cover bowl with plastic wrap (I put the bowl inside a small white plastic garbage bag and twist-tied it.). Let dough rest at least 12 hours, preferably about 18 (I raised it 18 hours), at warm room temperature, about 70 degrees. (I placed it in the oven of my well-insulated stove with the oven light on. I had previously heated the oven up just a little, and placed a tea towel on the rack.)
2. Dough is ready when its surface is dotted with bubbles. Lightly flour a work surface and place dough on it; sprinkle it with a little more flour and fold it over on itself once or twice.


(It's quite sticky-- keep your hands and the surface floured; maybe used a bench scraper.) Cover loosely with plastic wrap and let rest about 15 minutes.
3. Using just enough flour to keep dough from sticking to work surface or to your fingers, gently and quickly shape dough into a ball.

Generously coat a cotton towel (not terry cloth) with flour, wheat bran or cornmeal (I used flour and bran, see comments above); put dough seam side down on towel and dust with more flour, bran or cornmeal. Cover with another cotton towel and let rise for about 2 hours. When it is ready, dough will be more than double in size and will not readily spring back when poked with a finger.

Dough ready for oven
4. At least a half-hour before dough is ready, heat oven to 450 degrees (I used 475 this time, but might use 450 next time-- some folks went up to 500; might depend on your oven.). Put a 6- to 8-quart heavy covered pot (cast iron, enamel, Pyrex or ceramic) in oven as it heats. When dough is ready, carefully remove pot from oven. Slide your hand under towel and turn dough over into pot, seam side up; it may look like a mess, but that is O.K. Shake pan once or twice if dough is unevenly distributed; it will straighten out as it bakes. Cover with lid and bake 30 minutes, then remove lid and bake another 15 to 30 minutes, until loaf is beautifully browned. Cool on a rack.
Copyright 2006 The New York Times Company
Servings: 12
Yield: One 1 1/2-pound loaf.
Nutrition Facts (using 2 tsp. salt)
Nutrition (per slice 1/12th of loaf): 120.4 calories; 2% calories from fat; 0.3g total fat; 0.0mg cholesterol; 314.7mg sodium; 42.7mg potassium; 25.2g carbohydrates; 1.1g fiber; 0.1g sugar; 24.1g net carbs; 3.5g protein; 2.2 points.


Happy baking!

Subscribe to:
Posts (Atom)