Showing posts with label whole grain. Show all posts
Showing posts with label whole grain. Show all posts
Thursday, May 9, 2019
FINALLY ON THE MEND, WITH WHOLE GRAIN, LOW-FAT, LOW-GLYCEMIC LEMON, WALNUT, BLUEBERRY MUFFINS


I'm happy to report that, over the last few days, my rotten cold is just about over, my nerve pain (from shingles) discomfort has eased quite a bit (after 4 months), and I have had much more energy in the last few days. I have managed to get some much-needed household and outside jobs done (in the morning, when my energy is highest)-- yay!
In my original recipe, I made a note stating: "Batter will be kind of runny-- it will be fine." I was a bit nervous about this, but decided to proceed anyway. Again, I needn't have worried-- the muffins turned out just fine-- in fact, nice and moist, but not soggy at all. I hope you'll give them a try!

Printable Recipe
BRYANNA'S NEW, MOIST LOW-FAT, LOW-GLYCEMIC LEMON, WALNUT, BLUEBERRY MUFFINS
Makes 12 muffins
WET MIX:
1 1/2 cups creamy plant-based milk (I use soy)
1/2 cup sugar of choice (for sugar-free, use 1/2 cup sucralose instead)
1/3 cup unsweetened applesauce
1 T. oil
grated zest of 1 lemon
DRY MIX:
3/4 cup oat flour
1/2 cup whole wheat flour
1/4 cup chickpea flour (or white bean flour)
1/4 cup wheat germ
1/4 cup oat bran
2 tsp. baking powder
3/4 tsp. salt
1/4 tsp. grated nutmeg
1/4 tsp. baking soda
Additional:
1 cup fresh or frozen blueberries (do not thaw them out!)
1/2 cup chopped walnuts (or nuts of your choice)
Optional for topping: brown sugar or coconut sugar
Preheat oven to 400 degrees F and grease 12 muffin cups (or use cupcake liners or my Homemade Palm-Oil-Free, Non-Hydrogenated “Cake Release” (Pan Coating or Professional Baker's Grease).
Blend the Wet Mix ingredients together in a blender or with a stick blender, or a food processor. Set aside Mix the Dry Mix ingredients in a medium bowl. Add the blueberries and walnuts and stir to coat with the Dry Mix.
Stir in the blended Wet mix and stir well, making sure that there is no Dry Mix still at the bottom of the bowl. As noted in the intro above, the batter will be runny-- see pics below.


Spoon the batter evenly into the prepared muffin cups. Sprinkle with a bit of brown sugar or coconut sugar, if you like.

Nutrition Facts (see below for Nutrition Facts for recipe without sugar):

Nutrition Facts for recipe without sugar-- for instance, using an equal amount of sucralose:


Enjoy!


Monday, April 7, 2014
MOIST AND DELICIOUS WHOLEGRAIN PEANUT BUTTER-BANANA BRAN MUFFINS

This recipe is an old one in our house-- I developed it for my book "The Fiber for Life Cookbook", published back in 2002. Nothing fancy, but nutritious and delicious. My granddaughter has been enjoying them today, too. No need for butter on these-- just a little of your favorite jam!

Printable Copy
BRYANNA’S
PEANUT BUTTER-BANANA BRAN MUFFINS (can be soy-free)
Makes
12
All you need is a little jam or jelly on
these delicious and healful muffins.
ALLERGY NOTE: If you are allergic to peanuts, use any other
favorite nut butter instead. And I’m sure they would work well with a whole
grain GF flour mix, too.
DRY
MIX:
1 1/2 cups whole wheat pastry flour
1/2 cups wheat bran
2 tsp. baking powder
1/2 tsp. salt
WET
MIX:
2 tablespoons flax seeds blended with 1/2
cup water until “gloppy”
1 cup mashed ripe banana (about 2 medium)
1/2 cup packed brown sugar
1/2 cup chunky natural peanut butter
(nothing added)
1/2 cup non-dairy milk
Preheat the oven to 375 degrees F. Oil 12 muffin cups.
In a medium bowl, mix together the Dry Mix
ingredients.
After blending the water and flax seeds together until “gloppy” in your blender, add the remaining Wet Mix ingredients and blend again briefly.
After blending the water and flax seeds together until “gloppy” in your blender, add the remaining Wet Mix ingredients and blend again briefly.
Pour the Wet Mix into the Dry Mix and stir
briefly, just to mix. Spoon the batter
equally between the muffin cups. Bake for
about 20 minutes, or until they test done.
Loosen the muffins carefully with a table
knife and turn them on their sides.
Place the muffin tin on a rack, cover the muffins with a clean tea towel
and cool for a few minutes before serving.
Cool thoroughly before storing in a plastic bag or rigid plastic
container. These muffins freeze well.
Nutrition
per muffin: 192 calories; 6 g fat; 4.6 g fiber; 29
g carbohydrates; 7 g protein; 179 mg sodium.
Enjoy!

Monday, December 31, 2012
QUICK VEGAN MICROWAVED CHOCOLATE CHIP COOKIE IN A CUP (OR DISH)-- REDUCED-SUGAR-AND-FAT, WHOLE GRAIN, SF & CAN BE GF

A little New Year's present to my readers: In the interests of (kitchen) science, I spent my afternoon today experimenting with a lower-fat, sugar-reduced, whole grain, vegan version of the latest microwave mug dessert craze-- chocolate chip cookie in a cup. This sounded like a wonderful idea to me (if I could pare down the calories and still have it taste wonderful) because I rarely make cookies anymore. There's only the two of us and neither of us can just eat one! With this recipe, we can have the satisfaction of a sweet, gooey treat in a matter of minutes, with no danger of sneaking another one, and it can fit into just about anyone's dietary peculiarities.
Can't say this often enough: This cookie must be eaten fresh and slightly warm-- after they cool off they get kind of stiff and cakey.


Printable Recipe (both 1 serving and 2 servings)
BRYANNA'S VEGAN
MICROWAVE CHOCOLATE CHIP COOKIE IN A CUP (OR DISH) (Whole Grain, and Fat-and-Sugar-Reduced;
SF and can be GF)
1 serving
I like making this treat in a shallow dessert dish rather
than a cup, but it’s up to you. So nice
to indulge in this treat and know that there are no more cookies sitting there to
tempt weaklings like me! I cut down the
butter in this recipe by using a little syrup rather than applesauce. Applesauce
works well in cakes, but syrup works better in cookies.
NOTE: If you want this a
little sweeter and gooey-er, add 1/2 tablespoon granulated unbleached organic
sugar and another 1/2 tablespoon chocolate chips.
1/2 tablespoon vegan butter (I use my homemade vegan palm oil-free “Buttah”)
1/2 tablespoon brown rice syrup, or organic corn syrup, or
golden syrup
(I prefer the brown rice syrup because of its rich butterscotch-y flavor.)
1 tablespoon brown sugar (packed firmly)
1 tablespoon brown sugar (packed firmly)
1/16 teaspoon pure
vanilla extract
1 pinch fine sea salt
2 Tablespoons water mixed until frothy with:
2 Tablespoons water mixed until frothy with:
1/2 tablespoon Ener-G or Orgran egg replacer powder
1/4 cup whole wheat pastry flour (OR all-purpose GF flour mix)
1 tablespoon organic fair trade chocolate chips (dairy-free)
Directions:
Melt the vegan butter in a wide mouth cup or small dessert dish (the dish about
5 inches in diameter across the top and about 3 inches wide in the bottom). Do
this in the microwave-- I use 20% power for 20 seconds. Stir in the syrup,
brown sugar, vanilla and salt. Add the frothy mixture of water and egg replacer powder and stir
again. Add the flour; stir again. Add the chocolate chips and stir briefly just
to distribute them. Flatten the mixture out a bit. Microwave the cup or dish for 40-60 seconds. Start checking
for doneness at 40 seconds. How long you cook depends both on the strength of
your microwave and how you like the consistency (it will firm up when it cools a bit).
Serve warm. I let the cup/dish cool on a rack for 10 minutes
before serving. NOTE: This cookie must be eaten fresh and slightly warm—after they cool off
they get kind of stiff and cakey.
NOTE: I didn't like the results with this recipe using "flaxseed glop" as the egg replacer.
Nutrition Facts
Nutrition (per
serving):
324.5 calories; 24% calories from fat; 9.2g total fat; 0.0mg
cholesterol; 365.3mg sodium; 169.4mg potassium; 61.3g carbohydrates; 4.3g
fiber; 25.9g sugar; 57.1g net carbs; 5.1g protein; 6.5 points
Nutrition facts with an
extra 1/2 tablespoon EACH chocolate chips and organic unbleached granulated sugar added: 374.1 calories;
24% calories from fat; 10.8g total fat; 0.0mg cholesterol; 365.9mg sodium;
169.6mg potassium; 71.0g carbohydrates; 4.6g fiber; 32.2g sugar; 66.4g net
carbs; 5.3g protein; 7.6 points.
Comparison—the
Nutrition facts for one serving of the recipe that I used as a guide to develop
my vegan, whole grain, and lower-fat-and-sugar version are as follows:
729.1 calories; 47% calories from fat; 40.5g total fat;
270.8mg cholesterol; 1188.0mg sodium; 156.1mg potassium; 90.7g carbohydrates;
3.3g fiber; 39.5g sugar; 87.4g net carbs; 7.9g protein; 17.3 points

The Ingredients


BRYANNA'S 2 SERVING VEGAN
MICROWAVE CHOCOLATE CHIP COOKIE IN A CUP (OR DISH) (Whole Grain, and Fat-and-Sugar-Reduced; SF and can be GF)
2 servings
I like making this treat in shallow dessert dishes rather
than cups, but it’s up to you. So nice
to indulge in this treat and know that there are no more cookies sitting there to
tempt weaklings like DH and me! I cut down
the butter in this recipe by using a little syrup rather than applesauce. Applesauce
works well in cakes, but syrup works better in cookies.
NOTE: If you want this a
little sweeter and gooey-er, add 1 tablespoon granulated unbleached organic
sugar and another 1 tablespoon chocolate chips.
1 tablespoon vegan butter (I use my homemade vegan palm oil-free “Buttah”)
1 tablespoon brown rice syrup, or organic corn syrup, or
golden syrup
(I prefer the brown rice syrup because of its rich butterscotch-y flavor.)
2 tablespoons brown sugar (packed firmly)
2 tablespoons brown sugar (packed firmly)
1/8 teaspoon pure
vanilla extract
2 pinches fine sea salt
1/4 cup water mixed until frothy with:
1 tablespoon Ener-G or Orgran egg replacer powder
1/2 cup whole wheat pastry flour (OR all-purpose GF flour mix)
2 tablespoons organic fair trade chocolate chips
(dairy-free)
Directions:
Spray the 2 cups or small dessert you are going to “bake”
the cookies in with oil from a pump sprayer, or grease with a little vegan
butter. Use wide cups or small dessert dishes (each about 5 inches in diameter
across the top and about 3 inches wide in the bottom).
Melt the vegan butter in a small mixing bowl. Do this in the
microwave-- I use 20% power for 25 seconds. Stir in the syrup, brown sugar,
vanilla and salt. Add the frothy mixture of water and egg replacer powder and stir again. Add
the flour; stir again. Add the chocolate chips and stir briefly just to
distribute them. Divide the mixture evenly between your two prepared cups or
dishes. Flatten the mixture out a bit. Microwave the two cups or dishes for 60-80 seconds; start checking for
doneness at 60 seconds. How long you cook depends both on the strength of your
microwave and how you like the consistency (it will firm up when it cools a bit).
Serve warm. I let the cups or dishes cool on a rack for 10
minutes before serving.
NOTE: I didn't like the results with this recipe using "flaxseed glop" as the egg replacer.
Nutrition Facts
Nutrition (per
serving):
324.5 calories; 24% calories from fat; 9.2g total fat; 0.0mg
cholesterol; 365.3mg sodium; 169.4mg potassium; 61.3g carbohydrates; 4.3g
fiber; 25.9g sugar; 57.1g net carbs; 5.1g protein; 6.5 points
Nutrition facts with an
extra 1 tablespoon EACH chocolate chips and organic unbleached granulated sugar added to the 2-serving recipe:
374.1 calories; 24% calories from fat; 10.8g total fat; 0.0mg cholesterol;
365.9mg sodium; 169.6mg potassium; 71.0g carbohydrates; 4.6g fiber; 32.2g
sugar; 66.4g net carbs; 5.3g protein; 7.6 points.
Comparison—the
Nutrition facts for one serving of the recipe that I used as a guide to develop
my vegan, whole grain, and lower-fat-and-sugar version are as follows:
729.1 calories; 47%
calories from fat; 40.5g total fat; 270.8mg cholesterol; 1188.0mg sodium;
156.1mg potassium; 90.7g carbohydrates; 3.3g fiber; 39.5g sugar; 87.4g net
carbs; 7.9g protein; 17.3 points Happy New Year!

Saturday, October 27, 2012
ONE SWEET WAY TO USE UP SOME OF YOUR RHUBARB SUPPLY

This post is going to be a quickie, as I'm belatedly making the components tonight for a lasagna to bring to our friends' house where we're going to lunch tomorrow. I also decided to make this recipe with frozen rhubarb (the first year we've grown any) to bring for dessert, so I thought I'd share it with you. I developed them back in 2007 for my old newsletter, the Vegan Feast. These whole grain bars are easy to make, easy to store and easy to transport, so they're an excellent choice for taking along to a potluck or shared meal. Though scrumptious any time of the year, these bars are a perfect fall dessert-- delicious hot or cold with vanilla vegan ice cream (like my Vegan French Vanilla Ice Cream) or whipped topping (here's my Almond Cream Whipped Topping). I think you'll like them!
Printable Recipe
BRYANNA'S
RHUBARB/ORANGE OAT BARS
Makes
9 bars
CRUST AND TOPPING:
1 cup whole wheat pastry flour
1 cup rolled (old-fashioned) oatmeal
2/3 cup chopped walnuts, pecans or other
nuts of choice
2/3 cup packed brown sugar
3/4 tsp salt
1/2 cup cold vegan butter (such as my homemade palm oil-free Buttah), cut into small
pieces
3 Tbs organic corn syrup, agave nectar, or
brown rice syrup
FILLING:
3 cups diced rhubarb
2/3 cup light granulated organic sugar
2 Tbs orange juice concentrate
2 Tbs water mixed with:
4 tsp cornstarch
grated zest from 1/2 a large organic orange
3/4 tsp pure vanilla extract
Preheat the oven to 350°F. Oil a 9-inch square baking pan.
Combine the flour, oats, nuts, brown sugar,
and salt in a medium bowl. Add the vegan
butter and drizzle in the syrup. Mix until crumble, using your fingers. Pat half the mixture into the bottom of the
prepared pan. Set aside the rest.
Combine the rhubarb, sugar, and the orange
juice concentrate and water mixed with the cornstarch in a medium
saucepan. Bring to a boil, and then
lower the heat to medium and cook, stirring, until the mixture is
thickened. Pour it into a bowl to allow
it to cool slightly, and add the orange zest and vanilla. Spread this Filling evenly over the crust in
the pan.
Sprinkle the remaining crumbled mixture
over the rhubarb mixture evenly. Press
down slightly.
Bake for 30 minutes. Serve hot or store in the refrigerator.
Nutrition Facts
Nutrition (per serving): 307.6 calories;
44% calories from fat; 15.6g total fat; 0.0mg cholesterol; 280.0mg sodium;
249.2mg potassium; 42.4g carbohydrates; 1.4g fiber; 38.6g sugar; 1.8g protein,
7.2 points.
Enjoy!
Enjoy!
Friday, February 11, 2011
BIG, CRISPY, WHOLE GRAIN, LOW-FAT PIZZELLE CRACKERS AND A YUMMY LOW-FAT VEGAN ARTICHOKE HEART AND SPINACH (OR KALE) DIP

Ever since I had success making sweet vegan pizzelle cookies with my "new" pizzelle maker
 (which I purchased at Value Village for $10!), I have been wanting to try making crackers with it. Well, yesterday I finally got around to it, and, though this is a very basic cracker, I am buoyed by another success and eager to try some different formulations!
No rolling-out and no oven is necessary with this method of making crackers. Instead, the runny batter is baked (very quickly) on an electric pizzelle maker (or you could use an electric Scandinavian krumkake iron
 , an electric ice cream cone or waffle cone maker or an electric "petite cone" maker). I actually found that making them this way is less bother than rolling out cracker dough very thinly and evenly and watching them in the oven so that the edges don't burn.
(or you could use an electric Scandinavian krumkake iron, an electric ice cream cone or waffle cone maker or an electric "petite cone" maker). I actually found that making them this way is less bother than rolling out cracker dough very thinly and evenly and watching them in the oven so that the edges don't burn.
It takes about 1 minute for each batch of two crackers on my pizzelle maker. I made 40 large crackers in under 1/2 an hour, doing some clean-up and other kitchen chores as I went, so it’s really not much of a bother. Just be sure to have your cookie racks ready and a timer to time each batch!
This is a very basic, though tasty, whole grain cracker—in future I’m going to experiment with different types of flours and meals, herbs, seeds, seasonings, etc. Each cracker contains only 33 calories and less than 1 g fat per cracker-- and they are big crackers.


BRYANNA'S WHOLE WHEAT AND OAT BRAN PIZZELLE CRACKERS
Makes about 40 large, thin, crispy crackers
NOTE: See text above the recipe.
Dry Mix:
2 cups whole wheat flour (I used regular, NOT pastry flour)
(I used regular, NOT pastry flour)
1/3 cup oat bran
2 tablespoons + 2 teaspoons soy flour or chickpea flour
or chickpea flour
2 tablespoons brown sugar
1 1/4 teaspoons baking powder
1 teaspoon salt
Wet Mix:
2 tablespoons oil or melted vegan butter
1 2/3 cups water
1 cup nondairy milk
Mix the Dry Mix ingredients with the Wet Mix ingredients in a large food processor until smooth. Or, you can mix the Dry Mix ingredients together in a large bowl, and then whisk in the Wet Mix.
until smooth. Or, you can mix the Dry Mix ingredients together in a large bowl, and then whisk in the Wet Mix.
Heat an electric pizzelle maker (or alternate-- see text above) according to directions (it takes 7 to 8 minutes to heat up and usually there is a light that tells you when it’s hot). When it's hot, add 1 tablespoon of the batter to the middle of each cookie section. (These crackers use a little less batter than the sweet pizzelle, and need to be cooked a little longer.)

(or alternate-- see text above) according to directions (it takes 7 to 8 minutes to heat up and usually there is a light that tells you when it’s hot). When it's hot, add 1 tablespoon of the batter to the middle of each cookie section. (These crackers use a little less batter than the sweet pizzelle, and need to be cooked a little longer.)
Close the iron and secure the handle. Set a timer for 1 minute. When the timer goes, open the iron and check that the crackers are golden, not whitish. If they are not quite golden, close again and cook for a few more seconds only! Carefully loosen each cracker and place them on the cooling racks
 (it's okay to overlap slightly).
Continue until you have used up all of the batter. for 1 minute. When the timer goes, open the iron and check that the crackers are golden, not whitish. If they are not quite golden, close again and cook for a few more seconds only! Carefully loosen each cracker and place them on the cooling racks (it's okay to overlap slightly).If the crackers seem at all flexible after cooling thoroughly, you may need this extra step (which I did). Place the crackers on dry cookie sheets and place in a 150-170 degree F oven. If you have convection, use that (and make sure the oven is venting properly). If not, leave the oven door open a crack (place a pot holder between the door and the top of the stove to hold it open a crack). I did this for about 20 minutes. The crackers were totally crispy afterwards. Cool them thoroughly before storing in airtight containers.
Cooking Tips
1.) My pizzelle maker is non-stick, and the instruction booklet (which I found online) said there was no need to grease the cooking surfaces, but I found that I had to lightly and quickly grease the top and bottoms with a wadded paper towel coated with shortening (see my homemade shortening recipe) or a spray of oil from a pump spray bottle before baking each batch of sweet pizzelle, or they stuck. (And the surface is in excellent condition.) However, with the crackers, I only had to grease or oil every 2 or 3 batches.
2.) My pizzelle maker's guide instructed me to use one heaping teaspoon of batter for each cookie, but this yielded a very small cookie-- which may be what you want. But for a cookie which totally filled each "depression" in the pizzelle iron, I had to use 4 teaspoons of batter exactly, but only 1 tablespoon (3 teaspoons) for each cracker.
Nutrition Facts
Nutrition (per cracker): 33.1 calories; 22% calories from fat; 0.9g total fat; 0.0mg cholesterol; 57.2mg sodium; 54.4mg potassium; 5.9g carbohydrates; 0.9g fiber; 0.8g sugar; 5.0g net carbs; 1.2g protein; 0.6 points.
****************************************************************
I wanted something elegant to go on my crackers, so I made a lower-fat variation of one of my (several) vegan versions of creamy artichoke heart and spinach dip. This one is good cold or hot, and very easy to make!

****************************************************************
I wanted something elegant to go on my crackers, so I made a lower-fat variation of one of my (several) vegan versions of creamy artichoke heart and spinach dip. This one is good cold or hot, and very easy to make!

Servings: 7
Yield: about 3 1/2 cups
1 (12.3 oz.) box extra-firm SILKEN tofu
2 1/2 tablespoons nutritional yeast flakes
5 teaspoons lemon juice
4 1/2 teaspoons light miso
4 teaspoons tahini
2 cloves garlic, peeled
1/2 teaspoon salt
1/2 teaspoon salt
1 pinch sugar
1/2 cup vegan mayonnaise (my lowfat eggless mayo, OR Reduced-Fat Vegenaise or Spectrum Naturals Eggless,Vegan Light Canola Mayo)
Mayo)
Mayo)
2 tablespoons homemade vegan pesto or commercial vegan basil pesto
freshly-ground black pepper to taste
14 oz. jar marinated artichoke hearts, drained, rinsed under hot water, and patted dry
14 oz. jar marinated artichoke hearts, drained, rinsed under hot water, and patted dry
1(10 oz.) pckg. frozen spinach OR kale (which is what I used this time), thawed out and squeezed dry, chopped
NOTE: If you use fresh greens, use 12-16 ounces; wash and trim, chop and steam them until tender. Drain and cool, then squeeze as much liquid out of them [in your fist] as possible.)
NOTE: If you use fresh greens, use 12-16 ounces; wash and trim, chop and steam them until tender. Drain and cool, then squeeze as much liquid out of them [in your fist] as possible.)
Optional (for hot version)
1/2 cup whole grain breadcrumbs
Paprika or smoked paprika
Serve with:
Raw veggie dippers, crusty bread, bread crisps, pita crisps, or whole grain crackers
Directions:
Process the silken tofu, nutritional yeast, lemon juice, miso, tahini, salt and sugar in a food processor until very smooth. Add the vegan mayonnaise, pesto and pepper and process again. Add the artichokes and spinach, and pulse just to chop the artichokes a bit and combine.
until very smooth. Add the vegan mayonnaise, pesto and pepper and process again. Add the artichokes and spinach, and pulse just to chop the artichokes a bit and combine.
To serve cold, spoon into an attractive serving dish and sprinkle with paprika or smoked paprika. Cover and refrigerate until serving time.
To serve hot, preheat the oven to 375ºF. Oil a shallow baking dish. Spread the mixture into the baking dish. Sprinkle with the breadcrumbs and paprika. Spray with a bit of oil from a pump sprayer. Bake for 15-20 minutes, or until hot and bubbly.
Nutrition Facts for cold version made with Reduced-Fat Vegenaise or Spectrum Naturals Eggless,Vegan Light Canola Mayo:
Nutrition (per 1/2 cup serving): 259.1 calories; 32% calories from fat; 10.4g total fat; 0.0mg cholesterol; 413.9mg sodium; 1724.2mg potassium; 32.0g carbohydrates; 12.5g fiber; 0.9g sugar; 19.5g net carbs; 19.2g protein; 5.2 points.
(NOTE: the Spectrum Naturals mayo is 10 calories less per tablespoon than the Vegenaise.)
(NOTE: the Spectrum Naturals mayo is 10 calories less per tablespoon than the Vegenaise.)
For hot version, with breadcrumbs:
Nutrition (per 1/2 cup serving): 267.6 calories; 32% calories from fat; 10.5g total fat; 0.0mg cholesterol; 435.8mg sodium; 1727.4mg potassium; 33.6g carbohydrates; 12.6g fiber; 1.0g sugar; 21.0g net carbs; 19.5g protein; 5.4 points.
Nutrition Facts for cold version using my low-fat eggless mayo:
Nutrition (per 1/2 cup serving): 238.0 calories; 25% calories from fat; 7.2g total fat; 0.0mg cholesterol; 418.5mg sodium; 1726.8mg potassium; 32.3g carbohydrates; 12.6g fiber; 1.0g sugar; 19.8g net carbs; 19.8g protein; 4.6 points.
For hot version, with breadcrumbs:
Nutrition (per 1/2 cup serving): 246.5 calories; 24% calories from fat; 7.3g total fat; 0.0mg cholesterol; 440.4mg sodium; 1730.0mg potassium; 34.0g carbohydrates; 12.7g fiber; 1.2g sugar; 21.3g net carbs; 20.0g protein; 4.7 points.
Enjoy!

Thursday, August 5, 2010
FLAX AND 100% WHOLE WHEAT "SANDWICH THIN"-TYPE BURGER BUNS
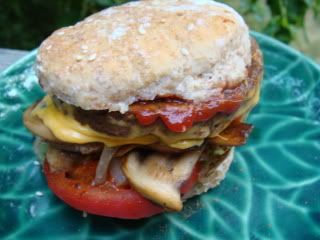
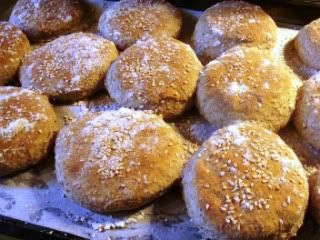
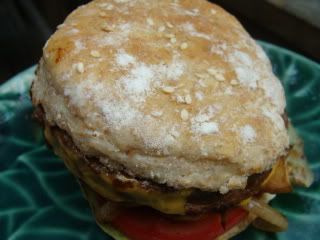
A rather tippy veggie burger, with all the trimmings, made with one of my new thin buns.
I've been meaning to try some "sandwich thin"-type buns for a long time, and finally got inspired to adapt one of my favorite burger bun recipes-- one I've used for over 25 years! The recipe was an old "yeast batter bread" recipe. In those days, you made a yeast-leavened batter and just rose it for 30 minutes, then formed the bread or buns, rose again briefly and baked. These were tasty enough, but I figured that they could be improved upon by using the newer no-knead bread techniques. The longer rising time with the new techniques develop the gluten and the flavor.
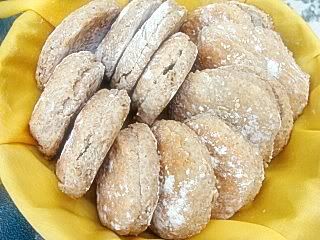
I chose this recipe because it was 100% whole wheat, vegan already (many sandwich bun recipes contain egg), it was "tried and true", and it is fairly soft (due to the added potato). It worked very well, though some might say they aren't big enough for some burgers. I added an option to make bigger buns, if you like. But these just fit the burgers I had around and I thought it was great that the bun didn't overwhelm the other tastes. The bun was soft, but held together well and didn't get soggy.
I did a little research, and whole wheat burger buns seem to range from 110 calories to 210 calories. Mine are 98 calories for the smaller ones and 130 for the larger ones. If you want to raise the fiber level, you can add 1/4 cup of wheat bran to the batter with no ill effects. At any rate, you can control the ingredients, and they certainly are easy and cheap to make! My freezer is now sticked with burger buns for quick meals!
Printable Recipe
BRYANNA'S WHOLE WHEAT AND FLAX "SANDWICH THIN" BUNS
Servings: 24
Yield: makes 18-24 buns
These are half the calories of many ordinary sandwich buns, 100% whole grain, and 1.5 ww points! Also, very good!
1 Tbs dry active baking yeast
 (or 3/4 Tbs instant yeast)
1 cup warm water
2 cups warm nondairy milk
1/4 cup instant potato flakes
2 Tbs olive oil
2 Tbs maple syrup or unbleached sugar, or 1 tablespoon agave nectar

2 tsp salt
1/4 cup ground flax seed, preferably golden flax

4 cup whole wheat flour (NOT pastry flour), regular or white whole wheat
Soy, hemp or nut milk for glazing tops
OPTIONAL: sesame seeds or other desired topping
Dissolve the yeast in the water. Add to the soymilk in a medium bowl, along with the potato flakes, oil, syrup or sugar, and salt.
Add the flour and ground flax and stir with a heavy wooden spoon or Danish dough whisk
 until well mixed, but rough looking. Cover and let rise at room temperature for 2 to 18 hours.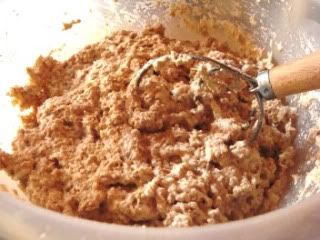
First mixing
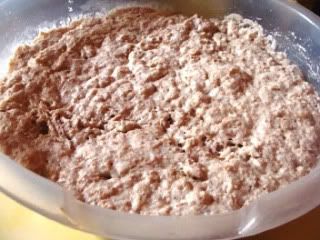 \
\After 2 hour rise
Then refrigerate the dough, well-covered, for at least 3 hours and up to a week.
When ready to bake, take the dough from the refrigerator. With floured hands, dump the dough out on a well-floured surface and, coating the dough lightly with flour as you go, pat the dough out into a large rectangle about 3/8" thick. Cut the dough into rounds with a 3 1/2-inch cookie cutter
 (or a 4-inch cutter if you want 18 larger buns). Here's a set of round cutters
 that goes up to 4 and 7/16-inches.)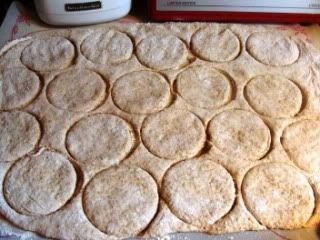
Carefully transfer to baking sheets lined with baking parchment
 and sprinkled with flour or cornmeal. The rounds should have a little room around them, unless you like them softer, in which case you can have them barely touching.
Note: You could also use a hamburger bun pan, either with 3 1/4” molds (for 24 buns
 ) or 4 1/4” molds (for 18 buns).
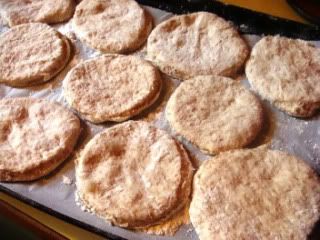
Pat down the dough in the center of each round, so that they don't make big "humps" in the middle when they rise.
Sprinkle the rounds lightly with flour, cover with plastic wrap, or place the pans inside of large food-safe plastic bags,and let rise 40 minutes, while you heat the oven to 375 degrees F.
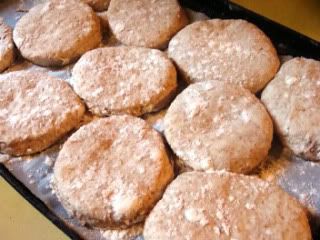
Ready to bake
Brush the buns with nondairy milk and sprinkle with sesame seeds or other topping. Bake 15-20 minutes, or until golden. Cool on racks. When serving, slice them in half horizontally with a sharp serrated knife.
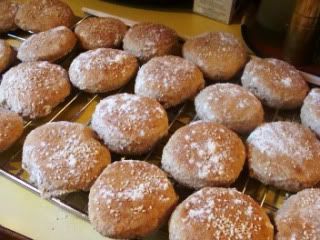
Nutrition Facts
Nutrition (per serving [1 of 24 buns]): 98.3 calories; 19% calories from fat; 2.2g total fat; 0.0mg cholesterol; 169.2mg sodium; 131.7mg potassium; 17.3g carbohydrates; 3.1g fiber; 1.7g sugar; 14.3g net carbs; 3.8g protein; 1.5 points.
If you make 18 larger buns (4" across) the nutrition facts are as follows: Nutrition (per serving [1 of 18 buns])): 131.0 calories; 19% calories from fat; 2.9g total fat; 0.0mg cholesterol; 225.6mg sodium; 175.6mg potassium; 23.1g carbohydrates; 4.1g fiber; 2.2g sugar; 19.0g net carbs; 5.0gprotein; 2.1 points.
Enjoy!
Subscribe to:
Posts (Atom)