Showing posts with label chickpea flour. Show all posts
Showing posts with label chickpea flour. Show all posts
Wednesday, May 29, 2019
NEW MOIST & VERY CHOCOLATE-Y LOW-FAT OAT BROWNIES (CAN BE GF)


I love brownies! You will find quite a few brownie recipes on this blog, but, because I was diagnosed with pre-diabetes last year, I've been working on a version that is not only very chocolate-y, moist and low in fat, but made with low-glycemic ingredients. (See this post and this one.)
I did devise a very good low-glycemic brownie last September, which included the addition of yellow split pea puree and unsweetened applesauce. (See about the low-glycemic advantages of split peas and other pulses here.)
In this new recipe I still use my favorite low-glycemic flour combination of oat flour and chickpea flour, but, in addition to split peas and unsweetened applesauce, this new recipe utilizes prune puree , which provides sweetness (thereby cutting down on the amount of sugar needed) AND a whole lot of other goodness. (It seems that prunes contain lots of fiber, which is slow to digest, leaving you satisfied for a longer time. Prunes also have a low glycemic index count, which means that they raise the glucose [sugar] levels in your blood slowly. See this article for more about the benefits of adding prunes to your diet.

Printable Recipe
BRYANNA'S NEW MOIST AND VERY CHOCOLATE-Y LOW-FAT OAT & CHICKPEA FLOUR BROWNIES
(It also happens to be gluten-free if you use GF oatmeal.)
Makes 18 brownies
This is the latest (and maybe the last!) recipe in my quest for a really delicious dark chocolate, vegan, low-fat, low-glycemic brownie. It's easy to make and, dare I say it, even healthful, despite being a delicious dessert item.
Oat flour and chickpea flour are both low-glycemic flours. Applesauce, prune puree and yellow split pea puree add plenty of fiber and nutrients, as well as moisture.
NOTE: I make oat flour by grinding oatmeal flakes in my Vitamix-- just make sure the container is absolutely dry!
DRY MIX:
3/4 cup oat flour
1/2 cup +1 Tbsp dark cocoa powder
6 Tbsp. chickpea flour (also called besan) (or other bean flour)
3/4 tsp. salt
3/4 tsp. baking soda
3/4 tsp. baking powder
WET MIX:
1 cup unsweetened smooth applesauce
1/2 cup Prune Puree (see end of blog for homemade recipe) OR babyfood pureed prunes in a jar
6 Tbsp. yellow split pea puree (see how to and store make below)
6 Tbsp. maple syrup or agave nectar
1 1/2 Tbsp. oil
2 tsp. vanilla extract
ADDITIONAL:
1/2 cup chopped walnuts or pecans
INSTRUCTIONS:
Turn the oven to 350 degrees F. Prepare a 7 x 11" baking pan by lining with baking parchment.
Or, as I do, grease the bottom and sides of the inside of the pan lightly with my Homemade Palm-Oil-free, Non-Hydrogenated “Cake Release” (Pan Coating or Professional Baker's Grease) with GF Option.
Whisk the Dry Mix ingredients together in a small bowl and set aside.
In a larger bowl, whisk together the Wet Mix ingredients until smooth. Add the Dry Mix into the bowl and stir until smooth. Add the chopped walnuts and stir just to distribute evenly.
Scoop the batter into the prepared pan (using a silicone spatula to get as much as possible) and then spread it evenly into the pan with the spatula.
Bake for 18 minutes and cool thoroughly on a rack before cutting into 18 pieces.
HOW TO MAKE PRUNE PUREE:
Note: 2 cups of large pitted prunes, pressed down a bit, with make about 2 3/4 cups of prune puree.
In an appropriately-sized bowl, cover your prunes with hot water. (Make sure that they are completely covered with water.) Let the prunes sit until they are more or less lukewarm. Then pour the prunes and water into your blender and blend until VERY smooth. You can safely keep this in your refrigerator in a tightly-closed container for 2 or 3 days, or you might prefer to store it in 1/2-cup containers in the freezer.
HOW TO MAKE YELLOW SPLIT PEA PUREE (Makes 5 cups):
Mix 2 cups of dried split yellow peas with 4 cups of water in an Instant Pot and cook at high pressure for 10 minutes. (PS: You could use any other type of pressure cooker, OR you can simmer, covered, for 30 minutes in a medium saucepan on your stovetop.) The resulting soft mush just needed a few stirs to "puree", or, if it looks a bit lumpy, you can cool it off a bit and puree it in your blender.
I refrigerate the puree in a covered container for a day or so-- it will firm up considerably. You can press then the puree into silicone cupcake liners or large silicone ice cube trays in 1/4 cup portions, or into normal ice cube trays in 2 Tbsp. portions and freeze them. Then pop out the frozen portions, bag them up and place them back in the freezer for future use.
(See more about yellow split pea puree at this link.)

Enjoy!


Thursday, May 9, 2019
FINALLY ON THE MEND, WITH WHOLE GRAIN, LOW-FAT, LOW-GLYCEMIC LEMON, WALNUT, BLUEBERRY MUFFINS

I'm happy to report that, over the last few days, my rotten cold is just about over, my nerve pain (from shingles) discomfort has eased quite a bit (after 4 months), and I have had much more energy in the last few days. I have managed to get some much-needed household and outside jobs done (in the morning, when my energy is highest)-- yay!
In my original recipe, I made a note stating: "Batter will be kind of runny-- it will be fine." I was a bit nervous about this, but decided to proceed anyway. Again, I needn't have worried-- the muffins turned out just fine-- in fact, nice and moist, but not soggy at all. I hope you'll give them a try!

Printable Recipe
BRYANNA'S NEW, MOIST LOW-FAT, LOW-GLYCEMIC LEMON, WALNUT, BLUEBERRY MUFFINS
Makes 12 muffins
WET MIX:
1 1/2 cups creamy plant-based milk (I use soy)
1/2 cup sugar of choice (for sugar-free, use 1/2 cup sucralose instead)
1/3 cup unsweetened applesauce
1 T. oil
grated zest of 1 lemon
DRY MIX:
3/4 cup oat flour
1/2 cup whole wheat flour
1/4 cup chickpea flour (or white bean flour)
1/4 cup wheat germ
1/4 cup oat bran
2 tsp. baking powder
3/4 tsp. salt
1/4 tsp. grated nutmeg
1/4 tsp. baking soda
Additional:
1 cup fresh or frozen blueberries (do not thaw them out!)
1/2 cup chopped walnuts (or nuts of your choice)
Optional for topping: brown sugar or coconut sugar
Preheat oven to 400 degrees F and grease 12 muffin cups (or use cupcake liners or my Homemade Palm-Oil-Free, Non-Hydrogenated “Cake Release” (Pan Coating or Professional Baker's Grease).
Blend the Wet Mix ingredients together in a blender or with a stick blender, or a food processor. Set aside Mix the Dry Mix ingredients in a medium bowl. Add the blueberries and walnuts and stir to coat with the Dry Mix.
Stir in the blended Wet mix and stir well, making sure that there is no Dry Mix still at the bottom of the bowl. As noted in the intro above, the batter will be runny-- see pics below.


Spoon the batter evenly into the prepared muffin cups. Sprinkle with a bit of brown sugar or coconut sugar, if you like.

Nutrition Facts (see below for Nutrition Facts for recipe without sugar):

Nutrition Facts for recipe without sugar-- for instance, using an equal amount of sucralose:


Enjoy!

Sunday, January 13, 2019
BACK ON THE BLOG (FINALLY), WITH YUMMY LOW-GLYCEMIC CHOCOLATE CHIP COOKIES

It's been about 2 1/2 months since I last blogged. There are various reasons for this-- some "blogger burn-out", I suppose you could call it, after 12 years, first of all (13 years, actually). And then, there's been a fairly big change in my diet and how I cook now, since I was diagnosed as pre-diabetic last year and now eat a low-glycemic diet. (See blog posts from March 2018 and on, particularly this one.) I'm not on a low-carb, or no-sugar, or vegan keto diet. I've just been learning to cook with low-glycemic and high-fiber grains and flours, and fewer sweets, and also learned about "resistant starch"-- see this post.
Just as I was feeling like blogging again, I developed a case of shingles! This has laid me low for over a month now. It is improving, but my energy has been pretty low. I'm hoping that I'll be back to normal in a couple of weeks, but it's hard to predict.
But, at least I've had a little more interest in cooking again. Lately, I've been working on developing some truly good low-glycemic rolled biscuits, but I haven't got there yet! (Stay tuned.) I've also been working on a good high-fiber, low-glycemic, not too fatty or sweet chocolate chip cookie recipe. My goal was also to make it easy to make, using readily-available, inexpensive ingredients, and of course, to make cookies that still tasted like a treat!
So, I'd like to offer you my latest version, which I'm quite happy with (but, you never know-- I might refine them further). I hope that you will enjoy them, too!

BRYANNA'S LOW-GLYCEMIC CHOCOLATE CHIP COOKIES
©
2019 Bryanna Clark Grogan. All Rights Reserved.
Servings: 12 cookies
These also happen to be GF and soy-free, too, though I do not purposely avoid either of those things.
DRY MIX INGREDIENTS:
3/4 cup COLD chickpea flour (besan/gram flour) (Keep some in a jar in your fridge or freezer.)
1 T. oat flour (You can grind oat flakes or quick oats to a powder in a DRY blender.)
1 T. coconut flour
1/8 tsp. salt
1/2 tsp. baking soda
WET MIX INGREDIENTS:
1 Psyllium "Egg":
Mix and let stand 5 minutes
2 tsp. psyllium husk (not powder)
3 T. water and
1/2 tsp. oil
(NOTE: If you have no psyllium husk, use 1 T. ground flax seed whisked with 3 T. hot water and then chilled in the fridge for about 5 minutes. Both psyllium husk and flax seed are inexpensive, high in fiber and easily available in large supermarkets, bulk food stores, or natural food stores.)
*********
1/3 cup brown sugar
1/4 cup oil
2 T. smooth UN-sweetened applesauce
1 tsp. vanilla extract
ADDITIONS:
1/2 cup dark vegan chocolate chips
Optional: 1/4 cup walnut pieces, chopped (Use pecans or other nuts, if you wish, or you can omit the nuts.)
Preheat oven to 350°F. Line a large cookie sheet with baking parchment.
In a medium bowl, mix together the Dry Mix ingredients with a whisk.
Mix together the Wet Mix ingredients in a 2-cup measuring cup-- this works best with an immersion/stick blender.
Add the Wet Mix to the dry mix and stir with a spoon. Then add the chocolate chips and nuts (if using).


Scoop the batter out with a 4 tsp. measuring spoon, slightly rounded, and drop a the dough "blobs" a couple of inches apart on the parchment-lined baking sheet, using a small silicone spatula to scoop the dough out of the spoon.
Bake for 6 minutes,

then gently flatten each cookie a bit with a flexible stainless-steel slotted spatula (see below).

Continue to bake for another 8 minutes. Remove the baking sheet to a rack and cool for 5 minutes. Then remove the cookies from the baking sheet to the rack and cool for at least another 10 minutes before serving.
Nutrition Facts (using the walnuts) per cookie:
Calories: 134 ; Total Fat 8g; Saturated Fat 2.3g; Cholesterol 0mg; Sodium 28mg; Total Carbohydrate 15.4g; Dietary Fiber 1.4g; Total Sugars 10.1g; Protein 2.1g; Calcium 9mg; Iron 1mg; Potassium 58mg
Enjoy!

Wednesday, September 12, 2018
UPDATED MOIST & DELICIOUS LOW-GLYCEMIC, LOW-FAT, VEGAN BROWNIES

The one thing that we haven't been eating very often is dessert, sadly. (My husband is being very patient!) I have devised a delicious low-sugar apple/rhubarb crumble, and some yummy no-sugar corn muffins, but we've mostly been enjoying the lovely fruits available this summer, and the occasional Chocolate "Nice Cream. (It's made with frozen ripe bananas and no added sweetener-- I'll post my version soon, as well as my newest version of Peruvian Lucuma Ice Cream, made with lucuma powder, which is used as a natural sweetener by some raw foodists, so you don't need to add much sweetener.). But, as the weather was changing a bit, I thought I'd work on making some LG and low-fat brownies. (You might have noticed that I love chocolate!)
In my first version, I use a combination of oat, millet and soghum flours (all low-glycemic) and smooth unsweetened applesauce instead of fat and a small amount of agave nectar for the sweetener (you could use maple syrup instead). They weren't bad, but the millet and sorghum flours made the brownies slightly crumbly in the finished product, even though the flours felt very fine to me when raw. So, I tried the same recipe again with only oat flour. The brownies were better, but I still felt that they weren't moist enough.
The 3rd time I made brownies, I used 2/3rds oat flour and 1/3 bean flour, AND I added 1/4 cup of yellow split pea puree, which I keep in the freezer, frozen in ice cube trays [2 tablespoons per cube] and then popped into freezer bags. This puree is a great as a fat replacer in baking and I thought it might add just that little bit more moisture that I needed. It turned out really well and this is the recipe I'm sharing below.
UPDATE: But, re-reading my post on baking with yellow split pea puree, I noted that I had been adding 1 T. water to the 2 thawed-out cubes of puree for a moist texture in muffins. So, I did just that today (Sept. 22, 2018) when I made a fourth batch, and the brownies were perfect this time. One more change I made was using 6 tablespoons of agave nectar instead of 1/3 cup (which is 5 1/2 tablespoons). We brought the brownies over to some friends today and they loved them! So I have updated the recipe below and I hope you enjoy it!PS: See about baking with yellow split pea puree, + a yummy fat-free muffin recipe at this link.
Anyway, enough chatter! If you try these, let me know what you think. I may try using a date puree for the sweetener next time and, if it works, I'll post it.

Printable Recipe
BRYANNA'S MOIST & DELICIOUS LOW-GLYCEMIC, LOW-FAT, VEGAN BROWNIES (soy-free and gluten-free if you use GF oats; NO added oil)
Servings: 12 bars
RECIPE UPDATED SEPT. 22, 2018 (See highlighted paragraph above.)
UPDATED on June 21, 2019:
If you cannot have any kind of sugar, you can use your favorite non-sugar sweetener, use sugar-free chocolate chips and use 1 cup chopped walnuts. [I dislike the taste of stevia, BTW.] Allulose is a relatively new type of sugar-free sweetener that sounds ideal (I haven't tried it yet, but plan to soon)-- read about it here https://bit.ly/32mD8C8 . Considering that most of the newer sugar subs are quite expensive, this is a pretty good buy, if you're interested.
DRY MIX:
1/2 cup oat flour (I simply blend rolled oats in a dry blender until fine and fluffy.)
(NOTE: stir the oat flour a bit before measuring.)
1/4 cup chickpea flour, yellow split pea flour, soy flour or white bean flour (You could use a darker bean flour, if you like, as long as the taste is mild.)
(PS: Soy flour is very low-glycemic-- GI 20-25 ; yellow split pea flour and black bean flour are GI 30; chickpea and oat flours ar GI 44.)
1/3 cup dark cocoa powder
1 tsp baking powder
1/2 tsp baking soda
1/2 tsp salt
WET MIX:
1 cup smooth UN-sweetened applesauce
6 tablespoons agave nectar (you can use maple syrup instead, if you prefer)
1/4 cup yellow split pea puree (see Tip below for how to make and store)
1 tablespoon water (to mix with split pea puree)
1 tsp vanilla extract
EXTRAS: (Optional)
1/2 cup semisweet or bittersweet dark chocolate chips (can be minis)
1/2 to 1 cup walnut halves or pecans, roughly chopped
Procedure:
Preheat oven to 350 degrees F. (NOTE: When I use my little counter-top Cuisinart Air Fryer Oven, 325 degrees F works best.)
Oil an 8-inch square baking pan (I use a Pyrex pan). Line with baking parchment, if you wish.
In a medium bowl, mix together the Dry Mix ingredients.
In a small bowl, mix together the Wet Mix ingredients.
Pour the Wet Mix into the Dry Mix and combine briefly but thoroughly. If you are using the chocolate chips and/or nuts, stir them into the batter.
Spread evenly in prepared pan. Bake for 18-20 minutes. Check with a toothpick at 18 minutes. If the toothpick is a bit gooey, bake a few minutes more. A toothpick should come out just about clean, but not really dry.
Cool the pan on a rack. When it has cooled completely, cut into 12 squares. Store in a covered container at room temperature-- they are even better the next day!
TIP- To make and store yellow split pea puree: Mix 2 cups of dried split yellow peas [they don't have to be soaked first] with 4 cups of water in your Instant Pot or other pressure cooker and cook at high pressure for 10 minutes. (PS: Or, you can simmer them in a pot, covered, for 30 minutes on your stovetop.) Let the pressure come down before opening the pot. The resulting soft mush just needed a few stirs to "puree", and the yield was 5 cups.
I refrigerated the puree for a day or so. When I removed it from the refrigerator, it had hardened considerably! I pressed some of the the puree into ice cube trays, which made cubes of 2 tablespoons puree, and some in 1/4 cup portions in silicone cupcake liners also in a silicone ice cube tray that made 1/4-cup cubes. Then I froze them. Later, I popped out the frozen portions, bagged them up in zipper-lock storage bags and placed them back into the freezer for future use.) Add 1 Tablespoon water to each 1/4-cup portion of split pea puree before adding to a baking recipe for brownies, muffins, etc..
NUTRITION FACTS:
WITHOUT chocolate chips or nuts:
Nutrition (per bar): 64 calories, 6 calories from fat, less than 1g total fat, 0mg cholesterol, 134.1mg sodium, 139.2mg potassium, 14.9g carbohydrates, 1.8g fiber, 7.1g sugar, 1.8g protein, 2.1 points.
WITH semisweet chocolate chips, but NO nuts:
Nutrition (per bar): 98 calories, 23 calories from fat, 2.9g total fat, 0mg cholesterol, 134.9mg sodium, 139.2mg potassium, 19.4g carbohydrates, 2.3g fiber, 7.1g sugar, 2.1g protein, 3.2 points.
WITH 1/2 cup nuts, but NO chocolate chips:
Nutrition (per bar): 96 calories, 33 calories from fat, 4g total fat, 0mg cholesterol, 134.2mg sodium, 160.7mg potassium, 15.6g carbohydrates, 2.2g fiber, 7.2g sugar, 2.6g protein, 3.1 points.
WITH both chocolate chips AND 1/2 cup nuts:
Nutrition (per bar): 130 calories, 49 calories from fat, 6.1g total fat, 0mg cholesterol, 135mg sodium, 160.7mg potassium, 20g carbohydrates, 2.6g fiber, 7.2g sugar, 2.9g protein, 4.1 points.
WITH semisweet chocolate chips AND 1 cup nuts:
Nutrition (per bar): 195 calories, 94 calories from fat, 10.9g total fat, less than 1mg cholesterol, 141.6mg sodium, 198.7mg potassium, 20.1g carbohydrates, 3.5g fiber, 6.5g sugar, 5.3g protein, 5.6 points.
Nutrition Facts for this recipe, using 1/2 cup sucralose instead of agave, and with 1 cup chopped walnuts and no choclate chips, are directly below,
***followed by Nutrition Facts for the recipe using 1/2 cup sucralose instead of agave, with 1/2 cup chopped walnuts and 1/2 cup sugar-fee chocolate chips or chunks, and***

Nutrition Facts for the recipe using 1/2 cup sucralose instead of agave, with 1/2 cup chopped walnuts and 1/2 cup sugar-free chocolate chips or chunks.

Nutrition Facts for the recipe using 1/2 cup sucralose instead of agave, with 1 cup chopped walnuts and 1/2 cup semisweet chocolate chips.

Enjoy!!

Wednesday, April 16, 2014
FARINATA (ITALIAN CHICKPEA FLOUR "PANCAKE") WITH VEGETABLE TOPPING FOR DINNER

NOTE: Apologies for my lack of posting and this short post! I'm trying to get ready for Easter company and I have a knee that's acting up, so I'm not getting as much done as I would like. I'll post a proper post very soon!
HAPPY EASTER AND HAPPY PASSOVER/PESACH!
Above is a photo of our dinner the other night-- Farinata (Italian chickpea flour "pancake") with a topping of lightly sautéed veggies and a bit of vegan cheese, accompanied by roasted cauliflower. This is one of my favorite dishes. The recipe for the basic Farinata (and some history, too) is at this post on my blog (and it's in my book "Nonna's Italian Kitchen"). It is far more delicious than the simple ingredients might suggest. The modern way to eat this very old peasant dish is to use toppings on the already-baked farinata, a bit like pizza (it doesn't taste like pizza, though). Personally, I like vegetable toppings, cooked ones in colder weather, raw or cooked ones at room temperature in warmer weather. You can let your imagination run wild, but I think less is more in terms of number of ingredients.
The topping in the photo (added AFTER the 10 minute baking and then pop it under the broiler or into a very hot oven to melt the cheese) was a combination of thinly-sliced onion, chopped brocolette, thinly sliced baby zucchini, and some organic oven-dried Roma tomatoes from a jar (they are from Costco, Kirkland brand, and contain herbs and oil-- I rinse much of the oil off them in a strainer before using), along with some basil and about 4 cloves of garlic, slivered. I added a bit of vegan parmesan and sprinkled a handful of Daiya mozza shreds on top (but you could use whatever type you prefer).
Honestly, it's such an easy, inexpensive meal and so very nutritious and delicious! DH is crazy about this!
PS: I usually make this in a 14" round pizza pan, but I this time made it in my little Cuisinart countertop oven (energy-saving!), so I used the 12" square pan that comes with the oven, lined with parchment.
Do give this a try!

Enjoy!

Thursday, November 21, 2013
HULI HULI SAUCE & BEAN-FLOUR-BASED GRAVIES + YOUR BROILER MAY BE A LOWFAT COOK'S BEST FRIEND
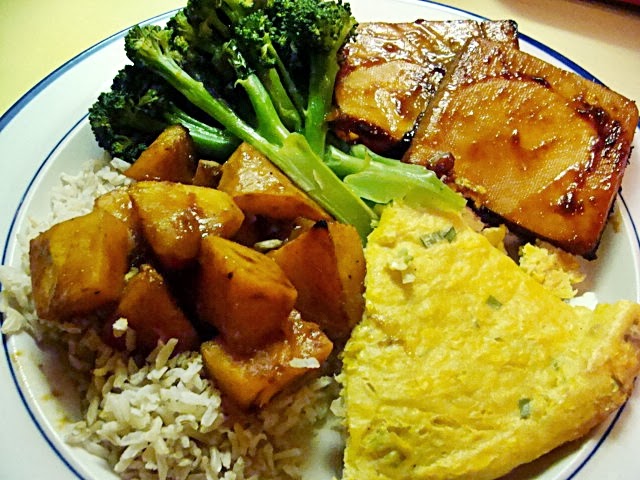 |
| A very easy and yummy low-fat vegan dinner: steamed broccoli, baked tofu with Huli Huli Sauce, Corn Pudding, brown basmati rice and roasted squash. |
HULI HULI SAUCE:
The first thing I need to post is the Huli Huli sauce. I posted the photo above on my Facebook page a couple of weeks ago and promised to post the recipe for the Huli Huli Sauce "soon". Well, I am finally getting around to it-- sorry to be so slow! Huli Huli Sauce is of Hawaiian origin and the "Huli Huli" part derives from the meaning, "to turn". The sauce was used on food turning on a spit-- hence, the name. Judging by the ingredients (which vary a little from version to version), the sauce has been a bit Americanized over the years, and the sauce is used as a type of barbecue sauce. This is my own particular version, which we think is quite yummy.
 |
| Baked tofu with Huli Huli Sauce (recipe below) |
BRYANNA'S VERSION OF HULI-HULI SAUCE
Servings: 4 Yield: about 1 cup
Use as a grilling, baking or BBQ sauce
1/4 cup water
1/4 cup brown sugar or coconut sugar
1/4 cup soy sauce (can be low-sodium)|
2 Tbs dry or medium sherry
2 Tbs ketchup (can be low-sodium)
2 tsp dark sesame oil
1 Tbs grated fresh ginger
a few shakes of hot sauce
a few shakes of liquid smoke
1 large clove garlic, crushed
Whisk together the ingredients. Marinate your tofu, seitan, Soy Curls, tempeh or whatever in the sauce for a while, if you have time. Then grill, bake (at about 450 °F), BBQ or broil your food until the sauce soaks in and your food has nicely browned. I didn't have time to marinate it, so I just baked thick firm tofu slices until they soaked up most of the sauce and browned a bit.
Nutrition Facts (sauce only):Nutrition (per 1/4 recipe): 100.6 calories; 19% calories from fat; 2.3g total fat; 0.0mg cholesterol; 539.1mg sodium; 128.1mg potassium; 17.9g carbohydrates; 0.3g fiber; 15.2g sugar; 17.6g net carbs; 1.0g protein; 2.2 points.
*******************
BEAN-FLOUR-BASED GRAVIES:I've been experimenting lately with using bean flours for thickening sauces, gravies and soups (more recipes to come). Using bean flours instead of white flour thickens mixtures such as this while adding fiber, protein and other nutrients to what might have been an almost empty calorie condiment. It's also handy for converting your sauces and gravies and cream soups to gluten-free and soy-free, and great for diabetics and those on low-glycemic and low-fat diets. The results have good depth of flavor and a lovely creaminess. So, far, I've only used chickpea flour and white bean flour, which are very versatile. You can substitute white bean flour measure-for-measure in place of white flour for thickening purposes. (Still checking chickpea flour sub amounts.)
 |
| Freshly-milled white bean flour from my new Wonder Mill-- you can also buy this flour in some natural food stores and online. Bob's Red Mill and Barry Farms are well known brands that carry it. I mill it from white navy beans, which are less expensive than the white kidney beans I usually use for cooking. |
 |
| Broiled Soy Curls, onions and mushrooms on toast with bean-based GF Rich Brown Yeast Gravy (from my book "World Vegan Feast", but recipe below) |
BRYANNA’S RICH BROWN YEAST GRAVY (GLUTEN-FREE, BEAN-BASED)
Makes 2 1/2 cups
This fat-free and delicious brown gravy will become a
low-fat staple. It lends itself to many variations!
1/3 cup nutritional yeast flakes
2 tablespoons oat flour (can be GF) (grind rolled or quick oats in a dry
blender or electric coffee/spice mill)
4 tablespoons chickpea flour (besan)
(OR use 1/3 cup white bean flour in place of the oat and chickpea flour)
(OR use 1/3 cup white bean flour in place of the oat and chickpea flour)
2 tablespoons soy sauce
2 1/2 cups water
1/2 teaspoon salt
Optional: several shakes of gravy browner, such as Kitchen Bouquet
In a 1 1/2 to 2 quart microwave-safe batter bowl or measuring
pitcher, mix the flours and yeast. Toast this in the microwave on full power
for 2 to 3 minutes, uncovered. Whisk in the water, soy sauce, salt, and gravy
browner, if using. Cover and cook on full power for 3 minutes. Whisk well. Cook
again for 3 minutes on full power. Whisk one last time.
Alternatively, in a heavy saucepan over high heat, whisk the
yeast and flours together until they smell toasty. Remove from the heat briefly
to whisk in the water, soy sauce, salt, and gravy browner, if using. Stir
constantly over high heat until it thickens and comes to a boil. Reduce the
heat and simmer for 2 to 5 minutes.
This gravy can be made ahead and reheated.
Nutrition (per 1/2-cup
serving): 26.6 calories; 13% calories from fat; 0.4g total fat; 0.0mg
cholesterol; 218.0mg sodium; 113.5mg potassium; 3.5g carbohydrates; 1.4g fiber;
0.3g sugar; 2.1g net carbs; 3.0g protein; 0.3 points.
 |
| Freshly-milled chickpea flour from my new Wonder Mill with an adapter for milling bean flours. If you don't have a mill, you can buy chickpea or garbanzo bean flour (or besan) in health food stores and Indian grocery stores, as well as online. |
My latest gravy recipe is a new bean-based version of my Southern-style biscuit gravy. You can bulk it up with Soy Curls (read about Soy Curls here) or other chicken subs, or vegan sausage, if you like. DH went crazy over it! (And, if you are counting calories, nix the biscuits and serve it on a steamed or baked potato, or whole grain toast or fat-free waffles.)
 |
| Creamy-smooth Vegan Southern-Style Bean-Based Biscuit Gravy (with Soy Curls) on a potato |

Printable Recipe
BRYANNA'S
VEGAN SOUTHERN-STYLE BEAN-BASED BISCUIT GRAVY
Servings:
6
Yield:
3 cups (without additions)
1/3 cup
white bean flour
1/4 cup
nutritional yeast flakes
1/2 tsp
salt
1 1/2 cups water
1 cup plain nondairy
milk
1/2 Tbs soy sauce
1/2 Tbs
"chicken-style" vegetarian broth powder or paste (you can use
a GF and/or SF version, if necessary), such as Better Than Bouillon No-Chicken Vegan Soup Base
2 tsp
dark sesame oil (Optional, but gives a smokey flavor)
freshly-ground black pepper
OPTIONAL: (any or all)
2 cups
reconstituted Soy Curls or other vegan chicken sub strips OR crumbled
vegan breakfast sausage (about 2 large links or 4 small), browned a bit under a
broiler
1/2 tsp
dried rubbed sage (not powdered)
1/2 tsp
dried thyme leaves (not powdered)
2
green onions, thinly sliced
 |
| Freshly-milled white bean flour |
Blend together all of the gravy
ingredients (EXCEPT optionals) until smooth.
Place in a heavy medium saucepan. Whisk over high heat until it starts to boil,
then reduce the heat to medium and whisk constantly for several minutes. Bean
flour takes a little longer than grain flour to cook through. Use taste and smell to discern whether or not
the gravy is finished. There should be no
“beany” taste or smell if it’s done.
 |
| Making the gravy |
If you are adding any of the optionals, do
so at this point, heat through and taste for seasoning. Serve hot over hot
split biscuits, toast, plain waffles, or potatoes.
 |
| The Gravy (with Soy Curls) on a potato; broiled leeks mixed with broth-sauteed broccoli with sundried tomatoes |
LAST, BUT NOT LEAST---BRING BACK THE BROILER!
I've been utilizing my oven's broiler ALOT these days, as we have been watching our calories. I spread veggies, or sliced tofu in a marinade, or reconstituted Soy Curls, etc. on a cookie sheet sprayed with a little oil from a pump sprayer, add any seasoning I might want, spray with a little oil from the pump sprayer again and place about 4-5 inches under the hot broiler. In just a few minutes they start to char a little and vegetables soften. I stir them around and cook for a few more minutes. In about 6 to 8 minutes, my food it cooked through and browned, with virtually no fat and not much effort.
Sometimes I use this method for a simple vegetable side dish an sometimes I use it as an alternate to stir-frying. I love doing leeks this way-- they get so soft and sweet and juicy. Give it a try!
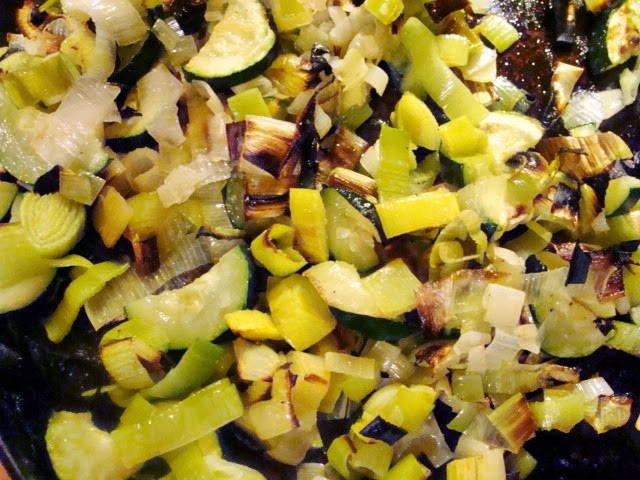 |
| Broiled leeks and zucchini |
 |
| Broiled Soy Curls, mushrooms and onions, ready to be topped with Rich Brown Gravy. |
 |
| Broiled leeks |
Enjoy!
Subscribe to:
Posts (Atom)