Showing posts with label white bean. Show all posts
Showing posts with label white bean. Show all posts
Friday, January 5, 2018
FRENCH CANADIAN-STYLE VEGAN MAPLE BAKED BEANS


This is my first blog post in a month! I've been taking a bit of a rest from blogging in the last few months, but am feeling more inspired since the New Year.
My husband, who was born and raised in Quebec City, has been requesting that I make the sort of French-Canadian baked beans that he was used to back home in Quebec, but vegan, of course. And no brown sugar or molasses; just real Canadian maple syrup for the sweetener. The Quebec version of this common North American meal is also not quite as sweet as what I grew up with in the USA.
I hope you'll enjoy this as much as we did! It makes alot, but leftovers can be frozen.
Just in case you wondered:
DIFFERENT WAYS TO SERVE BAKED BEANS:
1.) We like ours with just a green salad or cooked greens, and crunchy artisan bread or cornbread. Braised cabbage would be a great as a vegetable side dish, too.
2.) Some good vegan sausages or sliced vegan “ham” or vegan “bacon” alongside would be good. Or seitan “ribs”, perhaps?
3.) Leftovers are great as “beans on toast” or baked bean “Sloppy Joes”.
4.) Try them on top of split baked potatoes, or split baked sweet potatoes.
5.) Coleslaw makes a good side dish with baked beans.
6.) Pickles on the side?
7.) Heat leftover beans with chunks of veggie hotdogs or spicy vegan sausage.
8.) Corn on the cob!
9.) If you like beans for breakfast, serve with some scrambled tofu and hash browns.

Printable Copy (Includes Chili Sauce recipe)
BRYANNA'S FRENCH CANADIAN-STYLE VEGAN MAPLE BAKED BEANS
Serves 10-12
Ingredients:
4 cups (about 2 lbs.) dried small white beans or navy beans (which are also called white pea bean, Boston bean, Yankee bean or fagioli, depending on where you live),
(Other possibilities are cannellini beans--also called white kidney beans or fazolia)-- OR Great Northern beans OR marrow beans)
1 large onion, chopped
1 cup real maple syrup (preferably the darker kind-- Grade B)
3/4 cup bottled chili sauce (the spicy, sweet-ish sauce-- Heinz makes it), or use a favorite tomatoey BBQ sauce, or the easy homemade recipe* at the end of this recipe)
2 tablespoons Chinese toasted sesame oil
1 tablespoon mustard powder (such as Coleman's or Keen's)
1 tablespoon fine salt
OPTIONAL: 1/4 cup of vegan “bacon bits” or 1 cup of chopped vegan “ham” or “bacon” of your choice
Instructions:
Soak the beans in lots of water overnight.
The next day, drain them in a colander. Place the soaked beans in a large Dutch oven or oven-proof pot with a fitted lid. Bring to a boil, then remove from the heat and let stand, covered for 1 hour. After an hour, if there is not about a 1/2-inch of water over the beans, add some to that level
Turn your oven to 300°F. (I use my counter-top oven for this job-- saves energy.) While it heats up, add the remaining ingredients to the pot of beans and mix gently to distribute evenly.
Cover and bake for 4 hours. Check after 2 hours and add some water if the mixture looks too dry. (Do the same when they are fully-cooked.) You don't want the beans swimming in liquid, but you don't want them to be dry either.

*EASY HOMEMADE CHILI SAUCE
Makes about 11/2 cups
This sauce is great baked on top of a vegan meatloaf, and it can also be used in homemade Thousand Island Dressing, on burgers, vegan "ribs" and "hot dogs".
6 oz. can of good-quality tomato paste (I used Kirkland organic.)
1/2 cup water
1/2 cup agave syrup, maple syrup or brown rice syrup
1/2 cup cider vinegar
2 tsp. onion powder
1 tsp. chili powder
1 tsp. salt
1/2 tsp. vegan Worcestershire sauce (here's my homemade recipe)
1/4 tsp. ground allspice
1/8 tsp. EACH ground cloves, garlic granules or powder, and chili flakes
a few grindings of black pepper
Mix the ingredients together well in a 1-quart saucepan. Bring to a low boil, then turn down to a simmer and cook until thickened (almost the consistency of ketchup-- it will thicken a bit more as it cools). Keep in a jar in the refrigerator.
Enjoy!


Friday, December 19, 2014
SIMPLE-BUT-DELICIOUS LEEK & GIGANTE BEAN (OR WHITE BEAN) SOUP; & YUMMY VEGGIE SANDWICH ON HOMEMADE SPROUTED WHEAT BREAD

 This was our lunch the other day and you could hardly hope for a more delicious, inexpensive and healthful, even though it was made from simple ingredients and leftovers. The soup is my rendition of an Italian soup and, in true Italian style, the flavor belies the simplicity of the few ingredients. My husband raved over it and wants me to make it regularly. The sandwich was made with thin slices of my second batch of homemade sprouted wheat bread made with minimal flour. (Read about my first trial here.) I didn't have much to make a sandwich out of, so I spread both sides the last of my homemade Okara/Cashew Ricotta (2 other vegan ricotta recipes here) and sprinkled one side with grated carrots and the other side with thinly-sliced red bell pepper. Doesn't sound very exciting, does it? But, surprisingly, the combination of the smooth ricotta, the crunchy fresh veggies, and the nutty sprout bread was scrumptious! The first batch of my sprouted wheat bread included about 1 cup flour per loaf-- the rest was the ground sprouted wheat, kneaded together with the yeast, salt, etc. (no oil). The loaves rose beautifully, cut well, had a lovely crumb and flavor, and looked like a "normal" loaf of homemade sandwich bread:
My second batch was made the same way (but I oiled everything the dough touched to avoid having a sticky mess like the first time!), except that I used only 1 cup whole wheat flour for 3 loaves. As you can see by the photos below, it didn't rise as nicely, but it was easy to slice and smelled and tasted divine.
I want to test the sprouted wheat bread at least one more time, or until I get it to our satisfaction (so close!), before I post the recipe on this blog, but I doubt I'll get it done until January-- too many other things to do right now! (UPDATE: Here's the recipe!) But we love it so much that we don't mind consuming the experiments! Happy Holidays, everyone. (I will post again before Christmas.)
 Printable Recipe BRYANNA'S SIMPLE-BUT-DELICIOUS LEEK AND GIGANTE BEAN (OR WHITE BEAN) SOUP Serves 4 | ||||||||||||||||||||||||||||||||||||||||||
| ||||||||||||||||||||||||||||||||||||||||||


Thursday, November 4, 2010
SUNDRIED-TOMATO POLENTA ROUNDS W/ BRAISED KALE, CARAMELIZED ONIONS & CANNELLINI BEANS W/ DRIED MUSHROOMS & SAGE

Continuing the post about onions in general, and Caramelized Onions in particular (and the recent post on beans, too), I'm going to share a very special dish that I developed for a McDougall Celebrity Chef event in Santa Rosa, CA 2 years ago. I wanted to create a bean dish that was simple, yet elegant and delicious, and used seasonal foods, such as corn, kale, onions, and dried vegetables. What really makes the dish special is the dried mushrooms cooked with the beans!
The dish also contains instructions for cooking with and without fat (I used no fat in the McDougall workshop), gives options for different cooking methods for the beans, polenta and onions, and a method of speeding up stove-top Caramelized Onions that I adapted from a recipe for improving gas-grilled onions in Cooks Illustrated magazine. It looks long, but you don't have to make it all in one go. You can cook the components at different times, well ahead of time (and you can make more of each component to use in other dishes, if you like).
Printable Recipe
BRYANNA'S SUNDRIED-TOMATO POLENTA ROUNDS WITH BRAISED KALE, CARAMELIZED ONIONS, AND CANNELLINI BEANS WITH DRIED MUSHROOMS AND SAGE
Serves 6
Serves 6
This is adapted from a recipe I developed for a McDougall Celebrity Chef workshop. For that reason, I made the dish (onstage!) with no oil whatsoever and it was perfect. However, I have given options here for some judicious use of oil if you prefer.
The components for this dish can be made ahead of time and reheated before serving (except for the kale, but it can be prepared for cooking ahead of time). By the way, please don't substitute that ready-made polenta in a tube! It really is nowhere near as good as homemade, and so much more expensive!
The components for this dish can be made ahead of time and reheated before serving (except for the kale, but it can be prepared for cooking ahead of time). By the way, please don't substitute that ready-made polenta in a tube! It really is nowhere near as good as homemade, and so much more expensive!
BEANS: (You can make these ahead of time, even a day or two before.)
2 cups dried cannellini beans (or white kidney beans
 , butter beans or Great Northern beans
 ), soaked 8 or more hours in salted water (see this post) and drained
(or white kidney beans, butter beans or Great Northern beans), soaked 8 or more hours in salted water (see this post) and drained
1/2 oz (1/2 cup) dried porcini mushrooms
1 large sprig fresh sage
2 cloves garlic, chopped
CARAMELIZED ONIONS: (You can make these earlier in the day.)
4 large onions, thinly sliced
salt
OPTIONAL: 1 tablespoon or so of brown sugar
OPTIONAL: 2 tablespoons olive oil or vegan butter
OR use 2/3rds of the recipe for Slow-Cooker Caramelized Onions here (Use either the fat-free or the oil version.)
POLENTA ROUNDS: (You can make this ahead of time, even a day or two before.)
4 cups water
1 1/4 cups yellow cornmeal or polenta
1 1/2 teaspoons salt
12 dried tomato halves soaked in boiling water until softened, drained, patted dry and chopped
soaked in boiling water until softened, drained, patted dry and chopped
(OR use sundried tomato halves in oil and rinse the oil off under hot tap water and pat with a paper towel before chopping)
plenty of freshly-grated black pepper to taste
OPTIONAL: 2 tablespoons olive oil or Earth Balance
BRAISED KALE: (You can trim, wash, and slice the kale earlier in the day and refrigerate, but cook it just before serving)
1 large bunch fresh kale, washed, stripped off the stems, and thinly sliced
salt
OPTIONAL: 1 to 2 tablespoons olive oil or dark sesame oil
OPTIONAL: 1 to 2 tablespoons olive oil or dark sesame oil
To cook the beans, you have several options: (I don’t use a pressure cooker for the beans in this dish because it’s harder to control the texture and shape retention of the beans.)
Option #1: Mix all of the bean ingredients in a large pot and bring to a boil. Boil for a couple of minutes, then turn down to a simmer and cook 1 1/2 to 2 hours, or until tender but holding their shape. Remove the sprig of sage and discard. Option #2: place the ingredients in a large oven-safe pot with a lid and bake at 350ºF. Check them after an hour and test for tenderness. Option #3: Place the ingredients in the insert of your slow-cooker
 , using BOILING hot broth. Cover and cook on High for about 3 hours, or until tender but retaining their shape. If they are not done yet, check every 30 minutes or so.
with a lid and bake at 350ºF. Check them after an hour and test for tenderness. Option #3: Place the ingredients in the insert of your slow-cooker, using BOILING hot broth. Cover and cook on High for about 3 hours, or until tender but retaining their shape. If they are not done yet, check every 30 minutes or so.
To caramelize the onions (if you aren’t using the slow-cooker method): (I learned this method of pre-cooking from Cook’s Illustrated magazine.)
Place the onions in a large microwave-safe bowl or casserole. Cover with the lid or with plastic wrap and microwave on High until the onions begin to soften and the tips turn slightly translucent, 6 to 8 minutes, stirring once halfway through cooking (be careful of the steam). Set aside. (An alternative might be to steam the onion, but make sure they are only partially softened as described above.)
Heat a large heavy nonstick skillet over high heat. Add the optional olive oil or Earth Balance, if using. Add all of the pre-cooked thinly-sliced onions and sprinkle liberally with salt. (The salt draws out the liquid, causing the onions to soften more easily as they cook.)
Start steam-frying them (see Cooking Tips below) over high heat and, after they wilt, turn down to medium-high. As soon as the natural sugar in the onions starts to brown on the bottom and edges of the pan, add a little liquid and scrape up the brown bits, mixing them into the liquids and around into the cooking onions—you probably won’t need to do this if you use the oil or earth Balance. (Some people like to add a little brown sugar at this point-- it's up to you!) Keep doing this until the onions are soft and brown, being careful not to scorch them.
This can take about 20 minutes and you don't have to stir continually, but you have to be around and keep an eye on them! I do simple chores in the kitchen while I do this.
Cooking the Polenta-- you have several choices. (Whichever way you are cooking the polenta, mix the cornmeal with COLD water and salt. Don't mix hot water with dry cornmeal, or it will clump up.)
For the Double-Boiler Method, mix the cornmeal, water and salt in the top of a double boiler. Set the bottom of the double boiler to boil with water in it. Place the top of the double boiler over high heat and, bring to a boil quickly, stirring almost constantly with a whisk or wooden spoon, to prevent sticking and clumping. IMMEDIATELY it boils, place it over the bottom part of the double boiler, over the simmering water. Let simmer 20 minutes, partially covered, and stirring now and then, until the mush is creamy and smooth (for soft), or very thick and not gritty anymore (for firm).
For the Pressure-Cooker Method, mix the polenta, cold water, and salt in a heat-proof or stainless steel bowl or casserole that will fit into your pressure cooker. Cover with foil. Fold a long piece of heavy foil into a 2"-wide length and use that to lift the casserole/bowl in and out of the cooker. Place the casserole/bowl on a rack over 1-2" of water in the bottom for your cooker. Bring to pressure over high heat, then turn down just enough to maintain this pressure, and cook 10 minutes. Remove from heat and let rest 5 minutes, then quick-release the pressure under cold running water. Stir the polenta.
For the Microwave Method, whisk the polenta, water, and salt together in a large microwave-safe bowl or casserole. Cover and cook on High for 5 minutes. Whisk the mixture. Re-cover and cook on High 3 minutes. Whisk again. Re-cover and cook again for 3 minutes more. Let stand 1 minute. (Taste the polenta and make sure that it doesn't have that rather unpleasant bitter taste of undercooked cornmeal. If it does, let it cook a little longer.)
To make the Polenta/Sun-Dried Tomato mixture:
Mix the chopped sundried tomatoes into the hot polenta, and add plenty of freshly-ground black pepper. Add the olive oil or Earth Balance, if you like. Immediately spread the hot polenta into a cooking-parchment-lined 9 x 13" baking pan and smooth it out evenly. Refrigerate until firm.
When you are ready to assemble the dish:
Cook the kale, by mixing the kale and broth in a large covered pot. Bring to a boil, then turn down to medium and cook until the kale is tender, about 10 minutes. Drain off any excess liquid. toss with the oil, if you like. Season with salt to taste and keep warm.
Make the Polenta Rounds:
Cut the now-firm polenta into 6 rounds with a 4" cutter (or use a small plate as a guide). (There will be some scraps of polenta left over-- I brown them and eat them for breakfast with some leftover gravy!)
Either grill or broil them 3 to 4" from the heat source until speckled with browned spots; brown them over high to medium-high heat in a nonstick skillet; or place them on a nonstick cookie sheet and bake them at 450 °F for 10-15 minutes.
Warm the beans and onions, if you have made them ahead of time.
For each serving:
Place a hot Polenta Round on a plate, top with 1/6th of the kale, then with some of the beans, and, finally, with 1/6th of the Browned Onions. You can layer them casually on an angle, or stack them more formally as they might do in a restaurant. Serve immediately.
© Bryanna Clark Grogan 2008
Cooking Tips
HOW TO STEAM-FRY
You will often see the term "steam-fry" in my recipes. Here is a description of what it is and how to do it.
METHOD OF STEAM-FRYING:
"Steam-fry" simply means sautéing without fat. To do this, use a heavy skillet or stir-fry pan (use non-stick, hard anodized aluminum, or cast iron), or a well-seasoned wok,sprayed lightly with oil from a pump sprayer, or with cooking spray.
Heat the pan over high heat, add the chopped onions or other vegetables, and one or two tablespoons of liquid (water, low-sodium vegetarian broth, or wine), depending on the amount of vegetables. Do not crowd the pan, or your vegetables will "stew". Cook over high heat until the liquid starts to evaporate, stirring with a spatula or wooden spoon. Keep stirring until the vegetables are done to your liking, adding JUST ENOUGH liquid to keep the vegetables from sticking to the bottom of the pan.
You can brown onions (but not caramelize them) perfectly by this method. As soon as the natural sugar in the onions starts to brown on the bottom and edges of the pan, add a little liquid and scrape up the brown bits, mixing them into the liquids and around into the cooking onions. Keep doing this until the onions are soft and brown, being careful not to scorch them.
TO "STEAM-FRY" IN THE MICROWAVE, use a glass dish, such as a round 10" Pyrex casserole dish or pie plate. Spray with oil from a pump sprayer or cooking spray. Add ther chopped onions, garlic, carrots, celery, or whatever vegetables you want to sautè. Cover the dish with a glas lid or microwavable plate, and microwave 5 minutes, or however long it takes to soften them. This method is convenient because you don't have to watch the vegetables- you can be preparing the rest of the recipe while they cook. Just add the softened vegetables to the recipe.
Enjoy!

Thursday, January 18, 2007
A COUPLE OF OLD FAVORITE FAT-FREE RECIPES
We don't eat fat-free, but I try to keep the fat to a minimum, for various reasons. Here are a coupld of our favorite recipes that are fat-free or made with minimal fat, but still are enjoyable.
With many recipes, you can lower the fat, or even eliminate it, by steam-frying onions, etc., instead of sauteing them. (See the bottom of this post for how to do this.) To do this, use a well-seasoned stir-fry pan (flat-bottomed wok). Alternately, use a heavy well-seasoned cast iron or anodized aluminum skillet, lightly lubricated with about 1/2 teaspoon of oil brushed onto the cold pan with your fingertips. (Stainless steel and carbon steel pans can also be seasoned to have an almost-non-stick surface. Just Google "How to season a stainless steel skillet" or whichever type you want to make nonstick.)
When I do add fat, I tend to use a little bit of dark roasted sesame oil most often, because a little bit adds alot of flavor.
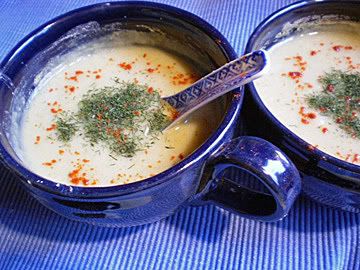
Creamy bean-based broccoli-cauliflower soup with smoked paprika and dill garnish
Printable Recipe
BRYANNA'S CREAMY BROCCOLI-CAULIFLOWER-AND-WHITE BEAN SOUP
Servings: 4
A very simple concept-- you simmer cooked white beans with whatever vegetable you like , then puree it for a thick and creamy soup, without potatoes, starches, butter, cream, or nuts.
1 1/2 cups well-cooked or canned white beans (15 ounce can), rinsed and drained (such as white kidney beans, cannellini beans, navy beans, or Great Northern beans)
1/2 a medium onion, chopped
1 large clove garlic, chopped
1/2 pound fresh broccoli, trimmed and chopped
1/2 pound fresh cauliflower, trimmed and chopped
2 cups chicken-style vegetarian broth (Better Than Bouillon No-Chicken is my favorite)
1/2 teaspoon salt
freshly-ground black pepper to taste
Steam-fry (see the bottom of this post for how to do this) the onion and garlic for 5 minutes over high heat in a large well-seasoned heavy skillet sprayed with a little oil from a pump sprayer, adding drops of water as needed to keep from sticking. (Or cook in a microwave oven in a covered microwave-proof casserole for 3 minutes.) Don't brown the onions.
Add this to the beans, vegetables, broth, and salt in a medium pot. Bring to a boil, cover, turn down to medium-low, and simmer about 10-15 minutes, or until the vegetables are tender.
Puree right in the pot with an immersion/stick blender, OR, with a slotted spoon, transfer all the solids to the food processor or blender and puree until smooth. (Important caution: Leave an escape in the lid for steam, or else hot veggies will explode all over you!). Add a bit of the broth, then stir the pureed mixture back into the pot. Taste for salt and pepper. Garnish each serving with dried dill weed and smoked paprika or sweet paprika.
Nutrition Facts
Nutrition (per serving): 129.7 calories; 3% calories from fat; 0.6g total fat; 0.0mg cholesterol; 268.3mg sodium; 745.3mg potassium; 24.0g carbohydrates; 4.5g fiber; 0.9g sugar; 19.5g net carbs; 9.9g protein; 1.8 points.
*****************************************************************
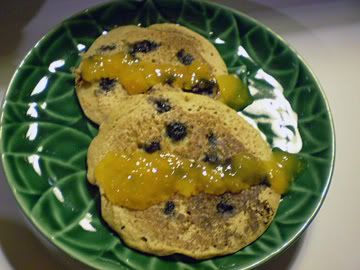
Blueberry pancakes made with half oat flour and half wholewheat pastry flour
Printable Copy
BRYANNA'S BLUEBERRY-OAT PANCAKES
Servings: 6
Yield: makes about 24 four-inch pancakes
This is a great basic high-fiber, but very light and tender pancake recipe, due to the oat flour and wholewheat pastry flour.
1 1/2 cups oat flour ( you can use 1 1/3 cups rolled oats ground fine in a dry blender or, in batches, in a clean dry electric coffee/spice mill)
1 1/2 cup whole wheat pastry flour (do not substitute ordinary whole wheat flour or the pancakes will be tough)
2 Tbs brown sugar
1 teaspoon baking soda
1 teaspoon baking powder
1 teaspoon salt
1 large pinch nutmeg
1 large pinch cinnamon
2 cups minus 1 Tbs nondairy milk
1 cup water
1 Tbs lemon juice
1 Tbs oil
1 teaspoon vanilla
1 cup small fresh or frozen blueberries, placed in a small sieve over a bowl to drain
In a large bowl, whisk the oat flour, pastry flour, baking powder, baking soda, salt, nutmeg, and cinnamon together well. Add the soymilk, water, lemon juice, oil, and vanilla. Stir briefly, just to mix-- lumps are okay. (This batter is a little more runny than ordinary pancake batter.)
Heat a nonstick electric griddle (which cooks very evenly), or a well-seasoned cast iron griddle or skillet, over high heat. When it's hot (drops of water dance on the surface when sprinkled on, the disappear quickly), turn it down to medium-high (about 325 degrees F for electric griddle). Spray with a little oil from a pump sprayer. Spoon the batter onto the surface, not crowding, because they spread a little. You can make small pancakes, about 4" across , or larger ones, whichever you prefer.
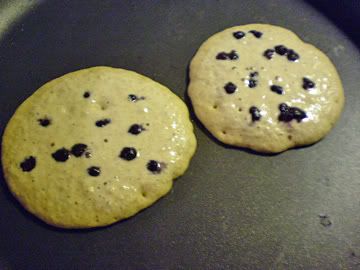
Sprinkle a few blueberries over the top of the pancake immediately after forming the pancake batter in the pan.
When bubbles appear on the tops, flip the pancakes over gently, loosening the bottoms carefully.
When the underside is golden and the inside is cooked (you can check one with a fork to make sure), serve them immediately. Don't overcook these-- they should still be kind of puffy when you take them off the griddle. If you let them overcook, they'll go flat and won't be as light and cakey as they should be. Serve hot with low-sugar syrup or fruit topping, such as low-sugar jam.
Nutrition Facts
Nutrition (per 4 pancakes): 177.2 calories; 19% calories from fat; 3.9g total fat; 0.0mg cholesterol; 566.7mg sodium; 338.2mg potassium; 31.0g carbohydrates; 5.1g fiber; 4.5g sugar; 25.9g net carbs; 6.9g protein; 3.1 points.
BRYANNA’S METHOD OF STEAM-FRYING
Steam-Frying, or Sautéing without Fat (including caramelizing)
Steam-frying simply means sautéing or stir-frying without fat. To do this, use a well-seasoned stir-fry pan (flat-bottomed wok). Alternately, use a heavy well-seasoned cast iron or anodized aluminum skillet, lightly lubricated with about 1/2 teaspoon of oil brushed onto the cold pan with your fingertips. (Stainless steel and carbon steel pans can also be seasoned to have an almost-non-stick surface. (Just Google "How to season a stainless steel skillet" or whichever type you want to make nonstick.)
Heat the pan over medium heat, add the chopped onions or other vegetablesyou are using (sometimes referred to as “aromatics”), salt them lightly to bring out the natural liquids, which helps soften the vegetables, and add one or two tablespoons of liquid (water, low-sodium vegetarian broth, or wine), depending on the amount of vegetables. Do not crowd the pan, or your vegetables will stew. Turn up the heat to high and cook over high heat until the liquid starts to evaporate, stirring with a wooden or plastic spatula or spoon. Keep stirring until the vegetables are done to your liking, adding just enough liquid to keep the vegetables from sticking to the bottom of the pan.
Variations: (PS: I collect Pyrex casseroles, bowls and lids from thrift stores to use in the microwave.)
*To “Micro-Steam-Fry”, use a microwave-safe glass dish, such as a round 10” Pyrex casserole dish or pie plate. Add the chopped onions, garlic, carrots, celery, or whatever vegetables you want to sauté. Cover the dish with a Pyrex lid or microwavable plate, and microwave 5 minutes, or however long it takes to soften them. This method is convenient because you don’t have to watch the vegetables— you can be preparing the rest of the recipe while they cook. Just add the softened vegetables to the recipe. This method is not great for browning, however.
* You can brown, or caramelize, onions without fat perfectly by tweaking the steam-fry method. You will need to use a heavy large, heavy seasoned skillet-- see first paragraph.
Combine your thinly-sliced onions with 1/2 teaspoon salt for each 2 large onions, in medium microwave-safe bowl or casserole. Cover with a microwave-safe plate or lid (not touching the onion), and microwave on high power until onions begin to soften and tips turn slightly translucent, 4 to 6 minutes, stirring once halfway through cooking (be careful of steam). If you cook more than 2 large onions, it will take longer.
Place the cooked onions in your heavy well-seasoned skillet (see first paragraph) over high heat. As soon as the natural sugar in the onions starts to brown on the bottom and edges of the pan, add a little liquid and, using a wooden or plastic spoon or spatuala, scrape up the brown bits, mixing them into the liquids and around into the cooking onions. Keep doing this until the onions are soft and brown as you like them, being careful not to scorch them. You can keep going until the onions are dark brown if you want them caramelized.
Enjoy!

Subscribe to:
Posts (Atom)