Showing posts with label sprouted wheat bread. Show all posts
Showing posts with label sprouted wheat bread. Show all posts
Tuesday, January 20, 2015
MY RECIPE FOR SPROUTED WHEAT BREAD (WITH MINIMAL FLOUR)


UPDATE Nov. 2017: Are you gluten-intolerant or do you have IBS? There is research showing that you may be able to tolerate grains with gluten if they are sprouted or risen with natural fermentation, such as sourdough. (PS: Using sourdough starter in this bread recipe would require some experimentation because so little liquid is used in this dough.)
Sprouted wheat flour can be used in place of ordinary wheat flour in this recipe and the bread would still be inexpensive, since so little is used. You could even make your own sprouted wheat flour, if you are so inclined, directions here: http://www.theprairiehomestead.com/2011/01/making-sprouted-flour.html
RECIPE UPDATED ON JAN. 23, 2015-- I added some photos and a few extra notes and corrected the size of the bread pans I use and the amount of water used in the recipe. Sorry about that-- should not write recipes when I'm sick!
I'm sorry it's taken so long to get this post (or any post!) up-- I've been sick with the flu. But, at last I'm finishing this post on how to make a delicious sprouted wheat bread (with minimal flour) that is not heavy, flat and/or overly moist, that has the texture and appearance of a good whole wheat loaf.
I started this journey because I was interested in making a bread with a lower glycemic index rating. I discovered that: "Since particle size influences the glycemic index (the smaller the size the higher the glycemic index), bread made from grain kernels have been shown to be lower GI. Not yet tested but probable, bread made from sprouted grains can be expected to have a similar effect." From http://tinyurl.com/ywve7 (And evidently, sourdough breads are lower on the glycemic index, too.) Eating lower on the glycemic index may have a positive influence on my husband's triglyceride levels, so we (both being bread bakers) thought it was worth some experimentation.
Many bakers are experimenting with sprouted wheat flour, but I prefer not to buy it-- it's very expensive, and it's time-consuming to make (you must sprout the grain, then dry it thoroughly, and then grind it-- which is why it is expensive to buy). We grind our whole wheat flour, so we have lots of wheat kernels in the house at all times. So, the most practical solution seemed to be to experiment with the sprouted wheat itself. But I was aiming for a lighter loaf than most the sprouted wheat breads I'd seen, one with minimal flour, and one which did not need the addition of vital wheat gluten powder in order to rise (not that I object to it-- I use it to make seitan-- but I think it makes breads too chewy.)
My first experiment, using an adapted version of a recipe from "The Laurel's Kitchen Bread Book: A Guide to Whole Grain Breadmaking" was a success-- the dough was easy to handle and rose beautifully, baked up nice and crusty. I used my husband's signature baking method-- 5 minutes at 485°F. and 25 more at 375°F-- and the bread tasted great, smelled heavenly (kind of nutty), and the crumb is lovely. It made delicious toast!
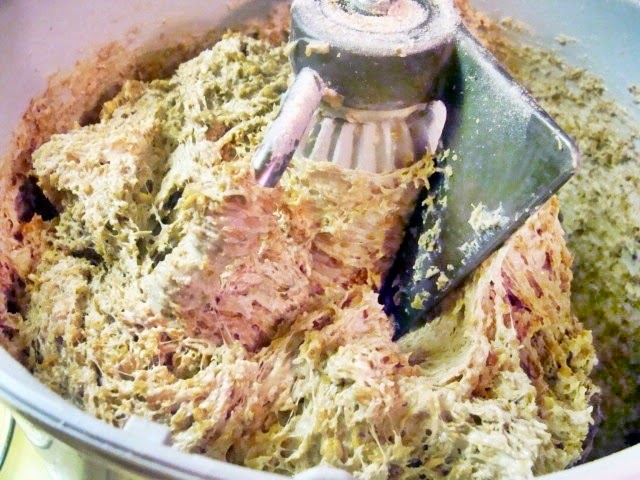
But what was NOT so positive with my first batch was that when I removed the initial ground sprout mixture from the food processor and the kneaded dough from the mixer bowl, I was left with a thin coating of sticky dough that stuck like glue, particularly to the blade (inside and out) of the processor. After soaking everything in warm water for a while, it took me about 20 minutes of scrubbing to clean everything, and the sponge had to go into the garbage can. But I let the dough rise in an oiled bowl and that bowl was easy to clean (thank goodness!). When I cut and rolled the dough and shaped the loaves, I oiled my hands and had no problem with sticking. So, the next time, as I outlined in the final recipe, I oiled everything the dough was going to touch, and it went smoothly (not to make a pun). Don't worry-- after kneading, the dough not so sticky and should feel like an ordinary bread dough.
So, here's the final recipe. I hope it works as well for you as it has for us. It's truly delicious and I have some more wheat kernels soaking right now for the next batch.

So, here's the final recipe. I hope it works as well for you as it has for us. It's truly delicious and I have some more wheat kernels soaking right now for the next batch.
BRYANNA'S
SPROUTED WHEAT BREAD (WITH MINIMAL FLOUR)
Yield:
3 loaves
You will need a large food processor to grind the soaked
wheat kernels, a large colander, a large bowl for rising the dough, and, if you
prefer not to hand-knead, a sturdy stand mixer than can knead 3-4 loaves-worth
of whole grain dough. You will also need three 8 x 4.5-inch loaf pans. (We use these pans-- they are excellent and long-lasting and only need greasing once in a while.)
6 cups hard red wheat kernels
1/4 cup warm water
2 teaspoons instant baking yeast
1/3 cup (packed) brown sugar, Sucanat or
coconut sugar
3 1/2 teaspoons salt
3 cups whole wheat flour OR sprouted whole wheat flour
(NOTE: You can even make your own sprouted wheat flour, if you are so inclined:
http://www.theprairiehomestead.com/2011/01/making-sprouted-flour.html )
(NOTE: You can even make your own sprouted wheat flour, if you are so inclined:
http://www.theprairiehomestead.com/2011/01/making-sprouted-flour.html )
Optional:
3 tablespoons oil (this addition does help keep the bread moist for a longer time)
1 In a large bowl,
cover the wheat kernels (by several inches) with warm water. Cover the bowl and
let stand in a warm place (such as in the oven—turned off-- with the light on).
Depending on the warmth in house, you may
have to let the wheat soak for up to 3 whole days (which is what it takes me, usually), rinsing and changing the water twice a day.
IMPORTANT: You don't want the wheat to sprout more than a tiny fraction-- just so you see the white sprout emerging. In my experience, some of the wheat may not sprout at all, but it still works just fine for this recipe. NOTE: If the water smells a bit fermented and gets a little frothy on top, the temperature where you are sprouting the wheat is too warm! Thoroughly rinse the wheat in cold water, add new water and continue in a cooler place. If you can't use the sprouts right away, rinse them, then store in a covered container in the refrigerator (for only a day or two) until you can make the bread. Rinse them with warm water and drain for 30 minutes before using.
IMPORTANT: You don't want the wheat to sprout more than a tiny fraction-- just so you see the white sprout emerging. In my experience, some of the wheat may not sprout at all, but it still works just fine for this recipe. NOTE: If the water smells a bit fermented and gets a little frothy on top, the temperature where you are sprouting the wheat is too warm! Thoroughly rinse the wheat in cold water, add new water and continue in a cooler place. If you can't use the sprouts right away, rinse them, then store in a covered container in the refrigerator (for only a day or two) until you can make the bread. Rinse them with warm water and drain for 30 minutes before using.
ALSO IMPORTANT: If the wheat sprouts more than a tiny bit, the diastatic enzymes develop and make the bread dough very gooey and hard to bake.
3 When you are ready to make the dough, drain the wheat in a large colander and let drain for about 1/2 an hour.
4 Meanwhile, thoroughly oil ALL of the equipment that the dough will touch-- all of the inside of the food processor bowl and the inside of the lid, the blade, the inside of the blade, and the spindle for the blade; and then the inside of your mixer bowl, the inside of the mixer lid, and the dough hook. Also oil the inside of the bowl you will use for rising the dough. This is VERY important. If you neglect the oiling procedure, the un-kneaded dough will stick like glue to everything it touches!
5 Grind the drained wheat kernels in the oiled food processor in 2 or 3 batches, depending on the size of your machine. Grind the kernels until they form a dough on the top of the blade. You will see the bran in the dough, by the way. Deposit each batch of dough into a large oiled bowl or the oiled bowl of the stand mixer you are using.

6 Soften the yeast in
the warm water for a few minutes and scoop it into the dough (along with the
optional oil, if you are using it). In a small dry mixing bowl, stir together 1
cup of the whole wheat flour, the sugar and salt. Add this mixture to the dough
and begin kneading, by machine or with your hands on an oiled counter, or right
in a large oiled bowl. Add the remaining flour as the kneading proceeds. You
should use the entire 3 cups in order for the bread to rise nicely. This has
worked for me with no adjustments after draining the wheat for about 30 minutes, but if you drain the wheat for a longer time, you may have to add a bit of water until the dough feels right. You do not want the dough to be very dry or
stiff. Knead the dough for about 10 minutes. It should feel like a
normal, springy whole grain yeast dough. If you knead by hand, oil your hands
and the kneading surface, rather than flouring them, so that the dough remains moist
and springy.


8 The dough should double in size and be springy. To test for whether or not it has sufficiently risen, poke your finger into the dough and, if the hole does not start filling in, it’s ready. If you would like to rise it once again before forming the loaves, punch it down and let it rise again for about 1 hour.

9 On an oiled surface, with oiled hands, divide the dough into three equal pieces. You want each loaf to weigh approximately 1 lb. 12 oz., no more. You may have some extra dough left over, which you could shape into small buns, a little baby loaf, to or make into tortilla-like flatbreads, if you like.
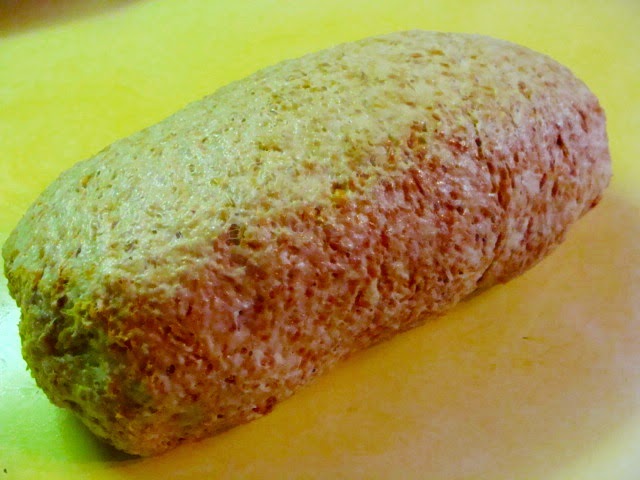
Pat each piece of dough into a rough rectangle and roll it up from one of the short sides. Pinch dough on the “seam”.


Place
each loaf into greased or nonstick 8 x 4.5-inch loaf pan, press it down so
that the top is even.


Cover the loaves with clean, warm, wet tea towels (non-textured), or canvas; OR place them inside of a new plastic bag that is big enough to puff up over and around the loaves, without touching the dough. Secure it in place with a twist-tie. Rise the loaves in a warm place for about another hour or so, checking after half an hour and every 10 minutes or so after that.
10 After 30 minutes rising, turn on your oven on to 485°F.

11 When the loaves have risen over the tops of the pans (see picture above), slash the top as pictured with a sharp serrated knife or a blade, squirt the tops with water from a spray bottle. Place the loaves on a rack in the middle of the preheated oven and bake for 5 minutes. Turn the oven down to 385°F and back for 25 minutes, or until the loaves are golden brown and crusty.
12 Remove from the pans and cool thoroughly on racks.


Nutrition Facts
Nutrition
(per slice [16 per loaf]): 110.1 calories; 4%
calories from fat; 0.6g total fat; 0.0mg cholesterol; 138.5mg sodium; 117.2mg
potassium; 23.2g carbohydrates; 3.8g fiber; 1.6g sugar; 19.4g net carbs; 4.7g
protein.
Nutrition
Facts with Optional Oil:
Nutrition
(per slice [16 per loaf]): 117.5 calories; 10%
calories from fat; 1.4g total fat; 0.0mg cholesterol; 138.6mg sodium; 117.2mg
potassium; 23.2g carbohydrates; 3.8g fiber; 1.6g sugar; 19.4g net carbs; 4.7g
protein.Happy Baking!


Friday, December 19, 2014
SIMPLE-BUT-DELICIOUS LEEK & GIGANTE BEAN (OR WHITE BEAN) SOUP; & YUMMY VEGGIE SANDWICH ON HOMEMADE SPROUTED WHEAT BREAD

 This was our lunch the other day and you could hardly hope for a more delicious, inexpensive and healthful, even though it was made from simple ingredients and leftovers. The soup is my rendition of an Italian soup and, in true Italian style, the flavor belies the simplicity of the few ingredients. My husband raved over it and wants me to make it regularly. The sandwich was made with thin slices of my second batch of homemade sprouted wheat bread made with minimal flour. (Read about my first trial here.) I didn't have much to make a sandwich out of, so I spread both sides the last of my homemade Okara/Cashew Ricotta (2 other vegan ricotta recipes here) and sprinkled one side with grated carrots and the other side with thinly-sliced red bell pepper. Doesn't sound very exciting, does it? But, surprisingly, the combination of the smooth ricotta, the crunchy fresh veggies, and the nutty sprout bread was scrumptious! The first batch of my sprouted wheat bread included about 1 cup flour per loaf-- the rest was the ground sprouted wheat, kneaded together with the yeast, salt, etc. (no oil). The loaves rose beautifully, cut well, had a lovely crumb and flavor, and looked like a "normal" loaf of homemade sandwich bread:
My second batch was made the same way (but I oiled everything the dough touched to avoid having a sticky mess like the first time!), except that I used only 1 cup whole wheat flour for 3 loaves. As you can see by the photos below, it didn't rise as nicely, but it was easy to slice and smelled and tasted divine.
I want to test the sprouted wheat bread at least one more time, or until I get it to our satisfaction (so close!), before I post the recipe on this blog, but I doubt I'll get it done until January-- too many other things to do right now! (UPDATE: Here's the recipe!) But we love it so much that we don't mind consuming the experiments! Happy Holidays, everyone. (I will post again before Christmas.)
 Printable Recipe BRYANNA'S SIMPLE-BUT-DELICIOUS LEEK AND GIGANTE BEAN (OR WHITE BEAN) SOUP Serves 4 | ||||||||||||||||||||||||||||||||||||||||||
| ||||||||||||||||||||||||||||||||||||||||||


Monday, December 1, 2014
TEASER ABOUT SUCCESSFUL SPROUTED WHEAT BREAD (MINIMAL FLOUR)

UPDATE: Here is the final, successful recipe!
This is going to be a short post with no recipe (YET!). I promise to post a great soup recipe in the next two days to make up for this! But I just had to post the photos of an experiment I did today (started several days ago).
I prefer not to buy sprouted wheat flour-- it's very expensive. And, in any case, we grind our whole wheat flour, so we have lots of wheat kernels in the house at all times. So, because I am interested in bread with a lower glycemic index rating (low-glycemic diets may have a positive influence on my husband's triglyceride levels AND definitely improve blood sugar levels for pre-diabetics and Type 2 diabetics), I did some research on making yeasted sprouted wheat breads with no flour or minimal flour. ("Since particle size influences the glycemic index (the smaller the size the higher the glycemic index), bread made from grain kernels have been shown to be lower GI. Not yet tested but probable, bread made from sprouted grains can be expected to have a similar effect." From http://tinyurl.com/ywve7) After some rather intensive research as to how to make a sprouted grain bread that looked like the type of bread we are used to-- nicely risen, not flat and brick-like-- I was ready to give it a try.
So, I placed 6 cups of hard wheat kernels in a bowl of warm water to soak and eventually sprout. The sprout is supposed to be tiny. Unfortunately, our weather is quite cold right now, so it took about 3 days for them to sprout at all-- some didn't. But I have to go to work tomorrow, so today was now or never.
I took the advice of the blogger in the link above and ground the kernels in my food processor (but I did it in 3 batches). I don't think I drained the kernels sufficiently, though, because the "dough" seemed very wet. I ended up adding 3 cups of whole wheat flour while kneading in my Bosch mixer for 10 minutes. It also felt like a lot more dough than two loaves worth, so I added another 1/2 tablespoon salt. I used 1/3 cup brown sugar. Instead of the 2 loaves mentioned in the recipe, I ended up with dough for 3 loaves, 1 lb., 12 oz. each, plus 9 ounces more, which I used to make 3 flatbreads in a cast iron frying pan on the stovetop. ** Next time I'll drain the kernels for an hour or so before grinding and I hope that will preclude the need for any flour. And it will probably mean that I won't have 9 oz. extra to deal with (I hope!).**
As you can see by the photos above and below, the recipe was a success-- dough was easy to handle and rose beautifully, baked up nice and crusty (I used my husband's baking method-- 5 minutes at 485 degrees F and 25 more at 375), tastes great, smells heavenly (kind of nutty) and the crumb is lovely. It makes delicious toast!

THE PROBLEM:
But the thing that was NOT so positive was that when I removed the initial ground sprout mixture from the food processor and the kneaded dough from the mixer bowl, I was left with a thin coating of sticky dough that stuck like glue, particularly to the blade (inside and out) of the processor. After soaking everything in warm water, it took me about 20 minutes of scrubbing to clean everything, and the sponge had to go into the garbage can.
I let the dough rise in an oiled bowl and that bowl was easy to clean (thank goodness!). When I cut and rolled the dough and shaped the loaves, I oiled my hands and had no problem with sticking. When I rolled out the flatbreads I oiled the counter a little and they rolled out just fine-- no flour needed.
So, contrary to what I was thinking while washing those sticky appliance parts this morning, I WILL try this once again, but I plan to oil everything the dough touches! I am hoping that this will make cleaning much easier. So, I will post again when I do the second trial! Stay tuned!

Subscribe to:
Posts (Atom)