Thursday, May 4, 2006
VEGAN PIZZA NIGHT


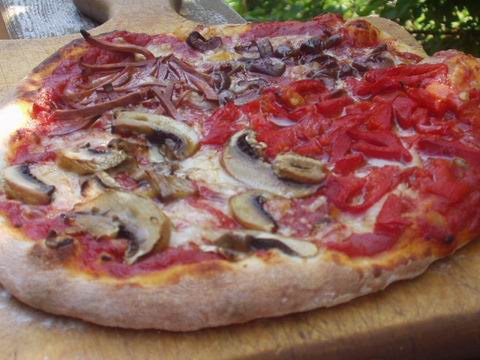
On the left are the pizzas I made for dinner last night, cooked in dark metal pizza pans on the oven racks, at 550 degrees F, with convection; on the right is a pizza made with the same dough, but baked on unglazed ceramic tiles in my oven, same temperature.
The pictures are just to illustrate the different quality of pizza that you can get in your own home oven. They were both good, by the way! But the "stone-baked" one has a crust that is crispy all over, not just on the bottom. It looks more Italian, somehow! Last night I was just too preoccupied to heat up the tiles
beforehand.
I'm not going to go into a long explanation of how I make pizza. For that you can get my book Nonna's Italian Kitchen (your library might have it) or my new book World Vegan Feast
There is so much bad pizza out there! Which is puzzling, because, once you know a few things, it's easy. And the dough is not an afterthought-- in Italy it is the primary component, and it should be here in N.A., too. In Italy they don't over load a pizza with sauce, ingredients, cheese, etc.. The dough is simple, very simple, but it tastes so good you want to eat the edges, and you don't need them to be stuffed with cheese or have some gloppy sauce to dip them into! I'm going to give you my latest favorite dough recipe, which is from my newsletter. Both of the pizzas above were made with this dough.
HINT: Pizza dough is better if you make it hours before using and let it rise in the refrigerator for 8-14 hours. Yes, it's true, and it's very convenient. The directions are in the recipe below. An alternative is to make it in the morning, let it rise once, punch it down and refrigerate as instructed until about 2 hours before dinner (so it has time to warm up). Why is it better this way? Because dough needs time to develop the enzymes which give dough flavor and good texture.
BTW, "American Pie" by master baker Peter Reinhart is a wonderful book on pizza!
A way to stretch the dough without rolling or throwing in the air! Drape the dough over an over-turned bowl (see picture) and gently stretch it all around until it is the right size, again using the weight of the dough stretch it.

Work slowly so that you don’t tear the dough. If it does tear, you can patch it and seal it again. The pizza does not have to be absolutely round!
Cheers!

Subscribe to:
Post Comments (Atom)
10 comments:
That's right, Jane...you can get large tiles with just a tiny bit of the corner nicked off quite cheaply at tile stores.
Hi. Thanks for all your great information! Do you know if this would work with a wheat/gluten-free flour blend? kit.
Thanks, anonymous! I don't know too much about gluten free baking, and I don't know whether you would bake it the same. You could use my toppings and a tried-and-true GF pizza crust, but I don't know whether you should follow my baking directiosn with a GF crust. There is something called "Gluten Free Pantry mix called Country French Bread and Pizza Mix", which you might like to try. I also suggest that you get the book by Bette Hagnman, "The Gluten-Free Gourmet Bakes Bread", which has some pizza crusts, some with healthy flours, and she is reliable.
I tried this pizza dough last night, and it came out great! Thanks!
I'm a little confused - it seemed like either there was too little liquid or way too much flour - any suggestions?
Joelle-- My recipe is pretty standard in regards to the proportion of liquid to flour in a pizza dough recipe. If you check other recipes, the amount of liquid varies from 1 to 1 1/2 cups liquid for 2 1/2 to 3 1/2 cups flour.
My recipe is 1 1/4 cups liquid for 3 1/2 cups flour. I cup of that flour is pastry flour, which sucks up less liquid than ordinary flour. Of course, you have to go by feel with any dough, because flours and conditions vary. but, trust me, i have made this MANY times!
I don't see the recipe...am I missing something? Sorry!!!
No recipe-- just technique! this time I used my husband's bread dough. You can see my usual dough here: https://docs.google.com/View?id=dqhrgm2_282cbcrv5dr&pli=1
Sorry, but I am a little confused on the pizza crust.In this page you state:
"But the "stone-baked" one has a crust that is crispy all over, not just on the bottom."
Which implies the bottom of the crust is crispy.
However, on your page of " MY NEW COUNTERTOP "BRICK OVEN" ",
You state:
"pizza, even on a stone, never gets golden-brown and a bit crispy on the bottom."
Implies not crispy on bottom.
Please understand, I am not trying to find fault, just if botom of crust gets brown/crispy.
Thanks!!!
Anonymous, you'll notice that this post was from May 2006. The other post you mentioned was Jan, 2008, and we had a new stove, about which I wrote:
"We bought our stove about 1 1/2 years ago and it's great-- I love it. Except for making pizza. Unfortunately, we did not realize when we bought it that the "covered element" is not on the bottom of the oven, but in the back wall! For this reason, pizza, even on a stone, never gets golden-brown and a bit crispy on the bottom. This has been a source of frustration for me." Two stoves, two different effects of pizza-making!
I perhaps wasn't heating the stone enough in that new oven, but I hate having to heat it for an hour at high heat before baking, so now, for large pizzas, I use a cast iron skillet instead of a pizza stone (see http://veganfeastkitchen.blogspot.ca/2011/10/cast-iron-skillet-pizza-perfect.html ) because it heats up in half the time, and I place the rack in the center of the oven. For smaller pizzas, I use the small countertop oven with the stone-- it's heats up much faster than the large oven and the stone does, too. Hope that makes sense!
Post a Comment