Wednesday, January 20, 2010
EXPERIMENTS WITH PUMPKIN KIBBEH


I've been wanting to try a pumpkin kibbeh for a long time, but never got around to it before now. (Read about the Middle Eastern dish kibbeh at this blog post, along with a recipe for a delicious [but high-fat] potato/bulgur/onion kibbeh.) I had a can of pumpkin leftover from the holidays, so I decided to make kibbeh for lunch today.
This version is adapted from a recipe by Canadian/Syrian author and scholar Habeeb Salloum from his excellent books "Arab Cooking on a Saskatchewan Homestead: Recipes and Recollections
 ", "Classic Vegetarian Cooking From The Middle East And North Africa
 ", and “From the Land of Figs and Olives
 ”.
”.
My changes:
I used more onion and I sautéed it first to deepen the flavor.
I used smoky Aleppo Pepper
 instead of cayenne
 .
. I cut the amount of allspice in half because I find that it can be rather overwhelming.
I used chickpea flour instead of white flour, to add more fiber, protein and general nutrition.
And I found no need to add water.
As for technique:
I squeezed the soaked bulgur dry in my hands and I baked the mixture in two 8-inch square pans instead of one. (I was afraid the center would be too "squishy" if I made a thicker version in one pan, and I think I was right to do this.)
I also added a tart, savory sauce to cut the sweetness of the pumpkin.
The result is a tasty, make-ahead, low-fat, low-points meal (or appetizer, if served in smaller quantities) with lots of protein and fiber.

Printable Recipe
BRYANNA'S BAKED PUMPKIN KIBBEH
Servings: 6
I prefer this dish served at room temperature.
1 cups fine (#1 grade) bulgur wheat,
 soaked in 2 cups boiling water
 (for info about bulgur wheat)
2 teaspoons salt
1 tablespoon extra-virgin olive oil
1 large onion, chopped
2 cups canned pumpkin
(or use very well-drained, thick mashed, cooked pumpkin or dark orange winter squash [see Cooking Tip Below])
4 cloves garlic, peeled
1 teaspoon ground coriander

1 teaspoon Aleppo Pepper
(*Aleppo Pepper substitute: 4 parts sweet paprika and 1 part ancho chile or cayenne powder)
3/4 teaspoon cumin
1/2 teaspoon freshly-ground black pepper
1/2 teaspoon allspice
1 cup chickpea flour
 (besan
 )
) 4 teaspoons olive oil (for greasing)
Tofu/Tahini Mint Sauce
2/3 cup (5 oz.) firm or extra-firm silken tofu

1/4 cup lemon juice
2 tablespoons tahini

2 cloves garlic
1 teaspoon dried mint
 (or 1 tablespoon fresh, chopped)
 1/2 teaspoon salt
1 pinch sugar
freshly-ground pepper to taste
Preheat the oven to 375 °F.
Heat the 1 tablespoon olive oil in a nonstick skillet and, when hot, add the chopped onions and salt lightly. Saute briefly, then turn the heat down to medium-low and continue to cook until they are softened and just started to brown.
MICROWAVE OPTION: Place the oil in a microwave safe dish, add the onions, salt lightly and toss to coat with oil. Cover and cook on High for 4 minutes (that's at 1200 watts-- slightly longer for less wattage).
When the bulgur has absorbed most of the water, pour it into a fine strainer over a bowl and then squeeze handfuls of it as dry as you can. Place the squeezed bulgur in a medium bowl and discard the liquid. Mix the salt into the bulgur, distributing evenly.
Place the cooked onion, pumpkin, garlic, coriander, pepper, allspice, cumin, cayenne (or Aleppo Pepper), and chickpea flour in a food processor and whirl until thoroughly blended.
Scoop the processed mixture into the bulgur and mix well.
Grease two 8-inch square pans
 , each with 1 teaspoon of olive oil. Scoop half of the mixture into each pan, and smooth the surface of each until level. Drizzle a teaspoon of olive oil over the top of each and spread it around gently and evenly with your fingertips.
Bake for 25 minutes or until the surface looks dry. (The inside will be moist.)
Place the pans under the broiler for a few minutes (watching carefully!) just to brown and crisp up the surface a bit. Remove the pans to a rack to cool.
Cut the kibbeh into squares or triangles and serve at room temperature with the Tofu/Tahini Mint Sauce.

To make the Tofu/Tahini Mint Sauce,
blend all the ingredients until smooth. Scoop into a bowl, cover and refrigerate until serving time.
Nutrition Facts
Nutrition (per serving—includes sauce): 275.6 calories; 31% calories from fat; 9.8g total fat; 0.0mg cholesterol; 822.3mg sodium; 525.3mg potassium; 40.0g carbohydrates; 9.5g fiber; 6.1g sugar; 30.5g net carbs; 10.4g protein; 5.5 points.
Cooking Tips
If you use home-cooked pumpkin or squash, bake it until it is tender and then scoop it out of the shell and puree it in a food processor. Drain it for several hours hanging in a cloth (tied with string) suspended by your kitchen tap over the sink, until it’s thick like canned pumpkin.
Measure AFTER draining.


Thursday, January 14, 2010
FINALLY! NO-KNEAD, CRUSTY ALMOST-ALL WHOLE WHEAT ARTISAN BREAD BAKED IN A POT!
UPDATE: THIS DOUGH ALSO MAKES GREAT PIZZA!See the pizza photo at the end of this post.
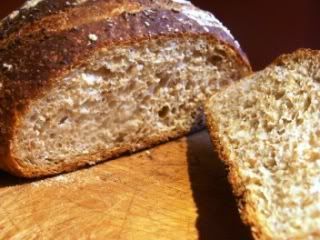
Over the last few months, in between other projects, I have been trying to make a whole wheat, crusty, no-knead artisan loaf that I can be really proud of (like my "whiter version", which is only about 1/3rd whole wheat.) I'm not saying that this is the final version, but I think it's pretty darn close! (Read more about the no-knead bread process and why it's so good here and here.)
As with my other recipe, I borrowed ideas and advice from a number of experts (see the text at the beginning of the recipe below), combined with my own tastes and experience. I don't know if it is possible to make a really tempting whole wheat version of this type of bread solely with whole wheat flour. My early attempts were "grassy"-tasting and heavy. So, I used the proportions in Jeff Hertzberg's and Zoë François' recipe for "five-minute" no-knead, refrigerated for whole grain bread, with a few additions and changes.
The proportions are slightly more than 3/4 whole wheat flour to slightly less than 1/4 unbleached white flour-- not bad! The authors explained that "In order to mix up dough that’s really high in whole grains, but can still be successfully stored, you need to boost the dough’s gluten level. Otherwise, the bread won’t rise nicely and will be too dense..." This made sense, even though I've always disliked the breads I'd tried with added gluten (they seemed to have a "tough" quality). But it worked with this very wet dough! I used a little less gluten this time, because it still seemed a bit tough the first time I tried it. However, this may be explained by the higher gluten content in Canadian flour, so you can try it both ways if you live in the USA.
I took master baker Peter Reinhart's advice and added a little organic sugar (to counteract the "bitter tones of the whole wheat flour") and olive oil ("to soften the bran"). The resulting bread does not taste sweet or "enriched"-- it tastes "clean" to me, and very tasty. (In my "whiter version", I used less whole wheat, so I didn't add the sugar, but I did add some oil, which I thought improved the texture.)
I hope you will give this a try and perhaps you can improve upon it further, and make your own variations. It's such an easy and satisfying way to make good bread!
Printable Recipe
BRYANNA'S 3/4 WHOLE WHEAT SIMPLE NO-KNEAD CRUSTY BREAD (BAKED IN A POT)
Makes 3 good-sized loaves (Jan. 13, 2010)
For this recipe, I have used as much wholewheat flour as possible and still kept the qualities of an artisan crusty bread-- a crackly crust, holes in the crumb, etc.. I started with Jeff Hertzberg's and Zoë François' recipe for "five- minute" no-knead, refrigerated dough for whole grain bread, combined with some of the qualities of Jim Lahey's no-knead bread method (via Marc Bittman in the NY Times), along with his novel pot-baking method; and took also advice from Peter Reinhart's books (reluctantly adding a little sugar to the whole grain dough, as he recommended, and finding that it improves the flavor of a mostly whole grain loaf), and Cook's Illustrated magazine experiments with no-knead, pot-baked bread. (See this blog post and this one for more about no-knead, crusty bread, and this one for my "whiter" version.) It's very good!
4 cups lukewarm water
1 tablespoon regular dry-active baking yeast (OR 3/4 tablespoon instant yeast
 )
)
2 tablespoons olive oil
2 tablespoons organic sugar
1 tablespoon table salt (or small crystal kosher salt )
)
Flour mixture (combine together in a dry container):
5 1/2 cups whole wheat flour (ground from hard wheat, if you grind your own, or, especially in the USA, use whole wheat bread flour)
2 cups unbleached white flour (Canadian all-purpose flour is fine, but you might want to use bread flour in the US) + more for dusting dough
3 tablespoons pure gluten powder (vital wheat gluten )
)
(In the USA, if you are using unbleached all-purpose flour, you might want to use 1/4 cup of gluten powder. When I used 1/4 cup [with Canadian flour], it seemed too tough, so I reduced the amount.)
Cornmeal and flour for dusting
In a large bowl or plastic container, mix the yeast into the lukewarm water (about 100 degrees). Let sit until yeast dissolves. (If using the instant yeast, you don't have to dissolve it, though master baker Peter Reinhart has revised his thinking on this and recommends dissolving instant yeast to "allow it to ferment more effectively during the cooldown phase in the refrigerator".) Add oil, sugar, and salt. Stir in the flour mixture, mixing until there are no dry patches. Dough will be quite loose.
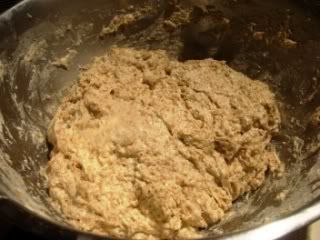
Place the container inside of a clean plastic bag (a small new white garbage bag does fine), and twist-tie it closed, leaving room for the dough to rise. Let dough rise at room temperature 2 hours (or up to 10 hours).
Prepare to bake all or some of the dough at this point OR refrigerate in a tightly-covered oiled container (OR 2 containers) with room to double in size, for as long as two weeks. (The dough is much easier to work with if you refrigerate it for at least 3 hours before shaping.)
When ready to bake, sprinkle a little flour on dough (DON'T PUNCH DOWN!) and cut off 1/3rd of the dough with serrated knife, or a bench knife, for each loaf.
Lightly flour a work surface and place dough on it; sprinkle it with a little more flour and fold it over on itself once or twice. (It's quite sticky-- keep your hands and the surface floured; maybe used a bench scraper.)
Using just enough flour to keep dough from sticking to work surface or to your fingers, gently and quickly shape dough into a ball OR oval shape, depending on the shape of the pot you are going to bake it in.
Line a bowl, pan or oval casserole (depending, again, upon the shape of the vessel you will be baking the bread in-- doesn't matter what it's made from as you aren't going to bake it in this, just let it rise in the appropriate shape) with baking parchment -- 1 for each loaf you are baking at the time. Sprinkle the parchment with flour, cornmeal, semolina, or bran. Place the dough seam-side-down on the parchment in the bowl or pot, and dust lightly with more flour, semolina, bran, or cornmeal. Place the vessel(s) inside of a clean plastic bag(s) (a small new white garbage bag does fine), and twist-tie closed, leaving plenty of room for the dough to rise. Let dough rise in a warm spot for about 2 hours (if dough has been refrigerated-- if it has not, rise at room temperature for about 1 hour).
Heat the oven to 475°F, with the pot(s) you are baking the bread in heating in the oven at the same time, for at least 30 minutes. Use a deep cast iron skillet or Dutch oven with a lid (can be enamel-coated or not), or a heavy ceramic covered casserole (NOT unglazed clay).
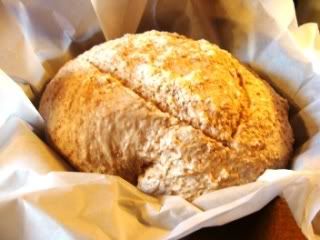
When the oven and the pan are heated, and the dough has risen for the appropriate time, just lift up the loaf (or loaves) right in the parchment (using the parchment as a "lifter") and set it into your hot pot, pan or casserole with the parchment. (Don't worry-- it won't stick or burn!) Cover with the lid and bake 30 minutes, then remove the lid and bake another 15 minutes, or until the loaf is beautifully browned. Remove the bread from the pan immediately and cool on a rack.
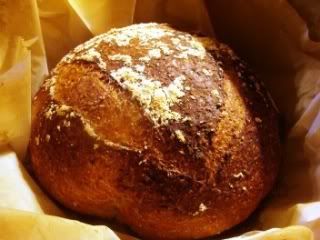
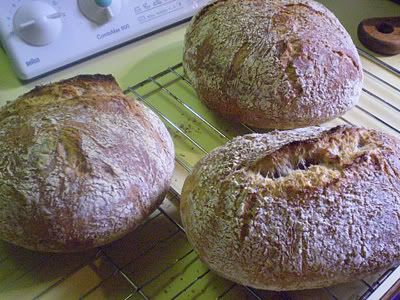
PS: If this method of transferring the loaves to the pots in parchment makes too much of a "neat and tidy-looking" loaf for your taste, follow my original directions at this blog post (using the recipe in the blog post, not the printable recipe). This results in a more rustic-looking loaf as the photo below shows. It's up to you!
Nutrition Facts
Nutrition (per slice [12 slices per loaf]): 100.1 calories; 10% calories from fat; 1.2g total fat; 0.0mg cholesterol; 189.9mg sodium; 89.0mg potassium; 19.5g carbohydrates; 2.5g fiber; 0.8g sugar; 17.0g net carbs; 3.8g protein; 1.6 points.
UPDATE (Jan. 16, 2010): This afternoon I used the remaining dough (2/3rds of the recipe) to make 3 pizzas. This was the best almost-all-whole-wheat pizza I've ever made! Even my 3 picky granddaughters loved it! I used it cold straight from the refrigerator, with no rising, baked it at 500 degrees F. I just patted and stretched the dough out by hand on a sheet of baking parchment-- it's a sticky dough and you can't spin this one! I baked it right on the parchment because I was afraid the sticky dough would stick to the peel. It worked just fine! I made the pizza pretty thin, but you can see that the edges puffed up quite a bit in the oven.

Pizza made with the same dough, after refrigerating it for 3 days.
Happy Baking!

Printable Recipe
BRYANNA'S 3/4 WHOLE WHEAT SIMPLE NO-KNEAD CRUSTY BREAD (BAKED IN A POT)
Makes 3 good-sized loaves (Jan. 13, 2010)
For this recipe, I have used as much wholewheat flour as possible and still kept the qualities of an artisan crusty bread-- a crackly crust, holes in the crumb, etc.. I started with Jeff Hertzberg's and Zoë François' recipe for "five- minute" no-knead, refrigerated dough for whole grain bread, combined with some of the qualities of Jim Lahey's no-knead bread method (via Marc Bittman in the NY Times), along with his novel pot-baking method; and took also advice from Peter Reinhart's
books (reluctantly adding a little sugar to the whole grain dough, as he recommended, and finding that it improves the flavor of a mostly whole grain loaf), and Cook's Illustrated magazine experiments with no-knead, pot-baked bread. (See this blog post and this one for more about no-knead, crusty bread, and this one for my "whiter" version.) It's very good!4 cups lukewarm water
1 tablespoon regular dry-active baking yeast
(OR 3/4 tablespoon instant yeast)2 tablespoons olive oil
2 tablespoons organic sugar
1 tablespoon table salt (or small crystal kosher salt
)Flour mixture (combine together in a dry container):
5 1/2 cups whole wheat flour
(ground from hard wheat, if you grind your own, or, especially in the USA, use whole wheat bread flour)2 cups unbleached white flour
(Canadian all-purpose flour is fine, but you might want to use bread flour in the US) + more for dusting dough3 tablespoons pure gluten powder (vital wheat gluten
)(In the USA, if you are using unbleached all-purpose flour, you might want to use 1/4 cup of gluten powder. When I used 1/4 cup [with Canadian flour], it seemed too tough, so I reduced the amount.)
Cornmeal and flour for dusting
In a large bowl or plastic container, mix the yeast into the lukewarm water (about 100 degrees). Let sit until yeast dissolves. (If using the instant yeast, you don't have to dissolve it, though master baker Peter Reinhart has revised his thinking on this and recommends dissolving instant yeast to "allow it to ferment more effectively during the cooldown phase in the refrigerator".) Add oil, sugar, and salt. Stir in the flour mixture, mixing until there are no dry patches. Dough will be quite loose.
Place the container inside of a clean plastic bag (a small new white garbage bag does fine), and twist-tie it closed, leaving room for the dough to rise. Let dough rise at room temperature 2 hours (or up to 10 hours).
Prepare to bake all or some of the dough at this point OR refrigerate in a tightly-covered oiled container
(OR 2 containers) with room to double in size, for as long as two weeks. (The dough is much easier to work with if you refrigerate it for at least 3 hours before shaping.)When ready to bake, sprinkle a little flour on dough (DON'T PUNCH DOWN!) and cut off 1/3rd of the dough with serrated knife, or a bench knife, for each loaf.
Lightly flour a work surface and place dough on it; sprinkle it with a little more flour and fold it over on itself once or twice. (It's quite sticky-- keep your hands and the surface floured; maybe used a bench scraper.)
Using just enough flour to keep dough from sticking to work surface or to your fingers, gently and quickly shape dough into a ball OR oval shape, depending on the shape of the pot you are going to bake it in.
Line a bowl, pan or oval casserole (depending, again, upon the shape of the vessel you will be baking the bread in-- doesn't matter what it's made from as you aren't going to bake it in this, just let it rise in the appropriate shape) with baking parchment
-- 1 for each loaf you are baking at the time. Sprinkle the parchment with flour, cornmeal, semolina, or bran. Place the dough seam-side-down on the parchment in the bowl or pot, and dust lightly with more flour, semolina, bran, or cornmeal. Place the vessel(s) inside of a clean plastic bag(s) (a small new white garbage bag does fine), and twist-tie closed, leaving plenty of room for the dough to rise. Let dough rise in a warm spot for about 2 hours (if dough has been refrigerated-- if it has not, rise at room temperature for about 1 hour).Heat the oven to 475°F, with the pot(s) you are baking the bread in heating in the oven at the same time, for at least 30 minutes. Use a deep cast iron skillet or Dutch oven with a lid (can be enamel-coated or not), or a heavy ceramic covered casserole (NOT unglazed clay).
When the oven and the pan are heated, and the dough has risen for the appropriate time, just lift up the loaf (or loaves) right in the parchment (using the parchment as a "lifter") and set it into your hot pot, pan or casserole with the parchment. (Don't worry-- it won't stick or burn!) Cover with the lid and bake 30 minutes, then remove the lid and bake another 15 minutes, or until the loaf is beautifully browned. Remove the bread from the pan immediately and cool on a rack.
PS: If this method of transferring the loaves to the pots in parchment makes too much of a "neat and tidy-looking" loaf for your taste, follow my original directions at this blog post (using the recipe in the blog post, not the printable recipe). This results in a more rustic-looking loaf as the photo below shows. It's up to you!
Nutrition Facts
Nutrition (per slice [12 slices per loaf]): 100.1 calories; 10% calories from fat; 1.2g total fat; 0.0mg cholesterol; 189.9mg sodium; 89.0mg potassium; 19.5g carbohydrates; 2.5g fiber; 0.8g sugar; 17.0g net carbs; 3.8g protein; 1.6 points.
UPDATE (Jan. 16, 2010): This afternoon I used the remaining dough (2/3rds of the recipe) to make 3 pizzas. This was the best almost-all-whole-wheat pizza I've ever made! Even my 3 picky granddaughters loved it! I used it cold straight from the refrigerator, with no rising, baked it at 500 degrees F. I just patted and stretched the dough out by hand on a sheet of baking parchment-- it's a sticky dough and you can't spin this one! I baked it right on the parchment because I was afraid the sticky dough would stick to the peel. It worked just fine! I made the pizza pretty thin, but you can see that the edges puffed up quite a bit in the oven.
Pizza made with the same dough, after refrigerating it for 3 days.
Happy Baking!
Wednesday, December 30, 2009
COMING UP FOR AIR!
No recipes today! It is ironic that I spent the last week cooking and entertaining (mostly family) and cooking and entertaining some more, and I haven't had time to photograph or blog about it!Suffice it to say that we ate too much and had a great time! I hope you did, too!
Tomorrow is the "last hurrah" before we go back to a more moderate eating regime, shall we say! My friend Jenny and her granddaughter, and one of my granddaughters, are coming to stay overnight, and we will have soynog (with rum for the grown-ups) and various goodies with some other friends. I WILL photograph and blog about that in the next few days!
For Christmas Eve we had vegan Tourtiere (Quebec "Meat Pie"), of course (DH is from Quebec). Dessert was my "Grown-Up Nanaimo Bars" (this recipe will be in a new book coming out late in 2010):

For Christmas Breakfast, we had fried potatoes with smoked paprika
 , vegan cornbread, and vegan or non-vegan scramble (it was a mixed group) with DELICIOUS Field Roast Chipotle sausage, which even the omnis in our midst were crazy about! (It's like chorizo!)
For Boxing Day (the day after Christmas), which was our big meal, we had my homemade Seitan Ham:

with mashed potatoes and "Ham Gravy"; Brussels Sprout Slaw with Mustard Dressing and Maple-Candied Nuts; roasted sweet potato fries with smoked paprika
 ; Tofu Pot Pie and Sage and Onion Stuffing (half wheat bread and half cornbread).
For dessert there was Panettone (Italian Sweet Bread), which my oldest daughter Bethany made; Butter Tarts and some chocolately bar cookies (which went superfast) that my middle daughter Sarah made, and vegan Trifle (this recipe will be in a new book coming out late in 2010) that I made using Soyatoo! Soy Whip/Topping Cream :

I think there was more, but I can't even remember!
We've been eating leftovers since then! We also had a big meal on Sunday with my sister Karin and her DH and daughter and a friend, and my son Tim and family, and my stepson Laurie and his girlfriend Meghan. It was a mix of leftover pot pie, stuffing and gravy, seitan "roast pork" with barbecue sauce, lots of salad and more roasted sweet potatoes and steamed potatoes topped with sauteed mushrooms and Daiya vegan cheese, more Trifle, chocolate, and melons. There were more people than I expected, so I had to make up a few dishes on the spot!
I'll check in after New Year's with some new recipes and photos. Have a great (and safe) New Year celebration (there's a Blue Moon that night-- did you know?)!!
Happy, happy!

Friday, December 18, 2009
AN EASY, MOIST, WHOLE GRAIN APPLE-ALMOND CAKE TO SERVE HOLIDAY GUESTS WITH COFFEE OR TEA
 |
| Moist, delicious Rustic Apple-Almond Cake |
In a day or two I'll blog about my trip, etc... Today I'm just going to share a recipe for a delicious cake that goes well with coffee or tea and utilizes the zillions of apples that were harvested around here this year! If you have some unexpected guests, you can whip this up quickly and serve it hot, or you can have it ready and waiting and serve it cold or at room temperature-- it's yummy either way.
Don't be fooled by the simple ingredients-- you won't be able to have just one piece!
Printable Recipe
BRYANNA’S RUSTIC APPLE-ALMOND CAKE
makes 1/ 9x13" cake
PS: Here's a fancier version of this cake: Apple Pecan Crumb Cake with Gianduia (Chocolate/Hazelnut) Drizzle
DRY MIX:
1 and 3/4 cups wholewheat pastry flour
 PLUS 1/4 c. oat bran
OR use 2 cups wholewheat pastry flour
1 tsp. baking powder
1/2 tsp. baking soda
1/2 tsp. salt
1/4 tsp. ground ginger

Additional:
2 cups chopped apples (I don't peel them if they are organic)
WET MIX:
1/3 cup smooth unsweetened applesauce
3 Tbs. oil
1 cup unbleached organic granulated sugar

7/8 cup nondairy milk (that's 3/4 cup + 2 tablespoons)
TOPPING:
1/2 cup brown sugar

1 tsp. cinnamon

1/4 cup slivered, blanched almonds

Preheat oven to 350 degrees F. Grease a 9x13" cake pan.
Whisk together the Dry Mix ingredients in a medium mixing bowl. Stir in the apples. In a blender, blend the Wet Mix ingredients until smooth. Mix the Wet Mix into Dry Mix, stirring as briefly as possible. Spread into prepared pan. Mix the Topping ingredients together in a small bowl. Sprinkle the Topping evenly over the cake. Bake 35 minutes. Test for doneness. Cool on a rack and serve right out of the pan, cut into squares.
Enjoy, and I'll blog again soon!

Subscribe to:
Posts (Atom)