Wednesday, March 19, 2008
5-MINUTE NO-KNEAD YEAST BREAD (AND FOCACCIA), TAKE TWO!


After experimenting with the "five-minute" no-knead method of bread making in this blog post, which I really liked, but thought could be improved a bit, I made a slightly different dough on Monday and baked a loaf of bread and a focaccia today. The bread and the focaccia were fabulous! Here are the changes I made:
I doubled the recipe because I thought the loaf size of the original recipe was too small. The original recipe called for all unbleached flour-I used more than 1/3 whole wheat. It also called for 1 1/2 tablespoons of yeast for a recipe half this size, which I think is way too much. (I can't figure out why they used so much yeast. ) I cut that by 2/3's. I also added 1/2 tablespoon olive oil per loaf because I thought the dough was a little tough without it, especially for pizza.
I combined some of the quality's of Jim Lahey's no-knead bread, along with his novel baking method, with the Jeff Hertzberg's "five-minute" no-knead, refrigerated dough method.
(PS: You don't HAVE to use Jim Lahey's baking method-- baking in a preheated heavy pot or casserole. If you aren't really concerned about an extra-crunchy crust, you can bake the bread in a regular loaf pan, or baguette pans, or whatever! In a loaf pan, it might be adviseable to bake the bread at only 375 degrees F.)
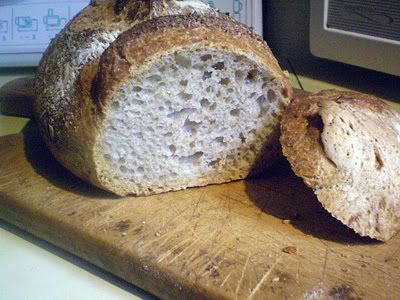
MORE PICTURES OF THIS BREAD ON THIS BLOG POST! WHY I USED LAHEY'S BAKING METHOD COMBINED WITH THE "5-MINUTE" MIXING AND REFRIGERATION METHOD: 1.) Lahey's baking method (in a heavy covered pot) produces amazingly crusty bread, but 2.) the "five-minute" method of mixing and refrigerating the dough is so much easier and more spontaneous than the long rise at room temperature, and I think 3.) the taste is better. (4.) It also makes it practical to bake bread fresh every day, since you can have some dough in the refrigerator at all times, and this type is really best when eaten the same day it is made.) AND 5.) the wet dough is much easier to handle when cold. I used a little more water than required by the "five-minute" recipe, so that the dough was more like Lahey's very wet dough. 6.) The wetter dough tends to give you more big irregular holes.

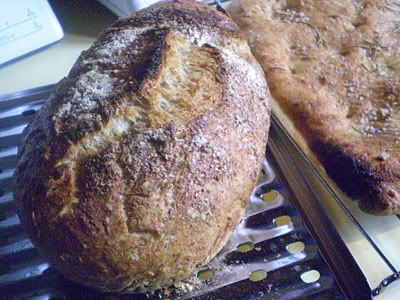
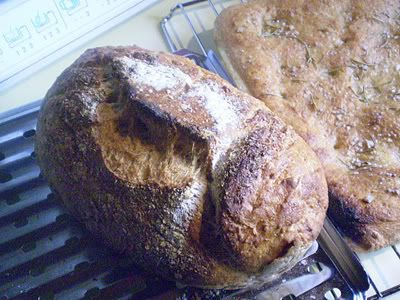


MORE PICTURES OF THIS BREAD ON THIS BLOG POST! WHY I USED LAHEY'S BAKING METHOD COMBINED WITH THE "5-MINUTE" MIXING AND REFRIGERATION METHOD: 1.) Lahey's baking method (in a heavy covered pot) produces amazingly crusty bread, but 2.) the "five-minute" method of mixing and refrigerating the dough is so much easier and more spontaneous than the long rise at room temperature, and I think 3.) the taste is better. (4.) It also makes it practical to bake bread fresh every day, since you can have some dough in the refrigerator at all times, and this type is really best when eaten the same day it is made.) AND 5.) the wet dough is much easier to handle when cold. I used a little more water than required by the "five-minute" recipe, so that the dough was more like Lahey's very wet dough. 6.) The wetter dough tends to give you more big irregular holes.
7.) The bread baked by Lahey's method stayed crunchy after it cooled, and I have found that often you'll get a crispy crust in your home oven, after using steam, etc., but then it softens as it cools. Not this way! The baking in a heavy, covered pot acts like a miniature brick oven, creating steam inside to help the
The finalized recipe for this bread will be in a new book coming out late in 2010.
The science behind it-- Harold McGee author of "On Food and Cooking" (Scribner, 2004-- a book I have on my personal shelf!), says:
"It makes sense. The long, slow rise does over hours what intensive kneading does in minutes: it brings the gluten molecules into side-by-side alignment to maximize their opportunity to bind to each other and produce a strong, elastic network. The wetness of the dough is an important piece of this because the gluten molecules are more mobile in a high proportion of water, and so can move into alignment easier and faster than if the dough were stiff."
As well, the long rise produces umami flavor compounds which give the bread outstanding flavor.
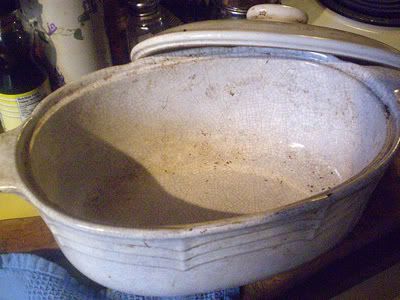
This is the casserole I used, but you can also use a deep cast iron skillet or Dutch oven with a lid (can be enamel-coated or not), or a heavy ceramic covered casserole (NOT unglazed clay).
Focaccia made with this dough:

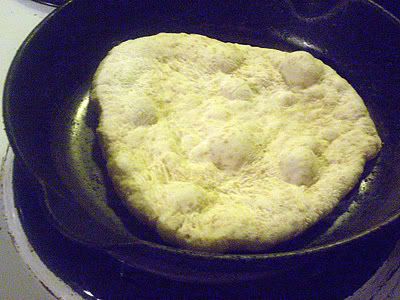
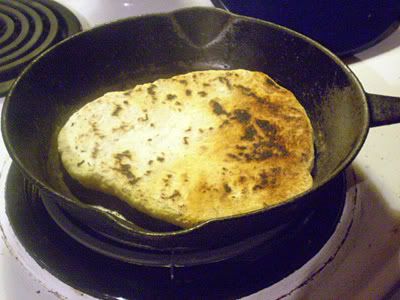
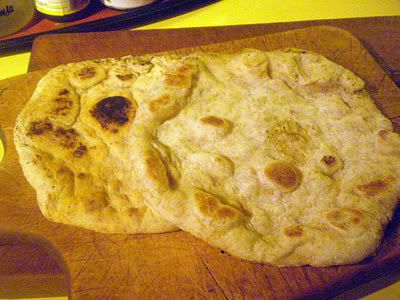
UPDATE: I made some flatbreads with the (cold) dough this morning-- just took fist-sized pieces and rolled them out and cooked them on both sides in an ungreased cast-iron pan over medium heat (heat pan well first). They probably would have made "pockets" if I'd covered them and let them rise for 30 minutes or so, but they did bubble up and they are delicious!
Enjoy!
Subscribe to:
Post Comments (Atom)
14 comments:
the best of both worlds :)))
Bryanna,
Your breads look fantastic! Thank you so much for sharing these recipes with your readers.
We have an error sheet posted on our website that has all the mistakes we missed during editing. It is helpful as you go through the book.
www.artisanbreadinfive.com
Enjoy the bread!
Zoë François (co-author Artisan Bread in Five Minutes a Day)
The bread looks so good - and the foccacia - YUM! I need to start making my own bread more often.
Thank you for posting all this! I happen to have the "Artisan Bread in Five Minutes A Day" out from the library, and I've experimented with it with mixed results (more my fault than the books -- I don't have a lot of the tools they call for, and I used all whole wheat flour at first). I'm definitely going to try it with your suggestions!
You can post about bread as many times as you want--we love them all!
Courtney
So if you want to make four loaves of bread yo have to use the caserole dish fourtimes and keep the oven on that long? I guess it is best to bake a loaf aday!
YES to lots of bread posts!
You could freeze them, anonymous. You can use all kinds of pans and casseroles-- the kind I used, or a cast iron Dutch oven, or a cast iron deep skillet with a lid that fits, round ceramic casseroles, etc. So you could "mix it up"!
Hi Bryanna,
Do you think white whole wheat flour could be completely subbed for the all purpose flour? i haven't ever used it before but I've heard it's almost as light. Have you worked with it before?
This looks amazing! Thank you for sharing with us, as usual.
-Charlotte
Binx, white whole wheat flour is still whole wheat flour, so it doesn't act just like white flour. It still has the germ and bran, which makes it heavier than white flour, and the bran flakes can "cut" the gluten a bit. White whole wheat bread flour has the advantage of having a higher gluten content than all-purpose flour, so it's great for bread doughs. It is lighter in color and has a sweeter, less acidic taste than hard red wheat. You do have the option of sifting off the coarser bran, if you need a finer flour-- save the bran for cereals and muffins.
White whole wheat PASTRY flour (I don't know if you can buy this yet-- I grind it myself from soft white wheat)is great for alot of non-yeast baking. Both are from white wheat, but bread flour is from hard wheat, and pastry flour is from soft wheat.
When I use white flour, I use unbleached, not plain all-purpose flour. In Canada, this is higher in gluten contenbt than American unbleached flour, as a rule, so, in yeast doughs only, you might want to use unbleached white bread flour when I calll for unbleached flour.
I hope this helps1
Hi Bryanna:
You have absolutely read my mind! I am a long-time home bread baker with a fair amount of experience in the NYT no-knead method and some experience with the five-minute-bread method.
I have been wobbling back and forth between the methods. The Lahey method absolutely produces the best and longest-lasting crust. I also believe that baking in a closed container captures flavors and returns them to the loaf. But I’m often not ready to bake when the NYT dough is ready at 18 hours. I’m also never quite sure when the dough has been properly proofed. I get variable results. But most importantly, I find that the flavor fades pretty quickly.
The five-minute-bread method (FMB) really suits my schedule but I just wasn’t comfortable with such massive amounts of yeast. I am sure that the long, slow retarding in the fridge greatly improves flavor and keeping qualities but I wanted to bake using the NYT method.
But I just didn’t have the focused time to figure out how to put the two together. But then I stumbled upon your webpage. You, my dear sister, did a whole bunch of work for us all! Thank you. I read you webpage on a Sunday night, made a half recipe on Monday morning and baked one loaf on Tuesday afternoon and the other on Wednesday. Both were excellent. I have more dough in the fridge now and am planning to give it at least fives days in the fridge.
I have a couple comments and questions:
1. I believe I have been mistakenly over-mixing my doughs over the last several months. I’d give the dough two or three minutes with a dough hook, thinking that a little bit more couldn’t hurt. I now think that this was a mistake. I believe that the less you organize the gluten, the more open and variable its links will be, which in turn produces more larger holes, which is what we all want. Do you agree?
2. After I incorporate the wet and dry ingredients, I immediately transfer the dough to a large, lidded tub. The tub helps me know when the dough has risen and begun to fall. Is falling the goal of this first ferment? Is there a specific reason to go beyond a mere doubling? Is the 2 to 5 hour time-frame the estimate, under variable conditions, for falling? I just want to know why a slight collapsing of the dough is a good thing.
3. After the first ferment, is there any benefit to turning down the dough before refrigerating the dough? Since I don’t transfer the dough from a bowl to a closed container at the end of the first ferment, I just let it stay risen when I move it to the fridge. Would turning down be helpful? Harmful?
4. Have you tried reducing the yeast even more? Or adding a poolish or biga in place of some of the yeast?
5. Your analysis of the pros and cons of the two methods is spot on!
6. With prior FMB recipes I have sometimes divided the dough into loaf portions at the end of the first ferment. I put each portion into a separate covered container. It’s a little quicker and cleaner to form the final loaf without a lot of grabbing and cutting.
7. Thanks for introducing me to “umami”.
8. You are absolutely right about the mega-over-abundance of yeast in the FMB recipes.
9. I’ve been lining a bowl with non-stick aluminum foil and then I proof the loaf in the bowl. It is much easier to port the dough, aluminum foil and all over to the very hot cast iron pot. I’ve been able to re-use the foil many times before recycling it. I’ve used parchment paper successfully but it tends to get worn out after one use.
10. Thanks for standing up for 80% hydrated dough!!!
11. I know of an avocational baker in Toronto who will proof his finished loaves for several hours. What is your thinking about the short 40-60 minutes proof? I am coming to appreciate the shorter proof. It lets me prepare a loaf at breakfast and have baked bread for lunch, or prepared loaves at lunch with baked and cooled loaves ready for dinner. When I proof for more than an hour and a half, I find that the bread gets kind of puffy and lacks a distinct flavor.
12. I am now experimenting with holding back a portion of my retarded dough and mixing it into new batches, kind of like "old-dough" additions. Have you tried this?
Having written all this, what really got me was your fabulous picture of that lovely loaf. No one could fake that bread!
Your respect for bread will make me try the vegan recipes, one by one. One who honors good bread as much as you do must know something about food in general.
Best, Bruce from southern New Jersey
Thanks for your post, Bruce! To quickly answer your questions;
1.) From my own reading, I do agree about the over-mixing. I have been mixing only minimally.
2.) I am going to have to research this question-- I'm not sure why this works the way it does.
3.) It may be helpful to turn down the dough during the transfer-- I don't do anything except dump it into the container after the first rise but some gases are expelled. But this must be something like the punching-down and may prevent an over-rising effect, and protect the yeast from exhausting itself. I'm not sure.
4.) I haven't tried reducing the yeast any more as yet.
6.) Good idea!
9.) Another good idea!
10.) It definitely made a difference!
11.) The 60 minute proof worked fine with the approx. 2/3 white flour dough, but it did not work well with a wholewheat dough-- I had to rise it 3 hours! (I am not having a great deal of satisfaction with making this dough all whole wheat. I have been asked to do this, but I don't think this particular formula works well with all wholewheat.)
12.) I have not tried this-- haven't had alot of time for baking lately. How is it working for you?
Did you see the pictures on this post:
http://veganfeastkitchen.blogspot.com/2007/01/gorgeous-holey-crunchy-crust-no-knead.html
Wow, your flat bread looks like naan! I can't wait to try it. Thanks!
Where can I find the recipe for this bread?
There are links in the text to Jim Leahy's bread method:
http://veganfeastkitchen.blogspot.ca/2007/01/gorgeous-holey-crunchy-crust-no-knead.html
and Jeff Herzburg's 5-minute method:
http://veganfeastkitchen.blogspot.ca/2008/03/another-kind-of-no-knead-bread-i-like.html
The last link has my version. I have since refined it somewhat and that recipe is in my book "World Vegan Feast".
Post a Comment