Sunday, March 16, 2008
ANOTHER KIND OF NO-KNEAD BREAD-- I LIKE THIS ONE!

When I read about a yeast bread that takes 5 minutes to mix (no kneading), and you can keep it in the refrigerator for 2 WEEKS, AND it's tasty and crusty, I just had to try it! I read about it on my friend Julie Hasson's blog. The recipe is from a best-selling book:
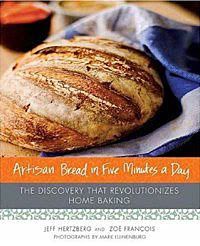
"Artisan Bread in Five Minutes a Day" by Jeff Hertzberg and Zoe Francois
You may have read about my experiment with the other no-knead sensation from Jim Lahey via Mark Bittman at the new York Times. That was a great bread, but it did require some planning ahead. The "five-minute" bread is similar in some ways-- a very simple dough, very wet, no kneading, long rise. The long rise is what gives it exceptional flavor and gives strength to the gluten the way kneading ordinarily would.
This is not really new. I have a book called "No Need to Knead" by Susanne Dunaway, which was published in 1999:
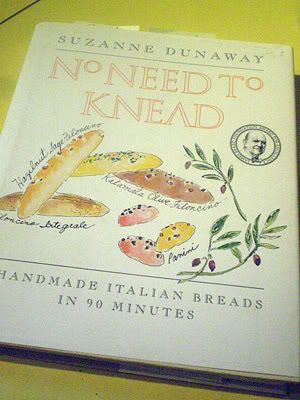
The author is a professional baker who operated an Italian bread business. Her breads often (but not always) use a starter or biga (firm Italian starter), she stirs the dough with a wooden spoon for about 2 minutes, and then, with many of the recipes, you have the option of using it after a 40-minute rise, OR an overnight rise in the refrigerator. The ones I tried came out pretty well, but I definitely think the longer rise improved flavor.
I compared Jim Lahey's recipe with the "five-minute" one, and a basic one from "No Need to Knead". The amount of water to flour is about the same (Jim Lahey's used a tiny bit more water-- for a recipe the size of the recipe below, you would add about 1/4 cup more water). The amount of yeast really varies, though. The Jim Lahey dough has an 18 hour rise at room temperature, so you start with only 1/4 teaspoon instant yeast (1/3 teaspoon regular dry active yeast). Dunaway uses 2 teaspoons yeast for a dough about 2/3 the weight of the one below.
The "five-minute" dough calls for 1 1/2 TABLESPOONS of yeast-- I find that excessive. I really can't figure out why they would use so much yeast. I used 1/3 as much (1/2 tablespoon) and it rose beautifully, as you can see from the pictures below!
NOTE: I had no suitable container empty, so I used the plastic box that organic baby salad greens come in!
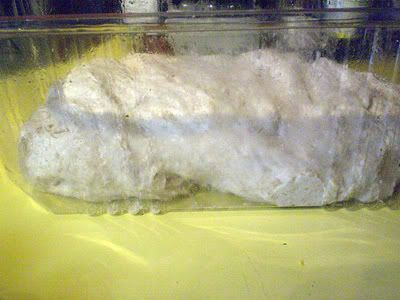
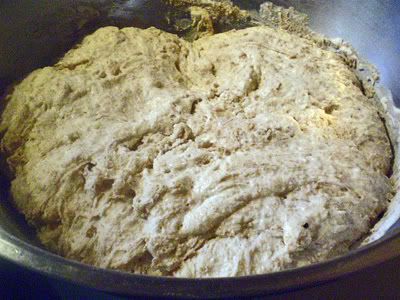
The dough just after mixing.
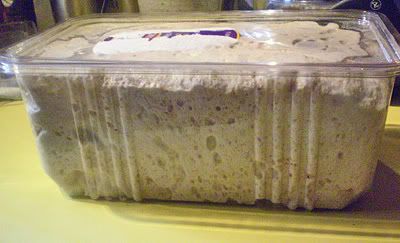
The dough after being in the refrigerator for 24 hours.
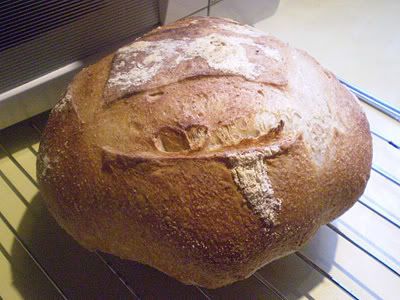
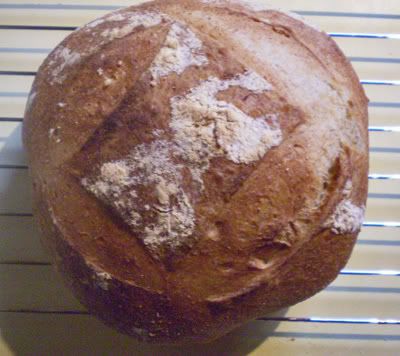
I made some of the "five-minute" dough yesterday, using less yeast and some whole wheat flour, and baked a loaf of bread today (I plan to make pizza with the rest of the dough tonight-- I'll report on that!) I thought 1/4 of the dough looked too small, so I used half the dough for a round loaf.
(UPDATE: SEE BELOW RECIPE FOR PIZZA RESULTS.)
The taste of the bread was fantastic! It didn't have great holes, but I think that is from too much handling on my part-- as I read from an anonymous chef on a forum: "getting the big holes is achieved by:
a) a very wet dough
b) handling the dough with alot of care after retarding, no punchdown whatsoever!
c) NOT overproofing the dough. Dont wait untíl you get EXACTLY double in size
d) a VERY VERY hot oven + spritzing 2 to 3 times to avoid early crusting
all the things in combination work, none of them alone !!"
The crust was better on Jim Lahey's bread, but the taste of this one was better, we thought. I might try the "five-minute" bread in a cast iron Dutch oven. I'm sure that many recipes are adaptable to this very easy method!
SIMPLE CRUSTY BREAD (BRYANNA'S VERSION)
(See my final personal version in my book "World Vegan Feast". I use the "bake in a pot" method now [most of the time]-- see at this post. )
The original recipe called for all unbleached flour— I used some whole wheat.
Adapted from “Artisan Bread in Five Minutes a Day,” by Jeff Hertzberg and Zoë François (Thomas Dunne Books, 2007)
1 1/2 teaspoons (1/2 tablespoon) dry active yeast [The original recipe said 1 1/2 TABLESPOONS, but this is way too much! It worked fine with 1/2 tablespoon.—BCG]
1 1/2 tablespoons kosher salt
4 cups unbleached, all-purpose flour, more for dusting dough
2 1/2 cups whole wheat flour (hard wheat flour or bread flour)
Cornmeal
1. In a large bowl, large plastic bowl with lid, or plastic bread-mixing container, mix yeast with 3 cups lukewarm water (about 100 degrees). Let sit until yeast dissolves. [I did this even though the original recipe didn’t say to—mine was regular dry active yeast, not instant, so I thought it might need dissolving.—BCG] Add salt. Stir in flour, mixing until there are no dry patches. [UPDATE: I now use a Danish dough whisk.] Dough will be quite loose. Cover. Let dough rise at room temperature 2 hours (or up to 5 hours). [I let it rise about 4 hours—BCG]
2. Bake at this point or refrigerate, covered, for as long as two weeks. When ready to bake, sprinkle a little flour on dough and cut off a grapefruit-size piece with dough cutter/bench scraper (metal or plastic). Turn dough in hands to lightly stretch surface, creating a rounded top and a lumpy bottom. Put dough on pizza peel [or a or cookie sheet with no sides-- BCG] sprinkled with cornmeal; let rest 40 minutes. [I let it rise 1 hour- BCG] Repeat with remaining dough or refrigerate it.
3. Place broiler pan in bottom of oven. Place baking stone or large cast iron skillet, cast iron pizza pan or cast iron griddle on middle rack of oven and turn oven to 450 degrees F [I used convection, too-- BCG]; heat stone at that temperature for at least 45 minutes (cast iron pans only require 30 minutes).
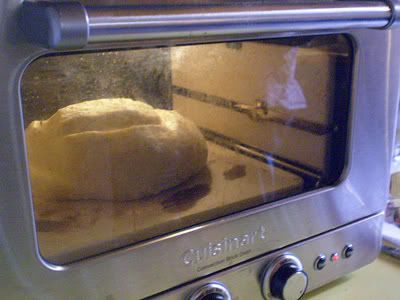
4. Dust dough with flour, slash top with serrated or very sharp knife three-four times. Slide onto stone. Pour one cup hot water into broiler pan and shut oven quickly to trap steam. [NOTE: I used my little Cuisinart countertop BrickOven and you don’t need steam in that—it worked great! BCG] Bake until well browned, about 30 minutes. Cool completely.
Yield: 2 loaves. [The original recipe says 4 loaves, but they would be pretty small!—BCG]
Variation: If not using stone or cast iron pan, stretch rounded dough into oval and place in a greased, nonstick loaf pan. Let rest 40 minutes if fresh, an extra hour if refrigerated. Heat oven to 450 degrees for 5 minutes. Place pan on middle rack.
PIZZA UPDATE, 7 PM:

I made two 12" pizzas, but I think 3 would have been better. Even though the dough was cold and I got it right into the oven after rolling, it rose like crazy!


This crust was a little tough, but I think that is because it rose so much and had to cook longer because of the thickness. Adding a little olive oil to the dough next time might be a good idea for pizza. It was very good, but I will make 3 pizzas (with half of the dough) next time because I like a thin crust.
Enjoy!

Subscribe to:
Post Comments (Atom)
10 comments:
My mother-in-law uses No Need to Knead all the tie, the recipes are so good!!
I plugged this into the Weight Watchers flex points counter and 20 servings (10 slices for 2 loaves, or 5 for 4 small loaves) = 2 points/piece.
I don't have a stone; do you think using a large cast-iron skillet would also work, or should I stick with the loaf-pan variation?
Hi Bryanna,
Do you think this type of bread would work with a sour-dough starter? It sure looks good!
Catherine
Catherine, I don't really know if it would work with sourdough. When I have time, I'll try it. But here is a long comment about tghe "five minute" book from a sourdough user:
Some notes for sourdough/dense loaf fans, December 15, 2007
By born every minute
This is a terrific book ... I've tried the basic approach and it is great. To make it more useful (for some) I'd like to add a few notes.
The book has an unfortunate, (for me) bias towards light, fluffy breads and breads that rely on "ingredients". So...
Sourdough breads: I've been refrigerating my dough for years to increase the sourdough flavor. This books opens the door to a very simple approach to sourdough.
As the book notes, the sourdough taste increases with time in the refrigerator. So simply keep two sets of dough running ... a "dormant" set and an active set. Start by making a batch of dough. Stick it in the refrigerator and don't touch it for at least a week. After a week or so, make a second batch of dough. (I would mix in a hunk of the previously mixed, week old dough to enhance the sourdough development.) Now put this second batch away and start using the first batch ... which will have started to taste like a sourdough. When this first batch is used up, make up a brand new "dormant" batch and put it aside while you start using the batch that's been sitting in the refrigerator for the past week or so.
In this way you can keep a sourdough going forever, without any additional work. (Since you only a new batch when an old batch runs out.)
Rye and whole wheat: The technique is IDEAL for rye ... which is a gummy, no-knead but extremely delicate dough. I would certainly use much more rye than any of these recipes call for and would use the sourdough technique I mentioned above to develop flavor.
It its also ideal for whole wheat. The big problem with whole wheat is not the crust, (I'll mention a technique to bring out a crust), but that whole wheat contains bran, which, when kneaded, cuts the strands of gluten/protein. That's why 100% whole wheat is so dense. But, since you do not knead this dough, the bran does not cut the protein strands and the dough is free to rise almost as much as a white flour.
Personally, I use 50% rye and 50% whole wheat and, using the books oven technique get a great rise.
Another technique that develops a very thick crust, no matter the flour, is to bake the bread in a preheated, covered oven pot or casserole pot at 450 degrees.
By the way ... to get actual pumpernickel, forget the powders, (coffee and chocolate ... yeesh!) and just use pumpernickel flour in place of rye flour. (Pumpernickel flour is nothing more than whole grain rye flour.) http://www.amazon.com/review/R33RLJWW99XA1K
Wendy, I think a cast-iron skillet would work well-- just heat it up as you heat the oven and gently overturn the loaf onto the pan when it's ready.
Hi Bryanna,
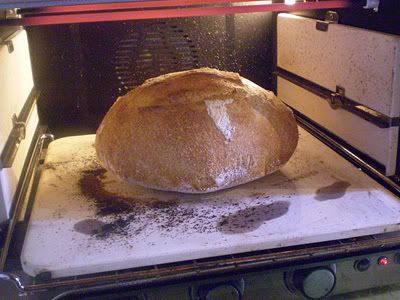
That bread looks great! I have to say that Cuisinart oven of yours is amazing - the pictures you have shown us of pizza and bread that you make it in, they look like they were cooked in a brick oven. I would never think that a countertop oven would cook so well. I am sure you are very pleased with it.
Thanks so much Bryanna! I'm going to try this today. It looks so good and simple :) And I want that pizza! LOL
Hi everyone. I have been baking with a cast iron dutch oven and it produces great results. You can check out many more recipes and techniques at www.breadtopia.com. I have made my own sourdough starter and it makes great bread. It is easy to do to. I am investigating this counter brick oven and wanting to put one in my kitchen. That way we can toast and roast and make bread while my other oven is also making bread. It sure looks like a great addition. I will also be playing around with quary tiles unglazed. I have seen these used in a couple of other sites and you can spritz them too.
Hi, John! Don't worry-- I have your website link on my toolbar! I'm a big sourdough fan, having grown up in San Francisco. I just haven't had much time for experimenting with it with these methods lately, as I have a number of deadlines. That's why the "5-minute" bread is so handy right now!
Have you had any experience refrigerating the actually dough made with sourdough for any length of time (I refrigerate my staters)?
I have had super success using cast iron pans (as you can see from the two blog posts posted after this one)!
I love that little oven! I was nervous at first, spending that much money, but it's in use alot!
I made this today. And somehow managed to not kill the yeast, despite not having a thermometer. It is rising in my container on the countertop right now and will go into the refrigerator in a few minutes. I only let it rise two hours, since Florida is warm enough that my apartment is about 72 degrees F inside. Don't plan on making bread loaves, however might make one, just for fun. This is for flat bread, naan, and pizza crusts. I will be busy baking next week.
Post a Comment