Showing posts with label no-knead whole wheat bread. Show all posts
Showing posts with label no-knead whole wheat bread. Show all posts
Sunday, January 10, 2016
CRUSTY SOURDOUGH HALF-WHOLE WHEAT NO-KNEAD BREAD


You might have read my post several years ago about my history with San Francisco sourdough and my vegan version of the San Francisco sourdough starter. Well, I've neglected it for quite a while, but a friend's interest in making sourdough bread sparked me to revive my starter and start baking sourdough bread again.
However, as you might know, I'm a big fan of the no-knead baking method. Why? Harold McGee, author of " On Food and Cooking: The Science and Lore of the Kitchen", explains why the no-knead method works: "It makes sense. The long, slow rise does over hours does what intensive kneading does in minutes: it brings the gluten molecules into side-by-side alignment to maximize their opportunity to bind to each other and produce a strong, elastic network. The wetness of the dough is an important piece of this because the gluten molecules are more mobile in a high proportion of water and so can move into alignment easier and faster than if the dough were stiff." In addition, the long rise produces umami flavor compounds which give the bread outstanding flavor.
I had played briefly in the past with a no-knead version of sourdough bread, but without much success. But, being a bit more experienced in this baking method at this point, I decided to try my hand at it again. I made a batch a couple of weeks ago, and it wasn't bad, but I wanted to use more whole wheat flour AND have more sourdough flavor. Well, yesterday I had success! There are very few ingredients in this bread, but its simplicity belies the complexity of its flavor and textures. The bread rose well, had fine sourdough flavor, and the crust was beautifully golden-brown and crusty. I promised to share the recipe with you today and I've been working on this post most of the day, to make sure that I didn't forget any details that will help you have success with sourdough bread baking.
First things first: If you don't already have a good sourdough starter, here is the link to a printable copy of my instructions for making my vegan San Francisco-style sourdough starter, and how to care for it, replenish it, increase it and use it.
Notes: (The following information is also useful for making other kinds of bread.)
1.) The following bread recipe can easily be doubled or tripled if you have extra sourdough starter on hand-- or you can increase your starter for making more loaves if you give yourself an extra day or two.
2.) 2 times the recipe will, of course, make two 2 lb. loaves, three 1-lb. 5 oz. loaves, or or four 1-lb. loaves (weights are approximate). *****THESE WEIGHTS ARE FOR THE DOUGH BEFORE BAKING***** I recommend purchasing an inexpensive kitchen scale, if you don't have one already.
4.) 2 1/2 lbs. of dough (weight before baking) should be baked in a 10" round pan or
2 lbs. of dough should be baked in either 9 x 5 x 2 3/4" loaf pans or 9-10" round pans.
1 1/4 to 1 3/4 lbs. of dough should be baked in 8 x 4 x 2" loaf pans or 9" round pans
1 lb. of dough should be baked in either 7 x 3 x 2 1/2 loaf pans or 8-9" round pans.
You could also bake all 4 lbs of the doubled dough as "mega boule" or giant round loaf in an 11-12" round Dutch oven or similar pan, or a large stoneware baking cloche. (See Tips below for information about pans and other baking vessels.)

BRYANNA'S CRUSTY HALF-WHOLE WHEAT NO-KNEAD SOURDOUGH BREAD
© Bryanna Clark Grogan 2016
Servings: 24
Yield: One 2-pound loaf, or two 1-pound loaves (weight of dough before baking)
Ingredients:
Dry Ingredients:
2 cups whole-wheat flour
1 cup unbleached white flour
2 tsp salt
Wet Ingredients:
1 1/4 cups warmish water
3/4 cup active sourdough starter (use your own, or my San Francisco-Style Vegan Sourdough Starter-- see link above)
Instructions:
In a large bowl, mix together the Dry Ingredients.
In a smaller bowl or pitcher, whisk together the water and sourdough starter. Stir this into the Dry Ingredients just until all of the flour is absorbed into a "shaggy" dough. (I like to use a Danish dough whisk for this-- see photo below.)
In a smaller bowl or pitcher, whisk together the water and sourdough starter. Stir this into the Dry Ingredients just until all of the flour is absorbed into a "shaggy" dough. (I like to use a Danish dough whisk for this-- see photo below.)
 |
| Freshly mixed dough |
 |
| A Danish dough whisk |
Let the dough rise at normal room temperature for about 12 hours (up to 18 hours). I start the dough in the evening and let it rise overnight, and plan to finish the bread in the morning. I mix the dough and set to rise about 9 pm, so that I can get it made into a loaf or loaves and rising again by 9:30 or 10 am the next morning.
After the first long rising, the dough should look softer and be doubled in size.
 Don't stir the dough down. Cloak the dough with flour, and cover your work surface with a sheet of baking parchment or a silicone mat, flouring it well. Note: The dough will be quite sticky-- keep your hands and the parchment floured and use a bench knife/dough scraper to handle the dough whenever possible.

Using the dough scraper, scoop the dough onto the floured surface, sprinkle it with a little more flour and stretch the dough a little, folding it over on itself twice.

Cover the dough with a domed lid or pot, or a damp tea towel, and let rest for 15 minutes.
NOTE: If you don't plan to bake right away, you can refrigerate dough in a covered bowl or bucket, or even a zipper-lock bag, for up to 5 days. Then take the dough out and let rise for 8-12 hours or overnight.

Cover the dough with a domed lid or pot, or a damp tea towel, and let rest for 15 minutes.
NOTE: If you don't plan to bake right away, you can refrigerate dough in a covered bowl or bucket, or even a zipper-lock bag, for up to 5 days. Then take the dough out and let rise for 8-12 hours or overnight.
While the dough is resting, get your pan(s), or whatever baking vessel(s) you are using, ready. Then choose the similar-sized and shaped vessel(s) in which you are going to rise the loaf or loaves. Cut a piece or pieces of baking parchment to fit into the rising vessel(s) with some overlap. Just lay it over the vessel and sprinkle the middle with flour. (NO OILING IS NECESSARY!)


After the 15 minutes are up, if you are making more than 1 loaf, cut the dough in half with the dough scraper. Using just enough flour to keep dough from sticking to your work surface, or to your fingers, quickly shape dough (or dough halves) into ball, oval or loaf shape(s), depending on the shape of the vessel(s) in which you are going to bake the bread. Do this by folding the dough under itself. If making more than one loaf, I advise weighing the dough (on floured parchment) so that you have even loaves, but you can "eyeball" it. Note: The process will be a bit sticky and messy, but, with flour and a dough scraper, you'll get there!
Place the shaped dough seam-side-down on the parchment-lined rising vessel(s) you have prepared earlier and dust the top of the dough lightly with more flour. With scissors, cut off the excess parchment just above the top of the rim of the vessel, leaving just enough to be able to grasp on each end in order to transfer to the hot baking vessel(s) when the time comes.


Place the rising vessel(s) inside of a food-safe plastic bag and twist-tie it closed, leaving plenty of room for the dough to rise; or cover with damp tea towels; or use a proofing box, if you have one. Let rise at a normal room temperature, setting your kitchen timer to 1 hour. When that hour is up, place your baking vessel(s) (see Tips) in the oven and turn the oven to 475°F. Now set the timer for 30 minutes.
After 30 minutes, IF the loaves have doubled in size (if not, let rise some more until they do), transfer the risen loaf or loaves to the (hot!) baking vessel(s), using the parchment under the dough as a "lifter", and set the dough (parchment and all) into or on your baking vessel(s). (Don't worry-- it won't stick or burn!) Cover with the lid(s) and bake for 30 minutes, then remove the lid(s), lower the heat to 350ºF and bake another 15 minutes, or until the bread is a beautiful crusty golden-brown. With hands protected by heat-resistant oven mitts, remove the bread immediately, discarding the parchment, and cool on a rack.
If you can resist, it is best to wait until the bread is cooled (mostly, at least!) before tasting.


Nutrition Facts
Nutrition (per serving): 60 calories, 2 calories from fat, less than1g total fat, 0mg cholesterol, 157.3mg sodium, 48.2mg potassium, 12.7g carbohydrates, 1.4g fiber, less than1g sugar, 2.1g protein.

Tips
PANS FOR BAKING: (PS: This info is useful for baking all kinds of no-knead crusty breads.)
I have used all kinds of pans for baking this type of crusty bread, including an enamelled cast iron Dutch oven (8 1/2" across the bottom, 12" across the top, 5" deep), Granite Ware roasting pans of 3 sizes, and oval glazed ceramic casseroles with lids (I have one that is 9" x 6" x 3", and one that is 10" x 7 1/2" x 3". They can handle 2 to 2 1/2 lbs of dough respectively.) You could also use a deep cast iron skillet with a raised lid, even a Pyrex lid, over the top.
If you have a bread cloche (a stoneware or ceramic dish with a bell-shaped lid for baking round loaves), of course you can use that. I have a Pampered Chef Round Lid/Bowl Baker Roaster and matching Sassafras SuperStone Deep Dish Pizza/Pie Baker (I found them at a thrift store for a song!) that I haven't tried yet, but I plan to soon. (We are told not to preheat these before baking, but many bakers on Pampered Chef forums state that they do preheat them with no problem-- just don't spray them!) UPDATE: I baked this bread in the Pampered Chef combo mentioned above, with EXCELLENT results! See the photos at this post.
You can also use a pizza stone with an overturned ceramic or cast iron or Granite Ware pot or roaster, or even the ceramic insert of your slow cooker, for the lid. If you Google "improvised bread bakers and cloches", you'll find lots of ideas, such as this from: http://www.thefreshloaf.com/node/22370/my-improvised-la-cloche-thai-style
You can improvise a cloche for bread baking: a flower pot cloche. It's simply an inexpensive unglazed domed flower pot turned upside down on the matching rimmed dish that comes with it. The dish is 9 inches across the bottom, 11 inches across the top and 2 inches deep; the pot itself is 7 inches across the bottom, 10 inches across the top and 4 1/3 inches deep. Place the risen bread in the dish (with the baking parchment it rose in) and turn the flower pot upside down over it. You can plug the hole in the flower pot with a little wad of aluminium foil. (The bread never actually touches the clay, by the way.) This will set you back $10; a La Cloche Baker costs upwards of $50. (Alternatively, place the risen dough on a heated pizza stone and place a large overturned dome-shaped clay flower pot over the dough.)


What about unglazed "clay bakers" or terra cotta bakers (such as Romertopf)?
I didn’t think these would work at first, but as long as you soak the pot (both bottom and top) in cold water for 15 minutes before placing it in a cold oven to preheat, it works just fine! I have a number of them, bought cheaply at thrift stores. I have one Romertopf-wanna-be that is very much like the Romertopf 109 or 110 (3 to 5-pound size that measures 12 x 8 1/4 x 6-inches. All of my clay bakers 2 or 2 1/2 quart size.
Here is some different advice from a forum at http://www.thefreshloaf.com/node/15322/la-cloche-instructions
"Romertopf is good for any small loaf that needs steam
I have an older unglazed Romertopf and I used to use it for bread all the time. I always pre-heated it while the oven was heating up; sometimes I pre-soaked it and sometimes I didn't, and that didn't seem to make much difference. I mostly used it for no-knead, but I'd say it's good for any bread that is baked with steam. The main reason I stopped using it is that the breads I'm making these days won't fit inside it, so for baguettes and miches I switched to a stone and steam pan arrangement, or in some cases a bigger cloche. I now prefer this because I find it easier to load loaves on a flat surface than in the deeper Romertopf. But there's no question that the results it produced were terrific." (Note: there are large clay bakers, too.)
Lately, I have made conventional (but crusty) "sandwich loaves" by baking the dough in regular rectangular bread pans (metal or Pyrex) INSIDE of a large roaster.
Two 9 x 5" or 8 1/2 x 5" bread pans (with no handles), or two 7" round pans, or one 10" round pan will fit in a large oval roaster 15 1/2" long, 11" wide and 4" deep. (That's my largest oval roaster, but there are 18" and 19" ones, and even a rectangular one 21" x 15"!)

A medium oval roaster 12" long, 8" across and 3" deep will hold a 9 x 5 bread pan (with or without handles).
A small oval roaster 11" long, 7" across and 3" deep on it's own will hold a 2-3 lb. of dough, or it will hold a bread pan 8 1/2" x 4 1/4" x 2 1/2" OR 8" x 4" x 3".
Pre-heat the bread pans inside the roaster. Rise your bread in a pan or basket or anything else that will yield a loaf pretty much the size and shape to fit into the heated bread pan. When the oven comes up to temperature and the roasters and pans are hot, transfer the loaves (with the parchment) into the hot bread pans, cover the roaster and bake as directed.
UPDATE Jan. 14, 2016: I was lucky enough to find a large rectangular roaster in great shape at Value Village, and it only set me back about $4.00 Cnd-- a real bargain! (Actually it might be a Granite Ware roasting/baking pan with a roaster lid, but they fit together.) Below I'll post some pics I just took of the pans I can fit into it. I could probably also bake 3 short baguettes in this pan.
 |
| When used with the smaller pan on the bottom, the baking space is about 14 1/2 x 9 1/2". |
 |
| When used with the larger pan on the bottom, the baking space is 14 x 9". |
 |
| Three 8 x 4" bread pans fit perfectly. |
 |
| One 9 x 5 plus two 8 1/2 x 4 1/2" bread pans. |
 |
| One 10" round pan plus one 8 1/2 x 4 1/2" bread pan. |
 |
| Two 9 x 5" bread pans (with handles-- you might get 3 in without handles and edges). |
Happy Baking!


Thursday, January 14, 2010
FINALLY! NO-KNEAD, CRUSTY ALMOST-ALL WHOLE WHEAT ARTISAN BREAD BAKED IN A POT!
UPDATE: THIS DOUGH ALSO MAKES GREAT PIZZA!See the pizza photo at the end of this post.
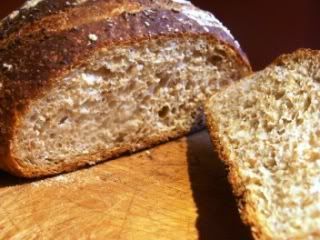
Over the last few months, in between other projects, I have been trying to make a whole wheat, crusty, no-knead artisan loaf that I can be really proud of (like my "whiter version", which is only about 1/3rd whole wheat.) I'm not saying that this is the final version, but I think it's pretty darn close! (Read more about the no-knead bread process and why it's so good here and here.)
As with my other recipe, I borrowed ideas and advice from a number of experts (see the text at the beginning of the recipe below), combined with my own tastes and experience. I don't know if it is possible to make a really tempting whole wheat version of this type of bread solely with whole wheat flour. My early attempts were "grassy"-tasting and heavy. So, I used the proportions in Jeff Hertzberg's and Zoë François' recipe for "five-minute" no-knead, refrigerated for whole grain bread, with a few additions and changes.
The proportions are slightly more than 3/4 whole wheat flour to slightly less than 1/4 unbleached white flour-- not bad! The authors explained that "In order to mix up dough that’s really high in whole grains, but can still be successfully stored, you need to boost the dough’s gluten level. Otherwise, the bread won’t rise nicely and will be too dense..." This made sense, even though I've always disliked the breads I'd tried with added gluten (they seemed to have a "tough" quality). But it worked with this very wet dough! I used a little less gluten this time, because it still seemed a bit tough the first time I tried it. However, this may be explained by the higher gluten content in Canadian flour, so you can try it both ways if you live in the USA.
I took master baker Peter Reinhart's advice and added a little organic sugar (to counteract the "bitter tones of the whole wheat flour") and olive oil ("to soften the bran"). The resulting bread does not taste sweet or "enriched"-- it tastes "clean" to me, and very tasty. (In my "whiter version", I used less whole wheat, so I didn't add the sugar, but I did add some oil, which I thought improved the texture.)
I hope you will give this a try and perhaps you can improve upon it further, and make your own variations. It's such an easy and satisfying way to make good bread!
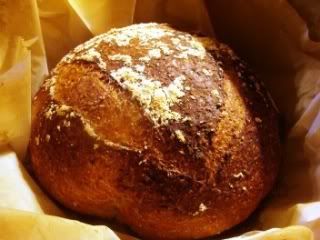
Printable Recipe
BRYANNA'S 3/4 WHOLE WHEAT SIMPLE NO-KNEAD CRUSTY BREAD (BAKED IN A POT)
Makes 3 good-sized loaves (Jan. 13, 2010)
For this recipe, I have used as much wholewheat flour as possible and still kept the qualities of an artisan crusty bread-- a crackly crust, holes in the crumb, etc.. I started with Jeff Hertzberg's and Zoë François' recipe for "five- minute" no-knead, refrigerated dough for whole grain bread, combined with some of the qualities of Jim Lahey's no-knead bread method (via Marc Bittman in the NY Times), along with his novel pot-baking method; and took also advice from Peter Reinhart's books (reluctantly adding a little sugar to the whole grain dough, as he recommended, and finding that it improves the flavor of a mostly whole grain loaf), and Cook's Illustrated magazine experiments with no-knead, pot-baked bread. (See this blog post and this one for more about no-knead, crusty bread, and this one for my "whiter" version.) It's very good!
4 cups lukewarm water
1 tablespoon regular dry-active baking yeast (OR 3/4 tablespoon instant yeast
 )
)
2 tablespoons olive oil
2 tablespoons organic sugar
1 tablespoon table salt (or small crystal kosher salt )
)
Flour mixture (combine together in a dry container):
5 1/2 cups whole wheat flour (ground from hard wheat, if you grind your own, or, especially in the USA, use whole wheat bread flour)
2 cups unbleached white flour (Canadian all-purpose flour is fine, but you might want to use bread flour in the US) + more for dusting dough
3 tablespoons pure gluten powder (vital wheat gluten )
)
(In the USA, if you are using unbleached all-purpose flour, you might want to use 1/4 cup of gluten powder. When I used 1/4 cup [with Canadian flour], it seemed too tough, so I reduced the amount.)
Cornmeal and flour for dusting
In a large bowl or plastic container, mix the yeast into the lukewarm water (about 100 degrees). Let sit until yeast dissolves. (If using the instant yeast, you don't have to dissolve it, though master baker Peter Reinhart has revised his thinking on this and recommends dissolving instant yeast to "allow it to ferment more effectively during the cooldown phase in the refrigerator".) Add oil, sugar, and salt. Stir in the flour mixture, mixing until there are no dry patches. Dough will be quite loose.
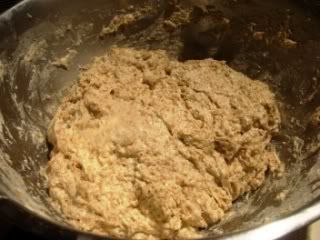
Place the container inside of a clean plastic bag (a small new white garbage bag does fine), and twist-tie it closed, leaving room for the dough to rise. Let dough rise at room temperature 2 hours (or up to 10 hours).
Prepare to bake all or some of the dough at this point OR refrigerate in a tightly-covered oiled container (OR 2 containers) with room to double in size, for as long as two weeks. (The dough is much easier to work with if you refrigerate it for at least 3 hours before shaping.)
When ready to bake, sprinkle a little flour on dough (DON'T PUNCH DOWN!) and cut off 1/3rd of the dough with serrated knife, or a bench knife, for each loaf.
Lightly flour a work surface and place dough on it; sprinkle it with a little more flour and fold it over on itself once or twice. (It's quite sticky-- keep your hands and the surface floured; maybe used a bench scraper.)
Using just enough flour to keep dough from sticking to work surface or to your fingers, gently and quickly shape dough into a ball OR oval shape, depending on the shape of the pot you are going to bake it in.
Line a bowl, pan or oval casserole (depending, again, upon the shape of the vessel you will be baking the bread in-- doesn't matter what it's made from as you aren't going to bake it in this, just let it rise in the appropriate shape) with baking parchment -- 1 for each loaf you are baking at the time. Sprinkle the parchment with flour, cornmeal, semolina, or bran. Place the dough seam-side-down on the parchment in the bowl or pot, and dust lightly with more flour, semolina, bran, or cornmeal. Place the vessel(s) inside of a clean plastic bag(s) (a small new white garbage bag does fine), and twist-tie closed, leaving plenty of room for the dough to rise. Let dough rise in a warm spot for about 2 hours (if dough has been refrigerated-- if it has not, rise at room temperature for about 1 hour).
Heat the oven to 475°F, with the pot(s) you are baking the bread in heating in the oven at the same time, for at least 30 minutes. Use a deep cast iron skillet or Dutch oven with a lid (can be enamel-coated or not), or a heavy ceramic covered casserole (NOT unglazed clay).
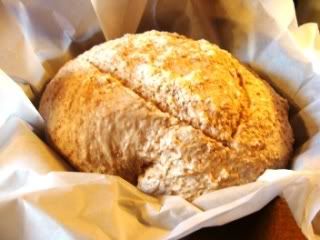
When the oven and the pan are heated, and the dough has risen for the appropriate time, just lift up the loaf (or loaves) right in the parchment (using the parchment as a "lifter") and set it into your hot pot, pan or casserole with the parchment. (Don't worry-- it won't stick or burn!) Cover with the lid and bake 30 minutes, then remove the lid and bake another 15 minutes, or until the loaf is beautifully browned. Remove the bread from the pan immediately and cool on a rack.
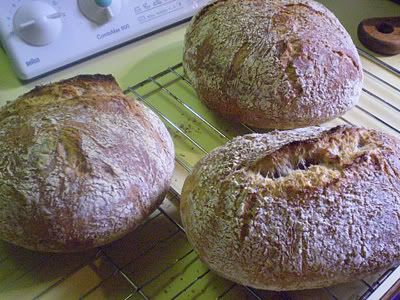
PS: If this method of transferring the loaves to the pots in parchment makes too much of a "neat and tidy-looking" loaf for your taste, follow my original directions at this blog post (using the recipe in the blog post, not the printable recipe). This results in a more rustic-looking loaf as the photo below shows. It's up to you!
Nutrition Facts
Nutrition (per slice [12 slices per loaf]): 100.1 calories; 10% calories from fat; 1.2g total fat; 0.0mg cholesterol; 189.9mg sodium; 89.0mg potassium; 19.5g carbohydrates; 2.5g fiber; 0.8g sugar; 17.0g net carbs; 3.8g protein; 1.6 points.
UPDATE (Jan. 16, 2010): This afternoon I used the remaining dough (2/3rds of the recipe) to make 3 pizzas. This was the best almost-all-whole-wheat pizza I've ever made! Even my 3 picky granddaughters loved it! I used it cold straight from the refrigerator, with no rising, baked it at 500 degrees F. I just patted and stretched the dough out by hand on a sheet of baking parchment-- it's a sticky dough and you can't spin this one! I baked it right on the parchment because I was afraid the sticky dough would stick to the peel. It worked just fine! I made the pizza pretty thin, but you can see that the edges puffed up quite a bit in the oven.

Pizza made with the same dough, after refrigerating it for 3 days.
Happy Baking!

Printable Recipe
BRYANNA'S 3/4 WHOLE WHEAT SIMPLE NO-KNEAD CRUSTY BREAD (BAKED IN A POT)
Makes 3 good-sized loaves (Jan. 13, 2010)
For this recipe, I have used as much wholewheat flour as possible and still kept the qualities of an artisan crusty bread-- a crackly crust, holes in the crumb, etc.. I started with Jeff Hertzberg's and Zoë François' recipe for "five- minute" no-knead, refrigerated dough for whole grain bread, combined with some of the qualities of Jim Lahey's no-knead bread method (via Marc Bittman in the NY Times), along with his novel pot-baking method; and took also advice from Peter Reinhart's
books (reluctantly adding a little sugar to the whole grain dough, as he recommended, and finding that it improves the flavor of a mostly whole grain loaf), and Cook's Illustrated magazine experiments with no-knead, pot-baked bread. (See this blog post and this one for more about no-knead, crusty bread, and this one for my "whiter" version.) It's very good!4 cups lukewarm water
1 tablespoon regular dry-active baking yeast
(OR 3/4 tablespoon instant yeast)2 tablespoons olive oil
2 tablespoons organic sugar
1 tablespoon table salt (or small crystal kosher salt
)Flour mixture (combine together in a dry container):
5 1/2 cups whole wheat flour
(ground from hard wheat, if you grind your own, or, especially in the USA, use whole wheat bread flour)2 cups unbleached white flour
(Canadian all-purpose flour is fine, but you might want to use bread flour in the US) + more for dusting dough3 tablespoons pure gluten powder (vital wheat gluten
)(In the USA, if you are using unbleached all-purpose flour, you might want to use 1/4 cup of gluten powder. When I used 1/4 cup [with Canadian flour], it seemed too tough, so I reduced the amount.)
Cornmeal and flour for dusting
In a large bowl or plastic container, mix the yeast into the lukewarm water (about 100 degrees). Let sit until yeast dissolves. (If using the instant yeast, you don't have to dissolve it, though master baker Peter Reinhart has revised his thinking on this and recommends dissolving instant yeast to "allow it to ferment more effectively during the cooldown phase in the refrigerator".) Add oil, sugar, and salt. Stir in the flour mixture, mixing until there are no dry patches. Dough will be quite loose.
Place the container inside of a clean plastic bag (a small new white garbage bag does fine), and twist-tie it closed, leaving room for the dough to rise. Let dough rise at room temperature 2 hours (or up to 10 hours).
Prepare to bake all or some of the dough at this point OR refrigerate in a tightly-covered oiled container
(OR 2 containers) with room to double in size, for as long as two weeks. (The dough is much easier to work with if you refrigerate it for at least 3 hours before shaping.)When ready to bake, sprinkle a little flour on dough (DON'T PUNCH DOWN!) and cut off 1/3rd of the dough with serrated knife, or a bench knife, for each loaf.
Lightly flour a work surface and place dough on it; sprinkle it with a little more flour and fold it over on itself once or twice. (It's quite sticky-- keep your hands and the surface floured; maybe used a bench scraper.)
Using just enough flour to keep dough from sticking to work surface or to your fingers, gently and quickly shape dough into a ball OR oval shape, depending on the shape of the pot you are going to bake it in.
Line a bowl, pan or oval casserole (depending, again, upon the shape of the vessel you will be baking the bread in-- doesn't matter what it's made from as you aren't going to bake it in this, just let it rise in the appropriate shape) with baking parchment
-- 1 for each loaf you are baking at the time. Sprinkle the parchment with flour, cornmeal, semolina, or bran. Place the dough seam-side-down on the parchment in the bowl or pot, and dust lightly with more flour, semolina, bran, or cornmeal. Place the vessel(s) inside of a clean plastic bag(s) (a small new white garbage bag does fine), and twist-tie closed, leaving plenty of room for the dough to rise. Let dough rise in a warm spot for about 2 hours (if dough has been refrigerated-- if it has not, rise at room temperature for about 1 hour).Heat the oven to 475°F, with the pot(s) you are baking the bread in heating in the oven at the same time, for at least 30 minutes. Use a deep cast iron skillet or Dutch oven with a lid (can be enamel-coated or not), or a heavy ceramic covered casserole (NOT unglazed clay).
When the oven and the pan are heated, and the dough has risen for the appropriate time, just lift up the loaf (or loaves) right in the parchment (using the parchment as a "lifter") and set it into your hot pot, pan or casserole with the parchment. (Don't worry-- it won't stick or burn!) Cover with the lid and bake 30 minutes, then remove the lid and bake another 15 minutes, or until the loaf is beautifully browned. Remove the bread from the pan immediately and cool on a rack.
PS: If this method of transferring the loaves to the pots in parchment makes too much of a "neat and tidy-looking" loaf for your taste, follow my original directions at this blog post (using the recipe in the blog post, not the printable recipe). This results in a more rustic-looking loaf as the photo below shows. It's up to you!
Nutrition Facts
Nutrition (per slice [12 slices per loaf]): 100.1 calories; 10% calories from fat; 1.2g total fat; 0.0mg cholesterol; 189.9mg sodium; 89.0mg potassium; 19.5g carbohydrates; 2.5g fiber; 0.8g sugar; 17.0g net carbs; 3.8g protein; 1.6 points.
UPDATE (Jan. 16, 2010): This afternoon I used the remaining dough (2/3rds of the recipe) to make 3 pizzas. This was the best almost-all-whole-wheat pizza I've ever made! Even my 3 picky granddaughters loved it! I used it cold straight from the refrigerator, with no rising, baked it at 500 degrees F. I just patted and stretched the dough out by hand on a sheet of baking parchment-- it's a sticky dough and you can't spin this one! I baked it right on the parchment because I was afraid the sticky dough would stick to the peel. It worked just fine! I made the pizza pretty thin, but you can see that the edges puffed up quite a bit in the oven.
Pizza made with the same dough, after refrigerating it for 3 days.
Happy Baking!
Subscribe to:
Posts (Atom)