Thursday, May 4, 2006
VEGAN PIZZA NIGHT


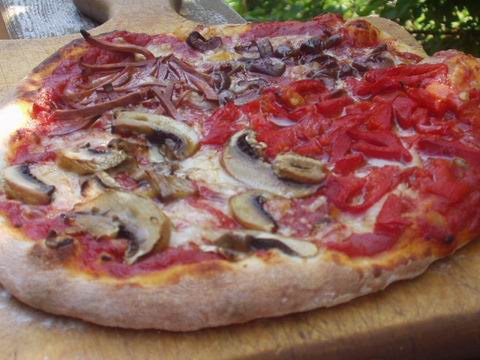
On the left are the pizzas I made for dinner last night, cooked in dark metal pizza pans on the oven racks, at 550 degrees F, with convection; on the right is a pizza made with the same dough, but baked on unglazed ceramic tiles in my oven, same temperature.
The pictures are just to illustrate the different quality of pizza that you can get in your own home oven. They were both good, by the way! But the "stone-baked" one has a crust that is crispy all over, not just on the bottom. It looks more Italian, somehow! Last night I was just too preoccupied to heat up the tiles
beforehand.
I'm not going to go into a long explanation of how I make pizza. For that you can get my book Nonna's Italian Kitchen (your library might have it) or my new book World Vegan Feast
 for a newer version.
There is so much bad pizza out there! Which is puzzling, because, once you know a few things, it's easy. And the dough is not an afterthought-- in Italy it is the primary component, and it should be here in N.A., too. In Italy they don't over load a pizza with sauce, ingredients, cheese, etc.. The dough is simple, very simple, but it tastes so good you want to eat the edges, and you don't need them to be stuffed with cheese or have some gloppy sauce to dip them into! I'm going to give you my latest favorite dough recipe, which is from my newsletter. Both of the pizzas above were made with this dough.
HINT: Pizza dough is better if you make it hours before using and let it rise in the refrigerator for 8-14 hours. Yes, it's true, and it's very convenient. The directions are in the recipe below. An alternative is to make it in the morning, let it rise once, punch it down and refrigerate as instructed until about 2 hours before dinner (so it has time to warm up). Why is it better this way? Because dough needs time to develop the enzymes which give dough flavor and good texture.
BTW, "American Pie" by master baker Peter Reinhart is a wonderful book on pizza!
A way to stretch the dough without rolling or throwing in the air! Drape the dough over an over-turned bowl (see picture) and gently stretch it all around until it is the right size, again using the weight of the dough stretch it.

Work slowly so that you don’t tear the dough. If it does tear, you can patch it and seal it again. The pizza does not have to be absolutely round!
Cheers!


Wednesday, May 3, 2006
ROASTED NUGGET POTATOES AND FENNEL

Not really a recipe-- just a guide!
The original of this recipe is from Susan V's wonderful blog, Fatfree Vegan Kitchen. I've been wanting to try it since it was posted, but had to go shopping first. Susan used fingerling potatoes, but I couldn't find any, so I used those little baby nugget potatoes, the yellow ones.
I changed the recipe a somewhat, mostly in the cooking method. I used 1 lb. of nugget potatoes and 1 large fennel root (you could use celery root, or even celery) which I cut into chunks. I had half a large onion in the fridge, so I diced that up. I mixed everything in a shallow pan with the 1 cup broth Susan called for, and I roasted it in a 500 degree F oven for about 20 minutes, instead of braising it like Susan did. The broth cooked off and everything was starting to brown. I stirred it up gently, sprinkled it with some coarse salt that my daughter brought me from Mexico, and some freshly-ground pepper, and put the pan under the broiler for a few minutes, just to get a bit of a charred thing going-- not too much.
It was delicious, and totally fat-free. Thanks, Susan!
Enjoy!
Monday, May 1, 2006
VEGAN ORANGE-PECAN CORNMEAL WAFFLES (GLUTEN-FREE!)
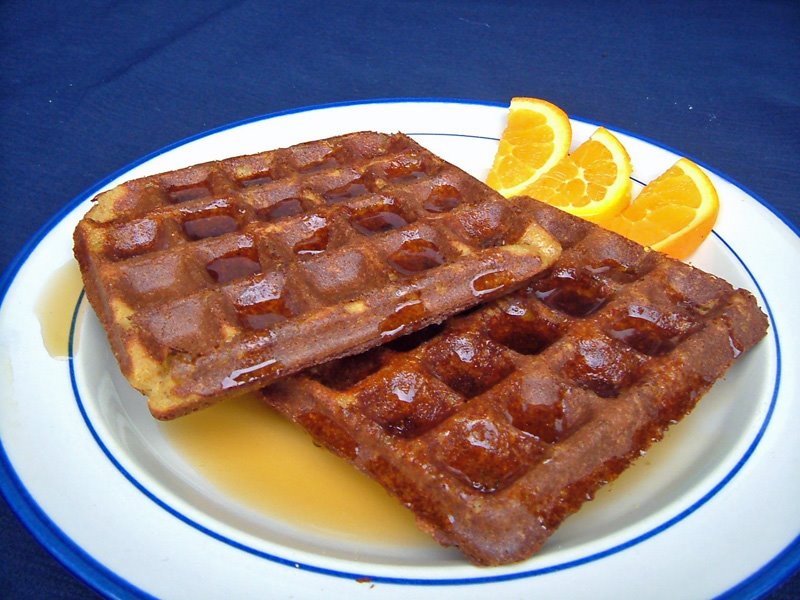
After vegan cappuccinos, I'll continue the breakfast theme with waffles. This recipe is a variation on a recipe from one of my books. I love the combination of orange, pecan and cornmeal-- seems very Southern to me, and it's always delicious. I decided to use this flavor combo in my bean-based waffles, which I usually make with oats. These waffles are high in protein and fiber and great for anyone with allergies. Hope you like 'em!
PS: These bean waffles do not work for me in a Belgian waffle iron (the thicker kind), so use a good nonstick traditional type. A good one is the round Cuisinart Traditional
 .
. Other waffles irons recommended by Cooks Illustrated are: Chef’s Choice WafflePro Express
 ; Cloer Double Waffle Maker
 ; Cuisinart 6-Slice Traditional Waffle Iron.
Printable Recipe
BRYANNA’S CRISPY VEGAN ORANGE PECAN CORNMEAL WAFFLES
makes 8-9/ 4” waffles (wheat-free and can be soy-free)
Adapted from a recipe in my book “The Fiber for Life Cookbook”
Don’t be put off by having to put the beans on to soak the night before. This takes just minutes before you retire for the night and then, in the morning, the batter is quickly made in the blender while the waffle iron heats up.
These waffles take a little longer to bake than ordinary waffles (about 7-8 minutes), so you might want to make them ahead of time, or have two waffle irons going at the same time. They can be reheated quickly in a very hot oven for a short time (you just want to crisp and heat them, not dry them out), or in a toaster.NOTE: And, don’t worry, no one will suspect that there are beans in these waffles!
THE NIGHT BEFORE:
1/3 c. dried Great Northern beans OR chickpeas
(If you use other beans, be sure to see the Important Update at this post.)
Plenty of water to cover
IN THE MORNING:
1 1/2 c. fresh water
1/3 c. orange juice concentrate
1 c. cornmeal

2 T. oat bran
 (or you could use rice bran or wheat bran instead)
 4 tsp. organic sugar or other sweetener
2 T. ground golden flaxseed
 (measure after grinding)
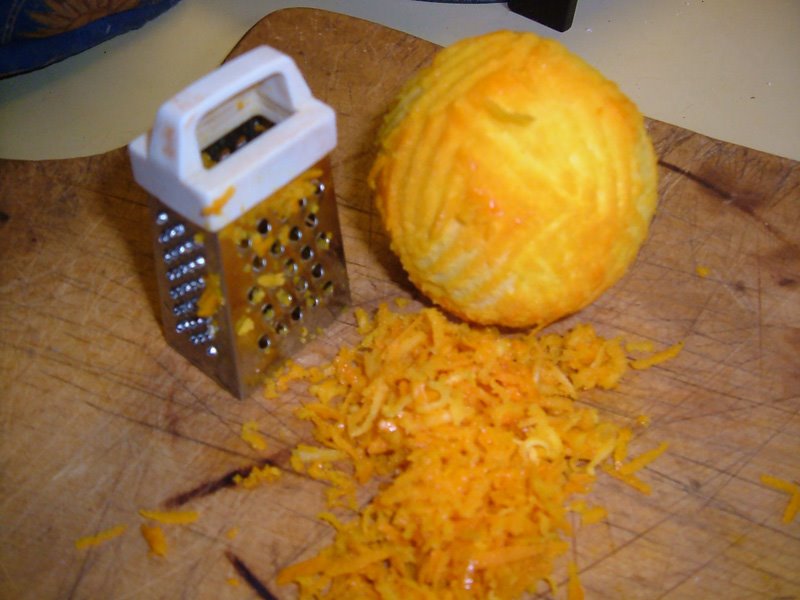
1 T. grated (organic) orange zest (see below)
1/2 T. baking powder
1 tsp. pure vanilla extract
1/2 tsp. baking soda
3/4 tsp. salt
1/3 c. finely chopped toasted pecans
The night before:
Soak the beans in plenty of water to cover, with a few inches of water above the beans-. The beans can soak in water in the refrigerator for up to a week with no fermentation, if you aren’t sure when you’ll make the waffles.
In the morning:
Drain the beans. Place them in the blender along with all of the other ingredients. Blend until smooth and light and foamy. This may take several minutes.
Let the batter stand while you heat up your NONSTICK waffle iron.
NOTE: USE A REGULAR WAFFLE MAKER, NOT A BELGIAN WAFFLE MAKER-- THE BELGIAN WAFFLE IS TOO THICK AND DOESN'T COOK PROPERLY WITH THIS BATTER! See recommended waffle irons above.).
NOTE: Even if you have a non-stick iron, this recipe will work better if you spray the grids with oil from a pump-sprayer
 .
. When the iron is hot, pour on about a heaping 1/3 c. of batter for each 4” square waffle . Close the iron and set the timer for 7 minutes. Don’t check before 7 minutes is up. If the iron is hard to open, let it cook a couple of more minutes.
If the batter gets thicker on standing, add a LITTLE water, just until it’s the consistency you started out with.
The waffle should be brown and crispy. Serve immediately, or let cool on cake racks. When they are cool, they can be frozen in plastic bags or rigid containers. Serve with your favorite toppings.
If you don’t use up all of the batter, and you don’t want to cook the waffles ahead of time and freeze them, just refrigerate the batter in the blender with the lid on. You can re-blend the batter (adding a tiny bit more water if the batter has become too thick) just before cooking the waffles.
COOKING NOTE: If you don't have one of those microplane zesters
 yet, for citrus zest (and fresh ginger) use a little tiny box grater about 2 1/2" high. it works just beautifully and cost about $1.50 Cnd!
Nutrition Facts (calculated using white kidney beans)
Nutrition (per serving—2/ 4” waffles): 324.6 calories; 25% calories from fat; 10.0g total fat; 0.0mg cholesterol; 529.6mg sodium; 833.3mg potassium; 53.3g carbohydrates; 8.1g fiber; 14.1g sugar; 45.2g net carbs; 9.5g protein; 6.5 points.
Enjoy!
Thursday, April 27, 2006
VEGAN CAPPUCCINO-- WHICH NON-DAIRY MILK FOAMS THE BEST?

Blue-striped cup, rear left: homemade soymilk; white cup, rear right: Almond Breeze; front in blue cup: Soy Dream
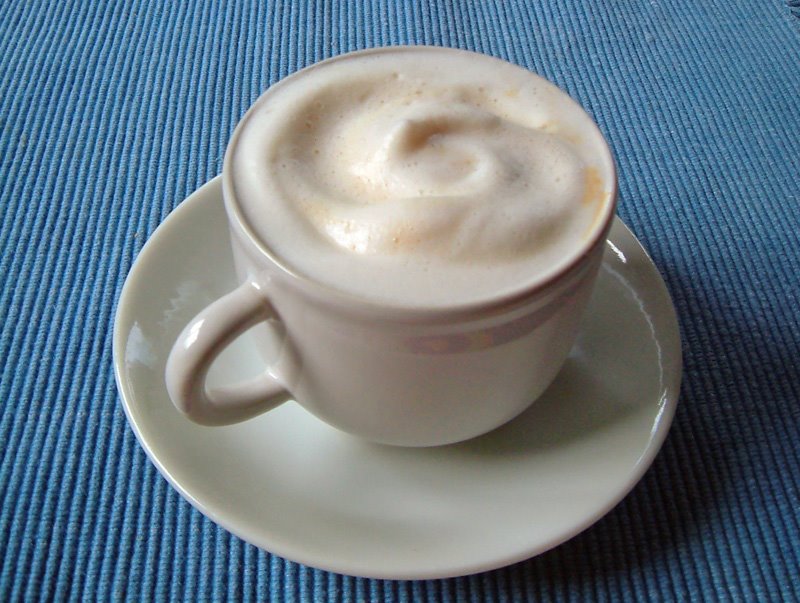
UPDATE: Ap. 28th, 8:50 am....cappuccino with Vitasoy Original.
PS: FOR NOTES ABOUT HOW TO KEEP SOYMILK FROM CURDLING IN COFFEE, LOW-ACID COFFEE, CHOOSING COFFEE, STOVETOP ESPRESSO MAKERS, ETC., SEE THE BLOGGER COMMENTS FOR THIS ENTRY.
COMPARING NON-DAIRY MILKS FOR THE BEST CAPPUCCINO FOAM
I'm not a regular coffee-drinker, but I do like a good cappuccino (made with organic, fair-trade dark roasted beans) now and then. We went shopping yesterday and I had a soy cappuccino at a local coffeehouse. The foam was pathetic! They used Silk and a professional foamer, but I might as well have had a latte. Now, as it happens, just the day before, I had pulled our cheap plunger-type milk foamer:

out of the cupboard and made myself a beautifully-foamed cappuccino using my homemade soymilk.
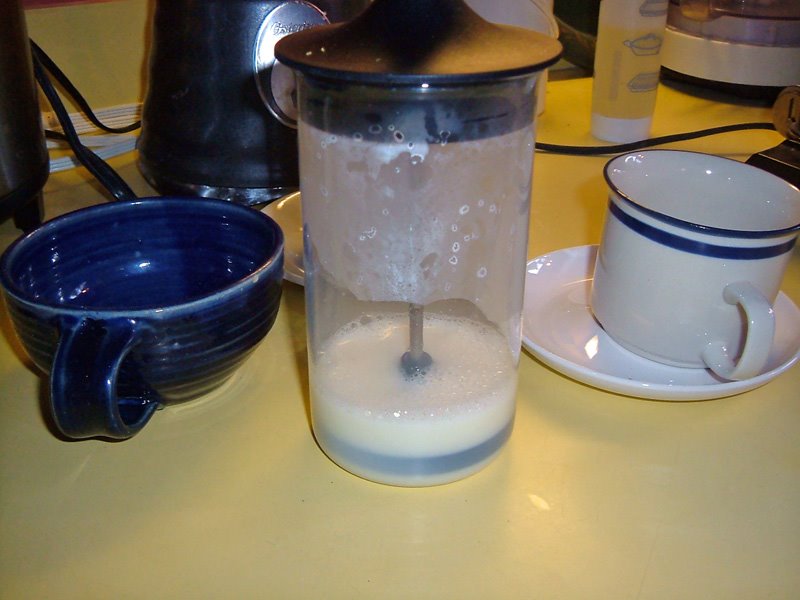

My husband (an expert) was very impressed! The foam really lasted, too.
Today I wanted to compare some vegan milks, so I made three cappuccinos-- one with my freshly homemade soymilk, one with Soy Dream (Original), and one with Almond Breeze (Original). (From past experience, I know that rice milk doesn't foam well, so I chose good-tasting Almond Breeze for the non-soy option..it's quite low in fat, too.)
The homemade soymilk won hands-down again! A beautiful stiff, long-lasting foam with only 30 seconds in the hand-plunger! The Soy Dream came in second, and the Almond Breeze third-- though it had a much better foam than the Silk used in the coffeehouse. UPDATE, morning of April 28th: I tried a cappuccino with Vitasoy Original this morning (see photo above) and it was very nice-- similar to soy Dream, so I'd say they tie for second place.

Blue-striped cup, rear left: homemade soymilk; white cup, rear right: Almond Breeze; front in blue cup: Soy Dream
Cheers!

Tuesday, April 25, 2006
QUICKIE MEAL

HEAR MY INTERVIEW ON GO VEGAN TEXAS! RADIO, ALONG WITH KAREN DAVIS OF UNITED POULTRY CONCERNS-- go to this link to access the archived interview.
Lately, I've been rushing upstairs from my office to the kitchen around 5 PM to find something to make for dinner. Usually I plan ahead, at least in the morning, but I've been on a deadline. This is a favorite quickie meal:
POTATOES AND BRAISED KALE WITH MUSHROOMS AND ITALIAN VEGGIE SAUSAGES
This is just a guide--you don't need a recipe for this.
Clean and trim and slice a whole pile of kale-- it will cook down alot.
Steam, boil or microwave some thin-skinned potatoes, cut into chunks. I microwave them in a microwave steamer.
In a large deep skillet, saute as much chopped garlic as you want in a little olive oil-- gently-- don't brown it! I would use maybe 4 cloves for the two of us. Add some sliced mushrooms-- as much as you want-- and brown them a bit. Add the kale and about a cup of vegetarian broth. Bring to a boil and then turn it down to medium and cover it. While this cooks (check it to see if you need more broth-- you want it to cook down, but still be a bit brothy to moisten the potatoes), brown as many Tofurkey Italian Sausages as you like, in a grill or in a skillet with a little olive and/or Asian (toasted) sesame oil.
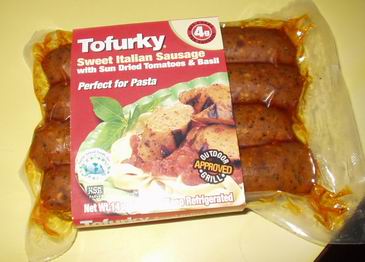
These vegan sausages are really good, but they are big and kind of high in fat. A big eater or a very hungry person can eat a whole one; daintier or less hungry diners may only want half of one.
When the kale is tender (I cook it maybe 10 minutes) and the potatoes are done, drain the potatoes and add them to the kale, stirring gently to mix the ingredients. Add a bit more broth if necessary. Add salt and pepper to taste (you could add a bit of red pepper flakes, if you like things spicy) and serve with the browned veggie sausages.
Enjoy!
Sunday, April 23, 2006
VEGAN POTATO AND SWEET POTATO GRATIN
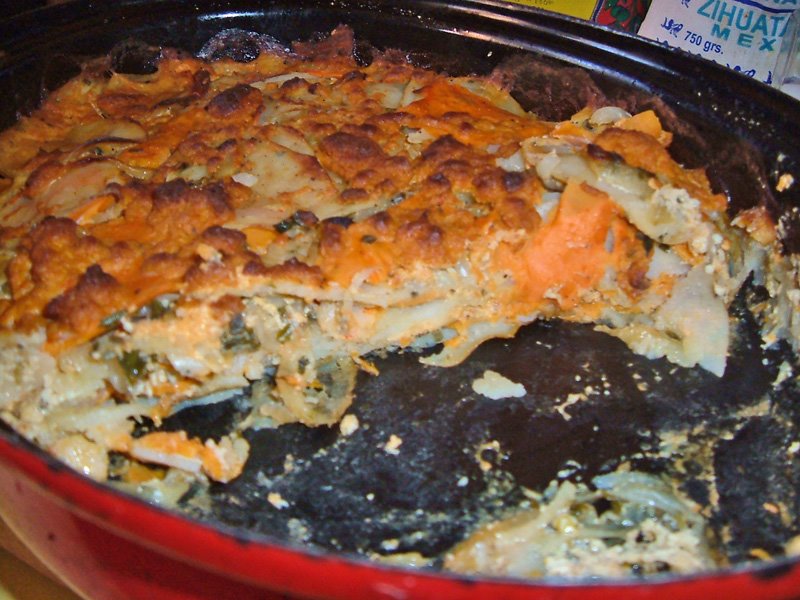
My mom came over for lunch today and I was looking for a light entree to make. I had 1/2 a raw sweet potato left, and 1/2 a block of my homemade vegan "cheddar" in the freezer, so I decided to mix the sweet potato with white potato and make a vegan gratin. It was delicious! My "cheddar" is tahini
 -based and has alot of flavor-- it also melts well. (a related recipe for Vegan "Gruyere" is in my new book .) However, you can use any other favorite vegan cheese instead.
Printable Recipe
BRYANNA'S POTATO AND SWEET POTATO GRATIN WITH SAGE
Updated April 2011
Servings: 4 ( actually, 3 of us ate the whole thing!)
1 large onion, thinly-sliced
1-2 Tbs chopped fresh sage
2 tsp olive oil
8 oz. sweet potato, peeled and sliced very thinly
1 lb thin-skinned white potatoes, scrubbed and sliced very thinly
1/2 cup chopped parsley
1 large clove garlic, minced
about 2 cups (grated and not packed down) of your favorite vegan "cheese" that melts well
salt and freshly-ground pepper to taste
1 cup soy or nut milk, warmed
Preheat the oven to 350°F. Lightly oil a 2 qt. gratin dish
 or shallow casserole
 . Put on a pot of water to boil.
 Heat the oil in a nonstick heavy skillet and add the onions and sage. Cook over medium heat, stirring often, until they soften and turn golden. OR, place the oil in a microwave-safe dish or casserole
 , add the onions and sage, cover and cook on full power for 8 minutes. (Shy of microwaves? Please read this.)
I use a mandoline slicer to cut the potatoes very thinly. I have one similar to this one

 , but there are so many and some for every budget . You can also do this on an attachment
 of your food processor. When the water boils, add some salt and add the potatoes and sweet potatoes. Stir the potatoes so that they don't clump together. When the water boils again, time for 1 minute.
 Drain the potatoes and mix in a large bowl
 with the cooked onions and sage, and the parsley and garlic. Mix well.
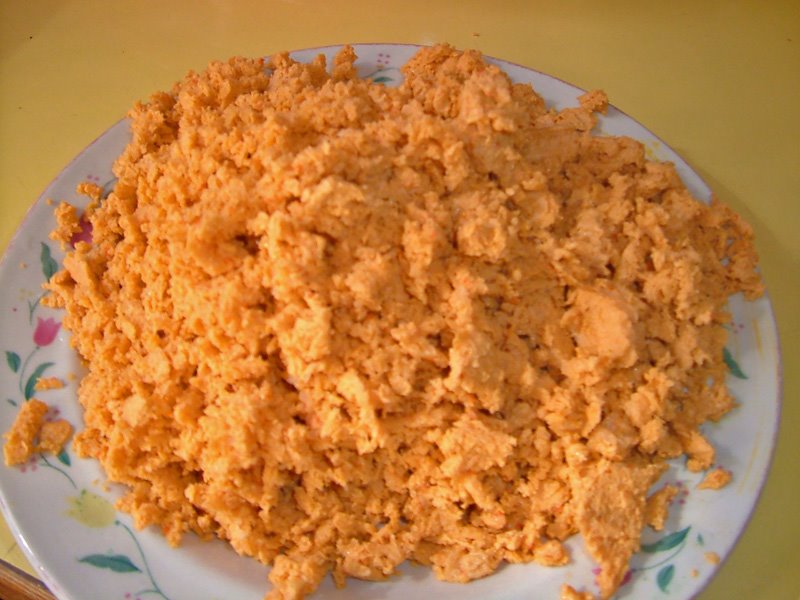
 Grate the "cheese". (The photos are of my Vegan "Cheddar" from my old Vegan Feast newsletter, which grates best when frozen or semi-frozen-- a related recipe for Vegan "Gruyere" is in my new book
 )
)
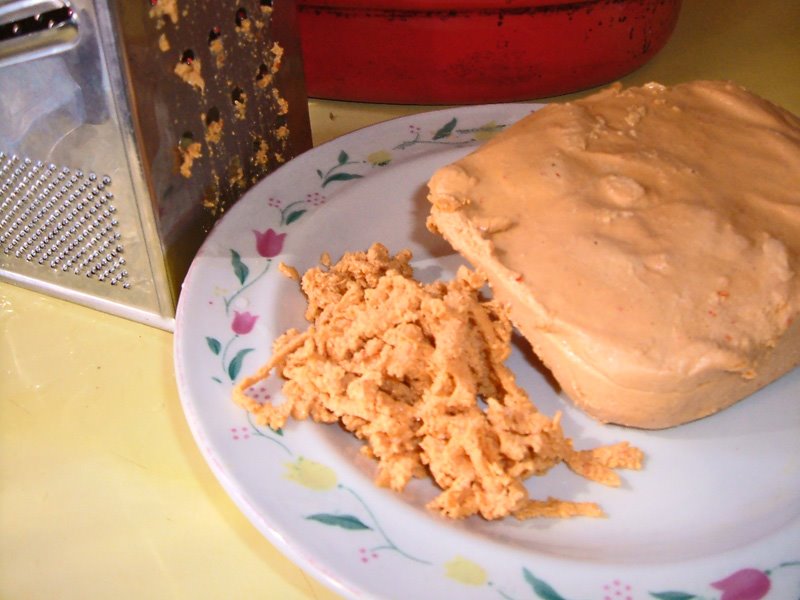
Spread 1/3 of the potatoes in the prepared pan. Sprinkle with salt and pepper and 1/3 of the "cheese". Repeat layering two more times. Pour the warm soy or nut milk over the gratin.
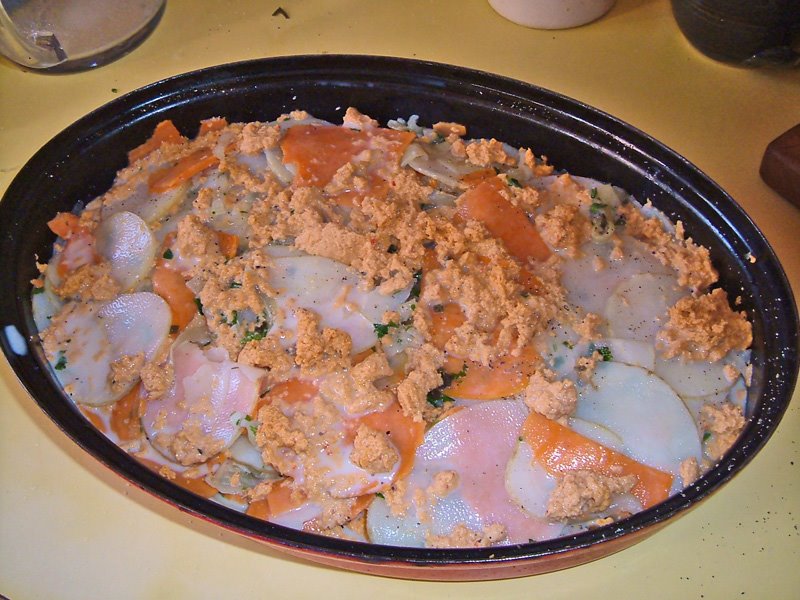
Cover with foil. Bake 25 minutes. Remove foil and bake 25 minutes more. Let the gratin stand for 5 minutes before serving.
Nutrition Facts
Nutrition (per 1/4 of the casserole): 209.2 calories; 20% calories from fat; 4.9g total fat; 0.0mg cholesterol; 137.0mg sodium; 857.5mg potassium; 36.8g carbohydrates; 6.0g fiber; 6.7g sugar; 30.8g net carbs; 6.1g protein; 3.8 points.
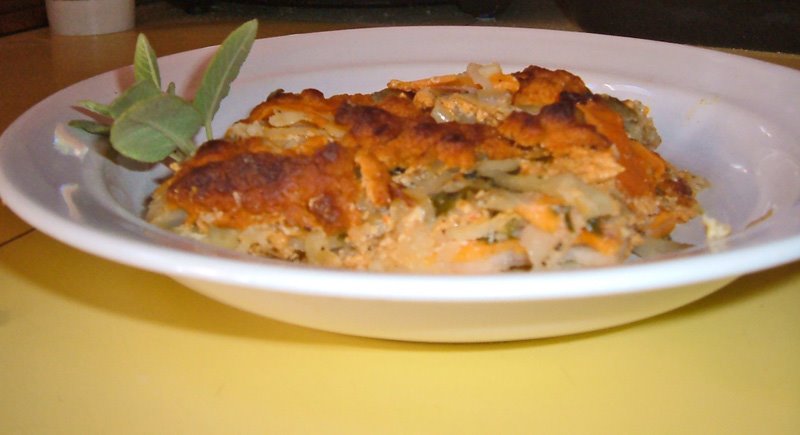
Enjoy!

Tuesday, April 18, 2006
THE 1906 EARTHQUAKE IN SAN FRANCISCO, MY GRANDFATHER, & SOURDOUGH

My grandfather, Gilbert Tonge (on the left), with his silkscreen art printing company colleagues in San Francisco in 1916.
SCROLL DOWN FOR A LIST OF LINKS TO SOURDOUGH RECIPES ON THIS BLOG.
Today is the centennial of the Great 1906 San Francisco Earthquake. That's where I'm from, originally, and my maternal grandfather, Gilbert Tonge, survived the disaster (he was a 22-year-old art student at the time). He used to tell us about it and I wish I had recorded some of that! But, of course, we were young, and didn't realize the historical importance of his stories. He was born in California, in what is now Placerville, in El Dorado County. The town was called "Hangtown" at one time!
 |
Cooking in the street after the 1906 San Francisco earthquake:
Above is a photo of my grandfather, Gilbert Ross Tonge (age 22 at the time, on the far left-- my cousin Chris Tonge looks just like him!); Guillermo DeCastro next to him; then my great-grandmother, Mary Hicks Tonge; then someone named Amelia; and, on the far right, my grandfather's Aunt Libby (Elizabeth Tonge Barret).
This photo was sent to one of my cousins by a Swiss art historian, Guido Lengwiler, who wrote a fascinating book on the history of screen printing. The book includes a section about my grandfather, who helped develop a type of silk-screening. (See http://www.signindustry.com/screen/articles/2014-04-01-History-of-screen-printing-part-2.php3) |
My mother was also born in California. Not to be outdone by her father, my mother was visiting California in 1989 when the Loma Prieta earthquake hit. In fact, she was in Santa Cruz, near the epicenter, and she and a friend [both senior citizens] had to run from a store, with goods from the shelves falling on their heads!
Anyway, all this got me thinking about San Francisco food memories. What came to mind first and foremost was sourdough. The sourdough bread was so delicious! I hope it still is-- I haven't visited for some time. You can't always get good sourdough bread up here very easily, so I make it myself. Of course, I really need an outdoor oven to get a good crust on it, and we may try making one this summer! UPDATE: Try the "bake in a pre-heated heavy pot or casserole" method for a super crust in your stove's oven.


**I also use the "Oregon Trail Sourdough Starter", which I treat the same way. You can get a free (dried) starter (and it's a great story that goes with it!) here. You just pay postage. (PS: I don't use the sugar and potato they call for in the instructions., and it works fine.)**
To acknowledge the centennial, I'm posting the vegan yogurt-based starter recipe.
UPDATE: More sourdough recipes on this blog:
Golden Sourdough Rolled Biscuits

Dutch Pumpernickel Bread
No-Knead Sourdough Bread Experiment
Crusty No-Knead Half-Whole Wheat Sourdough Bread (free-form or pan loaf)

Vegan Whole Grain Sourdough Pancakes
More Ways to use Sourdough Pancake batter-- sourdough, vegan, whole grain waffles and crepes!
BRYANNA'S VEGAN YOGURT SOURDOUGH STARTER
Printable Copy of recipe and Information
I keep sourdough starters in my fridge at all times. They will stay “fresh” (that is, active enough to use straight from the fridge in a bread recipe) for about two weeks. If you haven’t used your starter and refreshed it within two weeks, then dump out some of it and refresh it (preferably once a week). I keep a white starter, and one whole wheat and one rye.
In my opinion, most bread machine breads just don’t come up to scratch compared to our oven-baked breads. There is something missing. I have discovered that if you use the old-fashioned sponge method (the liquid and half the flour with the yeast—often much less than usual-- risen for 2 to 12 hours), or an Italian biga starter, or French poolish, etc., OR the use of sourdough gives better flavor, texture and keeping qualities (and you can also get away with a more moist dough, which I think makes better bread). If I use sourdough straight from the fridge with hot liquid and a little yeast (only 1.2-1 tsp.), I can make a bread without starting it hours before (although that is no problem—just put on the sponge before going to bed at night). I have converted lots of breads this way. If you use some yeast and sweetener, the sourdough flavor is not pronounced. To convert, use 1 c. starter in place of 2/3 to 3/4 c. liquid and 1/3 c. flour (approximately).
I generally use Canadian unbleached flour, which is similar to American unbleached bread flour, and wholewheat flour made from hard wheat (grind my own), and have not found it necessary to use gluten flour (even in all wholewheat bread).
HERE’S HOW I MAKE MY OWN STARTER:
I learned how to make San Francisco-style sourdough starter from Sunset magazine years ago. They had scientists from the University of California look at San Francisco starter and found that the closest thing to that particular sourdough bacteria was yogurt. I made it for many years with dairy yogurt and loved it. When I became a vegan, I tried it with soy milk, and it worked just fine. You can use hemp or nut milk yogurt, if you prefer.
 |
| Bubbly starter |
BRYANNA’S VEGAN YOGURT SOURDOUGH STARTER
Makes 1 1/3 cups
NOTE: I prefer soy milk. Other vegan milks are suggested in the recipe.
NOTE: Make sure that all utensils and containers are freshly washed and then scalded with boiling water, to avoid any foreign bacteria.
1 c. plain soymilk, pea milk, hemp milk, coconut milk or nut milk (90-100 degrees F or 32-38 degrees C) which has been scalded first (brought almost to a boil) and then cooled to the right temperature
NOTE: Ideally, use soymilk from an unopened package or freshly-made
3 T. live-culture plain vegan yogurt of your choice
OR a packet of dairy-free freeze-dried yogurt culture. Vegan Yogurt Starter is available here in the USA and Upaya Naturals in Canada.
Combine the ingredients in a glass, ceramic, rigid plastic, or stainless steel quart (or L)-size container, like a canning jar. Stir the mixture well, cover and let stand in a warm place for 18-24 hours, or until the consistency of soft yogurt.
If a clear liquid forms on top, stir it in. (CAUTION: But, if the liquid is pink, this indicates that a foreign bacteria has gotten in-- throw the mixture away and start again, using scrupulously clean equipment.)
Now add:
1 c. unbleached white flour
(1 T. rye flour can be added for more sourness)
Stir the mixture until it is smooth, then cover the container tightly and let it stand in a warm place until the starter is full of bubbles, has a bit of clear or grey (not pink-- see caution above) liquid on the top, and smells pleasantly sour (it will get a sharper tang with age). It will take from two to five days to achieve this.
TO STORE THE STARTER, keep the tightly-covered jar in the refrigerator (you can also freeze it for several months). REFRESH once a week, or AT LEAST every 3 weeks, if you use it infrequently. (See below.)
EVERY TIME YOU USE THE STARTER, replace the amount you used with equal amounts of warm water/soymilk mixture (1/2 & 1/2), and unbleached flour.
For instance, if you use 1 c. of the starter, you should have about 1/3 c. of the starter left in the jar. You add back to the jar 1 c. warm water/soymilk mixture (1/2 & 1/2), and 1 c. of unbleached flour. Stir it up, cover the jar, and set it on the kitchen counter for about 8-12 hours, or until it's bubbly again, then refrigerate it until the next time you use it.
TO INCREASE THE STARTER, if you want to make a larger recipe or give it away, you can add up to 10 c. EACH of water/soymilk mixture (1/2 & 1/2) and unbleached flour to 1 c. of starter. Use a LARGE container or bowl-- the starter may QUADRUPLE in size, then fall. It will take about 2 days for this much to get bubbly and form a clear liquid on top.
YOU CAN USE OTHER FLOURS FOR STARTERS, but the white one is the most versatile. If you make rye bread, or buckwheat pancakes, often, you can make rye, Durham semolina, or buckwheat flour starters, or a wholewheat starter. You can also make spelt flour starter. But you can use the white flour starter in a rye or wholewheat bread, or a buckwheat pancake batter-- it only adds 1 c. or so of white flour and you can use wholegrain for the rest.
YOU ARE SUPPOSED TO LET THE STARTER COME TO ROOM TEMPERATURE BEFORE USING it in recipes, but I often use it cold and use very warm liquids in the recipe to compensate-- I haven't had any trouble with using it this way.
After using the starter for a while, IF IT BECOMES TOO LIQUIDY, add a bit more flour in proportion to the liquid when you add the ingredients back into it.
TRY TO FRESHEN THE STARTER AT LEAST ONCE A WEEK IF YOU’RE NOT USING IT.
TO "FRESHEN" THE STARTER AFTER NOT USING IT FOR SOME TIME, discard or use most of it, leaving just enough to get it going again (1/4-1/3 c. for a quart jar). Add equal amounts of warm water/soymilk mixture (1/2 & 1/2) and unbleached flour. Stir it up and let it stand on the kitchen counter until it gets bubbly again, as instructed above.
If it doesn't bubble after a day or so, it's probably dead, and you'll have to start over again. Watch out for colored liquid-- anything other than clear or grey means it should be discarded.
IF YOUR STARTER IS OLD, FRESHEN IT AS ABOVE, BUT YOU MAY HAVE TO REPEAT IT FOR THREE OR MORE DAYS IN A ROW TO GET IT REALLY BUBBLY AGAIN. Do a small amount first, then gradually increase the amount. If it still seems sluggish after two days of freshening, you can add a tablespoon of sugar and/or 2 T. mashed potato flakes (just this once—you don’t need to keep adding them later on).
FROZEN STARTER must stand at room temperature for 24 hours before using.
Enjoy!

Subscribe to:
Posts (Atom)