Wednesday, August 11, 2010
WHAT TO MAKE FOR COMPANY?


Piedmontese Rice salad from my book "Nonna's Italian Kitchen
 " (Update: the recipe is on this blog here now.)
I was rushed today (as usual these days-- book deadline looming-- that's why not much blogging these recently!) and trying to figure out what to make for my husband's discerning (but omnivore) stepdaughter from Montreal, and her 12 year-old twin girls. I was also trying to figure out what to blog about before everyone gets here and I have no time to blog!
So, here's what I made for dinner tonight (well ahead-- everything but dessert can be eaten at room temperature) and they are due in about half an hour, so I'd better get going! I'll try to blog most of our meals over the week or so that they are here.


Italian Romano Bean salad (also from "Nonna's Italian Kitchen
")

Summer squash "a scapici"-- the first picture with our own pattypan squash, and the second with a neighbor's green and yellow zucchini. (Also from "Nonna's
".)"A scapici" is a southern Italian version of the Spanish or Caribbean "escabeche" (cooked fish pickled in a vinegar sauce), or Latin American "seviche" (a method of "cooking" fish with the acid of lime or lemon juice, which is a very typical dish in Peru, where my father was born-- now I make seviche with mushrooms). In Italy, many vegetables are prepared a scapici, including eggplant.
Some versions use vinegar instead of lemon juice, add garlic, use other herbs (such as sage), and fry the vegetables in olive oil. I like this very simple grilled version (I "grill" it under my oven's broiler) made with fresh lemon juice. It's such a simple recipe that you might tend to overlook it, but it is one of my absolute favorites! The eggplant melts in your mouth, and the zucchini is juicy and sweet.
Here's the recipe, which is really mostly a guide:
BRYANNA'S MELANZANE O ZUCCHINI A SCAPICI (GRILLED EGGPLANT OR ZUCCHINI WITH LEMON JUICE AND HERBS)
Serves about 4
1 large eggplant or 2 medium zucchini
salt
2 T. extra-virgin olive oil
1 T. fresh lemon juice
freshly ground black pepper
OPTIONAL: chopped fresh mint or basil
If using eggplant, slice it about1/2" thick. Salt it liberally and leave it to drain for half an hour in a colander. If using zucchini (I usually do some of each), slice it 1/4" thick and don't salt it.
Rinse and pat the eggplant dry. Brush both the eggplant and zucchini with 1 T. of the oil and grill or broil it on bothsides about 3-4" from the heat source, or until slightly browned and soft. (This takes just a few minutes per side.)
Cut the vegetables into thick strips and arrange on a serving platter. Drizzle them with the remaining olive oil and the lemon juice. Sprinkle with pepper to taste, and salt the zucchini lightly (salt isn't necessary for the eggplant). Sprinkle with chopped fresh mint or basil.
For a bread, I made Potato Fougasse, which will be in my new book coming out late this year, I think. It's a sort of French focaccia, with an interesting tree-like design, and very yummy! I sneaked in quite a bit of fiber!


Here it's just placed in the oven:

And, for dessert, we're having what I call "Grown-Up Nanaimo Bars", a vegan, less sweet, and more healthful version of a popular BC sweet:


UPDATE: I forgot the roasted beets with olive oil, wine vinegar, salt and pepper and Italian parsley!

And here is the dinner before everyone demolished it! (It was a hit!)

Hope you're enjoying your summer!
Cheers!



Thursday, August 5, 2010
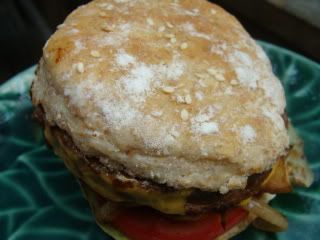
FLAX AND 100% WHOLE WHEAT "SANDWICH THIN"-TYPE BURGER BUNS
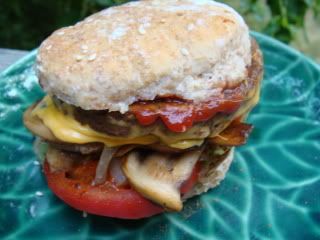
A rather tippy veggie burger, with all the trimmings, made with one of my new thin buns.
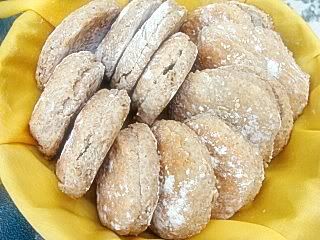
I've been meaning to try some "sandwich thin"-type buns for a long time, and finally got inspired to adapt one of my favorite burger bun recipes-- one I've used for over 25 years! The recipe was an old "yeast batter bread" recipe. In those days, you made a yeast-leavened batter and just rose it for 30 minutes, then formed the bread or buns, rose again briefly and baked. These were tasty enough, but I figured that they could be improved upon by using the newer no-knead bread techniques. The longer rising time with the new techniques develop the gluten and the flavor.
I chose this recipe because it was 100% whole wheat, vegan already (many sandwich bun recipes contain egg), it was "tried and true", and it is fairly soft (due to the added potato). It worked very well, though some might say they aren't big enough for some burgers. I added an option to make bigger buns, if you like. But these just fit the burgers I had around and I thought it was great that the bun didn't overwhelm the other tastes. The bun was soft, but held together well and didn't get soggy.
I did a little research, and whole wheat burger buns seem to range from 110 calories to 210 calories. Mine are 98 calories for the smaller ones and 130 for the larger ones. If you want to raise the fiber level, you can add 1/4 cup of wheat bran to the batter with no ill effects. At any rate, you can control the ingredients, and they certainly are easy and cheap to make! My freezer is now sticked with burger buns for quick meals!
Printable Recipe
BRYANNA'S WHOLE WHEAT AND FLAX "SANDWICH THIN" BUNS
Servings: 24
Yield: makes 18-24 buns
These are half the calories of many ordinary sandwich buns, 100% whole grain, and 1.5 ww points! Also, very good!
1 Tbs dry active baking yeast
 (or 3/4 Tbs instant yeast)
1 cup warm water
2 cups warm nondairy milk
1/4 cup instant potato flakes
2 Tbs olive oil
2 Tbs maple syrup or unbleached sugar, or 1 tablespoon agave nectar

2 tsp salt
1/4 cup ground flax seed, preferably golden flax

4 cup whole wheat flour (NOT pastry flour), regular or white whole wheat
Soy, hemp or nut milk for glazing tops
OPTIONAL: sesame seeds or other desired topping
Dissolve the yeast in the water. Add to the soymilk in a medium bowl, along with the potato flakes, oil, syrup or sugar, and salt.
Add the flour and ground flax and stir with a heavy wooden spoon or Danish dough whisk
 until well mixed, but rough looking. Cover and let rise at room temperature for 2 to 18 hours.
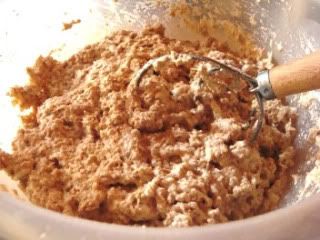
First mixing
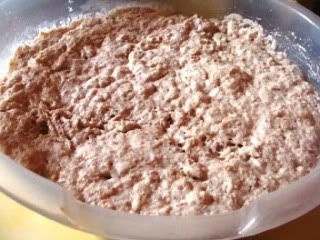 \
After 2 hour rise
Then refrigerate the dough, well-covered, for at least 3 hours and up to a week.
When ready to bake, take the dough from the refrigerator. With floured hands, dump the dough out on a well-floured surface and, coating the dough lightly with flour as you go, pat the dough out into a large rectangle about 3/8" thick. Cut the dough into rounds with a 3 1/2-inch cookie cutter
 (or a 4-inch cutter if you want 18 larger buns). Here's a set of round cutters
 that goes up to 4 and 7/16-inches.)
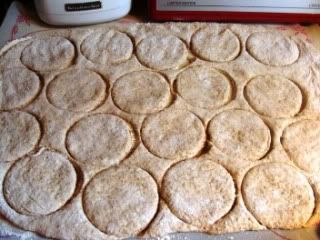
Carefully transfer to baking sheets lined with baking parchment
 and sprinkled with flour or cornmeal. The rounds should have a little room around them, unless you like them softer, in which case you can have them barely touching.
Note: You could also use a hamburger bun pan, either with 3 1/4” molds (for 24 buns
 ) or 4 1/4” molds (for 18 buns).

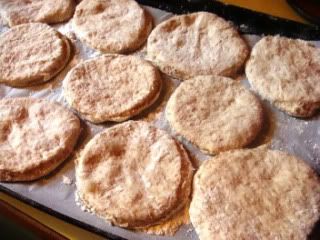
Pat down the dough in the center of each round, so that they don't make big "humps" in the middle when they rise.
Sprinkle the rounds lightly with flour, cover with plastic wrap, or place the pans inside of large food-safe plastic bags,and let rise 40 minutes, while you heat the oven to 375 degrees F.
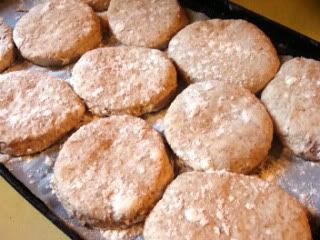
Ready to bake
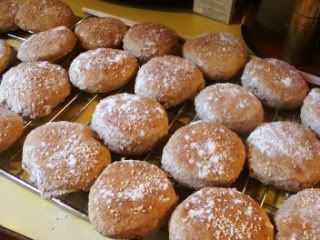
Brush the buns with nondairy milk and sprinkle with sesame seeds or other topping. Bake 15-20 minutes, or until golden. Cool on racks. When serving, slice them in half horizontally with a sharp serrated knife.
Nutrition Facts
Nutrition (per serving [1 of 24 buns]): 98.3 calories; 19% calories from fat; 2.2g total fat; 0.0mg cholesterol; 169.2mg sodium; 131.7mg potassium; 17.3g carbohydrates; 3.1g fiber; 1.7g sugar; 14.3g net carbs; 3.8g protein; 1.5 points.
If you make 18 larger buns (4" across) the nutrition facts are as follows: Nutrition (per serving [1 of 18 buns])): 131.0 calories; 19% calories from fat; 2.9g total fat; 0.0mg cholesterol; 225.6mg sodium; 175.6mg potassium; 23.1g carbohydrates; 4.1g fiber; 2.2g sugar; 19.0g net carbs; 5.0gprotein; 2.1 points.

Enjoy!
Friday, July 30, 2010
TORTA VERDE (LIGURIAN SAVORY CHARD AND POTATO TART WITH OLIVE OIL PASTRY)

As I mentioned in my blog last week, we have lots of lovely Swiss chard growing in our mini-garden, so I thought of this dish to use up some of it in an interesting way.
This type of delicious savory pie (many of them based on vegetables in season) is common all over Italy, but especially in the Italian province of Liguria, on the Italian Riviera, where my paternal grandmother’s family originated. It’s a large, thin double-crusted tart baked on a pizza pan
 . The thin olive oil dough (a little different from the olive oil pastry I used for a fruit pie here) is surprisingly pliable and easy to work with.
Though this type of tart is a gourmet treat, it was born of necessity—in earlier times wheat was expensive in that region and the thin dough used a small amount of flour and oil to feed quite a few. The filling could contain anything that was plentiful in the garden or on the farm, plus wild greens, mushrooms and herbs gleaned from nearby meadows, hillsides and forests.
(BTW, you can substitute any of your favorite greens for the chard in this pie.)
I’ve used my “Quick Tofu Feta Crumble” in place of the mildly tangy tuma fresca soft cheese of the region, and a binding mixture of silken tofu, nondairy milk and egg replacer instead of the customary eggs.
I think you'll like this!

Printable Recipe
BRYANNA’S TORTA VERDE (LIGURIAN CHARD, POTATO AND “SOFT CHEESE” TART)
Serves 6 to 8
Dough:
1 1/4 cups unbleached white flour
1/2 teaspoon salt
1 1/2 tablespoons extra virgin olive oil
1/2 cup ice cold water
Filling:
10 large Swiss chard leaves, washed, drained, stems discarded, leaves sliced 1/2” thick (4 cups)
1 medium Russet potato, steamed, peeled, and cut into 1/2” dice
1 medium onion, minced
2 tablespoons Italian parsley (flat leaf), minced
(Note: I mince the onions and parsley together in the food processor)
1 1/4 cups “Quick Tofu Feta Crumble” (recipe below)
1/2 teaspoon salt
Freshly-ground black pepper to taste
2 tablespoons extra virgin olive oil
Binder:
1/4 cup medium firm tofu, or extra-firm silken tofu

2 tablespoons nondairy milk
1/2 tablespoon nutritional yeast flakes

1 tablespoon egg replacer
 powder (Orgran or Ener-G)
To Finish:
1 1/2 tablespoons extra virgin olive oil
Make the dough first: Whisk together the flour and salt in a medium bowl. Drizzle in the oil and mix with your fingers or a fork. Drizzle in the cold water slowly, mixing with a fork as you go. When it holds together, knead it gently into a ball, cover with plastic wrap or a damp cloth and refrigerate for at least 30 minutes.
While the Dough is chilling, make the Filling: Heat a large pot
 of water over high heat until it boils. Add the sliced chard and boil for about 30 seconds—just long enough to wilt it. Immediately drain it in a colander
 and cool it off under cold running water. Squeeze it in your hands to get as much liquid out as you can. Transfer it to a food processor and pulse it until it is minced.
Make the Tofu Feta Crumble (see recipe below) and mix it in a large bowl with the potatoes, onions and parsley. Add the 1/2 teaspoon salt and freshly-ground pepper to taste, and mix well. Stir in the minced chard.
Mix the Binder ingredients with an immersion/stick blender
 , or in the (cleaned) food processor
 until smooth. Scrape this mixture into the bowl of Filling ingredients, along with the 2 tablespoons of olive oil and mix well. Set aside.
Preheat the oven to 375˚F.
Spray or lightly brush a 14” pizza pan
 with olive oil and sprinkle lightly with flour.
Cut of 1/3rd of the dough and set aside under a damp towel or plastic wrap while you work with the large piece. On a floured surface (Note: you can cover your counter with a large sheet of baking parchment and flour that, if you wish—this helps prevent sticking), flatten the larger ball of dough a bit and, using the “roll from the center forward, quarter turn, repeat” method, and flouring lightly if necessary, roll the dough out into a 15”-in-diameter round. This dough will roll out thinly quite nicely, but watch for tearing.
Sprinkle the round lightly with flour, fold loosely in half and then in half again. Transfer the dough carefully to the prepared pizza pan
 and carefully unfold the dough to fit the pan. Evenly spread the Filling over the dough, leaving 1” of exposed dough all around (Important!).
Now roll out the remaining, smaller ball of dough the same way to make a thin 13”-in-diameter round. Using the same method of transfer, place the dough over the Filling. It should overlap the Filling a little. Brush the exposed part of the bottom crust lightly with water and fold it over the top crust edge. Crimp to seal and pierce the top crust in various places to allow steam to escape and prevent the crust from puffing up. “Dimple” the top of the torta with your fingertips and drizzle or brush with the remaining 1 1/2 tablespoons of olive oil.
Bake about 35 minutes, or until it is golden and starting to brown. Place the pan on a cooling rack
 . Cut the torta into 6 or 8 wedges and serve hot or at room temperature.
Nutrition Facts
Nutrition (per serving): 284.0 calories; 42% calories from fat; 13.7g total fat; 0.0mg cholesterol; 627.7mg sodium; 403.5mg potassium; 33.0g carbohydrates; 2.6g fiber; 2.2g sugar; 30.4g net carbs; 8.8g protein; 6.3 points.
BRYANNA’S QUICK TOFU FETA CRUMBLE
Makes about 1 1/4 cups
8 ounces firm tofu (NOT silken), crumbled
4 teaspoons miso (not a very dark type)
2 teaspoons lemon juice
1/3 teaspoon salt
Mix and mash together all of the ingredients well with a fork. It will keep for a week or so, refrigerated in a covered container.
Enjoy!

Subscribe to:
Posts (Atom)