Showing posts with label sundried tomatoes. Show all posts
Showing posts with label sundried tomatoes. Show all posts
Saturday, April 25, 2015
PURPLE BARLEY & CHICKPEA SALAD; VEGAN RICOTTA, FETA & SUN-DRIED TOMATO SPREAD


We have a bulk food store in our nearest town now, and they carry an interesting array of whole grains. One that caught my eye was "Purple Prairie Barley", so I bought a small amount. But I never got around to using it until a few days ago.

I knew already that barley is a grain very low on the glycemic index, providing slow-acting, longer-lasting energy, and that it's a good source of soluble (viscous) fiber, too. Purple barley has an added bonus in that it is a variety sometimes called “naked barley,” or hull-less barley, which doesn't need pearling, so it still has the bran and germ intact. In addition, as we know, the colors in foods usually indicate the presence of antioxidants, and that's certainly true of purple barley!
"A press release on 15 August, 2011 by Ohio State University announced that anthocyanins, chemicals that offer red, blue and purple color to foods, are capable of inhibiting the growth of cancer cells while keeping healthy cells intact... Lead author of the study, Dr. Monica Giusti, commented, “These foods contain many compounds, and we’re just starting to figure out what they are and which ones provide the best health benefits.” Giusti added, “All fruits and vegetables that are rich in anthocyanins have compounds that can slow down the growth of colon cancer cells, whether in experiments in laboratory dishes or inside the body.” ...The bran fraction of purple barley has a significantly higher antioxidant activity than its paler cousins, by as much as six times."
See source links at http://www.bodybio.com/content.aspx?page=Purple-Foods
So this is a really nutritious grain, besides being a lovely color! It also has a nice chewy texture-- it's not mushy or slimey. I decided to make a hearty full-meal salad with my cup of Purple Prairie Barley, utilizing foods that I had in the refrigerator and pantry already. The result was delicious, nutritious and very colorful!

BRYANNA'S PURPLE PRAIRIE BARLEY & CHICKPEA SALAD
Servings: 8
This beautiful whole grain, bean and vegetable salad was a real hit and so nutritious!
Cook the barley several hours ahead of making the salad:
1 cup Purple Prairie Barley
2 cups water
1/2 tsp salt
Other salad ingredients:
2 cups rinsed and drained cooked or canned chickpeas
2 large red peppers, seeded and cut into 1/2-inch cubes (more or less)
1 cup chopped celery (with leaves)
1/2 cup dried cranberries (or chopped dried apricots)
4 large or 6 small green onions, chopped
1/2 cup slivered almonds, lightly toasted
Dressing:
1/2 cup aquafaba or Oil Substitute for Salad Dressings
1/4 cup extra-virgin olive oil
1/4 cup red wine vinegar
2 Tbs agave nectar or maple syrup
1 Tbs dark sesame oil
1 tsp dried oregano (or 1 tablespoon fresh, chopped)
1 tsp salt
1 tsp paprika or smoked paprika
1/2 tsp freshly ground black pepper
1. To cook the barley, mix the barely, water and salt in a small saucepan and bring to a boil. Turn down, cover and cook on Low for about 1 1/2 hours, or until the barley is tender, but a bit chewy, and all of the water has been absorbed. Cool at room temperature.
2. While the barley cools, prepare the other salad ingredients and make the Dressing by whisking or shaking all the ingredients together.
3. Combine the cooled barley, other salad ingredients and dressing and refrigerate. The salad is best when served at room temperature.
***************************************************************************
The same day that I made the salad, I needed to use up some of my homemade vegan "ricotta", and I also had some of my "Potted Tofu" in the fridge that was getting quite "ripe"! (The links to the recipes are in the recipe below.) I decided to make a spread-- spreads are always handy to have around to use on rye crisp, toast or vegetables for a quick snack. It turned out very well!

Printable Copy
Serves 12
6 ounces of any kind of vegan "Feta" (such as my "Potted Tofu" or Quick "Feta" Crumble)
2 7/8 cups (1 lb.) unseasoned vegan "Ricotta" (I used my Okara/Cashew Ricotta, but you could use my Tofu/Cashew Ricotta or Almond Ricotta)
2 cloves garlic, crushed
2 tablespoons fresh lemon juice
1 tablespoon extra-virgin olive oil
1 teaspoon dried thyme
1 teaspoon dried oregano (or 1 tablespoon fresh, chopped)
1/2 teaspoon salt
1/4 teaspoon red chile flakes
1/4 teaspoon onion granules
freshly-ground black pepper to taste
1/3 cup sliced sun-dried tomatoes in oil, rinsed under hot water and squeezed
Garnish:
extra-virgin olive oil, Kalamata olives, parsley
Combine all of the ingredients EXCEPT the sundried tomatoes in a food processor or high-speed blender and process until smooth. Add the tomatoes and process briefly-- you want it to have a little texture.
Scoop the spread into an attractive bowl, smooth it out, drizzle with olive oil and garnish with the olives and parsley.
Serve with crackers (we like rye crisp), thin slices of crusty bread, or raw vegetables.
Enjoy!

Sunday, November 25, 2012
"VEGAN SANDWICHES SAVE THE DAY" BLOG TOUR FINALE: PROTEIN-HAPPY QUINOA WRAPS


I had a really difficult time choosing which recipe from Celine Steen and Tamasin Noyes' new book, "Vegan Sandwiches Save the Day!" This book has energy! And its contents will fuel you through your day, morning, noon or night-- 101 new, original recipes that are not only plant-based, but seriously yummy.
Was it to be Berry-Stuffed French Toast Pockets for a luxurious breakfast? Or perhaps an elegant lunch of French Tofu Salad with Grapes on baguettes with arugula or Tofu Pomegranate Pockets? Or a supper sandwich such as the German stuffed buns, Bierocks; or Portobello Po' Boys; or mile-high Dagwood's Special Sandwiches? Honestly, you are spoiled for choice with this book.

In the end, I opted for a delicious-looking wrap that would fit well into our pre-Christmas low-fat, high-fiber eating regime-- Protein-Happy Quinoa Wraps. I had most of the ingredients, and would only have to deviate slightly by using chopped green olives in place of a couple of tablespoons capers, dark raisins instead of golden, and 8-inch whole grain flour tortillas instead of white 10-inch ones. (I live on an island-- can't run to the store whenever I like!) I'm sure you could use a gluten-free wrap instead.
I made cooked the quinoa and made the sun-dried tomato and olive tapenade in the morning so that, as the recipe mentions, it would have time to develop flavor. When the quinoa was cool, I quickly made the quinoa and bean filling, sliced the raw veggies and set everything aside, covered, until lunchtime. Since I had smaller tortilla wraps than were called for, I made 3 wraps instead of 2 to share with my husband for lunch. (He is quite happy to take the rest for a work lunch tomorrow.)
The sun-dried tomato and olive tapenade really added a depth of flavor to the mild, nutty quinoa salad, and there was plenty of crunch and a little bit of chile heat there, too. Very filling, satisfying, healthful and delicious.
Congratulations to Celine and Tamasin for this creative take on this worldwide favorite, the sandwich!

PROTEIN-HAPPY QUINOA WRAPS
Yield: 4 wraps, generous 3/4 cup (100 g) tapenade
(From Vegan Sandwiches Save the Day! Fair Winds Press, 2012)
For tapenade: (Note from BCG-- Make at least 2 hours ahead of serving)
1/2 cup (28 g) minced sun-dried tomatoes (moist
vacuum-packed, not oil-packed)
1/4 cup (25 g) minced (pitted) kalamata olives
2 tablespoons (15 g) chopped capers
2 tablespoons (30 ml) olive oil
1/4 teaspoon red pepper flakes
For filling: (Note from BCG-- good idea to make this an hour or two ahead, as well)
1 ½ cups (355 ml) vegetable broth
1/2 cup (84 g) dry quinoa
1/4 cup (30 g) packed golden raisins (optional)
1 tablespoon (15 ml) apple cider vinegar
1 tablespoon (15 ml) fresh lemon juice
1½ tablespoons (25 ml) olive oil
1/4 teaspoon red pepper flakes, to taste
1 ½ tablespoons (15 g) minced red onion
1 clove garlic, minced
Fine sea salt, to taste (I used 1/2 tsp.--BCG)
Cracked black pepper, to taste
2 tablespoons (15 g) roasted salted pepitas (pumpkin seeds)
3/4 cup (197 g) cooked cannellini beans
2 tablespoons (8 g) chopped fresh parsley
1 tablespoon (2 g) minced fresh basil
For wraps:
Four 10-inch (25-cm) flour tortillas
1 red bell pepper, cored and cut into strips
1 small cucumber, cut into strips
To make the tapenade:
Combine all the ingredients in a food processor. Pulse a few
times, but leave it chunky. Chill for at least 2 hours to let the flavors
develop.

To make the quinoa:
Bring the broth to a boil in a medium size pot. Add the
quinoa and cook for 8 minutes. Add the raisins and cook for 2 to 4 minutes
longer, or until the quinoa is cooked and the telltale tail appears. Drain in a
fine-mesh sieve. Set aside to cool completely.

In the meantime, prepare the dressing by combining the
vinegar, lemon juice, oil, red pepper flakes, onion, garlic, salt, pepper,
pepitas, and beans in a large bowl. Add the quinoa mixture, parsley, and basil
to the dressing and stir until well coated. (Note from BCG-- If making ahead, cover and refrigerate until serving time.)
To assemble the wraps:
In the middle of each wrap, spread 3 tablespoons (25 g) tapenade. Top with a generous 1/2 cup (120 g) quinoa filling. Divide the red bell pepper and cucumber among the wraps. Fold the ends in and roll closed.
In the middle of each wrap, spread 3 tablespoons (25 g) tapenade. Top with a generous 1/2 cup (120 g) quinoa filling. Divide the red bell pepper and cucumber among the wraps. Fold the ends in and roll closed.


Enjoy!

Sunday, August 24, 2008
EATING HOMEGROWN
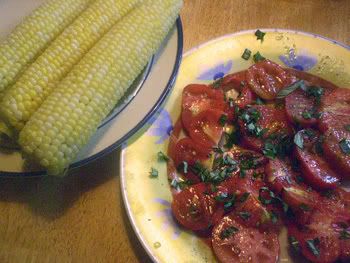
Denman Island corn and our own tomatoes and basil for lunch...


BC blueberry pancakes (made with my vegan pancake mix)
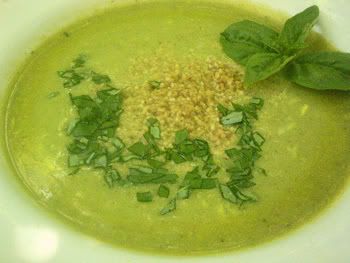
Zucchini Bisque-- delicious and uses up 2 1/2 lbs. of zucchini in one recipe!
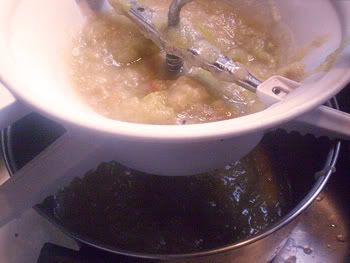
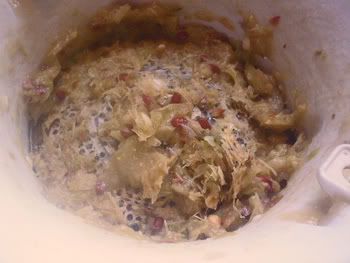
MAKING APPLESAUCE THE EASY WAY:
I use a food mill or mouli. There are a variety of them on the market-- mine is this one. Here's an all-stainless-steel one.
For smooth applesauce, you just wash the apples and cut them into quarters-- no peeling (unless there are bad spots), not coring, not stemming, even! Toss them in a big pot with a little water and cook until soft.
Then you place the food mill (I use the plate with the larger holes) over a large pot or bowl and feed the cooked apples through, cranking the handle (it's not hard). When you're done, you have the seeds, stems (if any) and skins left in the mill and a big pot of smooth applesauce! Sweeten if desired and can or freeze. (I freeze mine in little containers to use primarily in low-fat baking. (In recipes that call for oil, you can use use approximately 3 parts smooth unsweetened applesauce to 1 part oil, but be sure to use pastry or cake flour, or low-gluten or GF flours, for best results. This doesn't work as well in recipes calling for solid fats, but you can experiment. You can also experiment with using no oil, but sometimes the baked goods come out a little too chewy that way!)
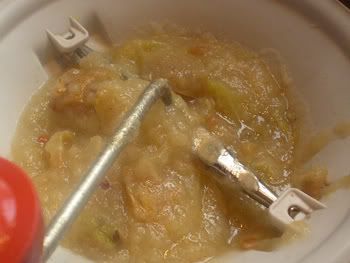
What's left behind...
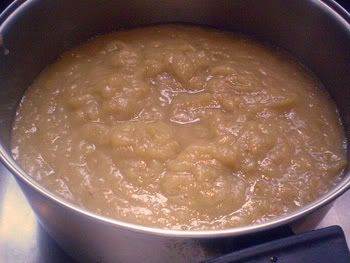
The results!
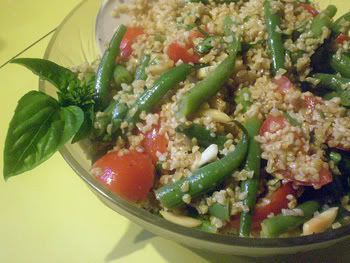
Here's one of the recipes I mentioned in my blog the post before last:
Printable Recipe
SUMMER BULGUR AND GREEN BEAN SALAD (with my changes--BCG)
by Tyler Florence for Food & Wine magazine
This was a lovely salad and simple to make. I made some changes according to what I had in the house.
2 cups boiling water
2 cups medium (#2) bulgur (11 ounces)
1 pound thin green beans
Juice of 2 lemons
1/4 cup extra-virgin olive oil
1 cup red and yellow cherry tomatoes, halved (I just used slightly larger red tomatoes, cut in half-- BCG)
1/2 cup roasted salted almonds, coarsely crushed (I used toasted unsalted slivered almonds--BCG)
1/4 cup coarsely shredded mint leaves (I had no mint, so used fresh basil instead-- BCG)
Salt and freshly ground pepper
In a large, heatproof bowl, pour the boiling water over the bulgur. Cover the bowl and let stand until the water is absorbed, about 20 minutes.
Meanwhile, bring a large pot of salted water to a boil. Add the green beans and boil over high heat until just tender, about 4 minutes. Drain and refresh under cold running water, then pat dry. Cut the green beans crosswise.
In a small bowl, stir together the lemon juice and olive oil. Fluff the bulgur with 2 forks. Add the green beans, tomatoes, almonds, mint (or basil) and lemon dressing. Season with salt and pepper and mix well. Transfer the bulgur salad to a large serving bowl and serve lightly chilled or at room temperature.
The salad can be refrigerated overnight. Add the tomatoes, almonds and mint (or basil) just before serving.
Servings: 8
Nutrition Facts
Nutrition (per serving): 237.8 calories; 37% calories from fat; 10.2g total fat; 0.0mg cholesterol; 12.1mg sodium; 371.0mg potassium; 33.9g carbohydrates; 9.4g fiber; 2.1g sugar; 24.5g net carbs; 6.8g protein; 4.8 points.
Hope you're having a good summer!

Wednesday, June 25, 2008
AN EGGPLANT RECIPE FOR EGGPLANT HATERS & A SOLUTION TO EGGPLANT SOAKING UP OIL LIKE A SPONGE

This will be my last blog post until July 6th or so, when I get back from the McDougall "Celebrity Chef" Weekend in Santa Rosa, Ca. I'll be in good company, with Chef Kevin Dunn, executive chef and creator of the Vegetarian Awakening vegan chef's conferences; Susan Voisin from the fat free vegan blog; Colleen Patrick-Goudreau from the Compassionate Cooks blog; Jill Nussinow, "The Veggie Queen"; Miyoko Schinner from the Artisan Vegan Life blog; and Chef Eric Tucker of Millennium Restaurant in San Francisco. Wow!
We will all, along with Mary McDougall, be demonstrating flavorful, no-fat-added recipes for the participants to recreate at home. I'm doing a workshop on breakfast foods on Saturday morning, and a work shop on "The Elegant Bean" on Sunday.
So, I'll be filling you in when I get back! In the meantime, I'm posting a delicious eggplant dish that I made the other day. A medical practitioner recommended that my husband eat more eggplant. Now, I've been telling him that for ages, because eggplant is a great source of viscous fiber-- "the 'sticky' type of soluble fiber found in oats, barley and beans, and certain vegetables such as okra and eggplant. Viscous fibers help binding the cholesterol in your digestive tract and sweep it out of your body. In another word, soluble fiber act as a sponge, absorbing cholesterol and carrying it out of your system. People at less-developed countries (such as China) are less prone to having high blood cholesterol because their diet are high on viscous fiber." See: http://foodheal.blogspot.com/2006/07/eating-to-lower-cholesterol-1-viscous.html You can read more about this here: "Portfolio Diet".
I love eggplant, but DH has only eaten it reluctantly, except when I make Szechuan eggplant, which he does like. So I thought I'd start out with a stir-fry. I found the following recipe on a great website called "Ashbury's Aubergines" that has thousands of eggplant (aubergine) recipes!
I wanted to cut down the oil a bit, so I experimented with a technique I read about in Cook's Illustrated magazine. Eggplant soaks up oil like a sponge-- as the authors say, "it's essentially a sponge, ready to absorb anything, and it's packed with water. This one-two punch transforms the eggplant into oil-soaked mush before it has a chance to caramelize."
and:
"The Solution: First we needed to dehydrate the eggplant, but the traditional salting method didn't sufficiently dry it out. Combining salting and microwaving did work— after we put a few disposable coffee filters under the eggplant to keep it from poaching in its leached-out liquid. The eggplant (now reduced to a third its original size) could be sautéed in a much smaller amount of oil (1 tablespoon vs. nearly 1/2 cup). The eggplant plumped up nicely when added back to the other vegetables to stew, absorbing these other flavors instead of just oil."
So, what you do is, cut your eggplant into chunks or strips and toss it with a bit of kosher salt in bowl. Line entire surface of large microwave-safe plate with double layer of [unbleached] coffee filters and lightly spray with oil from a pump sprayer. Spread the eggplant in one even layer over the filters. Microwave on high until the eggplant is dry and shriveled to one-third of its size, 8 to 15 minutes (the eggplant should not brown). (If your microwave has no turntable, rotate the plate after 5 minutes.) Use in your recipe. It worked!
(PS: For anyone who is still afraid of using a microwave oven, here's some information you may be interested in reading.)

Printable Copy
BRAISED EGGPLANT WITH SUNDRIED TOMATOES, BRYANNA'S VERSION
Serves 2-4
This was delicious and DH loved it, even though heclaims to hat eggplant.
1 pound eggplant, peeled and cut into strips and prepared as above
1 tablespoons olive oil
3 garlic cloves, minced
1 jalapeno pepper, finely chopped
1/4 cup sun-dried tomatoes in oil, diced (I washed the oil off with hot water and patted them dry)
2 tablespoons low-sodium soy sauce
1 tablespoon balsamic vinegar
1 teaspoon sugar
1 small tomato, peeled
seeded and diced
1 tablespoon chopped fresh parsley or cilantro
Heat the oil in a large skillet. Add the garlic and jalapeno pepper and cook over high heat until the garlic is soft. Add the sun-dried tomatoes and prepared eggplant (see text above). Turn the heat to medium. Cook and stir for about 5 minutes until the eggplant is tender. Add the soy sauce, vinegar and sugar to the skillet. Cook until the liquid is almost absorbed. Add tomato and parsley or cilantro. Stir to combine. Remove from the heat.
I served this with brown basmati rice, but it would be great cold with baguettes or pita bread or rye crisp!
Enjoy and have a great week!

Saturday, July 7, 2007
UPDATE ON MUSHROOM-LEEK GOURMET TOFU-- AND ANOTHER VERSION, TOO!

Slices of Sundried Tomato/Garlic/Basil/Artichoke Gourmet Tofu drizzled with a peppery extra-virgin olive oil and balsamic vinegar
I hope I won't bore you with my tofu adventures! Since I tried making the fresh sage, leek, and dried wild mushroom tofu two blog posts ago, I have talked to various other cooks about it, and wanted to try it with dried porcini mushrooms not soaked beforehand, so that the mushroom taste was more concentrated than in my first version (I soaked them the first time, then chopped them and added them to the soymilk). The originators of this recipe, on the wishwewerebaking blog, did not soak them first, but they used dried champignon mushrooms, which are not as strong as porcinis. Another friend used them without soaking, but did not specify the type she used-- she thought the results "screamed" mushroom on the first bite!
So, I had to try it myself. I also wanted to try adding the chopped leeks and sage raw, without sauteing, as I had done before. I figured that this would save time and effort, and that the leeks would cook in the hot soymilk, anyway.
NOTE: There are explicit directions for making tofu, written by my friend Brenda Wiley, at this link. Just follow those directions, with my additions below. If you don't want to make your own soymilk, and you have access to fresh unflavored soymilk , you can use that instead. But make sure it is fresh and unflavored!
To the two soymilk maker batches (3 qts.total) hot, fresh unflavored soymilk this time I added:
about 7/8 cup dried porcini mushrooms, crumbled, so that the pieces wouldn't be too large
3 cups chopped leeks
18 fresh sage leaves
(I chopped the leeks and sage more finely in the food processor)
I added these to the hot fresh soymilk in a large pot BEFORE adding the coagulant, let it come up to over 180 degrees F, and added the coagulant (2 tsp. nigari powder dissolved in 1 cup boiling water) slowly, covered the pot and let it sit 10 minutes. Then I stirred gently again and began ladling out the curds as instructed.
(See that last blog post for pictures of the process, and some of the ways I used the results.)
BTW: I made this batch with 1 Tbs. (3 packets) nigari powder for coagulant, but I think I will use only 2 tsp. (2 packets) again next time. The extra nigari made the curds smaller, and I don't think that makes as nice a tofu.

Version #2 of the Mushroom/Leek/Sage Tofu
I thought the tofu was good, the mushroom flavor stronger in a subtle way, but I think I would saute the leeks and sage again next time. I think the leek and sage flavor came through better with the sauteed version, and the leeks did not "crunch".
We just had some for a snack with real tamari (the liquid that drains off miso) from our local miso maker-- a treat!
ANOTHER VERSION:
I made this early last week, just 1 block using 1 batch (1 1/2 qts.) soymilk. I added (for 1 1/2 qts.) :
1/2 cup sundried tomatoes in oil (I rinsed the oil off with hot water and chopped them small after measuring)
1/2 cup marinated sliced artichoke hearts (also rinsed and then chopped pretty finely after measuring)
3 large cloves garlic, minced
2 tsp. dried basil (didn't have any fresh-- if you do, use 2 Tbs. chopped)
One thing I noticed was that the acid from the tomatoes (and any residual marinade on the artichokes, I guess) started curdling the soymilk before I even added the coagulator. But I added it anyway. I also noticed that the curds were smaller as a result. The tofu was a bit fragile from all the stuf I loaded into it, but tasted great! I might cut the tomatoes and artichokes down to 1/3 cup each next time.

We ate this cold drizzled with a very peppery extra-virgin olive oil and just a dash of balsamic vinegar. Yum...
As I mentioned before, I did not store the tofu in water, as I don't want to destroy the flavor, and we ate it all up within a day or two. I just placed it in the fridge on a plate, covered with plastic wrap.
Enjoy!

Subscribe to:
Posts (Atom)