Showing posts with label soy cappuccino. Show all posts
Showing posts with label soy cappuccino. Show all posts
Thursday, February 9, 2012
LET'S HEAR IT FOR GREAT HOMEMADE ESPRESSO-CAFE-STYLE COFFEE MADE WITH MANUAL EQUIPMENT; & HOW NOT TO CURDLE YOUR SOYMILK


Cappuccino with homemade soy milk
I was just reading about the recall of some 900,000 Tassimo coffee makers in Canada, and about 850,000 in the USA. This article goes on: "The U.S. Consumer Product Safety Commission says there have been 140 reports of problems with the Tassimo single-cup brewers dousing people, including 37 cases involving second-degree burns.
In one incident, a 10-year-old girl from Minnesota was hospitalized with second-degree burns to her face and neck. The commission also says the coffee maker's "T-disc" — the plastic disc that holds the coffee or tea — can burst while brewing and spray hot liquid. It says a 2-year-old girl in Canada suffered second-degree burns to her face.
Some four million packages of Tassimo espresso T-discs are also being recalled, and about half of those were sold in Canada. They were manufactured by Kraft Foods Global Inc., in Illinois, and were recalled after 21 reports of problems."
Now, far be it from me to say that electric coffee devices are no good. However, my husband has been making wonderful espresso-style coffee for years with no electric equipment, with stove-top espresso makers that last for many, many years if you treat them right. I'd just like to make the case for not bothering with another electric device which only has one use, takes up counter space, and has a tendency to break down after a very few years (never mind the possible dangers).
Another reason to consider switching to a stove-top version (perhaps when your electric one kicks the bucket) is the fact that these are sturdily-made from stainless steel, no plastic to throw away. And the Tassimo-- and other similar machines-- requires a plastic "T-disc" to hold little separately-packaged one-serving amounts of coffee-- more plastic to throw away. It's easy to grind your own coffee beans (organic, fair trade, preferably)-- it takes only a minute, even in a hand grinder-- and the coffee is fresh.
Another reason to consider switching to a stove-top version (perhaps when your electric one kicks the bucket) is the fact that these are sturdily-made from stainless steel, no plastic to throw away. And the Tassimo-- and other similar machines-- requires a plastic "T-disc" to hold little separately-packaged one-serving amounts of coffee-- more plastic to throw away. It's easy to grind your own coffee beans (organic, fair trade, preferably)-- it takes only a minute, even in a hand grinder-- and the coffee is fresh.

We use the big one when we have company, and the small ones when it's just one of two of us.
You fill the bottom part of the pot with water just to the little valve, add freshly-ground coffee (don't pack it down too much-- that firm packing is for the commercial steam machines), screw on the top part and set it on high on the burner. When it starts to make noise it means that the water is turning to steam and being forced up through the coffee. If your stove is electric, just leave it on the burner, but turn it off. The residual heat is enough to finish the process. If you have gas, turn it down a bit and keep an eye on it. Open the lid to see if the coffee has all come up, and enjoy!

 |
| DH even grinds his own coffee manually every time (takes only seconds) on this old Spong grinder that he's had for years. (The sound of grinding coffee is my morning wake-up call.) Missing from this photo: a little metal dish that fits into the gap below the grinding apparatus. Here's some history of the Spong, plus tips on using and a blog post about Spong grinders. |
 |
| The full battery of DH's stovetop espresso makers-- all in use at family gatherings. |

I don't drink much of coffee, but, when I do, only the best will do (my husband's), and I usually make a soy latte or cappuccino. To foam the milk for a cappuccino, I use a manual milk frother:

You add heated milk (or heat it right in the container in the microwave)-- just 1/3 to 1/2 cup...

This turns into...

...this!
Any store with cookware will have something similar-- this one was only $12.

Blue-striped cup,
rear left: homemade soymilk; white cup, rear right: Almond Breeze; front in
blue cup: Soy Dream (They all foam, but homemade soymilk or Soy Dream or Vitasoy are best; hemp milk foams, but is rather weak.)

Vitasoy Foam

Almond Breeze foam

Hemp milk foam
Some folks have told me that their coffee curdles with soy milk. Ours never does. We use dark roast, but not so dark that it tastes burnt (Starbucks tastes burnt to me). Brown (lighter roast) beans are actually more acidic than dark roast beans (and acid is what makes it curdle usually-- even some teas are a bit acidic. Warming the milk before adding to coffee also tends to prevent curdling. I found this on, of all things, the National Dairy
Council site (!): "...The acid in coffee, along with coffee's heat, favor
curdling of cream." From Oregon State U. site; "The phenolics and
acids in coffee may curdle the cream. This is especially true if the coffee is
hot ..."
Now, about the coffee: "The acid content in a
brew is also greatly dependent upon the roast degree, type of roaster, and
brewing method." (from http://www.coffeeresearch.org/) They show the types
of acids in coffee and point out that there is a maximum concentration of
acetic, malic, and citric acids in light roasted coffee. And: "In regards
to the concentration of citric, malic, lactic, pyruvic and acetic acid, Blank
found that a typical medium roast coffee consisted of 0.30%, 0.22%, 0.13%,
0.07%, and 0.27% of each acid, respectively (Clarke, 25). At very light roasts,
Blank found that the total concentration of these acids was around 1.58%, while
at dark roasts these acids could drop down to 0.71%."
They also showed that a quick-brewing method (such as the steam method of espresso, or the European plunger [French press] method) results in less acid in the brew. Also, oddly, less caffeine, even with the darker bean.
Here is the approximate caffeine content of a variety of coffee products. Keep in mind that the numbers provided are not exact:
Brewed (8 oz./250mL) = 85mg of caffeine
Instant (8 oz./250mL) = 75mg of caffeine
Decaffeinated, brewed (8 oz./250mL) = 3mg of caffeine
Decaffeinated, instant (8 oz./250mL) = 3mg of caffeine
Espresso (1 oz./30mL) = 40mg of caffeine
Cappuccino and Latte (1 oz./30mL) = 40mg of caffeine
http://www.truestarhealth.com/Notes/1718008.html
More advice from http://www.coffeereview.com/reference.cfm?ID=120: "Buy a moderately-dark- to dark-roasted coffee. Dark roasting reduces the acid sensation in coffee.
Buy a lower-altitude, naturally low-acid coffee brought to a moderately dark roast (full-city, Viennese, light espresso). To me, this is by far the best solution for acid-shy coffee drinkers. Naturally low-acid coffees include Brazils, most India and Pacific (Sumatra, Timor, Hawaii) coffees, and most Caribbean coffees.
It also helps to buy very good coffee, because the best coffee has been processed from ripe coffee fruit, and coffee from ripe fruit is naturally sweet and lacks the sharp, astringent sensation of cheaper coffee processed from less-than-ripe fruit."
http://www.coffeeresearch.org/ adds: "Acidity is typically a highly valued quality especially in Central American and some East African coffees." So you might want to avoid those.
And "Acidity has been correlated with coffees grown at very high altitudes and in mineral rich volcanic soils. The perceived acidity of washed coffees is also significantly higher than the acidity found in naturally (dry) processed coffees. This is likely due to an increase in the body of naturally processed coffees relative to wet processed coffees since body masks a coffee's acidity."

Enjoy!


Saturday, March 27, 2010
COMFORT FOODS TO THE RESCUE!

Mocha Soy Cappuccino made with my homemade soymilk
It has been a busy and stressful few weeks. Lots to work on; some family business going on; on grandchildren-sitting duty a fair amount; and a pesky on-going headache (seeing the chiro tomorrow), etc., etc. Consequently, I have not been blogging that often, for which I am very sorry! We have been eating pretty basic stuff most of the time. I have craved "comfort foods"!
I'm not a heavy coffee drinker, but my husband makes wonderful organic, fair trade, espresso, ground fresh just before steaming it. One treat I have allowed myself every few days lately is a homemade Mocha Soy Cappuccino. I use my homemade soy milk-- about 2/3 of a cup-- whisked with 1 teaspoon of organic, fair trade unsweetened cocoa and 2 teaspoons of brown sugar, heated and frothed in my inexpensive plunger milk frother
 , and a shot of DH's good espresso. To me, it's like dessert!
*********************************************************************************
A comfort food main dish from my childhood that I recently recreated was a vegan version of "Swiss Steak". It's kind of an old-fashioned dish, like pot roast. I enjoyed my mother's meat version in the 1950's and 60's (dating myself here!). I think it's actually making a comeback due to the popularity of the modern slow-cooker. There's actually nothing Swiss about it, though! It's a slow-braised meat dish (called "smothered" in some areas, as in "smothered in tasty gravy while it braises") that translates well to a vegan dish. (Slowly-cooked meat dishes are more successfully veganized because we don't expect them to taste like rare meat, which is well-nigh impossible to reproduce with a vegan meat substitute.)
Wikipedia says: "The name does not refer to Switzerland, but instead to the process of "swissing", which refers to fabric or other materials being pounded or run through rollers in order to soften it. Swiss steak is typically made from relatively tough cuts of meat, such as the round, which have been pounded with a tenderizing hammer, or run through a set of bladed rollers to produce so-called 'cube steak'. The meat is typically coated with flour and other seasonings and served with a thick gravy."
I have made a similar dish with my seitan "steaks" before, but it occurred to me that a firm vegan burger would make a fine stand-in for a "Swissed" piece of meat, or a "cube steak". AND, it would not have to cook as long because it is already fully cooked and tender. Sweet!
The sauce is a kind of bastardized vegan version of the classic Espagnole sauce, which is a reduction sauce starting with a brown roux, veal stock (yuck!)enriched with browned bones, beef cubes, vegetables, etc., and then further enriched with tomato puree. My version (for this dish) uses a combination of leftover vegan brown gravy and leftover good, homemade vegan spaghetti sauce (the kind with no meat sub in it). Couldn't be easier if you have those things around (I set aside some of each of these from other meals earlier in the week when I plan to make this dish-- the spaghetti sauce can be frozen, and the gravy will keep a week in the refrigerator.) This may sound weird, but, trust me, it's good!
My mother always made her Swiss Steak with lots of vegetables added, so I did, too. Oh, and I haven't tried this, but I'll bet this would do just fine in a slow-cooker for a few hours!

Printable Recipe
BRYANNA'S VEGAN "SWISS STEAK" WITH VEGETABLES
Servings: 4
6 vegan burgers (the "meat-like" kind)-- use 8 if they are very thin
A comfort food main dish from my childhood that I recently recreated was a vegan version of "Swiss Steak". It's kind of an old-fashioned dish, like pot roast. I enjoyed my mother's meat version in the 1950's and 60's (dating myself here!). I think it's actually making a comeback due to the popularity of the modern slow-cooker. There's actually nothing Swiss about it, though! It's a slow-braised meat dish (called "smothered" in some areas, as in "smothered in tasty gravy while it braises") that translates well to a vegan dish. (Slowly-cooked meat dishes are more successfully veganized because we don't expect them to taste like rare meat, which is well-nigh impossible to reproduce with a vegan meat substitute.)
Wikipedia says: "The name does not refer to Switzerland, but instead to the process of "swissing", which refers to fabric or other materials being pounded or run through rollers in order to soften it. Swiss steak is typically made from relatively tough cuts of meat, such as the round, which have been pounded with a tenderizing hammer, or run through a set of bladed rollers to produce so-called 'cube steak'. The meat is typically coated with flour and other seasonings and served with a thick gravy."
I have made a similar dish with my seitan "steaks" before, but it occurred to me that a firm vegan burger would make a fine stand-in for a "Swissed" piece of meat, or a "cube steak". AND, it would not have to cook as long because it is already fully cooked and tender. Sweet!
The sauce is a kind of bastardized vegan version of the classic Espagnole sauce, which is a reduction sauce starting with a brown roux, veal stock (yuck!)enriched with browned bones, beef cubes, vegetables, etc., and then further enriched with tomato puree. My version (for this dish) uses a combination of leftover vegan brown gravy and leftover good, homemade vegan spaghetti sauce (the kind with no meat sub in it). Couldn't be easier if you have those things around (I set aside some of each of these from other meals earlier in the week when I plan to make this dish-- the spaghetti sauce can be frozen, and the gravy will keep a week in the refrigerator.) This may sound weird, but, trust me, it's good!
My mother always made her Swiss Steak with lots of vegetables added, so I did, too. Oh, and I haven't tried this, but I'll bet this would do just fine in a slow-cooker for a few hours!
Printable Recipe
BRYANNA'S VEGAN "SWISS STEAK" WITH VEGETABLES
Servings: 4
6 vegan burgers (the "meat-like" kind)-- use 8 if they are very thin
1 Tbs olive oil
VEGETABLES:
1 Tbs olive oil
1 large green bell pepper, seeded and sliced into thin slices
1 large onion, sliced thinly
4 medium carrots, scrubbed and cut into thin "fingers"
2 cloves garlic, chopped
SAUCE:
1 1/4 cups your favorite vegan Brown Gravy
1 1/4 cups good homemade tomato spaghetti sauce
(If you gave a very good commercial brand that you like, you can use that instead)
1/2 cup dry red wine (can be de-alcoholized)
1/2 teaspoon dried thyme
1/2 teaspoon dried basil
freshly-ground black pepper to taste
Heat the 1st tablespoon of oil in a large nonstick skillet. Add the burgers. Cut the burgers into 3 large slices each to make it easier to divide up the servings (you don't have to do this is you use 8 thin burgers.) Brown the burgers lightly on both sides and remove from the pan.
Add the 2nd tablespoon of oil to the same pan and add the vegetables. Sprinkle lightly with salt. Saute them over medium-high heat until they wilt.

Alternatively, wilt the vegetables in the oil in a Pyrex casserole in the microwave for about 5 minutes.
Add the burgers back to the pan, covering them with the wilted vegetables.
Mix the sauce ingredients together with a whisk and pour over the burgers and vegetables. Bring to a boil, then turn down the heat to a low simmer, cover and cook 30 minutes.
Serve hot with mashed potatoes, steamed new potatoes, cooked flat noodles, or whole grain homemade spaetzle (drop noodles).
Nutrition Facts
Nutrition (per serving): 356.6 calories; 28% calories from fat; 10.1g total fat; 0.0mg cholesterol; 1266.8mg sodium; 900.6mg potassium; 30.6g carbohydrates; 12.0g fiber; 14.7g sugar; 18.6g net carbs; 28.2g protein; 7.2 points.
Enjoy!

Tuesday, July 10, 2007
FOOD PHOTOS AND EXPERIMENTS FROM THIS WEEK

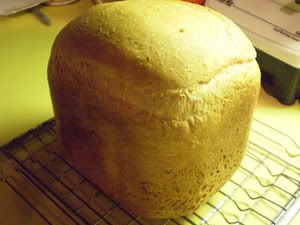
I made the following white bread loaf (it does have some oat bran in it) just as an experiment to see how little yeast I could get away with (most bread machine recipes call for WAY too much yeast, which does NOT improve the flavor!). For this loaf, I used only 1/2 tsp. yeast in total. I made a sponge (loose batter) with all of the water, yeast and some of the flour and let it rise in the ABM container for 6 hours, before adding the remaining ingredients and baking it. Look how it rose! The crust was nice and crunchy.
It tasted good for white bread, but was actually a little TOO fluffy for my liking! Here's the recipe:
Printable Recipe
BRYANNA’S “NOT QUITE WHITE” BREAD MACHINE BREAD
2 lb. (sponge method)
This can be used as basic bread for many variations. NOTE: This is the machine I have.
Sponge:
Mix for 5 minutes on dough cycle, then unplug and leave overnight, or for 6-12 hours:
1 and 1/2 c. water
1/2 tsp. dry active baking yeast (or 1/3 tsp. instant yeast)
2 c. unbleached flour (use bread flour in USA)
After rising the sponge, add:
4 tsp. brown sugar
2 T. plus 2 tsp. oil
1 and 3/4 tsp. salt
2 c. unbleached flour (use bread flour in USA)
1/3 c. whole wheat flour (or oat bran)
Set on the Basic Cycle, Dark Crust. Check the dough during the first knead to make sure that it is neither too dry, not too wet. If it’s too dry, add water by the tablespoonful, letting it knead in, until it looks right. If it’s too wet, do the same with flour.
If you want a more attractive top crust to the bread, 5 minutes before the bread is due to bake (I set my kitchen timer to remind me of this), you can make a decorative slash in the top of the bread with a razor blade, and you can also glaze the bread with some soymilk, using a pastry brush, or sprinkle the top with flour.
Cover the “window” in the top of your machine with foil, so that the top of the bread will brown properly. Remove the bread immediately from the machine when done, placing on a rack to cool thoroughly. This will insure a crisp crust.
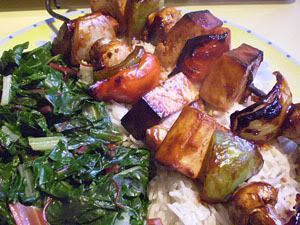
Dinner the other night was Swiss chard from our garden (yum!) and tofu kebabs with peppers, mushrooms and onion. I had soaked the extra-firm tofu cubes in the Breast of Tofu (or Crispy Marinated Tofu from World Vegan Feast) marinade for several days, anticipating a meal such as this. I just threaded them on skewers with the veggies, slathered on barbecue sauce (my Bourbon BBQ Sauce ) and grilled them, serving them on a bed of Basmati rice.

I just had to post yet another picture of a wonderful organic, fair-trade soy cappuccino made with my homemade soymilk! I always get such lame foam when I order soy cappuccinos in restaurants! I'm wondering if it's maybe because I use a cheap plunger-type milk foamer? I'm thinking that maybe foaming with steam dilutes the foam???

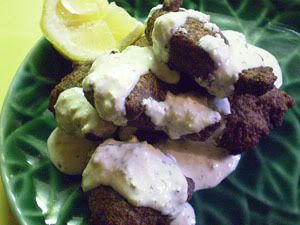
Last, but not least, two incarnations (above)of my experiments with Egyptian Felafel (ta’amiyya), which is made with fava or broad beans instead of chickpeas. Spice Island Vegan raved about the recipe from Canadian author Habeeb Salloum's EXCELLENT books, "From the Lands of Figs and Olives" and "Classic Vegetarian Cooking from the Middle East & North Africa".
I have a hard time getting dried favas, but I often use split yellow peas instead of dried favas in soups, etc., because, when they cook down to a puree they taste very similar. So, I substituted split yellow peas (cup for cup, and I did soak them) in the felafel recipe and it was great. However, next time I go to Vancouver I will get some fava beans and compare. These felafel are very light, quite different than the chickpea ones. Actually, I could not shape the batter-- it was too runny-- so I just dropped little spoonfuls of it into the oil.
Enjoy!

Sunday, February 11, 2007
VEGAN SUNDAY BREAKFAST, "CHICKEN" TACOS, AND OTHER GOODIES

Sunday breakfast, vegan-style, with Lightlife "Gimme Lean" "sausage" patties
Well, I guess it was inevitable that I get one of those boxes of goodies from Lightlife to try out and report on on this blog. (I am going to be totally candid about my reactions, BTW!) I have tried some of the Lightlife products, but they are no longer available in my area. After trying some of the products, I am going to ask my HFS to get some of them back!
Our favorite was the "Gimme Lean" Sausage Style

which I was afraid might be kind of dull, like many vegan "sausage" brands. It's low in fat, has a great texture, and actually a very nice flavor. If you want it spicier, the great thing is that you can squeeze it out of the tube into a bowl and knead in some spices and/or herbs, then form it easily into patties. Otherwise, just slice it like I did, with a sharp serrated knife.

I cooked the patties in a nonstick skillet with a small amount of Chinese (dark) sesame oil for a smokier flavor.

With hashbrowns, browned onions and apples, whole wheat sourdough toast, and tofu scramble, and accompanied by one of my husband's great soy cappuccinos (made with my homemade soymilk!), it was a great meal!

Previous to that breakfast, we'd tried the Organic Smoky Tempeh "Fakin' Bacon" Strips with a similar meal.

I was not sure how DH would receive these because he doesn't really like tempeh, but, surprise, surprise, he really liked them! They don't get really crispy unless you use alot of oil (and I cooked them in just a little dark Chinese sesame oil in a nonstick skillet, as I did with the sausage patties), but we still liked them. Very nice flavor.

On Friday, my husband tried the Smart Chili for lunch, and saved me some to taste later. It was surprisingly spicy (pleasantly so-- I thought it would be under-spiced), hearty, and low in fat, but a little on the sweet side. But it would make a good quick meal if you are really on the go.

Today for lunch, we tried the Smart Strips Chick'n Strips.

I wasn't as enthusiastic about these. I thought they were too salty, and a bit on the thick side. I rinsed them and drained them, but they were still pretty salty. However, they were pretty good in a "chicken" taco, cooked in my homemade Red Chile Paste (see below) (you could use your favorite taco seasoning).

I used commercial taco shells, Tofu Sour Creme, grated vegan cheeze, commercial tomato salsa, and shredded Savoy cabbage (didn't have any lettuce). They were quite tasty!

Printable Recipe
BRYANNA'S RED CHILE PASTE FOR TACO FILLINGS
From my book "Soyfoods Cooking for a Positive Menopause".
Mix in a food processor until smooth:
1/2 c. good-quality chile powder
7 T. red wine vinegar
2 T. dried red chile pepper flakes
enough vegan bouillon (cubes, powder or paste) for 4 cups liquid (preferably "beefy" style)
1 T. EACH olive or Chinese sesame oil, flour, Marmite (or other yeast extract), water, and salt
6 cloves garlic, peeled
1/2 tsp. EACH dried oregano and ground cumin
Store in the refrigerator indefinitely in a covered jar.
(FOR WHEAT-FREE, omit flour and use 2 tsp. rice flour.)
HOW TO USE THE PASTE:
Mix each Tablespoon of paste with about 1/4 cup of water. This would be enough for one package of the strips. Saute or steam-fry a small minced onion. Add whatever you are using for filling ( crumbled firm frozen tofu, veggie hamburger, veggie strips, etc.) and the dissolved paste and stir around until it is absorbed. It's pretty spicy!
Have fun!

BRYANNA'S RED CHILE PASTE FOR TACO FILLINGS
From my book "Soyfoods Cooking for a Positive Menopause".
Mix in a food processor until smooth:
1/2 c. good-quality chile powder
7 T. red wine vinegar
2 T. dried red chile pepper flakes
enough vegan bouillon (cubes, powder or paste) for 4 cups liquid (preferably "beefy" style)
1 T. EACH olive or Chinese sesame oil, flour, Marmite (or other yeast extract), water, and salt
6 cloves garlic, peeled
1/2 tsp. EACH dried oregano and ground cumin
Store in the refrigerator indefinitely in a covered jar.
(FOR WHEAT-FREE, omit flour and use 2 tsp. rice flour.)
HOW TO USE THE PASTE:
Mix each Tablespoon of paste with about 1/4 cup of water. This would be enough for one package of the strips. Saute or steam-fry a small minced onion. Add whatever you are using for filling ( crumbled firm frozen tofu, veggie hamburger, veggie strips, etc.) and the dissolved paste and stir around until it is absorbed. It's pretty spicy!
Have fun!
Monday, August 14, 2006
MEDITERRANEAN SOURDOUGH BREAD WITH SOY CAPPUCCINO
I haven't blogged for over a week! Summer kinda got away with me (not to mention a whole passle of little grandaughters!). Nothing earthshaking today, but I wanted to show you this yummy soy cappuccino (made with homemade soymilk) with chocolate shavings that made a great Continental-style breakfast with the following (partly wholewheat) bread:

Sourdough Olive Oil Bread
ABOUT THE BREAD:
I know, it's summer-- who bakes bread? Well, I had some extra fresh sourdough starter that I wanted to use-- exactly enough for this loaf. And I got a new stove and wanted to test out the oven. The recipe I used (see below) is actually a bread machine recipe
 I developed, but I just mixed and rose it in the machine, and baked it in the oven. It's delicious! (I developed several bread machine recipes using sourdough because I find most bread machine recipes kind of flat-tasting. Sourdough starter or an overnight yeast sponge both create a tastier bread, in my opinion.)
To bake it in the oven, I used the dough cycle, and then formed the dough into a ball on a greased and cornmeal-dusted pizza pan and let it rise for about 45 minutes, well-covered. I heated the oven (with convection) to 400 degrees F. I slashed the loaf with a razor blade and misted it with water before placing in the oven. NOTE: For an extra-crunchy crust and bigger holes in the crumb, you can bake this in a heavy covered pot, like a mini-brick-oven, if you like. See instructions here.

I baked it for about 10 minutes, sprayed it again, baked another 5 minutes, lowered the heat to 375 degrees F and baked about 15 minutes more. (Do the knock-on-the-bottom-and-listen-for-the-hollow-sound test.) Without convection, you should lower the heat about 25 degrees and cook a bit longer.

The crust was nice and evenly-golden and crisp, and the inside moist, with a pronounced sourdough flavor, despite the yeast (the addition of yeast tempers the tangy sourdough flavor, but this bread has a goodly amount of fresh sourdough starter in it). Try to resist cutting it right away-- it actually finishes the cooking process at it cools.


NOTE: If you are unfamiliar with sourdough, see http://veganfeastkitchen.blogspot.com/2006/04/1906-earthquake-in-sf-my-grandfather.html My San Francisco starter, how to make it vegan and how to use and care for it is at that link. I actually have two vegan sourdough starters-- both are very reliable. I also use the "Oregon Trail Sourdough Starter", which I treat the same way. You can get a free (dried) starter (and it's a great story that goes with it!) here. You just pay postage. (PS: I don't use the sugar and potato they call for in the instructions., and it works fine.)
If you would like a longer version of all this info, with recipes, write to me via my contact page.
Printable Recipe
BRYANNA’S ABM SOURDOUGH ITALIAN OLIVE OIL BREAD
Makes a 1 1/4 lb. loaf
A pretty fast recipe made with sourdough starter and yeast.
1 1/2 c. fresh sourdough starter (less than 2 weeks old if stored in the refrigerator) (See Note above)
1 T. water (hot if the starter is cold)
3 T. olive oil
1/2 T. salt
2 tsp. sugar
1 cup wholewheat flour (or wholewheat bread flour in the USA-- Canadian flour is higher in gluten)
1/2 cup unbleached white flour (or white bread flour in the USA)
1/4 c. bran
1 tsp. dry active baking yeast
 or 3/4 tsp. instant yeast
Mix the ingredients in your bread machine
 according to the directions for your machine. Use the French or Crusty Bread cycle according to your machine’s directions.
Check the dough during the first knead to make sure that it is neither too dry, not too wet. If it’s too dry, add water by the tablespoonful, letting it knead in, until it looks right. If it’s too wet, do the same with flour. This should be a moist dough, but it should come together in a ball.
See instructions above for how to bake the bread in the oven.
If you want a more attractive top crust to the ABM bread, 5 minutes before the bread is due to bake (I set my kitchen timer to remind me of this), you can make a decorative slash in the top of the bread with a razor blade, and you can also glaze the bread with some soymilk, using a pastry brush, or sprinkle the top with flour.
Cover the “window” in the top of your machine with foil, so that the top of the bread will brown properly. Remove the bread immediately from the machine when done, placing on a rack to cool thoroughly. This will insure a crisp crust.
Photo of the bread machine version:

Enjoy!
Subscribe to:
Posts (Atom)