Showing posts with label no-knead burger buns. Show all posts
Showing posts with label no-knead burger buns. Show all posts
Sunday, January 12, 2020
SUPER QUICK & EASY VEGAN SPELT BURGER BUNS


But, the good news is that I am feeling much better and regaining my energy and interest in cooking and writing. (I hope to get back to writing a blog post every week!) As you may have read in past posts from the summer of 2019, back to March of 2018, I was diagnosed with pre-diabetes, which inspired my interest in a low-glycemic diet. My blood sugar levels are now just over the line into diabetic. But, it's low enough that if I get back into dancing, walking and exercising more frequently, and keep learning about and implementing new information about low-glycemic living, I may be able to beat this.
Just one of the items of interest in my search is low-glycemic baking. I have always loved baking bread and I don't intend to give it up! For this last year or so I have been eating pretty much only sprouted grain bread (a Canadian brand from the Vancouver area called Silver Hills Bakery). The sprouted wheat can be ground and kneaded into a strong bread dough (see this blog post). The miraculous thing is that (to explain it in a very simple way), when there are just little white "beads" showing at the point of the grains, the sprouts have used up most, if not all, of the carbohydrate in the grains, making the dough low-glycemic. I definitely want to get back into making that sprouted wheat bread now and then, but I'm also investigating other low-glycemic grains to use.
In muffins and quick breads I've been using mostly a mixture of chickpea flour and oat flour (often with added oat bran, wheat bran and/or bean puree for added fiber and protein, which displace some of the usual carbohydrates). But my experiments with non-wheat yeast breads didn't turn out so well, to put it mildly! So, I have been exploring the world of spelt flour, which is a fairly low-glycemic relative of wheat, but one which many people who have problems with wheat, but aren't really allergic to gluten, are able to tolerate.
My first spelt bread, which I made using methods generally used for wheat breads, came out like a rock! So, I did my research, and learned that the glutens in spelt are different from wheat, and you have to use different methods than with wheat baking. 1.) You need to use less liquid per cup of flour than wheat. 2.) The dough should be soft-- even pretty wet, in some cases. 3.) You should not knead the dough for longer than a minute or so. And. 4.) Spelt dough doesn't need as much rising as wheat dough. All of this makes spelt yeast bread baking quite easy!
One of the first spelt breads that I successfully made was spelt burger buns. I made them when our neighbor came over for a casual dinner, because she suffers from IBS or something similar, and spelt is often a good option for some folks with stomach issues. The buns were so easy and quick to make, as well as being very tasty (spelt has a very pleasant "nutty" flavor) and having great crumb and crust.
This week I'd like to share the burger bun recipe with you! (Next week I plan to share a delicious crusty spelt bread recipe with you.)

Printable Recipe
BRYANNA'S SUPER QUICK & EASY VEGAN SPELT BURGER BUNS
Makes 7 buns-- can be doubled
NOTE: You may want to use sprouted spelt flour (though it's more expensive than non-sprouted spelt flour). If you do, you may have to use up to a third more of it than you would of ordinary spelt flour.
Flax Mixture (Let sit while you prepare the rest of the ingredients.)
3 T. water
1 T. flax meal (brown or golden)
Flour Mixture:
3 1/2 cups spelt flour (I used half brown spelt flour and half light spelt flour)
1 T. vital wheat gluten powder (optional)
1/2 T. salt
Liquid Mixture:
1 cup lukewarm water
1 T. instant yeast
1 T. brown sugar
1 T. oil
Mix the Flax Mixture with the Liquid Mixture in a medium bowl. Stir in the Flour Mixture with a stout wooden spoon or a dough whisk (see photo just below) for just a couple of minutes. Flour the dough lightly and pat it out into a long rectangle on a floured mat. Cover and let rise for 15 minutes.

Preheat your oven to 400°F.
With a knife or dough cutter, cut the rectangle into 7 equal parts (weigh them, if you want them to be of even sizes). Form the dough into round buns about 4" across. Don't make them too thick-- they will rise just enough. In fact, I pressed down gently in the middle of each one with the the heel of my hand after shaping them, to prevent them from having a domed top. Place the buns on a baking parchment-lined cookie sheet, leaving some space between them. Cover and let rest for 10 minutes.

Enjoy!


Thursday, June 13, 2013
FLATBREAD REVISITED-- *100%* WHOLEWHEAT THIS TIME, NO-KNEAD, & MAKES FAB BURGER BUNS, TOO
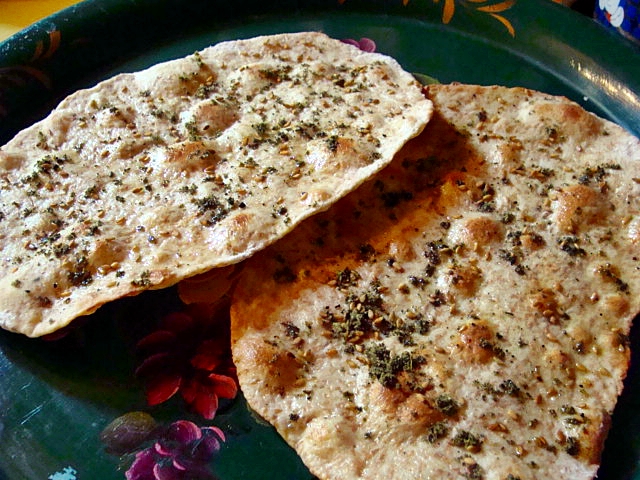 |
| Cracker Bread |

So, I've been at it again and I'm really, really pleased with the results. The pizza was great (and I am picky about pizza crust!), the pita puffed nicely, and the flatbreads were wonderful for wraps and even cracker bread. We were particularly happy with the burger buns. I don't like heavy buns and these were just light and tasty enough (with a slightly crispy bottom) to compliment the burger rather than dominate it.
 |
| Burger with Carrot Fries |
I hope you'll try this dough (see all the photo ideas in the last post, too) and invent your own flatbreads, wraps and buns.
Printable Recipe
BRYANNA’S EASY NO-KNEAD REFRIGERATED 100% WHOLE WHEAT NO-KNEAD FLATBREAD (& PIZZA, BUN) DOUGH (recipe can be doubled, etc.)
Yield: This recipe makes about 3 large pizzas; or 8
large wraps/flatbreads; or 12 pita or small flatbreads; or 11 hamburger buns; or
16 dinner rolls; or 22 cracker breads
3 3/4 cups whole wheat flour (you can use
white whole wheat flour, if you have it)
1/2 Tbs fine sea salt
1 3/4 cups lukewarm water
2 tablespoons mashed potato flakes or 1
tablespoon potato flour or starch
2 tsp organic sugar
1 tsp instant or dry active yeast
2 Tbs olive oil
Mix
together the flour and the salt in a medium bowl or dough-rising
bucket—preferably with a lid—with a whisk.
In a smaller bowl, or a measuring pitcher, mix the water, potato flakes, sugar and yeast. Let stand for a couple of minutes.
NOTE: I know that you don’t have to do this with instant yeast, but Master Baker Peter Reinhart says (in his book “Peter Reinhart’s Artisan Breads Every Day”, pps 12-13): “...I’ve discovered that waking up the yeast in lukewarm water allows it to ferment more effectively during the cooldown phase in the refrigerator. It also makes it possible to put the dough in the refrigerator as soon as it’s mixed rather than having to wait for it to rise. The warmer dough and activated yeast have plenty of time to rise as the dough cools, so the dough is ready to use right from the refrigerator, without the wake-up time required in many of the recipes I’ve developed...Another benefit of this method is that it’s the same whether you use instant or active dry yeast...”
Add the oil to the yeast mixture and pour into the flour mix. With a wooden spoon or dough whisk, stir into a rough dough. If it’s a bit too hard to stir, just knead it very briefly in the bowl til it all comes together. Cover with the lid or place the bowl inside of a large food-safe plastic bag (use a twist-tie, but make sure the bag “poofs” up over the bowl a few inches) and let it rise on your kitchen counter until doubled in size.
Now, you can “knock it back”, as Brits say (poke it until it collapses), cover again as above and refrigerate for up to two weeks, or you can use it right away. (Tip: Refrigerated dough is easier to handle.) You can use some of it right away, and keep the remaining dough in the fridge for other uses—that’s the beauty of this recipe!
If you are using refrigerated dough, there is you don’t need to bring the dough to room temperature before shaping—another plus! But your oven or pan must be hot, or at least heating up while you shape the flatbreads. Flatbreads can rise for a few minutes, but pizza should immediately be topped and placed in a very hot oven (500-550ºF).
TIP: I generally shape flatbreads on a piece of baking parchment spread over the surface I’m using, or on a silicone mat. You can get away with less flour that way. Parchment is handy because, if your dough sticks to it just cut away the excess around your flatbread and bake it with the parchment attached! It will come away just fine after baking. I generally top pizza dough which is on parchment and then transfer the pizza (using a pizza peel) to the hot pan or stone in the oven, parchment and all!

BASIC
FLATBREADS:
NOTE: Even though this is a yeast dough, you can use thin flatbreads like a
tortilla or sandwich wrap, or a stuffed bread.
Pinch or cut off 12 golf-ball-sized pieces of the dough for pita or flatbreads.
(For
larger wraps or flatbreads, cut into 12 equal pieces; OR for very thin
flatbread or cracker bread, cut into 22 pieces, approx. 1.5 or 1.6 oz. each.)
Roll them to less than 1/4” thick—they can be round, oval, or odd-shaped; it doesn’t matter!
For cracker bread, roll as thin as possible without tearing-- an oval shape about 8-inches long is good for these. (See Pita and Pizza entries below for tips and resources re rolling out the dough.)
Now, you “bake” them in a hot skillet on the stovetop on at a time.
They cook very quickly, so it doesn’t take long. (I often quickly make 2, 3 or 4 for lunch or breakfast with my refrigerated dough and it takes only minutes once you’ve done it a few times.) Flip them over for a minute or two if you want both sides to be more crispy.
To cook on top of the stove, heat a heavy cast iron skillet or griddle or hard-anodized skillet (9-12”) over high heat until the pan is very hot. (You can turn on your stove fan or open a few windows!)

Flip
one flatbread at a time onto the hot skillet and cook a minute or two, until
it’s bubbling up and has brown spots on the bottom. Flip it over and cook until
there are brown patches on the second side.
NOTE: You may have to turn the heat down on your stove, or adjust the heat as you go-- stoves vary. You don't want the breads to burn right away. After you've done a few, you'll know how to handle your stove next time!
Alternative method (I prefer this method for thin cracker breads.): You can bake several at one time like pita in the oven, but prick the dough all over with a fork before baking so the dough doesn’t puff up so much. Watch carefully so they don’t burn.
 |
| Rolling out thin dough for cracker bread |


If
you are eating them right away, you can brush or spray each bread with a little
olive oil (infused with garlic is yummy!) and sprinkle with any toppings you
want (see text above). If they are not to be used right away and you want to
keep them softened (for a wrap, perhaps), cool them in an open paper bag.
If you want them crisp, cool on baking racks.
If you want them crisp, cool on baking racks.
********
PITA:
See
this post for shaping and baking:
http://veganfeastkitchen.blogspot.ca/2006/08/5-foods-you-have-to-eat-before-you-die.html Important—don’t
stretch pita dough, just roll it.
If you don’t have a pizza stone, you can use a cast iron skillet or griddle. If you have neither, heat baking sheets in the oven and use those. Cool the pita in an open paper bag so that they stay flexible.
*****

PIZZA:
I generally roll or pat the dough into an
8" circle (on a lightly-floured piece of baking parchment or silicone
baking mat) and then use the weight of the dough to stretch it into a thinner, larger round by draping it over an over-turned mixing bowl. See this post for instructions and a photo, as well as baking instructions: http://veganfeastkitchen.blogspot.ca/2006/0/vegan-pizza-night.html Then I place the dough on
baking parchment which is sitting right on the pizza peel for topping.
To stretch the dough , you drape the dough over an over-turned bowl and gently stretch it until it is the right size, using the weight of the dough stretch it. Work slowly so that you don’t tear the dough. If it does tear, by some chance, you can patch it and seal it again. The pizza does not have to be absolutely round! You can use a rolling pin instead, but Neapolitans are of the opinion that stretching the dough rather than rolling it makes a flatter and less chewy crust.
Here’s a post with instructions for using a cast iron skillet or griddle to make great pizza: http://veganfeastkitchen.blogspot.ca/2011/10/cast-iron-skillet-pizza-perfect.html
******

BURGER
BUNS:
Divide the dough into 11 equal pieces
(about 3 oz. each). Fold down the sides of each pieces and pinch together on
the bottom to make a ball. On floured parchment, use the palm of your hand (oil
your hands first) to press each ball down flat. Now pick up the disc of dough
and turn it, holding the edges, so that it stretches a bit. Lay it down again
and press again.
What you are aiming for is a flat circle of dough about 4-inches across that is slightly concave in the middle.

Rise the buns made from refrigerated dough for about an hour on baking sheets lined with parchment and sprinkled with cornmeal or sesame seeds. When doubled, brush gently with soy or nut milk. Bake at 350 to 400°F (depending on how soft or crisp you want the outside of the buns) for 15-25 minutes. Cool on racks.


NUTRITION
FACTS:
Nutrition
(for 1 of 12 pita or flatbread): 152.5 calories;
17% calories from fat; 3.0g total fat; 0.0mg cholesterol; 285.3mg sodium;
164.0mg potassium; 28.4g carbohydrates; 4.7g fiber; 0.9g sugar; 23.8g net
carbs; 5.3g protein; 2.5 points.
Nutrition
(for 2 slices of one large pizza [cut into 6 ], crust only): 212.2 calories; 16% calories from fat; 4.0g total fat; 0.0mg
cholesterol; 379.8mg sodium; 224.9mg potassium; 39.8g carbohydrates; 6.6g
fiber; 1.2g sugar; 33.2g net carbs; 7.5g protein; 3.8 points.
Nutrition
(for 1 largish flatbread out of 8): 228.7 calories;
17% calories from fat; 4.4g total fat; 0.0mg cholesterol; 428.0mg sodium;
246.0mg potassium; 42.7g carbohydrates; 7.0g fiber; 1.3g sugar; 35.6g net
carbs; 8.0g protein; 4.1 points.
Nutrition
(for 1 of 11 hamburger buns): 166.3 calories; 17%
calories from fat; 3.2g total fat; 0.0mg cholesterol; 311.2mg sodium; 178.9mg
potassium; 31.0g carbohydrates; 5.1g fiber; 0.9g sugar; 25.9g net carbs; 5.8g
protein; 2.8 points.
Nutrition
(for 1 cracker bread or thin flatbread out of 22): 83.2
calories; 17% calories from fat; 1.6g total fat; 0.0mg cholesterol; 155.6mg
sodium; 89.5mg potassium; 15.5g carbohydrates; 2.6g fiber; 0.5g sugar; 13.0g
net carbs; 2.9g protein; 1.3 points.
Enjoy!

Enjoy!
Thursday, August 5, 2010
FLAX AND 100% WHOLE WHEAT "SANDWICH THIN"-TYPE BURGER BUNS

A rather tippy veggie burger, with all the trimmings, made with one of my new thin buns.
I've been meaning to try some "sandwich thin"-type buns for a long time, and finally got inspired to adapt one of my favorite burger bun recipes-- one I've used for over 25 years! The recipe was an old "yeast batter bread" recipe. In those days, you made a yeast-leavened batter and just rose it for 30 minutes, then formed the bread or buns, rose again briefly and baked. These were tasty enough, but I figured that they could be improved upon by using the newer no-knead bread techniques. The longer rising time with the new techniques develop the gluten and the flavor.
I chose this recipe because it was 100% whole wheat, vegan already (many sandwich bun recipes contain egg), it was "tried and true", and it is fairly soft (due to the added potato). It worked very well, though some might say they aren't big enough for some burgers. I added an option to make bigger buns, if you like. But these just fit the burgers I had around and I thought it was great that the bun didn't overwhelm the other tastes. The bun was soft, but held together well and didn't get soggy.
I did a little research, and whole wheat burger buns seem to range from 110 calories to 210 calories. Mine are 98 calories for the smaller ones and 130 for the larger ones. If you want to raise the fiber level, you can add 1/4 cup of wheat bran to the batter with no ill effects. At any rate, you can control the ingredients, and they certainly are easy and cheap to make! My freezer is now sticked with burger buns for quick meals!

Printable Recipe
BRYANNA'S WHOLE WHEAT AND FLAX "SANDWICH THIN" BUNS
Servings: 24
Yield: makes 18-24 buns
These are half the calories of many ordinary sandwich buns, 100% whole grain, and 1.5 ww points! Also, very good!
1 Tbs dry active baking yeast
 (or 3/4 Tbs instant yeast)
1 cup warm water
2 cups warm nondairy milk
1/4 cup instant potato flakes
2 Tbs olive oil
2 Tbs maple syrup or unbleached sugar, or 1 tablespoon agave nectar

2 tsp salt
1/4 cup ground flax seed, preferably golden flax

4 cup whole wheat flour (NOT pastry flour), regular or white whole wheat
Soy, hemp or nut milk for glazing tops
OPTIONAL: sesame seeds or other desired topping
Dissolve the yeast in the water. Add to the soymilk in a medium bowl, along with the potato flakes, oil, syrup or sugar, and salt.
Add the flour and ground flax and stir with a heavy wooden spoon or Danish dough whisk
 until well mixed, but rough looking. Cover and let rise at room temperature for 2 to 18 hours.

First mixing
 \
After 2 hour rise
Then refrigerate the dough, well-covered, for at least 3 hours and up to a week.
When ready to bake, take the dough from the refrigerator. With floured hands, dump the dough out on a well-floured surface and, coating the dough lightly with flour as you go, pat the dough out into a large rectangle about 3/8" thick. Cut the dough into rounds with a 3 1/2-inch cookie cutter
 (or a 4-inch cutter if you want 18 larger buns). Here's a set of round cutters
 that goes up to 4 and 7/16-inches.)

Carefully transfer to baking sheets lined with baking parchment
 and sprinkled with flour or cornmeal. The rounds should have a little room around them, unless you like them softer, in which case you can have them barely touching.
Note: You could also use a hamburger bun pan, either with 3 1/4” molds (for 24 buns
 ) or 4 1/4” molds (for 18 buns).


Pat down the dough in the center of each round, so that they don't make big "humps" in the middle when they rise.
Sprinkle the rounds lightly with flour, cover with plastic wrap, or place the pans inside of large food-safe plastic bags,and let rise 40 minutes, while you heat the oven to 375 degrees F.

Ready to bake
Brush the buns with nondairy milk and sprinkle with sesame seeds or other topping. Bake 15-20 minutes, or until golden. Cool on racks. When serving, slice them in half horizontally with a sharp serrated knife.

Nutrition Facts
Nutrition (per serving [1 of 24 buns]): 98.3 calories; 19% calories from fat; 2.2g total fat; 0.0mg cholesterol; 169.2mg sodium; 131.7mg potassium; 17.3g carbohydrates; 3.1g fiber; 1.7g sugar; 14.3g net carbs; 3.8g protein; 1.5 points.
If you make 18 larger buns (4" across) the nutrition facts are as follows: Nutrition (per serving [1 of 18 buns])): 131.0 calories; 19% calories from fat; 2.9g total fat; 0.0mg cholesterol; 225.6mg sodium; 175.6mg potassium; 23.1g carbohydrates; 4.1g fiber; 2.2g sugar; 19.0g net carbs; 5.0gprotein; 2.1 points.


Enjoy!

Subscribe to:
Posts (Atom)