Bryanna Clark Grogan’s Vegan Feast Kitchen/ 21st Century Table: The kitchen journal of a vegan food writer.. I'm on Facebook and Twitter (see links in sidebar at right).
Thursday, June 13, 2013
FLATBREAD REVISITED-- *100%* WHOLEWHEAT THIS TIME, NO-KNEAD, & MAKES FAB BURGER BUNS, TOO

 |
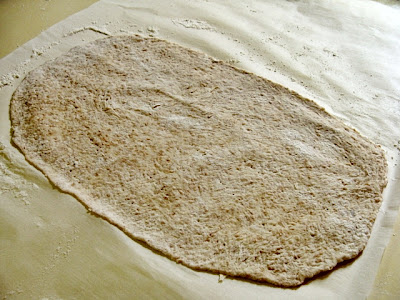
| Cracker Bread |
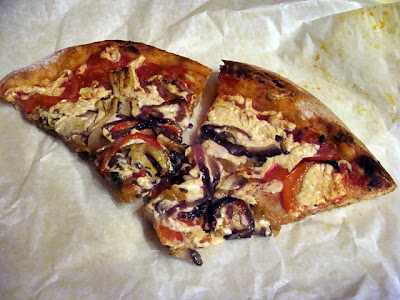
So, I've been at it again and I'm really, really pleased with the results. The pizza was great (and I am picky about pizza crust!), the pita puffed nicely, and the flatbreads were wonderful for wraps and even cracker bread. We were particularly happy with the burger buns. I don't like heavy buns and these were just light and tasty enough (with a slightly crispy bottom) to compliment the burger rather than dominate it.
 |
| Burger with Carrot Fries |
I hope you'll try this dough (see all the photo ideas in the last post, too) and invent your own flatbreads, wraps and buns.
Printable Recipe
BRYANNA’S EASY NO-KNEAD REFRIGERATED 100% WHOLE WHEAT NO-KNEAD FLATBREAD (& PIZZA, BUN) DOUGH (recipe can be doubled, etc.)
Yield: This recipe makes about 3 large pizzas; or 8
large wraps/flatbreads; or 12 pita or small flatbreads; or 11 hamburger buns; or
16 dinner rolls; or 22 cracker breads
3 3/4 cups whole wheat flour (you can use
white whole wheat flour, if you have it)
1/2 Tbs fine sea salt
1 3/4 cups lukewarm water
2 tablespoons mashed potato flakes or 1
tablespoon potato flour or starch
2 tsp organic sugar
1 tsp instant or dry active yeast
2 Tbs olive oil
Mix
together the flour and the salt in a medium bowl or dough-rising
bucket—preferably with a lid—with a whisk.
In a smaller bowl, or a measuring pitcher, mix the water, potato flakes, sugar and yeast. Let stand for a couple of minutes.
NOTE: I know that you don’t have to do this with instant yeast, but Master Baker Peter Reinhart says (in his book “Peter Reinhart’s Artisan Breads Every Day”, pps 12-13): “...I’ve discovered that waking up the yeast in lukewarm water allows it to ferment more effectively during the cooldown phase in the refrigerator. It also makes it possible to put the dough in the refrigerator as soon as it’s mixed rather than having to wait for it to rise. The warmer dough and activated yeast have plenty of time to rise as the dough cools, so the dough is ready to use right from the refrigerator, without the wake-up time required in many of the recipes I’ve developed...Another benefit of this method is that it’s the same whether you use instant or active dry yeast...”
Add the oil to the yeast mixture and pour into the flour mix. With a wooden spoon or dough whisk, stir into a rough dough. If it’s a bit too hard to stir, just knead it very briefly in the bowl til it all comes together. Cover with the lid or place the bowl inside of a large food-safe plastic bag (use a twist-tie, but make sure the bag “poofs” up over the bowl a few inches) and let it rise on your kitchen counter until doubled in size.
Now, you can “knock it back”, as Brits say (poke it until it collapses), cover again as above and refrigerate for up to two weeks, or you can use it right away. (Tip: Refrigerated dough is easier to handle.) You can use some of it right away, and keep the remaining dough in the fridge for other uses—that’s the beauty of this recipe!
If you are using refrigerated dough, there is you don’t need to bring the dough to room temperature before shaping—another plus! But your oven or pan must be hot, or at least heating up while you shape the flatbreads. Flatbreads can rise for a few minutes, but pizza should immediately be topped and placed in a very hot oven (500-550ºF).
TIP: I generally shape flatbreads on a piece of baking parchment spread over the surface I’m using, or on a silicone mat. You can get away with less flour that way. Parchment is handy because, if your dough sticks to it just cut away the excess around your flatbread and bake it with the parchment attached! It will come away just fine after baking. I generally top pizza dough which is on parchment and then transfer the pizza (using a pizza peel) to the hot pan or stone in the oven, parchment and all!
BASIC
FLATBREADS:
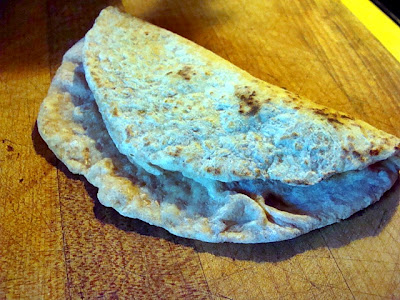
NOTE: Even though this is a yeast dough, you can use thin flatbreads like a
tortilla or sandwich wrap, or a stuffed bread.
Pinch or cut off 12 golf-ball-sized pieces of the dough for pita or flatbreads.
(For
larger wraps or flatbreads, cut into 12 equal pieces; OR for very thin
flatbread or cracker bread, cut into 22 pieces, approx. 1.5 or 1.6 oz. each.)
Roll them to less than 1/4” thick—they can be round, oval, or odd-shaped; it doesn’t matter!
For cracker bread, roll as thin as possible without tearing-- an oval shape about 8-inches long is good for these. (See Pita and Pizza entries below for tips and resources re rolling out the dough.)
Now, you “bake” them in a hot skillet on the stovetop on at a time.
They cook very quickly, so it doesn’t take long. (I often quickly make 2, 3 or 4 for lunch or breakfast with my refrigerated dough and it takes only minutes once you’ve done it a few times.) Flip them over for a minute or two if you want both sides to be more crispy.
To cook on top of the stove, heat a heavy cast iron skillet or griddle or hard-anodized skillet (9-12”) over high heat until the pan is very hot. (You can turn on your stove fan or open a few windows!)
Flip
one flatbread at a time onto the hot skillet and cook a minute or two, until
it’s bubbling up and has brown spots on the bottom. Flip it over and cook until
there are brown patches on the second side.
NOTE: You may have to turn the heat down on your stove, or adjust the heat as you go-- stoves vary. You don't want the breads to burn right away. After you've done a few, you'll know how to handle your stove next time!
Alternative method (I prefer this method for thin cracker breads.): You can bake several at one time like pita in the oven, but prick the dough all over with a fork before baking so the dough doesn’t puff up so much. Watch carefully so they don’t burn.
 |
| Rolling out thin dough for cracker bread |
If
you are eating them right away, you can brush or spray each bread with a little
olive oil (infused with garlic is yummy!) and sprinkle with any toppings you
want (see text above). If they are not to be used right away and you want to
keep them softened (for a wrap, perhaps), cool them in an open paper bag.
If you want them crisp, cool on baking racks.
If you want them crisp, cool on baking racks.
********
PITA:
See
this post for shaping and baking:
http://veganfeastkitchen.blogspot.ca/2006/08/5-foods-you-have-to-eat-before-you-die.html Important—don’t
stretch pita dough, just roll it.
If you don’t have a pizza stone, you can use a cast iron skillet or griddle. If you have neither, heat baking sheets in the oven and use those. Cool the pita in an open paper bag so that they stay flexible.
*****
PIZZA:
I generally roll or pat the dough into an
8" circle (on a lightly-floured piece of baking parchment or silicone
baking mat) and then use the weight of the dough to stretch it into a thinner, larger round by draping it over an over-turned mixing bowl. See this post for instructions and a photo, as well as baking instructions: http://veganfeastkitchen.blogspot.ca/2006/0/vegan-pizza-night.html Then I place the dough on
baking parchment which is sitting right on the pizza peel for topping.
To stretch the dough , you drape the dough over an over-turned bowl and gently stretch it until it is the right size, using the weight of the dough stretch it. Work slowly so that you don’t tear the dough. If it does tear, by some chance, you can patch it and seal it again. The pizza does not have to be absolutely round! You can use a rolling pin instead, but Neapolitans are of the opinion that stretching the dough rather than rolling it makes a flatter and less chewy crust.
Here’s a post with instructions for using a cast iron skillet or griddle to make great pizza: http://veganfeastkitchen.blogspot.ca/2011/10/cast-iron-skillet-pizza-perfect.html
******
BURGER
BUNS:
Divide the dough into 11 equal pieces
(about 3 oz. each). Fold down the sides of each pieces and pinch together on
the bottom to make a ball. On floured parchment, use the palm of your hand (oil
your hands first) to press each ball down flat. Now pick up the disc of dough
and turn it, holding the edges, so that it stretches a bit. Lay it down again
and press again.
What you are aiming for is a flat circle of dough about 4-inches across that is slightly concave in the middle.
Rise the buns made from refrigerated dough for about an hour on baking sheets lined with parchment and sprinkled with cornmeal or sesame seeds. When doubled, brush gently with soy or nut milk. Bake at 350 to 400°F (depending on how soft or crisp you want the outside of the buns) for 15-25 minutes. Cool on racks.
NUTRITION
FACTS:
Nutrition
(for 1 of 12 pita or flatbread): 152.5 calories;
17% calories from fat; 3.0g total fat; 0.0mg cholesterol; 285.3mg sodium;
164.0mg potassium; 28.4g carbohydrates; 4.7g fiber; 0.9g sugar; 23.8g net
carbs; 5.3g protein; 2.5 points.
Nutrition
(for 2 slices of one large pizza [cut into 6 ], crust only): 212.2 calories; 16% calories from fat; 4.0g total fat; 0.0mg
cholesterol; 379.8mg sodium; 224.9mg potassium; 39.8g carbohydrates; 6.6g
fiber; 1.2g sugar; 33.2g net carbs; 7.5g protein; 3.8 points.
Nutrition
(for 1 largish flatbread out of 8): 228.7 calories;
17% calories from fat; 4.4g total fat; 0.0mg cholesterol; 428.0mg sodium;
246.0mg potassium; 42.7g carbohydrates; 7.0g fiber; 1.3g sugar; 35.6g net
carbs; 8.0g protein; 4.1 points.
Nutrition
(for 1 of 11 hamburger buns): 166.3 calories; 17%
calories from fat; 3.2g total fat; 0.0mg cholesterol; 311.2mg sodium; 178.9mg
potassium; 31.0g carbohydrates; 5.1g fiber; 0.9g sugar; 25.9g net carbs; 5.8g
protein; 2.8 points.
Subscribe to:
Post Comments (Atom)


12 comments:
This looks so good. Will give it a go this weekend.
Have you tried adding white beans to this dough, and if so, how did it go?
in2insight, I did try it (had to add 1/4 cup more water, though) and it worked well, but I decided not to add it to the recipe because it's long enough already. It adds a few more calories, but more protein and fiber, too. However, I think I like the simplicity of this recipe.
This selection looks amazing Bryanna and Brunhilda (our 4 oven wood burning stove) is pretty much on 24/7 these days so we may as well take advantage of all that free cooking time and bake some of these gorgeous breads :) Cheers for tinkering and sharing :)
Sounds like a good plan! For lunch today, I just made a couple of wraps in a matter of minutes from refrigerated dough and did "fold-over" sandwiches stuffed with some simple bean and mushroom burgers I'm working on, sliced cooked sweet potato, cubed avocado, chipotle creme (tofu sour creme, lime juice, vegan mayo, and chipotles), and lettuce. Very satisfying!
Wow! Can't wait to try. Do you think I could cut out a bit of the oil?
Thank you for all your fab recipes!
Elizabeth, you can try it, but if you look at the nutrition facts, there is a very moderate amount of fat in each serving.
CORRECTION: in2insight, I answered you above as if I had posted the amounts for using beans-- I'm so sorry! You use 1 1/4 cup water and 3/4 cup beans instead of the 1 3/4 cups water.
Also, a little oil helps the dough stay flexible and prevents it from going stale so fast.
I just got this started...pizza tonight!
The potato flakes are listed in the ingredients, but not mentioned in the directions. I just added them when with the flour and salt. Thought you'd like to know.
Thanks as always for your great recipes! I'm also going to make some of your foccacia (with herbs added in) from World Vegan Feast. There are four kids and three adults in our household, and the foccacia is a favorite for everyone!
Oops! Thanks, Becky-- I'll fix that. I usually add it with the water, but it doesn't really matter.
Can I use Arrowroot or Cornstarch instead of the potato flakes? Thanks!
Potato is well-known for boosting rising, etc. in yeast doughs and is important here to make a light whole wheat dough. There is an option to use potato starch or potato flour in the recipe. If you have none of these, try about 1/3 up mashed cooked potato.
Post a Comment