Sunday, May 25, 2014
BIRTHDAY DINNER FOR BRENDA

 |
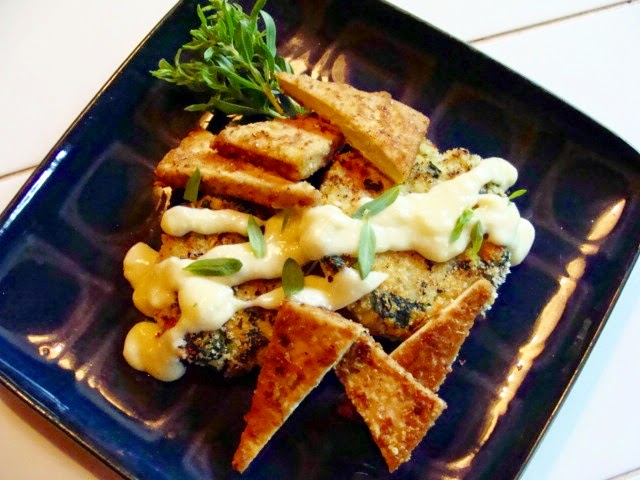
| Potato & Kale Cakes with Smoked Almond Breast of Tofu (Crispy Marinated Tofu Slices or "B of T") and Garlicky Vegan Hollandaise Sauce. |
 |
| Fettuccine and Roasted Vegetable Salad with Lemon Gremolata |
Last night we invited our friend Brenda over for a little birthday dinner. I had a couple of ideas (see photos above) for some new dishes that I wanted to try out and I thought they would be sufficiently interesting for this occasion. They turned out very well and Brenda enjoyed them (recipes below)-- I hope you'll let me know what you think of them.
***************************************
The cake:

For dessert, since it was just the three of us, I wanted to make a small, simple cake. I chose a moist chocolate "buttermilk" cake (also low in fat and made with whole wheat pastry flour) recipe that I had veganized from a recipe by Camilla Saulsbury in her delightful book "Enlightened Chocolate" (see this post). My vegan version of the recipe is here. I know that Brenda likes icing, but I was almost out of powdered sugar, so I decided to veganize another recipe from Camilla's book-- a chocolate sauce with marmalade in it. My version went like this: Mix 1 cup soy or nut milk with 6 tablespoons orange marmalade in a heavy-bottomed saucepan and bring to a simmer, whisking the whole time. Remove from heat. Add 3 oz. semi-sweet chocolate, chopped, and 2 T. unsweetened cocoa. Whisk until smooth. Whisk in 1 T. orange liqueur (I didn't have any, so I used some dark rum). Refrigerate until ready to use.
I drizzled this over the cake (over which I had sifted what was left of my powdered sugar) and added a sprinkle of grated orange zest. It was delightful- tasting much richer than it actually was.
************************************************
Printable Copy
BRYANNA’S POTATO & KALE CAKES WITH SMOKED
ALMOND “BREAST OF TOFU” AND GARLICKY VEGAN “HOLLANDAISE” SAUCE
Serves 6
Make-Ahead Notes: All of the components can be made ahead of
time, but the potato cakes should only be formed and refrigerated—brown them at
the last minute. The “B of T” and the
Sauce can be made earlier and gently reheated. The cooled mixture may be reheated gently, as
well. (You may have to add a bit more
nondairy milk and whisk briefly.)
PS:
Leftover Potato & Kale Cakes are great for breakfast!
RECIPE COMPONENTS:
SMOKED ALMOND “BREAST OF TOFU” (B
of T):
The recipe for “Breast of Tofu”/Crispy
Marinated tofu is at this link. For this recipe you will need 18
to 24 slices of the marinated tofu from that recipe (depending on the appetites
of your guests).
For the tofu coating, mix 1/2 cup of the Seasoned Flour (included in Breast of Tofu recipe) with 1/2 cup hickory-smoked almonds, ground fairly fine in a dry blender.
For the tofu coating, mix 1/2 cup of the Seasoned Flour (included in Breast of Tofu recipe) with 1/2 cup hickory-smoked almonds, ground fairly fine in a dry blender.
Cook the coated tofu slices as directed in
the B of T recipe either for the Crispy Oven-Fry method
or the Crispy Slices method. They
can be made ahead and reheated in the oven just before serving, if you like.
GARLICKY VEGAN HOLLANDAISE SAUCE:
My recipe
for Vegan
Hollandaise Sauce is here. Add 1 to 4 garlic cloves, pressed
to the basic mixture. For a spicier variation,
add some minced chile chipotle in adobo sauce (to taste—err on the side of
caution to begin with) to the Hollandaise.
POTATO & KALE CAKES:
1 1/2 lbs. Yellow-fleshed potatoes, such as Yukon
Gold, peeled and cut into 1-inch cubes
4 cups (packed) tender
kale leaves (stripped off stems)
4 cloves garlic,
pressed
1/2 cup panko or dry
breadcrumbs
1/2 cup Daiya vegan cheese shreds (your choice)
1 tablespoon whole-grain Dijon mustard
1/2 tsp. salt
plenty of
freshly-ground black pepper
Optional: panko breadcrumbs for coating
GARNISH: Fresh herb leaves, such as marjoram, savory,
tarragon, or snipped chives or parsley.
To make the Potato & Kale
Cakes, boil, steam or
microwave the potato cubes until tender, but not mushy. NOTE: This amount of potatoes microwaves nicely in
a 2 qt. covered casserole with no water. 10-12 minutes on high
should do it. This method saves a lot of
energy compared to stove-top cooking, and also saves nutrients, since none are
lost in the boiling water.
While the potatoes
cook, bring 1 qt. water to a boil (you can use your electric kettle to save
energy and then dump it into a cooking pot). Add your kale leaves, stir around, cover and
let sit for about 5-10 minutes. (This is called “passive boiling”.) When they are sufficiently soft, drain in a
colander and rinse with cold water until you can handle them. Squeeze the kale
until you get as much water out as possible.
Chop the cooked kale quite small with a sharp knife. (Pat the squeezed kale down on your cutting
board and slice the mass into about 1/4-inch (or less) slices going in one
direction, then do the same in the other direction. Use your fingers to loosen up the mass.
When they are done, drain
the potatoes, if necessary, and place back in the cooking pot or
casserole. Mash with a potato masher (a
few lumps are okay). Add the chopped
kale, pressed garlic, panko or other breadcrumbs, Daiya shreds, mustard, salt
and pepper. Mix well.
Form the mixture into
12 equal balls. To form the cakes, press
the balls into about 2 1/2-3-inch patties, smoothing the edges. If you like, coat them lightly with panko crumbs.
These can be
refrigerated for several hours before cooking, if you like.
When ready to serve, spray
a large non-stick or cast iron skillet with oil from a pump-sprayer and heat
over medium-high heat. Add the cakes
(you’ll probably have to cook about 6 at a time, unless you have 2 skillets)
and fry until the bottoms are golden to brown.
Spray the tops with a bit more oil and carefully turn them over. Cover and cook until the other side is
golden-brown. If you are cooking them in
batches, keep the cooked cakes hot on a cookie sheet in a pre-warmed oven.
To serve the Potato & Kale
Cakes with Smoked Almond “Breast Of Tofu” and Garlicky Vegan “Hollandaise”
Sauce: Have all three components (B of T, Potato
& Kale Cakes, and Hollandaise) ready and kept warm. For each serving, place 2 Potato & Kale
Cakes on a warm plate, slightly over-lapping.
Cut the B of T slices into wedges (see photos) and arrange artistically
over or around the cakes. Drizzle with
some of the Hollandaise Sauce (save some to serve on the side), and add your
garnish. Serve immediately.
*****************************************************************
 |
| Fettuccine and Roasted Vegetable Salad with Lemon Gremolata (this a serving of the salad the day after, with chickpeas added) |
BRYANNA’S FETTUCCINE & ROASTED VEGETABLE
SALAD WITH LEMON GREMOLATA
Serves 6
The Lemon Gremolata
makes a savory, crunchy topping that is a good contrast to the silky pasta and
roasted vegetables. The salad can be made ahead but is best at room
temperature.
PS: The day after I
made this, I added some cooked chickpeas to the leftovers for a full-meal
salad.
8 oz. dry fettuccine
pasta
8 oz. broccolette (or
broccolini)
1 medium onion, thinly-sliced
2 medium red bell
peppers, seeded and thinly-sliced
6 oz. cremini
mushrooms (the brown ones), sliced
Olive oil
Salt
Vinaigrette:
(Makes about 1 cup + 6
tablespoons—save any leftover for other salads)
1/4 cup olive oil
1/4 cup red wine
vinegar
1 tablespoon balsamic
vinegar
3/4 tablespoon Dijon
mustard
3/4 tsp. salt
1-3 cloves garlic,
pressed
Freshly-ground black pepper
to taste
Lemon Gremolata:
1/2 cup panko breadcrumbs
1/2 tablespoon olive
oil
The zest of 1 organic
lemon
1 tablespoon vegan
parmesan sub (I like Go Veggie! Soy Parmesan)
A few sprinkle of salt
and freshly-ground black pepper to taste
Optional: chopped chives or parsley
To prepare the fettuccine, break the strands in half and boil in hot
salted water for 8-10 minutes, or until al dente. Drain, and rinse with cold water. Set aside. (Energy-Saving Note: Boil
water in an electric kettle and pour into the pot. Add salt.
Add the broken fettuccine. Bring to
a boil—this will take only seconds. Immediately
turn off the heat, cover and set the timer for 10 minutes. Drain and proceed as directed above.
To roast the vegetables, heat the oven to about 450°F. You can do this
while the fettuccine is cooking and you are preparing the vegetables. If you use broccolette, you will have to cut
the fatter stalks lengthwise so that all of the pieces are of similar
thickness. Mix together the broccolette or broccolini and the onion on one
baking sheet, and the mushrooms and peppers on another. Sprinkle or spray the vegetables (both pans)
with olive oil—just enough to coat them lightly; they shouldn’t be drenched in
oil—and salt lightly. Roast for about
10-15 minutes, or until softened and getting a little charred. Remove from the oven.

In a serving bowl, mix
the cooked, drained fettuccine and both pans of roasted vegetables.
For the vinaigrette, whisk
or shake together all of the ingredients.
Measure out 3/4 cup of the vinaigrette and toss with the salad
ingredients.
To make the Lemon Gremolata topping, heat the 1/2 tablespoon oil in a small non-stick
or cast iron skillet over medium-high heat.
Add the panko and stir for a couple of minutes, or just until they start
to brown. Remove from the pan to a small
bowl immediately. Mix in the remaining
ingredients.
To serve the salad, divide between 6 shallow bowls and top with
some of the crunchy Lemon Gremolata.
Enjoy!


Saturday, May 17, 2014
NEVER EATEN YUBA? HERE'S A TASTY WAY TO TRY IT-- MALAY-STYLE YUBA & DAIKON CURRY
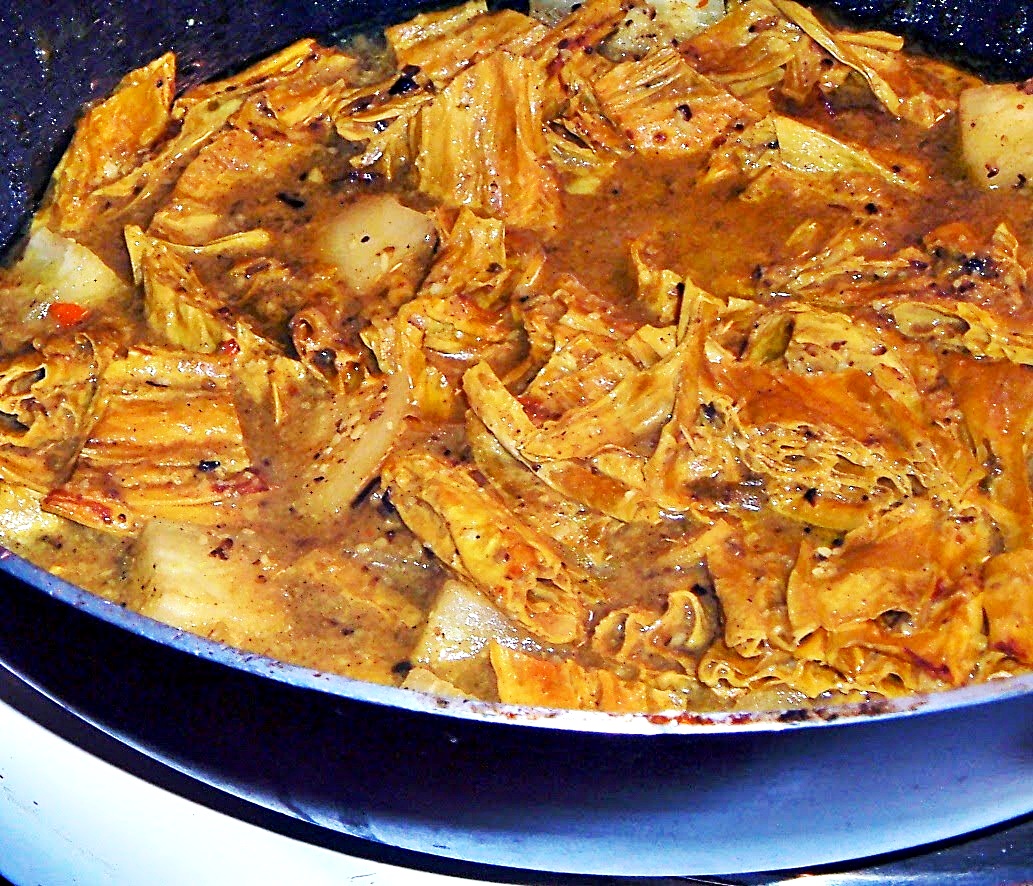
You may have seen the other yuba recipes I have shared on this blog. (See below for recipe links.) This recipe is quite different from both the Chinese "Buddha's Roast Duck" and the two European-style stews (one with a Peruvian flair). It's a recipe I developed for my now defunct vegan cooking newsletter, inspired by some Malaysian food I enjoyed in a Portland restaurant-- rich and spicy.
I love yuba-- it's a very versatile and satisfying food. I hope you'll give it a try after you've read the information below and checked out the recipe. Fortunately, you don't have to live in a city with a large Asian population anymore in order to source dried yuba sheets and sticks. These products, and most of the other more unusual ingredients required for a recipe like this, are available online (see links in recipe ingredient list) and in Asian grocery stores, and, more recently, in many large supermarkets, as well-- check the "International" aisle.
YUBA PRIMER: Yuba (also called “bean curd skin” or tou-p'i, doufu-p'i or doufu-i) is considered a delicacy Japan, but is a much more common food in China and Taiwan, where each city will have a number of shops or market stalls selling only bean curd skin and products made from it. It is made by simmering soymilk and lifting off the "skin" that forms on the top, just like that on dairy milk. This "skin" can be used fresh, or is dried in sheets or rolled-up "sticks". The sticks are used in soups, stews, and stir-fries, and can also be barbecued. The sheets, either fresh or dried and soaked, can be cut up like "noodles", or used in soups, stews, and stir-fries as well. They can be rolled around fillings and baked, steamed or fried for delicious appetizers, or used as a crispy "skin" around vegetarian poultry substitutes.
Fresh sheets are also available in large cities in Chinese tofu shops, and must be frozen for future use. They often come in 16"-diameter round sheets, or semi-circular sheets. These are sometimes labeled "Fresh Spring Roll Skins or Wrappers", but are not to be confused with the wrappers made from flour. The package will tell you that the ingredients are only soybeans and water. Some varieties are very thin, some are as thick as canvas. The sheets are folded into many forms and sizes to make rolls and stuffed pouches, or molded and steamed.
I refer to this product by its Japanese name, yuba, because it is shorter, is becoming more universally accepted (like tofu instead of “bean curd”), and is less confusing than the various English translations from the Chinese, such as "bean milk sheets", "pressed tofu", and other confusing monikers. Yuba is a very concentrated, rich-tasting soy food. The dried version, available in Asian markets and some large supermarkets, must be soaked in warm water before using.
Yuba products and probably usually available in Asian grocery stores, large supermarkets (in the "international" aisle), health food stores, and some delis and bulk food stores). You can order dried yuba products online, too. Amazon carries them, but the prices that I just checked today (May 17, 2020) are outrageously expensive!
Yuba products and probably usually available in Asian grocery stores, large supermarkets (in the "international" aisle), health food stores, and some delis and bulk food stores). You can order dried yuba products online, too. Amazon carries them, but the prices that I just checked today (May 17, 2020) are outrageously expensive!
SOAKING: Dried yuba MUST be soaked before it's cooked, so don't skip that step. The sticks need to be soaked an hour or two, in warm water; the sheets about 10 minutes. I have never experienced sheets not becoming flexible in that amount of time, but the sticks often have certain spots in them (usually where they were bent) that never get flexible. If you are deep-frying them, it doesn't matter. If not, just cut those parts off and discard.
(It's possible that really old yuba [like really old dried beans] won't ever rehydrate well. Try to go to a store that has a decent turnover.)
The Chinese have used amazing ingenuity to create "mock meats" using yuba. In Chinese yuba shops you will find replicas of chickens, ducks, fish, hams, rolled meats, sausages links, etc., all made primarily from yuba. These dishes, with names such as Buddha's Chicken or Buddha's Duck, as served on cold plates at fine restaurants or family banquets.
Here is a history of yuba.
OTHER YUBA RECIPES I'VE POSTED:
Buddha's "Roast Duck"
Buddha's "Roast Duck"
 |
| Dried Yuba sticks |
BRYANNA'S MALAY-STYLE YUBA (BEAN CURD
SKIN) AND DAIKON CURRY
Servings: 4
This
is even better a day after making it, and a great new way to serve yuba. If you haven’t used yuba before, please read all the information in the "Yuba Primer" in the text above.
1
pkg. (6 oz.) Chinese yuba (dried bean curd skin) "sticks" (See the "Yuba Primer" above.)
2
Tbs peanut oil or other neutral-tasting oil
PASTE INGREDIENTS:
2
small red hot chilies, fresh or dried, seeds removed
2
cloves garlic, crushed or chopped
2
green onions, chopped
1
Tbs grated fresh ginger
1
tsp galangal powder (or 1 cm. piece galangal root) (This is a rhizome related to ginger, available in Asian grocery stores.
Omit if you can’t find it.)
1
tsp turmeric
zest
of one organic lemon, grated OR 1 stalk lemon grass, smashed
1/2
Tbs tamarind paste (also called "concentrate")
1/4
cup coconut cream (in block form-- amazon.com carries it, including organic varieties, and so does amazon.ca and most Asian grocery stores, health food stores, large supermarkets, and some delis and bulk food stores)
2
1/2 cups vegetarian "chicken-style" broth (liquid measure)
6-8
oz daikon radish, peeled and cut into small chunks (Most large supermarkets sell this now, and any Asian grocery store will.)
ADDITIONAL:
1
tsp brown sugar
1/2
tsp salt
OPTIONAL:
If
you like more heat, add some chopped green chilies.
Soak
the yuba in a large bowl of hot water until it is flexible. Drain and cut it
into 1" pieces, discarding any hard bits.
 |
| Soaked yuba sticks |
 |
| Soaked yuba sticks cut up for a stew |
Grind
together the Paste Ingredients in a food processor.
Heat
the oil in a deep skillet, stir-fry pan or wok. Add the ground Paste ingredients,
along with the lemon zest or lemon grass stalk. Sauté until fragrant. Add the
drained yuba and stir to coat. Add the daikon, broth, tamarind, and coconut
cream and stir well. Cover and simmer over low heat for about 15 minutes. Add
the sugar and salt and simmer about 5 more minutes. Serve with steamed rice.
Enjoy!
Thursday, May 8, 2014
EATING OUT IN VANCOUVER AND A RECIPE FOR ARTICHOKE-STUFFED MUSHROOMS
.JPG) |
| Brownies with bobble-y antennae on the ferry to Vancouver It's been two weeks since I blogged-- sorry about that! We went to Vancouver for the first time in a year (!!) to visit friends and relatives for a few days, and since then I've been playing catch-up in the house and practicing with my dance class for a little show. We ate very well in Vancouver (as usual)-- Vancouver is known for its wonderful and varied restaurants. We stayed with my cousin Chris and his partner Roxanne at their lovely little house in the East End. Chris is a retired landscaper, as you can see: |


.JPG)
.JPG)
.JPG)
.JPG)
When we first arrived, we all (along with my stepson Laurence) headed for Banditas Tacqueria, a funky vegetarian place on The Drive (Commercial Drive)-- delicious homemade ginger beer there, too.

.JPG) |
| Fabric art show on the walls at Bandidas |
.JPG) |
| Vegan soft taco sampler plate that I had (Roxanne, too)-- these are five of the 6 vegan fillings, all delicious. (I forgot to take the picture until after I'd already eaten one!) |
Here are all the fillings-- very original-- I couldn't decide which one was my favorite!
MR.
B’S: Roasted potatoes, caramelized onions, pinto beans, cheese, sour cream,
& roasted salsa (Daiya vegan cheese
is available.)
CONNIE’S:
Walnuts ground, apple salsa , cheese & roasted red pepper sauce.
WOLF
& GOAT: Fresh guacamole, purple cabbage, pinto beans, fresh red salsa,
cheese & sour cream. (Daiya vegan cheese
and house-made vegan sour cream are available.)
LEONA
GAYLE: Smoky-sweet chipotle tofu (organic), pinto beans, cheese, roasted red
salsa, romaine lettuce & sour cream. (Daiya vegan
cheese is available.)
STELLA:
Kale, roasted red pepper salsa, pinto beans, cheese, & sour cream. (House-made vegan sour cream is available.)
RONNY
RUSSELL: Roasted yams and onions, fresh guacamole, black beans, green salsa,
purple cabbage & toasted pumpkin seeds.
****************************************
On Saturday, after a morning visit with my sister Karin and BIL Allen, we went with Chris to have lunch with some Denman Island friends, Sarah and Gordon, who have moved to the lower mainland. We had a wonderful visit and a lovely meal at Tamam Restaurant. It's a great place to go with a mixed group (vegan and non-vegan) because there are lots of vegan items, and items that can be made vegan. (Vegan and vegetarian items are marked with a leaf icon on the menu.) Very friendly and everything is made fresh-- and the homemade lemonade was amazing!
.JPG) |
We all shared freshly-made and smooth-as-silk Humus
& Matabal (roasted eggplant & tahini), a spicy green pepper sauce and
olives with pita
|
.JPG) |
My main course was Mujadarah: rice, lentils and roasted onions and salad. his is one of my favorite Middle Eastern dishes. Yummy!
|
.JPG) |
| Sarah and Gordon and my DH Brian has the Vegan
Stuffed Fresh Cabbage Rolls with salad-- delicous! (I had a taste.) ************************************************** We ate in on Sunday-- my youngest daughter Justine and her partner George and my youngest grandson Logan came for breakfast, along with my stepson Laurence. Justine brought delicious whole wheat vegan banana muffins, Roxanne made a beautiful fruit salad, we had sourdough bread from a Granville Island bakery, and also a lemon cranberry tea loaf that my sister had brought to us. For the main dish, I made five vegan onion, red and orange pepper and vegan "ham" Spanish potato tortillas (like fritattas/baked omelets) from my book "World Vegan Feast")    
We had so much food left over that we enjoyed the leftovers for another casual meal in the afternoon with DH's stepdaughter Barbara and her husband Mehdi.
********************************************
Our last meal in Vancouver was breakfast with my 2nd oldest granddaughter Kate at the Wallflower Modern Diner on Main St.. Kate grew up on Vancouver Is., but she is studying at Langara College in Vancouver and she's flourishing in the big city.
The Wallflower Modern Diner is another great place for a meal with a mixed crowd. They have several vegan items for breakfast, lunch and dinner, but they are not run-of-the-mill. ( Check out the menu here. ) The vegan dishes are flavorful and interesting, and we plan to go there again.
.JPG) 
My granddaughter Kate at the Wallflower Modern Diner.
.JPG)
I had the Vegan Benny with salad and hash browns-- English muffins topped with grilled portobello mushroom, marinated tofu, and vegan cheesey sauce. Yum!
Thanks to Roxanne and Chris for a great visit and for being such wonderful hosts, as always!

*************************************
I didn't want to end this post without a recipe, so I'm posting this old favorite. The cremini mushrooms we've been getting lately are big and firm-- perfect for this dish. (Sorry, the photo didn't turn out!) PS: This is not the usual calorie-laden "spinach and artichoke dip" type of stuffed mushroom. It's simple, but scrumptious.
Makes 4 main dish servings These sumptuous morsels make great appetizers, too (enough for 12 appetizer servings) MAKE-AHEAD NOTE: You can stuff the mushrooms ahead of time, cover and refrigerate them until just before baking and serving. approximately 1 1/2 pounds stuffing mushrooms, white or brown (NOTE: I use mushrooms about 1 to 2 inches across for appetizers and 3 to 4-inch ones for main dish servings.) 1/4 cup finely-chopped onion 2 cloves garlic, crushed 1/4 cup low-sodium vegetarian broth or dry white wine (can be non-alcoholic) 1/2 cup fresh whole wheat bread crumbs (1 slice) 14 ounces frozen or canned artichoke hearts, drained and chopped (NOTE: If you only have marinated artichoke hearts, place them in a colander and rinse them thoroughly with hot water to eliminate most of the oil and vinegar. Drain well.) 3 green onions, chopped 1/4 cup soy parmesan (I use GoVeggie! soy parmesan, which used to be Galaxy Vegan, but use your favorite) 1/2 cup lower-fat vegan mayonnaise (I use my homemade version or homemade Tofu Mayo, but you could use Spectrum Naturals Light vegan mayo or Reduced-Fat Vegenaise.) 1/4 teaspoon salt freshly-ground black pepper to taste Panko breadcrumbs for topping Clean the mushrooms gently with a damp cloth. Remove the stems. Chop and reserve the stems. Steam-fry the mushroom stems, onion, and garlic in a large heavy nonstick skillet sprayed with oil from a pump sprayer, until soft, adding a squirt of water or white wine as needed to keep it moving. Add the broth or wine and cook until the liquid evaporates. Stir in the bread crumbs. Remove the mixture from heat and let it cool. Combine the onion-bread crumb mixture in a medium bowl with the chopped artichokes, green onions, soy parmesan, vegan mayonnaise, salt, and pepper. Fill each mushroom cap with the filling so that it’s gently mounded. Arrange the stuffed mushrooms, just touching, in a shallow baking pan which has been sprayed lightly with oil from a pump sprayer. (At this point, you can cover the mushrooms with plastic wrap and refrigerate until ready to bake.) When ready to serve, preheat the oven to 350°F. Sprinkle the stuffed mushrooms with a little of the panko breadcrumbs (for crunch) and spray with a little oil from a pump sprayer. Bake the mushrooms for 12-15 minutes, or until golden. Serve hot. Nutrition Facts: Nutrition (per serving): 144.4 calories; 9% calories from fat; 1.1g total fat; 0.0mg cholesterol; 448.8mg sodium; 534.1mg potassium; 21.4g carbohydrates; 6.7g fiber; 2.5g sugar; 14.8g net carbs; 7.6g protein; 2.2 points. Enjoy! |
Thursday, April 24, 2014
OUR ENERGY-SAVING EXPERIENCES; + ONE-POT CHEESEY FARFALLE (BOWTIE PASTA) WITH ASPARAGUS & SOY CURLS
 |
| One-pot Cheesy Farfalle (Bowtie Pasta) with Asparagus, Zucchini & Soy Curls, recipe below |
I must apologize for not posting much lately. I seem to be suffering from bouts of IFS. I was just thinking of it as "Internet fatigue", but, apparently, it has a name already-- Information Fatigue Syndrome. So, I've been curtailing some of my Internet activities and reading actual books.
But I have not been totally inactive. Actually, my husband and I have been (and still are) on a mission-- to use less energy in our home. And, in two weeks, we have lowered our energy consumption by 40%! (This is according to our BC Hydro website, our provincial electrical company, where we can see our monthly, weekly and daily electrical consumption.)
So far we have lowered our energy consumption by:
**Turning the water heater down to 120 degrees F
**Using only cold-water wash and rinse in our front-loader washing machine
**Hanging laundry to dry (outside, or inside on racks + one line) and only using the dryer on medium heat for short time to fluff up towels or get out the wrinkles
**Turning off the power bars for electronics at night and unplugging the laptops
**Putting the laptops in sleep mode between uses during the day
**Being very careful about not turning on so many lights in the house
**Taking short showers and not necessarily every day (bring back the old-fashioned "sponge bath" on some days)
**Turning the water heater down to 120 degrees F
**Using only cold-water wash and rinse in our front-loader washing machine
**Hanging laundry to dry (outside, or inside on racks + one line) and only using the dryer on medium heat for short time to fluff up towels or get out the wrinkles
**Turning off the power bars for electronics at night and unplugging the laptops
**Putting the laptops in sleep mode between uses during the day
**Being very careful about not turning on so many lights in the house
**Taking short showers and not necessarily every day (bring back the old-fashioned "sponge bath" on some days)
Note: we don't heat with gas or electricity-- only wood-- and our house is very tight, so we are lucky that heat is not wasted.
But we also discovered that many savings can be made in the kitchen. For instance:
**Not OVER-preheating the oven before use
**Using the "Eco-Wash" cycle on the dishwasher and turning off the heat-dry option
**Not running hot water without really thinking about it-- You can rinse dishes for the dishwasher in cold water, and wash out the sink and wash your hands with cold water and soap. When I do use hot tap water now, I'm very concious of it and don't waste it down the drain. I use the electric kettle to boil water for cooking.
**Not running hot water without really thinking about it-- You can rinse dishes for the dishwasher in cold water, and wash out the sink and wash your hands with cold water and soap. When I do use hot tap water now, I'm very concious of it and don't waste it down the drain. I use the electric kettle to boil water for cooking.
** Cooking several things in the stove oven at once, if we must use it; otherwise using the little counter-top oven.
**Using the microwave for making sauces, puddings, etc., and sweating vegetables for soup and other dishes; for steaming veggies in their own juices, with no added water; making risotto, and many other tasks.
**We found out that our electric stove burners use alot of energy. So, I'm now utilizing my small appliances more frequently (pressure cooker--mine is electric-- and slow-cooker; electric frying pan; electric kettle; microwave [which can save up to 80% of the energy used to heat in a stove]; and our small counter-top oven.)
When I do use the stove burners I turn the heat down as low as I possibly can while still completing my task properly, and I turn the burner off slightly before the dish is finished, utilizing the residual heat.
When I do use the stove burners I turn the heat down as low as I possibly can while still completing my task properly, and I turn the burner off slightly before the dish is finished, utilizing the residual heat.
**What more can we do in the kitchen? We plan to replace our ancient chest freezer as soon as we can afford to, and I'm
looking into getting an induction burner plate for stir-frying, etc.
I've also been experimenting with some different cooking methods, especially to avoid boiling pots of water. For instance, when we felt like having mashed carrots and potatoes (a favorite of DH) I cut the potatoes in chunks and the carrots in smaller pieces and pressure-cooked them together, using only 1/2 cup water, in 8 minutes. Perfect!
These days, our preferred method of cooking pasta is this: Bring a pot of water to a boil-- but not as much water as you might be used to. I use about 2 qts. for up to a pound of pasta, and I bring the water to a boil in an electric kettle, then pour it into the pot before turning on the heat. When it comes back to a boil, add your pasta, bring back to a boil, stirring a bit, turn the heat off, cover and let stand for 8-10 minutes or so. (Spaghettini will take 8 minutes, other pasta, such as rotini or other shapes will take 10.) Drain and serve as usual. Trust me-- this works beautifully! The pasta is tender but al dente and there is no stickiness.
 |
| Gemelli pasta cooked by the no-boil method in the paragraph above. |
Another energy-saving pasta-cooking method (can you tell that we like pasta?) is the self-saucing one-pot method. I first heard about this about a year ago and I was intrigued by Martha Stewart's recipe for a recipe from the province of Puglia inItaly, in which all of the ingredients, including the dry pasta, are cooked in a pot together with water for about 9-10 minutes (I used vegetarian broth in mine, of course) until the pasta is al dente and a creamy sauce results.I used tagliatelle nests instead of linguine. The dish was quite tasty-- we sprinkled it with Go Veggie! soy parmesan (which used to be Galaxy Vegan).
 |
| My version of Martha Stewart's One-Pan Pasta, before cooking. |
Anyway, I should get to bed-- work tomorrow! But I'd be interested to hear your energy-saving kitchen ideas and explorations.

BRYANNA'S ONE-POT CHEESY FARFALLE (BOWTIE
PASTA) WITH ASPARAGUS, ZUCCHINI & SOY CURLS
Serves 4
A quick,
self-saucing one-dish meal, and only one pot to clean!
1 tablespoon
olive oil
4 cloves
garlic, chopped
3 cups
"chicken-y" vegan broth (I like Better Than Bouillon Vegan “No-Chicken” base)
1/2 lb. (8
oz) farfalle (bowtie pasta)
2 cups reconstituted Butler Soy Curls (see this post for info) or other sliced vegan chicken sub
1 tsp dried basil (or some chopped fresh, if you have it)
2 cups reconstituted Butler Soy Curls (see this post for info) or other sliced vegan chicken sub
1 tsp dried basil (or some chopped fresh, if you have it)
8 stalks
asparagus, trimmed and cut into 1-2” pieces
2 small zucchini, sliced into 1/4-inch-thick "coins"
12
red grape tomatoes, halved
3
green onions, thinly-sliced
1/2 cup
vegan mozza cheese shreds (I used Daiya)
1/4 cup
vegan parmesan sub (I used Go Veggie! soy parmesan)
freshly-ground black pepper

In a large
heavy pot or skillet, heat the oil over medium-high heat. Add the garlic and sauté briefly—do not brown
the garlic. Add the broth, pasta, Soy
Curls and basil. Increase heat and bring to a boil, then immediately reduce
heat to a simmer, cover and cook for 8 minutes. Add the asparagus and zucchini, cover
again and cook for 5 minutes. Add the tomatoes, green onions and the vegan
cheeses. Toss gently, grind pepper over
the dish and serve immediately.
Nutrition Facts
Nutrition (per
serving): 405.1 calories; 21% calories from fat; 9.8g total fat; 0.0mg
cholesterol; 1696.0mg sodium; 427.0mg potassium; 60.8g carbohydrates; 5.6g
fiber; 4.5g sugar; 55.2g net carbs; 19.3g protein.
Enjoy!
Wednesday, April 16, 2014
FARINATA (ITALIAN CHICKPEA FLOUR "PANCAKE") WITH VEGETABLE TOPPING FOR DINNER

NOTE: Apologies for my lack of posting and this short post! I'm trying to get ready for Easter company and I have a knee that's acting up, so I'm not getting as much done as I would like. I'll post a proper post very soon!
HAPPY EASTER AND HAPPY PASSOVER/PESACH!
Above is a photo of our dinner the other night-- Farinata (Italian chickpea flour "pancake") with a topping of lightly sautéed veggies and a bit of vegan cheese, accompanied by roasted cauliflower. This is one of my favorite dishes. The recipe for the basic Farinata (and some history, too) is at this post on my blog (and it's in my book "Nonna's Italian Kitchen"). It is far more delicious than the simple ingredients might suggest. The modern way to eat this very old peasant dish is to use toppings on the already-baked farinata, a bit like pizza (it doesn't taste like pizza, though). Personally, I like vegetable toppings, cooked ones in colder weather, raw or cooked ones at room temperature in warmer weather. You can let your imagination run wild, but I think less is more in terms of number of ingredients.
The topping in the photo (added AFTER the 10 minute baking and then pop it under the broiler or into a very hot oven to melt the cheese) was a combination of thinly-sliced onion, chopped brocolette, thinly sliced baby zucchini, and some organic oven-dried Roma tomatoes from a jar (they are from Costco, Kirkland brand, and contain herbs and oil-- I rinse much of the oil off them in a strainer before using), along with some basil and about 4 cloves of garlic, slivered. I added a bit of vegan parmesan and sprinkled a handful of Daiya mozza shreds on top (but you could use whatever type you prefer).
Honestly, it's such an easy, inexpensive meal and so very nutritious and delicious! DH is crazy about this!
PS: I usually make this in a 14" round pizza pan, but I this time made it in my little Cuisinart countertop oven (energy-saving!), so I used the 12" square pan that comes with the oven, lined with parchment.
Do give this a try!

Enjoy!
Monday, April 7, 2014
MOIST AND DELICIOUS WHOLEGRAIN PEANUT BUTTER-BANANA BRAN MUFFINS

This recipe is an old one in our house-- I developed it for my book "The Fiber for Life Cookbook", published back in 2002. Nothing fancy, but nutritious and delicious. My granddaughter has been enjoying them today, too. No need for butter on these-- just a little of your favorite jam!

Printable Copy
BRYANNA’S
PEANUT BUTTER-BANANA BRAN MUFFINS (can be soy-free)
Makes
12
All you need is a little jam or jelly on
these delicious and healful muffins.
ALLERGY NOTE: If you are allergic to peanuts, use any other
favorite nut butter instead. And I’m sure they would work well with a whole
grain GF flour mix, too.
DRY
MIX:
1 1/2 cups whole wheat pastry flour
1/2 cups wheat bran
2 tsp. baking powder
1/2 tsp. salt
WET
MIX:
2 tablespoons flax seeds blended with 1/2
cup water until “gloppy”
1 cup mashed ripe banana (about 2 medium)
1/2 cup packed brown sugar
1/2 cup chunky natural peanut butter
(nothing added)
1/2 cup non-dairy milk
Preheat the oven to 375 degrees F. Oil 12 muffin cups.
In a medium bowl, mix together the Dry Mix
ingredients.
After blending the water and flax seeds together until “gloppy” in your blender, add the remaining Wet Mix ingredients and blend again briefly.
After blending the water and flax seeds together until “gloppy” in your blender, add the remaining Wet Mix ingredients and blend again briefly.
Pour the Wet Mix into the Dry Mix and stir
briefly, just to mix. Spoon the batter
equally between the muffin cups. Bake for
about 20 minutes, or until they test done.
Loosen the muffins carefully with a table
knife and turn them on their sides.
Place the muffin tin on a rack, cover the muffins with a clean tea towel
and cool for a few minutes before serving.
Cool thoroughly before storing in a plastic bag or rigid plastic
container. These muffins freeze well.
Nutrition
per muffin: 192 calories; 6 g fat; 4.6 g fiber; 29
g carbohydrates; 7 g protein; 179 mg sodium.
Enjoy!
Subscribe to:
Posts (Atom)