Sunday, September 24, 2006
RED LENTIL/TOFU CURRY, FAMILY PHOTOS & WHAT WE'VE BEEN EATING THIS WEEK


The above picture is a portrait of my Peruvian (paternal) grandmother, Clotilde Roncagliolo de Urbina, painted in the 1950's by my mother, Eve Tonge Urbina. I have it hanging on my wall, but one of my Peruvian cousins recently asked for a copy of it, which is why I took a photo of it. My mother was a professional portrait artist and her father, Gilbert Tonge, was a well-known California artist and muralist.
Spice Island Vegan, who has met my mother, wondered what my mother looked like when she was young (see photo of her now, at age 88), so I'm adding (Sept. 25) a photo I came across recently of the Urbinas when my family visited Peru in 1954. I believe this was taken at Christmas.

My parents are on far right of the picture, my father, Alejandro, standing, and my mother sitting in front of him (she's very obviously the non-Peruvian!). My grandmother is in the very center, holding a baby (I don't know who this was). I (age 6) am in the second row, third from the left, with barrettes in my hair; my sister Karin (age 7) is in the first row, far right.

Our sister and brother kitties, Tina and Ringo. Ringo looks oh-so-dignified, doesn't he?
Now for the food...I'm not going to tease you with more newsletter stuff, which is mostly what I have been cooking. Below are photos and descriptions of some of the more simple meals we've been having this week:
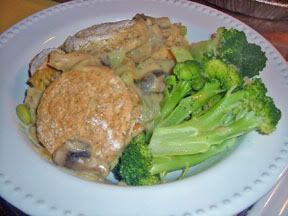
Chikn Pot Pie
This is a recipe from the Dec 04/Jan 05 Vegan Feast newsletter, but I used a biscuit topping-- actually, plain version of the scone dough I posted here. I used only 1 T. sugar, and no additions except a tsp. of dried basil.
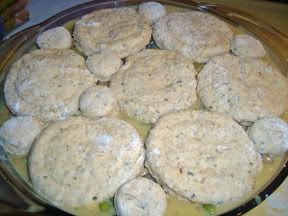
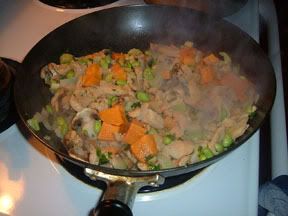
The filling consists of SoyCurls, which are tender TVP-like morsels made from the whole soybeans (and they really have the taste and texture of chicken), with a creamy gravy, green soybeans, sweet potato, etc.. The original recipe calls for fennel and leeks, but I didn't have any, so I used celery and onion. It was still good!
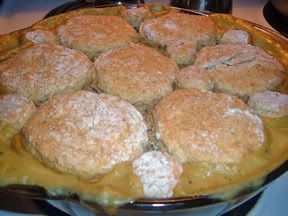
Actually, my husband goes nuts over it!
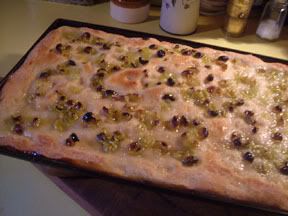
Grape Focaccia
This is a recipe from the Oct/Nov 04 Vegan Feast newsletter, but you don't really need a recipe. I happened to be making pizza that day, so I made extra dough just to make this with some organic grapes I was given. It's one of my favorite Autumn treats! Basically, use your favorite pizza or focaccia dough (if you use pizza dough, make it thicker than a pizza), let it rise for 1/2 an hour in the pan, then "dimple" the dough with your finger tips and place grapes on top (green or red, preferably seedless). I squish the grapes in my hands a bit to make them exude their juice. Then sprinkle with sugar-- it can be coarse if you like. Bake at 400 degrees F for about 25 minutes. Eat hot...yum!
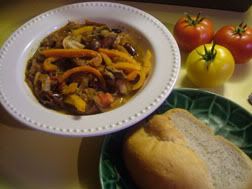
Italian Sausage Stew
This was a real spur-of-the-moment thing. I just sauteed a sliced onion, orange bell pepper, yellow bell pepper, a few mushrooms, lots of garlic, and two sliced Tofurkey Italian Veggie Sausages in a little olive oil with 4 medium garden-fresh tomatoes (two red and two yellow). I simmered it for about 10 minutes. I added about 1/2 cup of dry red wine, a handful of fresh basil, and salt and pepper. At the last minute I added some sliced sundried tomatoes and kalamata olives, but I think that was overkill. It was actually a bit too rich-tasting! The leftovers made a geat bruschetta topping, though!
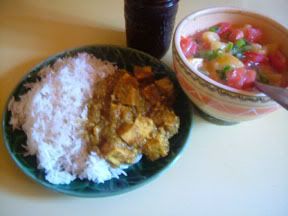
Red lentil and Tofu Curry with a sort of Indian-style "salsa".
This was a recipe I copied down from a June 1999 Gourmet magazine a long time ago and always meant to try. It was pretty quick to make, and I served it with basmati rice and a sort of Indian "salsa" made from red and yellow diced tomatoes from our garden, green onions, lemon juice, salt and pepper, and homemade plain soy yogurt (that was good!).
The curry was pretty dull, so I jazzed it up as I went along. It was tasty in the end, and certainly cheap!
Printable Recipe
RED LENTIL AND TOFU CURRY, BRYANNA'S VERSION
Serves 2 or 3 with rice
1 small onion, thinly sliced
4 cloves garlic, minced
1/2" piece of ginger, grated
1 T. olive oil
1/2 cup split red lentils
3 cups water
1/2 tsp. salt
1 T. olive oil
1/2 lb. firm tofu, in 1/2" dice
1 tsp. tumeric
1/2 tsp. EACH curry powder, ground cumin, salt, mustard powder, paprika
1/4 tsp. EACH ground cloves and coriander
pinch cayenne (or to taste)
a small cinnamon stick
2 T. lemon juice
Saute the onion, garlic, and ginger in the first T. oil until the onion is softened. Add to the red lentils, wit the water and first 1/2 tsp. salt in a saucepan. Bring to a boil, then simmer, uncovered, for about 20 minutes, or until the red lentils have softened.
Meanwhile, heat the second T. of oil in a large nonstick skillet. Add the tofu and all of the spices (except the cinnamon stick). Sate until the tofu is coated with the spices.
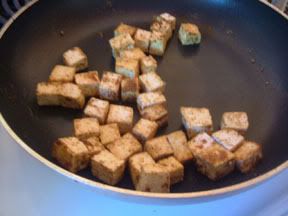
Stir the tofu into the lentil mixture and add the cinnamon stick. Simmer at medium heat, stirring often, until the mixture cooks down to a thick stew-like mixture, being careful not to let it scorch. remove the cinnamon stick and discard, and stir in the lemon juice before serving.
Enjoy!



Thursday, September 21, 2006
SNEAK PREVIEW; PUMPKIN-CREME CHEEZE-TUNNEL CAKE WITH CARAMEL SAUCE

UPDATE: I added the recipe for this cake to my blog here:
http://veganfeastkitchen.blogspot.ca/2011/10/pumpkin-tunnel-cake-w-lemon-ginger.html
This entry will be short and sweet (in more ways than one!). I had a glitch this morning with my camera software and just wasted 2 hours!
Anyway, yesterday I tested this cake for the upcoming Vegan Feast Newsletter, which contains Thanksgiving and Christmas recipes, so I can't divulge the recipe. I've been wanting to do a vegan "tunnel cake" for a long time, and this seemed a good opportunity.
It turned out really well! The pumpkin cake tastes richer than it really is, and it's moist and tender, not heavy. The "tunnel" is a ring of tangy lemon "creme cheeze" (homemade) with chunks of organic candied ginger. (I might make more of the filling next time for a bigger "tunnel".) I topped it off with a caramel sauce and toasted pecans. Divine!
I just used a regular bundt pan, BTW-- didn't need one of those special tunnel cake pan sets. (That would be great for ice cream cakes, though!)
I plan to work on more vegan "tunnel cakes" in the future!
Have a sweet day!

Friday, September 15, 2006
A MODERN VEGAN BLT SANDWICH: HEAVEN!
See links to Variations and Updates of this recipe in the recipe below (versions made with hemp milk and oil; with the Vegg egg yolk replacer; and one with with no extracted oil).

One of my "5 things that everyone should eat at least once before they die" from this entry was "a sandwich made with homemade white bread, vegan mayonnaise, a ripe tomato still warm from the garden (it HAS to be freshly-picked from a garden and NOT the hothouse variety), and a little salt".
We are currently inundated with both red and yellow tomatoes, one of the few items that we (non-gardeners that we are!) cultivate every year. We savor as many sweet, juicy tomato sandwiches as we can before that sad day when our tomatoes are all used up, because we only eat tomato sandwiches with our own tomatoes, purists that we are! No store-bought tomato is ever as good as ours, and a tomato sandwich is basically about the tomatoes, so we just don't bother the rest of the year! Makes us savor them even more.
Tomato sandwiches are very individual. I have mine as described above, sometimes on toasted bread and sometimes not; sometimes with lettuce and veggie bacon or soy bacon bits (stuck to the mayonnaise) (making it a BLT), sometimes not.


My husband adds pepper-- I don't. And he NEVER uses lettuce--I do. I like more mayonnaise than he does, too-- LOTS of it. Since I don't want to ingest too much fat on my sandwich, I make my own low-fat vegan mayonnaise, recipe below (with miso and chili/garlic flax oil variations). To me, it tastes very like real mayonnaise.
This morning I had a toasted vegan BLT for breakfast (why not?), with, I swear, the sweetest tomato I have ever eaten! I used Italian bread and Yves Veggie Bacon (you could use LightLife Smart Bacon instead, or use organic soy bacon bits such as Frontier Bac'Uns). I didn't have any lettuce, so I used a modern touch-- organic baby greens mix. It was very satisfying. UPDATE: Try my homemade Tofu "Bacon".
What's your favorite way of making a tomato sandwich?

NOW, THE MAYONNAISE....

In the recipe below, right after you blend it, the mixture will be pourable, but....

...after the mayonnaise has set in the refrigerator for several hours, it should look like this. Then you whisk it in the jar to get the familiar creamy texture.
Printable Recipe with all Variations
(GF, vegetable-gum-free, can be soy-free or corn-free, too)
Makes about 2 1/2 cups
PS: There's a hemp milk and hemp oil version here and a new version using The VEGG (powdered vegan egg yolk alternative), and another version, using no extracted oil.
This is a revised version of the recipe that appears in several of my cookbooks. For those who are allergic to soy, do not like tofu mayonnaise, or the commercial "light" mayos (most are not vegan, anyway), here is a delicious (and inexpensive) solution! Four Hellman's fans of may acquaintance loved this (and were surprised that they did!).It contains a small amount of oil, just enough for good flavor and mouthfeel. It’s smooth and creamy, and a little tangy, but not too much.
**BRIGHT IDEA-- This mayonnaise, with the addition of herbs, garlic, etc., can be used as a savory vegetable and toast topping. Note: If you leave out the agar in the basic recipe, this makes a good base for cold savory sauces.
Mix A:
1 cup any creamy clean-tasting non-dairy milk (I use Silk Original Organic or my own homemade soy milk)
2 T. apple cider vinegar (my preference), plain rice vinegar, white wine vinegar, or lemon juice
1 to 1 1/2 tsp. salt
1/2 tsp. dry mustard
1/4 cup (my preference) extra-virgin olive oil OR flax or hemp oil, or any neutral vegetable oil, or a combination
Mix B:
1/2 cup + 2 T. cold water
4 tablespoons cornstarch (or wheat starch , which is GF, if you can't use corn-- do not substitute other starches! You can buy organic cornstarch in health food stores and online.)
1/2 tsp. agar powder (NOT flakes!)
Optional: 1/2 to 1 tablespoon nutritional yeast flakes (This adds a subtle richness to the mayo.)
NOTE: If the cooled-off mayo seems too thick or stiff to you, beat it with a whisk (you can do it right in the jar if you have a whisk that fits) until creamy.
If you cut down the amount of cornstarch, it gets a bit runny after a week or so. The whisking method works for me-- it stays creamy but thick.
1.) Place the Mix A ingredients into your blender jar and set aside.
2.) In a small saucepan or microwave-proof bowl, mix together the water and agar from Mix B, and let sit for a few of minutes. Add the cornstarch and whisk well. If making in the pot on the stovetop, stir constantly over high heat until thick and translucent-- not white (you might have to switch to a silicone spatula halfway through). Microwave option (my preference): Use the microwave-proof bowl for the mixture, and microwave on HI 30 seconds. Whisk. (I switch to a silicone spatula after 2 turns in the microwave). Repeat this about three times, or until thick and translucent-- even if this takes more than four 30-second intervals in your microwave. (The microwave works well with starch mixtures.)
Tip: If you don't cook this thoroughly (and "translucent" is the key word-- meaning semi-transparent), the mayo won't thicken properly.Tip #2: Make sure to scrape the bottom of the pot or bowl with the spatula, so that no starch mixture gets left at the behind.

3.) Scrape the cooked Mix B into the blender (using a spatula so that you get as much of it as you can out of the bowl or pot) containing Mix A. Blend until the mixture is very white and frothy and emulsified (you can't see any oil globules). (**!!Tip: This mayo doesn’t get thick as you blend it, like regular mayonnaise or soy mayonnaise made with lots of oil, so don’t blend it and blend it, thinking it will thicken as it blends— it won’t!! It will thicken after a few hours in the refrigerator.)
4.) Pour into a clean pint jar, cover and refrigerate for several hours, until it is set. It should be firm enough to stand a knife up in.

Keep refrigerated. Will keep for about 2 weeks.
Nutrition facts were (using Living Cookbook software) calculated using my homemade soymilk and 1/4 cup olive oil. I calculated it using various kinds of nondairy milk and the nutrition facts are in this range no matter what you use (except for full-fat coconut milk). 21 calories a tablespoon is pretty darn good, considering regular mayonnaise (even vegan) contains about 100 calories per tablespoon!
Nutrition Facts: (per tablespoon, using 1/4 cup oil in the recipe): Nutrition (per serving): 21.0 calories; 75% calories from fat; 1.8g total fat; 0.0mg cholesterol; 92.5mg sodium; 2.3mg potassium; 1.1g carbohydrates; 0.0g fiber; 0.1g sugar; 1.1g net carbs; 0.2g protein; 0.6 points.
VARIATIONS:
MISO MAYO AND CHILI-/GARLIC FLAX OIL VARIATIONS:
Omit the salt and use 3 T. miso (not a dark variety)and/or omit the mustard powder and use chili/garlic flax oil
“SECRET BURGER SAUCE”: Mix to taste, Veggiennaise (already set and chilled), ketchup, and pickle relish; or you could use Veggiennaise, ketchup and mustard, or Veggienaise and a ketchup-style chili sauce.
OTHER USES FOR MAYONNAISE:
You can make tasty sandwich spreads by blending half vegan mayonnaise (blended but not set), and half grainy gourmet or creamy Dijon mustard (for a "Dijonnaise"), OR, for serious miso fans, light soy or chickpea miso.
Aioli:
To make a delicious garlic dip for cold, steamed vegetables and artichokes, omit the dry mustard and add 4-6 peeled raw cloves of garlic while blending. This also makes a good spread for making garlic toast.
Tartar Sauce:
Use dill pickle brine instead of plain vinegar. To the blended, but not set, mayonnaise, add 3/4 c. minced raw onion and 3/4 c. minced dill pickle. If you have no pickles, use chopped cucumber with dillweed and white wine vinegar to taste. Capers are optional, in my opinion.
Old-Fashioned Russian Dressing:
This dressing is a traditional addition to many deli sandwiches. To the blended but not set mayonnaise, add 2 T. prepared horseradish, 2 tsp. vegetarian worcestershire sauce, 1/2 c. ketchup-style chile sauce, and 2 tsp. grated onion.
OLD-FASHIONED THOUSAND ISLAND DRESSING
Makes about 1 1/2 cups.
Mix together:
1 cup Veggiennaise (already chilled and set)
1/3 cup ketchup
1/2 tsp. onion powder
1/4 tsp. salt
1/8 tsp. garlic powder
3 Tbsp. sweet pickle relish
2 Tbsp. minced stuffed green olives
FLAVORED MAYONNAISE
Flavored mayonnaise can turn a quick sandwich or salad meals into a gourmet treat. Try these suggestions, and then invent your own.
1.) Use cranberry or other berry vinegar, or white balsamic, champagne, or sherry vinegar, or lime juice, instead of ordinary vinegar (or lemon juice).
2.) Use your favorite herbal vinegar plus 3 to 4 T. of the appropriate fresh herb.
Add while the Veggiennaise is still runny (don't add AFTER the mayo is set, or it will get "soupy"), add one of these:
3.) 3 T. minced pickled jalapeños
4.) 3 minced chile chipotles
5.) several tablespoons vegan Pesto OR pureéd roasted red pepper OR pureéd sun-dried tomatoes (oil-packed--I rinse the oil off-- or soaked,dried ones)
6.) 1 T. minced or grated fresh ginger
7.) 2 T. prepared horseradish
8.) 1 T. curry powder
9.) 1/4 c. or more minced fresh herbs, such as basil, mint, oregano, cilantro, tarragon, etc..
10.) 1/3 c. chopped chives, 1 T. grated lemon zest (preferably organic) and Louisiana hot sauce to taste (this makes "Creole Mayonnaise")
11.) 1 T. Chinese hoisin sauce (or 1/2 T. EACH dark or red miso and maple syrup)
2.) 1/4-1/2 c. salsa
13.) 1-2 tsp. wasabi (Japanese green horseradish) powder
14.) 2 T. citrus zest (preferably organic)
15.) 1/4-1/3 c. minced Japanese-style pink pickled ginger
16.) 3-6 T. of your favorite chutney
17.) 12-18 cloves (1 head) roasted garlic
For those allergic to corn and or gluten: It's harder to find than other starches, but wheat starch can be used like cornstarch more easily (tsp. for tsp.) than, say, arrowroot, which I have never had success with. Wheat starch is easily available from amazon.com and it is gluten-free! (See http://www.glutenfreeliving.com/gluten-free-foods/ingredients/new-word-on-wheat-starch/ ) I have also purchased it in Asian food stores and the International sections of some supermarkets. Food Scientist Shirley O. Corriher (who I will mention more about below) says: "Asian grocery stores are a great place to buy starches. They have arrowroot, potato starch, rice starch, tapioca starch (a powder), wheat starch, etc. at a fraction of their cost in regular stores."
I use cornstarch because it works well in this recipe, is cheap (even organic is relatively cheap) and is easy to find. Wheat starch works the same way. Corriher explains why in this short article: http://www.splendidtable.org/story/tips-vegetable-cookery-starch-shirley-corriher
For more detailed information on starches and how they work, here are two more articles by Corriher: http://articles.sun-sentinel.com/2006-05-18/features/0605160149_1_starch-sauce-tablespoon and http://seattletallpoppy.blogspot.ca/2009/01/schoolin-in-starch-from-food-sleuth.html
I experimented quite a bit over the years with this mayo recipe and I definitely recommend corn or wheat starch for best results.
Enjoy!

Monday, September 11, 2006
CHOCOLATE-ORANGE-BLACKBERRY-PECAN SCONES


BRYANNA'S LOW-FAT CHOCOLATE-ORANGE-BLACKBERRY-PECAN SCONES
Makes 6 large scones
This recipe only has 1 T. of oil in it, but the scones are light and tender.
Heat oven to 400 degrees F.
Have ready:
3/4-1 cup fresh blackberries
Mix in a large bowl with a whisk:
1 c. whole wheat pastry flour

1 c. unbleached white flour
1/4 c. organic light unbleached granulated sugar

1 tsp. baking powder
1/2 tsp. salt
1/4 tsp. baking soda
Stir in:
1/2 cup chopped pecans
4 oz. organic dairy-free fair-trade chocolate chips or chopped chocolate

In a small bowl whisk together:
1/2 cup orange juice
6 Tbs. non-dairy milk
1 Tbs. oil
Grated zest of one organic orange
Pour this into the dry ingredients and mix lightly but thoroughly.

Dump the dough (very soft) on a greased cookie sheet. With wet hands, shape into a circle about 1/2" thick. With a sharp floured knife, cut 6 wedges. (If you want the edges of the scones to be soft, don't separate the wedges; if you want them crispy, separate them.)

Make slight indents in the dough with your finger where you want the berries to go and place a berry in each indent.

Bake about 15 minutes, or until golden. Pull the scones apart and serve warm.
Enjoy!


Wednesday, September 6, 2006
AJVAR (VEGETABLE "CAVIAR")

What I made for lunch the other day-- I call them "Mediterranean Quesadillas". I had some grilled eggplant and zucchini, and some wholewheat tortillas, leftover from dinner the night before. I cut one tortilla in half and spread one half with Ajvar
 , a Balkan red pepper and eggplant spread (see more about this and a recipe below), and the other half with vegan mayonnaise (my low-fat version). Then I added the grilled veggies, plus roasted green peppers (you could use red ones) thin slices of smoked tofu
 , and fresh basil leaves.
I put it together and cooked over medium heat in a nonstick pan
 until golden and crispy on both sides. Cut into wedges with a sharp knife
 . This will serve 1-2, depending on appetite. Have napkins handy!
ABOUT AJVAR
 (pronounced Eye-vahr):
This delicious condiment is originally from Macedonia, Croatia, and Serbia, but is popular also in Albania, Greece, Bulgaria, Hungary, Turkey, etc., and all over the Middle East now, it seems. It is sometimes called "vegetable caviar", and there is hot ajvar
 and mild ajvar
 . In some areas they use roasted green peppers.
Commercial versions are inexpensive in Middle Eastern stores and many brands are available from amazon.com. Trader Joe's sells it but they don't call it ajvar on the label. They call it Trader Joe's Red Pepper Spread with Eggplant and Garlic. I understand that Whole Foods sells an organic version with "Ajvar" on the label.

USES FOR AJVAR:
I use it on all kinds of wraps, panini, and sandwiches:


It also makes a great cracker spread or a dip. Serve it as an appetizer to spread on thick slices of country-style bread or flatbread such as pita or lavosh, or use it as a side dish. Or just use it like salsa. You can use it 0nrice or potatoes, or as a quick pasta sauce; or mix it in with hummous and other dips. It's used on grilled meats, so why not on grilled seitan or tofu? Or on some big Tofurkey or Field Roast veggie sausages? Or how about with white beans, veggie "meatloaf", "cheese" toast, or bruschetta? Spice Island Vegan used it with my tofu fritatta from "Nonna's Italian Kitchen
 " and it would be good on scrambled tofu, or vegan omelets, too .
Many Balkan families can their own supplies of it every year, but I can't find anything specific about canning it. I read that green beans and unripe tomatoes are sometimes mixed in with the ajvar before canning. All the canning sites I consulted warn against canning any pureed vegetables because of the problem of getting the temperature up high enough in the center of a jar of pureed food without commercial equipment. Perhaps if you made it very chunky you could pressure can it in small jars (1/2 pint) and then puree it after opening. I did read that you can freeze it, too.
HERE'S MY RECIPE:
Printable Recipe
BRYANNA’S AJVAR (BALKAN “SALSA”)
Makes 3 1/2 cups
Pronounced Eye-vahr, this is a name of Turkish origin given to a popular Balkan spread or relish made of roasted peppers and eggplant (and sometimes other vegetables, too). Fresh ajvar is always made during the late summer and early autumn, just after the pepper harvest, when many Balkan households also can or bottle their own ajvar for use throughout the year. You can make it as mild or spicy as you like!
I can get this in my area in jars, fairly cheaply (about $4.00 Cnd a jar), but I like the idea of doing my own seasoning, and it’s very easy to make!
NOTE: My husband didn’t care for the what-I-would-call-“silky” texture of this ajvar, but then, he doesn’t really like eggplant. I have noted below that you can use more pepper and less eggplant if you like, but see also the zucchini variation below, which he preferred.
3 medium red bell peppers
(NOTE: If you prefer a chunkier texture and redder color, use another pepper and a smaller eggplant)
OPTIONAL: 1 large mildly hot pepper (such as a Hungarian yellow banana pepper)
(NOTE: use more hot peppers instead of adding hot sauce, if you prefer)
1 medium eggplant
2 cloves garlic, peeled and chopped
1 tsp. salt
1/4 c. extra-virgin olive oil
3 T. red wine vinegar
juice of one medium lemon
1/2 tsp. liquid red hot sauce, or more to taste
freshly-ground black pepper to taste
Preheat oven to 425 degrees F. Place the peppers on a baking sheet and the eggplant on another. Poke the vegetables in a few places with a large fork. Roast the vegetables until they are somewhat charred on the outside and soft inside—the peppers will, of course, soften faster than the eggplant. Place the veggies inside a closed paper bag for 10 minutes or so— this will help loosen the skins.
This is a messy job, but quick—the skins should just peel away—it’s okay if a bit of pepper skin gets left behind. Remove the stems, and the seeds of the peppers. Rinse the peppers. Chop everything coarsely and then pulse in a food processor to the texture you like. Set aside.
On a small plate, mash the garlic with the salt with the back of a spoon til it is paste-like. In a large skillet, heat the oil a bit, then add the veggies, the salt and garlic, vinegar, lemon juice, hot sauce and fresh pepper to taste. Simmer the mixture until it has thickened a bit (it will thicken in the jar, too, so don’t cook it down too much). Taste for salt, pepper and hot sauce.
If serving immediately, serve it in a bowl drizzled with olive oil, or pack into 2 sterilized pint jars, drizzle a bit of olive oil on top, seal and refrigerate— it will keep for several weeks, although you’ll probably find many uses for it! (i have read that you can freeze it, too, but have not tried that myself.)
ZUCCHINI AJVAR: Omit the eggplant and use a chunk of large zucchini (this is a good way to use those overgrown ones!) about the size of a medium eggplant. (NOTE: you can use 4 red peppers and a slightly smaller chunk of zucchini if you prefer—it will be redder in color that way.) Otherwise, proceed as for the recipe above. I found that it needed about 1/2 tsp. more salt when using the zucchini, for some reason.
Enjoy!
BRYANNA’S AJVAR (BALKAN “SALSA”)
Makes 3 1/2 cups
Pronounced Eye-vahr, this is a name of Turkish origin given to a popular Balkan spread or relish made of roasted peppers and eggplant (and sometimes other vegetables, too). Fresh ajvar is always made during the late summer and early autumn, just after the pepper harvest, when many Balkan households also can or bottle their own ajvar for use throughout the year. You can make it as mild or spicy as you like!
I can get this in my area in jars, fairly cheaply (about $4.00 Cnd a jar), but I like the idea of doing my own seasoning, and it’s very easy to make!
NOTE: My husband didn’t care for the what-I-would-call-“silky” texture of this ajvar, but then, he doesn’t really like eggplant. I have noted below that you can use more pepper and less eggplant if you like, but see also the zucchini variation below, which he preferred.
3 medium red bell peppers
(NOTE: If you prefer a chunkier texture and redder color, use another pepper and a smaller eggplant)
OPTIONAL: 1 large mildly hot pepper (such as a Hungarian yellow banana pepper)
(NOTE: use more hot peppers instead of adding hot sauce, if you prefer)
1 medium eggplant
2 cloves garlic, peeled and chopped
1 tsp. salt
1/4 c. extra-virgin olive oil
3 T. red wine vinegar
juice of one medium lemon
1/2 tsp. liquid red hot sauce, or more to taste
freshly-ground black pepper to taste
Preheat oven to 425 degrees F. Place the peppers on a baking sheet
and the eggplant on another. Poke the vegetables in a few places with a large fork. Roast the vegetables until they are somewhat charred on the outside and soft inside—the peppers will, of course, soften faster than the eggplant. Place the veggies inside a closed paper bag for 10 minutes or so— this will help loosen the skins.This is a messy job, but quick—the skins should just peel away—it’s okay if a bit of pepper skin gets left behind. Remove the stems, and the seeds of the peppers. Rinse the peppers. Chop everything coarsely and then pulse in a food processor to the texture you like. Set aside.
On a small plate, mash the garlic with the salt with the back of a spoon til it is paste-like. In a large skillet, heat the oil a bit, then add the veggies, the salt and garlic, vinegar, lemon juice, hot sauce and fresh pepper to taste. Simmer the mixture until it has thickened a bit (it will thicken in the jar, too, so don’t cook it down too much). Taste for salt, pepper and hot sauce.
If serving immediately, serve it in a bowl drizzled with olive oil, or pack into 2 sterilized pint jars, drizzle a bit of olive oil on top, seal and refrigerate— it will keep for several weeks, although you’ll probably find many uses for it! (i have read that you can freeze it, too, but have not tried that myself.)
ZUCCHINI AJVAR: Omit the eggplant and use a chunk of large zucchini (this is a good way to use those overgrown ones!) about the size of a medium eggplant. (NOTE: you can use 4 red peppers and a slightly smaller chunk of zucchini if you prefer—it will be redder in color that way.) Otherwise, proceed as for the recipe above. I found that it needed about 1/2 tsp. more salt when using the zucchini, for some reason.
Enjoy!
Sunday, September 3, 2006
SOUP, SALAD AND BREAD SUPPER FOR TIRED MOVERS

Palestinian Lentil Soup (Shawrbat 'Adas Filasteeniya)
For the last few days, my husband and I have been moving my almost-89-yr-old mother to a new house here on Denman Island. (Well, not a NEW house, but new to her!) This entailed weeding out junk and some packing (she did alot of it herself), the actual move on Thursday evening (with the help of my son and daughter-in-law and their truck, and my friends Holly Walker and Fireweed), and then, the worst part, the cleaning of the old house. Everyone but me and my husband had to go to work on Friday(I took a day off from the library), so, after Holly and Amber helped me move the last bits and pieces, it took me and Brian all the rest of the day to clean. Then there was the junk and garbage, which Amber and Tim took to the dump yesterday. (You gather alot of stuff in 88 years! After this I am determined to weed out the unecessaries from my house to spare my children!) Then there was organizing the stuff in the new house and trying to get my mother to rest and not push heavy boxes of books from room to room!

My mom, Eve Urbina, age 88, photo taken July 5, 2006!
There is still stuff to do (a friend is helping her put books on shelves today), but we're taking today off until this evening, when we'll go put up her shower curtain, and some little things like that. So that is why I am sitting here blogging!
Yesterday we came home for lunch and I made a quick pot of soup for us to have for supper and to take some to my mom. When we got home for supper, I made a Syrian green bean salad to go with our supper, and pulled out one of the pita breads I made the other day from the freezer, to make zatar bread (included in that recipe) to go with the soup. It was a very satisfying and delicious meal.
Both the soup and the salad recipe are adapted from recipes in a wonderful book called "Classic Vegetarian Cooking from the Middle East and North Africa" by Habeeb Salloum, "a Canadian author and freelance writer specializing in Canadian, Arab, Far Eastern and Latin- American history, travel and the culinary arts. Besides five books and 15 chapters in books, he has had hundreds of articles published about food, travel, history and homesteading in western Canada." Mr. Salloum just happens to be the uncle of one of my subscribers!
BRYANNA'S VERSION OF HABEEB SALLOUM'S PALESTINIAN LENTIL SOUP (SHAWRBAT 'ADAS FILASTEENIYA)
This soup really benefits from being made several hours ahead of time and reheated. It's simple, but very delicious. Adapted from the excellent book "Classic Vegetarian Cooking from the Middle East and North Africa" by Habeeb Salloum. Really, the only change I made was to use broth instead of water and add the lemon juice directly to the soup pot (I used the highest amount he recommended, and I also used the pureeing option he gave). This soup serves 6-8 for a starter serving, but we ate it as a main dish, in which case it will serve 4 nicely. NOTE: you could cut down the amount of oil, but it really adds to the taste, and a good serving is still low in calories even with the whole 1/4 cup in the recipe.
1/4 cup extra-virgin olive oil
2 large onions, minced
7 cups hot vegetarian chicken-style broth
1 cup split red lentils
1 tsp ground cumin
1 pinch saffron
2 Tbs basmati rice
2 Tbs lemon juice
salt and freshly-ground black pepper to taste
In a nonstick skillet, saute the onions in the oil over medium heat until they soften and start to brown (OR microwave the onions with the oil in a microwave-safe dish, covered, at full power for 10 minutes).
Meanwhile, mix the broth in a soup pot with the lentils, cumin, and saffron. Add the softened onions and bring to a boil. Turn down and cook, covered, over low heat, for 20 minutes.
Add the rice and cook 15 minutes more. Puree the soup with a hand immersion blender and stir in the lemon juice. Taste for salt and pepper.
Servings: 4 main-dish, or 6-8 starter
Nutrition (per 1/4 recipe): 335.6 calories; 38% calories from fat; 14.7g total fat; 0.0mg cholesterol; 6.9mg sodium; 391.4mg potassium; 40.1g carbohydrates; 6.2g fiber; 2.8g sugar; 33.9g net carbs; 13.1g protein; 7 WW points.

Note: the yellow bits on the beans are actually from the evening sun shining on the olive oil dressing!
BRYANNA'S VERSION OF HABEEB SALLOUM'S SEASONED GREEN BEANS (SYRIA AND LEBANON)
This is adapted from another recipe in the excellent book "Classic Vegetarian Cooking from the Middle East and North Africa" by Habeeb Salloum. The contrast between the sweet fresh green beans and the garlicky lemon dressing is superb. The only changes I made were to use fresh beans instead of frozen and cut the olive oil from 3 Tbs. down to 2 Tbs. This was supposed to serve 4, but 2 of us ate the whole dish!
1 lb. fresh small green beans, trimmed
3 cloves garlic, crushed
3 Tbs fresh lemon juice
2 Tbs extra-virgin olive oil
1/2 tsp salt
freshly-ground black pepper to taste
Steam the green beans until just tender and cool under very cold water, then drain. Place in a serving bowl. Mix the garlis, lemon juice, oil and salt together with a small whisk and toss with the beans. Grind pepper over to taste.
Servings: 2
Nutrition (per 1/2 recipe): 202.1 calories; 60% calories from fat; 13.8g total fat; 0.0mg cholesterol; 485.0mg sodium; 520.6mg potassium; 19.7g carbohydrates; 7.9g fiber; 3.8g sugar; 11.8g net carbs; 4.5g protein; 4.5 WW points.
Enjoy!
Tuesday, August 29, 2006
5 FOODS YOU HAVE TO EAT BEFORE YOU DIE, AND HOW TO MAKE HOMEMADE PITA BREAD
SusanV over at http://blog.fatfreevegan.com/ "tagged" me for this "non-meme". She wrote: "The idea is to create a list of food bloggers' top picks for things you've eaten and think that everyone should eat at least once before they die." It comes from Melissa at The Traveler's Lunchbox.
It was tough to choose, so I just decided to go with what came to mind first:
1.) homemade crusty sourdough bread
2.) Denman Island Chocolate, especially the hazelnut variety
3.) a sandwich made with homemade white bread, (vegan) mayonnaise, a ripe tomato still warm from the garden (it HAS to be freshly-picked from a garden and NOT the hothouse variety), and a little salt
4.) homemade ravioli with porcini mushroom filling
5.) hot homemade cornbread with vegan butter (try my homemade palm oil-free Buttah) and blackberries you just picked
NOW, ABOUT THAT PITA BREAD.....

I hadn't made homemade pita for some time, but yesterday I decided to try it in my new oven because I needed some for a recipe I was trying out for the newsletter. As you can see from the picture above, it worked beautifully! It's really very easy to make and better than any you can buy. You need a pizza stone or a cast iron skillet or griddle (at least 10-inch) or some unglazed tiles (you can buy slightly chipped ones at a tile store very cheaply) and a good hot oven.
The pitas (which are pretty large) are cooked one at a time, unless you have enough unglazed tiles to cover a whole oven rack, in which case you can do 2 at a time. But they take only 3 minutes to cook, so, even though you have to be there during the whole baking time, it goes fast.
Printable Recipe
BRYANNA'S HALF-WHOLEWHEAT PITA BREAD
makes 8/ 9" pitas
2 1/2 cups warm water
2 tsp. dry active baking yeast (or 1 1/2 tsp. instant yeast)
3 cups wholewheat bread flour
1 T. salt
1 T. olive oil
3 cups unbleached white flour
Dissolve the yeast in the water. Add the whole wheat flour and mix briefly. Let this "sponge" stand for about 30 minutes. Add the salt, oil and unbleached flour, and knead for about 8-10 minutes. Don't add too much flour-- the dough should be silky smooth and not tough. You can knead the dough with a little oil instead of with flour if necessary to keep it from being too dry.
Place the dough in an oiled bowl, oil the top, cover, and let stand in a warmish place until doubled in bulk, about 1 1/2 hours. Punch it down and divide into 8 equal pieces on a floured counter. Keep the balls of dough covered when you aren't working with them.
Roll each piece out on a floured surface with a rolling pin to about 9" in diameter (they don't have to be perfectly round). For maximum "puff", try to avoid stretching the dough. I just roll out from the center toward the outer edge, turn the dough a quarter-turn and repeat, doing this until it is the right size. The thickness should be even all over. You'll get the hang of this after a while and it will go very fast.

Keep the rolled-out pita on a floured counter or floured cookie sheets and cover them.
Preheat the oven to 500 degrees F., with your unglazed tiles or pizza stone or cast iron pan or griddle on the rack at the lowest position (remove other racks).
My old method of transferring the pita to the hot surface was to place the pita to be cooked on a well-floured cookie sheet, pull the rack out as far as it will go and just flip the cookie sheet over to upend the pita onto whatever hot surface you are using. (If it lands with a wrinkle or two, just quickly straighten it out and shut the oven door.) If you are deft, you can just slap it onto the hot surface with your hand! Now I use a well-floured small baker's peel or cake and pizza lifter or even large bench scraper.
When the oven is up to temperature, place a pita bread (or 2, depending on how much room you have on the tiles/stone) on the hot surface, as directed above, quickly shut the door, and set the timer for 3 minutes.
Turn on the oven light and watch it puff up before your very eyes! (At first, your efforts may not puff perfectly, but you'll get the hang of it! You can still use them even if they don't puff.)

When the timer "dings", take the pita out carefully (use a large bench scraper or small baker's peel to take it out (or check out this nifty inexpensive cake and pizza lifter), and either place the hot pita bread (which will deflate immediately) in a large open paper bag, or wrap loosely in a clean large tea towel. Stack them up as you go. The pita should not get brown or crispy! You want them to stay flexible and soft.
That's it! Eat them within a day or so (place in plastic bags after they cool thoroughly) or freeze them. If they have puffed properly, when you cut them in half, they will have a "pocket".
Another way to enjoy them is as "Zatar bread":

Brush the bread with a little olive oil and sprinkle with the zatar, a delicious Lebanese spice mixture of lemony-tasting reddish sumac, sesame, thyme and sometimes other herbs.
See this post of mine on za'atar.
Enjoy!

Subscribe to:
Posts (Atom)