Monday, April 27, 2009
A 100% WHOLE WHEAT PIZZA CRUST THAT WE ACTUALLY LIKED!


As you may know, if you have read my other blog posts on pizza, I have not really cared for whole wheat pizza crust. I have been using about 1/3 whole wheat flour in my dough, with good results, but the whole wheat doughs I have tried have been awful! Until yesterday.
I have owned a copy of my baking hero Peter Reinhart's book, Peter Reinhart's Whole Grain Breads
However, DH and I are following the Weight Watcher's Core Plan and so we are trying to eat whole grain products for the most part. After a month without pizza, we decided to use our remaining extra points for a pizza blow-out for lunch! I planned it a day ahead and made Peter's whole wheat dough.
The recipe calls for two pre-doughs, a biga (Italian bread starter), which has to be refrigerated overnight, and a soaker, which is some of the flour (in this case-- it can also be whole grains) with liquid and sometimes a little salt.

Biga on the left, soaker on the right. I used my home-ground hard red wheat flour, so the dough looked fairly dark. If you used white whole wheat, it would be more golden in color.
You probably have some idea of what a starter is (this one is started with yeast, not sourdough), but why use a soaker? Well, for one thing, flour soaks in liquid for several hours (12-24 hours, in this case), the gluten gets a head start in development. The two proteins that make up gluten begin to join together, which makes the dough more malleable and cohesive. For another, soaking hydrates the bran and germ, which are the harder particles that can cut the gluten strands and sometimes prevent whole grain doughs from rising properly. And, very importantly, soaking flour initiates enzymatic activity. Enzymes convert complex starches into simple sugars, which feed the yeast, which rises the bread. The soaker gives a head start to this process. The enzymic action develops the umami flavor compounds in wheat flour to “ripen” the dough and develop its flavor.
When you are ready to make the final dough, you turn out the soaker on a floured board and cut it into 12 pieces:

Then you get out the refrigerated biga, which has fermented for at least 8 hours,

and cut it into 12 pieces, too.

(NOTE: Peter Reinhart says: "... The surface of the soakers and bigas will sometimes darken due to oxidation--no harm but if you want to avoid it, lay some plastic wrap directly on the surface of the dough to keep it from reacting to the air...")
Then you place them in your stand mixer with the other ingredients for the final dough (yeast [he uses instant yeast added with the flour-- I didn't have any, so I used ordinary dry active baking yeast dissolved in 1 tablespoon warm water-- you have to use about 1/3 more regular yeast than instant], salt, a little more whole wheat flour, olive oil, sweetener of your choice).

Then, knead it. The dough, once risen, can be refrigerated for up to 24 hours before use, and it can be frozen, too.
The dough was moist and easy to handle. (See an alternative way to stretch the dough at this post.) Although the instructions said to divide the dough into 5 parts, I divided it into 4, so that we could each have a good-sized individual pizza, and then freeze enough for 2 more.

I added the topping just before I baked each pizza.
IMPORTANT NOTE (this applies to any pizza dough): If you have a pretty moist dough (such as a no-knead dough) and you are making a thin crust pizza, letting it sit too long with the toppings on it may make the dough soggy and very difficult to get it off the peel! (As you can see in the photo, it is already on my custom-made 12"-wide Mini SuperPeel. You can get the 14"-wide SuperPeel here
BTW, here's a post I did about using a cast iron skillet instead of a pizza stone-- love it!

The verdict?
We liked it! It puffed up nicely on the edges and it had a nice flavor-- not "muddy", which is the only way I can describe some whole wheat crusts. I found the rim of the first pizza crust I baked a bit dry, so I sprayed the rim of the second pizza crust with a little oil from my pump-sprayer
Reservations? It was still a bit coarse for my taste, though, but that might have been our home-ground flour. I want to try it with white whole wheat flour and see if that makes a difference. I would probably also add a bit more salt.
One whole pizza crust (1/4 of the dough) was 9.7 points. It was worth it (we had saved up points)! I didn't want a measly 2 little slices-- I wanted it to be my whole meal! I figured that if I try the recipe again with a white biga dough, and the rest whole wheat (maybe white whole wheat), it might come up to my expectations better. If I use 1 1/2 tablespoons olive oil in the dough, instead of 2 tablespoons, then the points will be pretty much the same as the a 100% crust (actually, slightly less-- 9.2).
So, stay tuned for updates!
BTW, I can't reproduce the recipe here, since it's not online anywhere, so I don't think he wants it posted all over the 'Net. The book is worth buying (both of them, actually), anyway, if you are a serious baker, and a good price on amazon even for the hardcover version.
Enjoy!

Thursday, April 23, 2009
FANTASTIC JAPANESE GOBO TASTING DINNER!

Our Host, Matsuki (pronounced "Matski") Masutani, surveying the feast.
Our friends (here on Denman Is.), Matsuki and Jane Masutani invited us to dinner last night. I had been discussing gobo (burdock root) with Matsuki a few days before, and told him I had heard of it, and maybe had eaten it, but didn't really know that much about it. He explained that this root vegetable is an integral part of Japanese cuisine and also has medicinal qualities. (In North America it is often regarded as an invasive weed! Here is a history of burdock root.)

Burdock plant
Here's a great description of an introduction to gobo from Tom at blisstree.com:
"Before I moved to Japan, I had never seen, tasted or even heard of burdock. Now I know why. It would have to be one of the strangest vegetables I have ever seen in a shop anywhere. To the untrained eye it looks like a dirty old stick, about a metre long and maybe as thick as your thumb at the thick end. It is covered with dirty brown “bark” and it really looks very unappetising. Talk about Cinderella!

Gobo (burdock roots)
When it makes it to you plate, it is hard to believe that you are eating the same thing that you would previously have used to play “fetch” with your dog. You see burdock isn’t a dirty old stick at all. It is actually a root or tuber and within it’s ugly duckling appearance is actually a beautiful vegetable.
The Japanese call Burdock Gobo and the Chinese use it as a medicinal herb, but Australians really don’t use it at all. So I was a loss as to how to cook this bizarre thing. Having, up until now, tried it cooked by others, I gave it a stab myself the other night. And I failed. There is a fine balance between cooking it enough to make it edible and plain old burning it. I lost the balance and the burnt burdock ended up in the compost. I haven’t given up yet and so will give it another go soon. It is definitely worth the trouble and so I will persist.
Burdock root is usually scraped, rather than peeled, and either shaved or julienned thinly. Its most popular recipe seems to be burdock kinpira, where it is sauteed with carrots, chilli, and the usual suspects of sake, mirin, soy and sugar."
Matsuki and Jane were hosting an old friend from Japan, Kazuko (pronounced Kah-zukoh, with the accent on the Kah), who is a wonderful musician, storyteller and actress-- and, apparently, a great cook, too! So, they invited us for a gobo tasting dinner last night. They provided the convivial atmosphere, music (a beautiful recording of the Dalai Lama "chanting", but it was actually more like singing and it was very enjoyable), salad, the brown rice, and the beverages. Kazuko; our mutual friends Yoshi and Susan-Marie Yoshihara (who made the greatest miso here on Denman Is.-- Shinmeido Miso); and Norie (pronounced Noree-ay) McGillivray, a young professional Japanese chef and cooking teacher (specializing in macrobiotics and sushi), all cooked traditional Japanese gobo dishes for us to sample (actually, we feasted!). They very kindly made everything vegetarian. (Also present was Norie's young son and the Masutani's lovely daughter-in-law, Nobue (pronounced Nohbu-ay.)

I wait for DH to finish taking pictures of the food before we can sit down and eat!
Susan-Marie grows gobo (burdock root) in her wonderful garden. She uses a Lee Valley Dandelion Digger to dig out the slim roots without breaking them-- good tip! If you are interested in growing burdock, it's hard to find info because of it's bad reputation as a weed in North America, but I found some good information here.
Anyway, on to the dinner. What a treat! What a delight to the senses! I don't have their recipes, but they did tell me some of the ingredients, and I am including online recipes to investigate.

Norie brought the dishes above, some beautiful Soba-Sushi and Shikai-Sushi, along with some Kaki-Age (Julienned Vegetable Tempura) and Maze-Gohan (Japanese Rice Pilaf) wrapped in a banana leaf.


Norie is famous for her sushi here on Denman Is. (and rightly so!). Look at that beautiful Shikai-Sushi-- the square ones-- which translates to "Four oceans Sushi", Kazuko told me, because it looks like four waves closing in. The tempura (on the bottom) was delicious, too. Here are some online instructions for making Shikai-Sushi. And here's another page. (But neither tell you how to get the purple effect that Norie did-- I'll have to ask her about that! UPDATE: a commenter noted that purple shiso leaves are used to color rice pink or purple, but here is an article on coloring sushi rice with common vegetables.)
Here is a page on how to make Soba-Sushi (Norie made two kinds-- one with buckwheat soba [Japanese noodles] and one with spinach soba).

Norie also brought a type of salad, Classic Kinpira Gobo, made with burdock and carrot. It was delightful! Here is a recipe for it.
Yoshi also brought a dish of Maze-Gohan (Japanese Rice Pilaf), but it was a bit different from Norie's (I don't know what she put in hers). Yoshi's was Yuba-Maze-Gohan, containing strips of simmered yuba, hijiki seaweed,ginger pickle, soy sauce, sugar, and sesame oil. He instructed us to roll spoonful of it in squares of nori seaweed-- it was delicious that way! Here's a basic recipe for Maze-Gohan, but you can use all sorts of ingredients in it. I really liked the yuba in it! Yoshi said you could add a dash of hot sauce, such as Thai hot sauce, also known as Sriracha or "rooster sauce", if you like.

Yoshi's second dish was Kiriboshi-Daikon, a salad made with shredded carrot, strips of fried tofu (atsuage), onion, soy sauce, sugar, sesame oil, and dried daikon radish. The dried daikon has a more intense flavor than the fresh radish, giving a pleasant "bite" to the salad. There is a recipe for this here and another one here.

Kazuko made a delicious "Chinese-Style" Oden, or stew (I forgot to ask her why it was considered "Chinese-style"). It contained daikon radish, potato, burdock root, fried tofu (atsuage), seaweed, ginger, carrot, shiitake mushrooms, green onion, garlic, soy sauce, star anise, 5-spice powder (maybe that's the "Chinese-style" part?), sake, and sugar. There are many types of oden, but here is one recipe and here is another.
Kazuko also made a delicious appetizer, which we failed to photograph. She steamed carrots lightly (the Japanese prefer their root vegetables cooked) and cut them into pieces, and served them with a dip made of miso, crushed black sesame seeds, white wine, and sesame oil, if I remember rightly. It was absolutely scrumptious! She just made it up on the spot, so I have no idea of amounts, but I'm going to try to replicate it.
Susan-Marie provided the dessert, with two things from her garden-- it was a sort of crustless rhubarb custard "pie" (or pudding, I guess you could call it), made with only half of the usual sugar, due to the addition of the herb Sweet Cicily, which, according to Brenda Hyde, "It can be added to some dishes to reduce the sweetener, but it's not actually a sugar substitute."
It was really delicious! Unfortunately it got served and eaten before I could take a photo! Susan-Marie said she got the recipe from her friend and fellow Denman Is. Gardener, Phyllis Fabbi, but I found a similar recipe, for a Rhubarb and Sweet Cicely Pudding Recipe from Yorkshire (not vegan, of course). I have a vegan recipe for Sour Creme Rhubarb-Orange Pie which might be a good place to try Sweet Cicely.
Kampai!
Sunday, April 19, 2009
GOOD VEGAN MEALS ON THE WW CORE PLAN; LOW-FAT TIP; & UPDATE ON NONSTICK SKILLETS
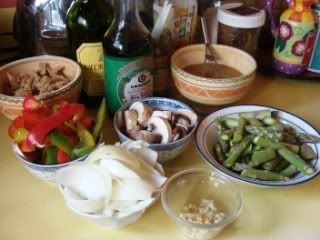 The ingredients for a delicious stir-fry using what I had available, and what needed using up.
DH and I have been on the Core Plan for almost 3 weeks now and have done pretty well, even with Easter and eating out a few times. I'd like to share some of the meals we've had (that I photographed, anyway!), and a tip for cutting down on oil. You will see that I DO use my own cookbooks!
One day we just HAD to have some Pasta alla Puttanesca, and it fit right into the plan! I used whole wheat pasta

One night I decided to have an Asian version of "weiners and cabbage"-- stir fried veggie weiner slices (I use the Yves Veggie "Bavarian Sausages") with Brussels sprouts. It was delish! I was a remake of a recipe for stir-fried weiners and cabbage that I used to make over 40 years ago:

We took this Vegan "Chicken" Caesar Salad to a dinner party at a friend's house, to rave reviews. I used reconstituted Soy Curls® stir-fried with chopped garlic (no oil) for the "chicken", the Caesar Dressing that's in my books "Soyfoods Cooking for a Positive Menopause

Another day I made a big pot of Vegetarian Feijoada (Brazilian Black Beans-- the recipe is in my books "The Almost-No-Fat Holiday Cookbook"

Then I made my Spicy Mexican Bean Dip (or "Refried Beans") with some of the pot (the recipe for the dip is in several of my books), which we used as a dip for veggies, and also in some tacos. I froze the rest of the beans for future meals.
I made a variation one night on my Asparagus Tofu with Black Bean Sauce from my book "Authentic Chinese Cuisine for the Contemporary Kitchen" , using ingredients that needed using up and that I had on hand (see photo at top of his blog post). I used I used reconstituted Soy Curls® instead of tofu, because I had just the right amount in the fridge:


Instead of rice, we ate the stir-fry with a mixture of steamed bulgur and quinoa:

I really like this mixture (it's cheaper than quinoa only, too), and we use it alot instead of rice on the Core Plan. I make it in my electric rice cooker. I just cook 1 part medium bulgur , 1 part quinoa
 , 4 parts water, and a little salt. I make quite a bit at a time and freeze portions of it to microwave for quick meals.

Quinoa and bulgur in the rice cooker.
One evening we had a lovely Syrian Tomato and Cucumber Salad with Mint (using our daily quota of olive oil and olives!), a recipe from Habeeb Salloum's lovely book, "Arab Cooking on a Saskatchewan Homestead ": Recipes and Recollections" (you can read more about it at this blog post):

One recent meal was a virtually-fat-free version of my Vegan "Chicken" Divan Casserole (I wrote about it and gave the original recipe in this blog post). I had a whole bunch of broccoli to use up and felt like something "homey" and comforting. I stir-fried the Soy Curls® with the garlic in a nonstick pan, and I omitted the fat from my Vegan Bechamel Sauce (just blended the flour in with the ingredients and cooked it in the microwave). I omitted the bread crumb topping and used a light sprinkling of my New, Improved Okara Parmesan Substitute. I didn't have any vegan cheese handy to grate, so I made my easy Melty Chedda Cheeze (2 x the recipe, from my book "20 Minutes to Dinner"), also in the microwave, just before assembling the casserole, and drizzled half of it in the middle:

and half of it on the top, covered with the Okara Parmesan sprinkle. It came out very well! The Bechamel puffed up nicely during the baking:

Here's a little preview of an upcoming post I'm working on about using chickpea flour for various treats. This was my first attempt at making Panella, which is a sort of deep-fried Italian chickpea polenta, only I oven-fried it. It was too thin, but otherwise very tasty:

One night we had a craving for peanut sauce, and some fresh spinach to use up, so I made low-fat version of my Thai-Style Spinach and Tofu with Peanut Sauce. The only changes I made to the recipe were to omit the 1 tsp. sesame oil and to dry-fry the tofu in a nonstick skillet instead of frying it in oil (you could also brown them on a cookie sheet under the broiler). The peanut butter made up our daily fat ration.

Today for lunch we had my vegan Minestrone alla Milanese (from my book "Nonna's Italian Kitchen" ). I used cooked brown Basmati rice in it and used no oil:

A FAT-SAVING TIP:
The way I saved on oil in the Minestrone recipe was something that I use frequently-- I "sweat", soften or "steam-fry" (saute without oil) the onions, and other chopped or sliced veggies, in a covered Pyrex casserole or pie plate in the microwave. Then you can use your oil or fat ration in a more interesting way-- a salad dressing or whatever. (PS: If you are afraid of using a microwave, please read this compilation of info.)
Microwave option for “sweating” the vegetables: Spray a microwave-safe pie plate or casserole lightly with oil from a pump sprayer , add the chopped or sliced vegetables.

Cook the mixture on high power for about 5 minutes, covered with a microwave-safe lid, plate or pie plate. If you are doing alot at one time, you might need 10 or more minutes. Cook until they are softened.

(To "sweat" vegetables with no oil on the stove-top: Spray a sturdy nonstick skillet lightly with oil from a pump sprayer, heat over high heat, then add the chopped or sliced vegetables. Stir-fry for a few minutes over high heat, then reduce the heat, cover the pan and cook gently over low heat for 5 to 10 minutes to soften the vegetables.)
I made the following soup using this method to cook the leeks, onions, and garlic:

Printable Recipe
BRYANNA'S FAT-FREE CREAMY LEEK AND POTATO SOUP
Servings: 4
A very easy and deliciously rich-tasting leek soup. I like the green parts of the leek, so I use them as well as the white part.
3 medium leeks, cleaned and sliced thinly crosswise
1 small onion, chopped
4 cloves garlic, chopped
1 teaspoon coarse salt
1/2 teaspoon dried thyme leaves
4 cups good vegetarian chicken-style broth
2 cups (@ 12 oz.) diced, peeled Yukon Gold potatoes (or Russets, in a pinch!)
1 small bay leaf
Garnishes:
a few tablespoons minced fresh parsley (or dill)
Tofu Sour Creme (Tofutti or homemade)
freshly-ground black pepper
Combine the white part of the leeks with the onion, garlic, coarse salt and thyme in a Pyrex casserole sprayed lightly with oil from a pump sprayer. Cover and microwave on High for 10 minutes. (Or use the Stove-Top Method above.)

In a heavy soup pot , mix about half of the leek-onion mixture (reserve the rest) with the broth, potatoes and bay leaf and bring to a boil, then reduce the heat to a simmer. Cover and cook about 15 minutes, or until the potatoes are tender.
Remove the bay leaf from the pot and discard. Blend the soup right in the pot with a stick/immersion blender until smooth. Add the reserved cooked leek mixture and stir briefly. Taste for salt and pepper.
Serve immediately, garnished as you wish.
Nutrition Facts
Nutrition (per serving): 134.0 calories; 1% calories from fat; 0.2g total fat; 0.0mg cholesterol; 1179.7mg sodium; 717.2mg potassium; 32.4g carbohydrates; 2.9g fiber; 4.3g sugar; 29.5g net carbs; 4.3g protein; 2.1 points.
Instead of rice, we ate the stir-fry with a mixture of steamed bulgur and quinoa:
I really like this mixture (it's cheaper than quinoa only, too), and we use it alot instead of rice on the Core Plan. I make it in my electric rice cooker. I just cook 1 part medium bulgur
Quinoa and bulgur in the rice cooker.
One evening we had a lovely Syrian Tomato and Cucumber Salad with Mint (using our daily quota of olive oil and olives!), a recipe from Habeeb Salloum's lovely book, "Arab Cooking on a Saskatchewan Homestead
One recent meal was a virtually-fat-free version of my Vegan "Chicken" Divan Casserole (I wrote about it and gave the original recipe in this blog post). I had a whole bunch of broccoli to use up and felt like something "homey" and comforting. I stir-fried the Soy Curls® with the garlic in a nonstick pan, and I omitted the fat from my Vegan Bechamel Sauce (just blended the flour in with the ingredients and cooked it in the microwave). I omitted the bread crumb topping and used a light sprinkling of my New, Improved Okara Parmesan Substitute. I didn't have any vegan cheese handy to grate, so I made my easy Melty Chedda Cheeze (2 x the recipe, from my book "20 Minutes to Dinner"), also in the microwave, just before assembling the casserole, and drizzled half of it in the middle:
and half of it on the top, covered with the Okara Parmesan sprinkle. It came out very well! The Bechamel puffed up nicely during the baking:
Here's a little preview of an upcoming post I'm working on about using chickpea flour
One night we had a craving for peanut sauce, and some fresh spinach to use up, so I made low-fat version of my Thai-Style Spinach and Tofu with Peanut Sauce. The only changes I made to the recipe were to omit the 1 tsp. sesame oil and to dry-fry the tofu in a nonstick skillet instead of frying it in oil (you could also brown them on a cookie sheet under the broiler). The peanut butter made up our daily fat ration.
Today for lunch we had my vegan Minestrone alla Milanese (from my book "Nonna's Italian Kitchen"
A FAT-SAVING TIP:
The way I saved on oil in the Minestrone recipe was something that I use frequently-- I "sweat", soften or "steam-fry" (saute without oil) the onions, and other chopped or sliced veggies, in a covered Pyrex casserole or pie plate in the microwave. Then you can use your oil or fat ration in a more interesting way-- a salad dressing or whatever. (PS: If you are afraid of using a microwave, please read this compilation of info.)
Microwave option for “sweating” the vegetables: Spray a microwave-safe pie plate or casserole lightly with oil from a pump sprayer
Cook the mixture on high power for about 5 minutes, covered with a microwave-safe lid, plate or pie plate. If you are doing alot at one time, you might need 10 or more minutes. Cook until they are softened.
(To "sweat" vegetables with no oil on the stove-top: Spray a sturdy nonstick skillet
I made the following soup using this method to cook the leeks, onions, and garlic:
Printable Recipe
BRYANNA'S FAT-FREE CREAMY LEEK AND POTATO SOUP
Servings: 4
A very easy and deliciously rich-tasting leek soup. I like the green parts of the leek, so I use them as well as the white part.
3 medium leeks, cleaned and sliced thinly crosswise
1 small onion, chopped
4 cloves garlic, chopped
1 teaspoon coarse salt
1/2 teaspoon dried thyme leaves
4 cups good vegetarian chicken-style broth
2 cups (@ 12 oz.) diced, peeled Yukon Gold potatoes (or Russets, in a pinch!)
1 small bay leaf
Garnishes:
a few tablespoons minced fresh parsley (or dill)
Tofu Sour Creme (Tofutti or homemade)
freshly-ground black pepper
Combine the white part of the leeks with the onion, garlic, coarse salt and thyme in a Pyrex casserole
In a heavy soup pot
Remove the bay leaf from the pot and discard. Blend the soup right in the pot with a stick/immersion blender
Serve immediately, garnished as you wish.
Nutrition Facts
Nutrition (per serving): 134.0 calories; 1% calories from fat; 0.2g total fat; 0.0mg cholesterol; 1179.7mg sodium; 717.2mg potassium; 32.4g carbohydrates; 2.9g fiber; 4.3g sugar; 29.5g net carbs; 4.3g protein; 2.1 points.
UPDATE ON PFOA AND PTFE-FREE NON-STICK SKILLETS:
(UPDATE ON THE UPDATE April 2012-- It's been a few years now and I'm still using some non-stick pans, but even some of the ones I paid alot of money for have not withstood the test of time. (The Swiss Diamond pans held up better than the Berndes ones did.)
I am beginning to think that I should acquire some smaller cast iron skillets. (I only have one left and it's 14" one-- very heavy, but great for baking pizza!) I have another 10" cast iron skillet from Ireland (I got it at a garage sale, I think) that has a nonstick coating on the inside, but it never peels or chips or loses its non-stick quality, as some do. I use it all the time , but I can't make out what company was the maker. I'll keep an eye out at thrift stores, etc., because I know how to season and care for a cast iron pan (however, you can by them pre-seasoned new).
HARD-ANODIZED ALUMINUM:
I acquired 2 small Calphalon hard-anodized aluminum pans years ago and I use them often, but one is a small (2 1/2 qt.) stockpot and the other is a small lidded shallow (1 qt.) saucepan. These are the old-fashioned kind (they call them Calphalon Commercial now-- all the other Calphalon lines, except for their stainless steel line, have a nonstick coating), and they don't seem to make these particular-sized pots anymore. I recently found a 12" Calphalon sauté pan (holds 3 qts.) at Value Village, in great condition, for $4 (new, it would be over $80-- I believe that it's this one.)! The pans heavy, but not as heavy as cast iron, and honestly, it is almost non-stick. It conducts heat so well-- it's my new favorite! You can buy a 13-piece set of Calphalon Commercial at amazon.com, as well as many other individual pieces of cookware in this line. This 12" "Everyday Pan" with a lid would be a good one in any kitchen.
Is it safe? "Anodized Aluminum Cookware May Be a Safer Alternative [to stainless steel] These days, many health conscious cooks are turning to anodized aluminum cookware as a safer alternative. The electro-chemical anodizing process locks in the cookware’s base metal, aluminum, so that it can’t get into food, and makes for what many cooks consider an ideal non-stick and scratch-resistant cooking surface. Calphalon is the leading manufacturer of anodized aluminum cookware, but newer offerings from All Clad (endorsed by celebrity chef Emeril Lagasse) and others are coming on strong." Source. (I think they all have a nonstick interior, though I could be wrong.)
And here's a long article explaining the process of anodizing and the benefits.)
*******************************************************************
ORIGINAL UPDATE:
Many people I talk to are afraid to use non-stick skillets, even though such respected doctors as John A. McDougall and Neal Barnard advocate their use. (Here is Dr. McDougall on the subject.) These folks are unaware that the industry has really been listening to the public and the technology is more advanced. Gone are the days of non-stick surfaces peeling off into your food!
The new coatings are inert (see the McDougall article) AND PFOA and PTFE-free (these are the substances that caused alarm).
There are so many makes of cookware out there, it's hard to know what to buy! And I know that not everyone can afford to or wants to spend over $100 on a skillet! If you want a mid-priced, but sturdy, skillet you can do very well with the new Cuisinart Green Gourmet line. The skillets were reviewed very favorably by Fine Cooking magazine in terms of construction and performance. From the Cuisinart website: "...Exclusive Cuisinart Ceramica ™ nonstick technology is ceramic based instead of petroleum based, helping to conserve existing oil supplies and the coating is applied at a temperature one half that of conventional nonsticks. And it’s completely free of PTFE and PFOA. The cookware’s hard anodized construction provides high heat conductivity, which requires less energy to reach desired cooking temperatures. Riveted stainless handles stay cool on the stovetop and are made from 70% recycled stainless steel. ..."
(It's important to have a sturdy pan with some heft-- otherwise it will warp. That's what usually happens to the cheaper pans, even the "green" ones. [I have some myself!] The popular Green Pan™ feels too light to me.)
There is a Cuisinart Green Gourmet Hard-Anodized line of cookware and a Stainless Steel Green Gourmet
 line, but the inner surface is the same. In the USA, they offer full lines of Green Gourmet cookware, not just skillets. (Only the hard-anodized seems to be available in Canada, and only some of the skillets.)
(You can get it for $49.99 Cnd or $41.31 USD at this Canadian source ! They also have the 10" model for $34.99 Cnd or $28.92 USD. These are the hard-anodized line only.)
Here's a blog review.
There is a Cuisinart Green Gourmet Hard-Anodized
(You can get it for $49.99 Cnd or $41.31 USD at this Canadian source ! They also have the 10" model for $34.99 Cnd or $28.92 USD. These are the hard-anodized line only.)
Here's a blog review.
I hope this helps!
Subscribe to:
Posts (Atom)