Saturday, December 27, 2014

PICS OF TWO HOLIDAY FEASTS & BEST WISHES FOR THE NEW YEAR!


My best wishes to all of my readers and friends, and I sincerely hope for a peaceful and joyful New Year for all of us!

Just a quick post today-- some photos of our Christmas Dinner and our Boxing Day (December 26th) gathering with family at my daughter Sarah's house.

VEGAN CHRISTMAS DINNER, 2014:
(CLICK ON THE PHOTO FOR A LARGER VERSION)

Our vegan friends Mike (whose partner, Fireweed, could not come due to illness), Holly, David and Tanya, and my stepson Laurence enjoyed this "Beefy" Seitan Roast" wrapped in crunchy artisan bread dough for the main dish-- I hadn't made this for quite a few years.  I'd almost forgotten how delicious it is!


"Beefy" Seitan Roast in a French Bread Crust au Jus was originally from my book "The Almost No-Fat Holiday Cookbook", but this time I used my newer version of "Beefy" Seitan Roast and my No-Knead Crusty Bread dough (and baking mehod), both from my book "World Vegan Feast". I baked it in a large pre-heated covered roasting pan at 475 degrees F for 45 minutes. The roast is pre-cooked in a very flavorful cooking broth and then thinly sliced and the slices then tied together with twine.

The crusty bread dough is rolled out fairly thin and a mixture of herbs and garlic is spread on the dough. The seitan roast is placed over the herb mixture, and then more of the garlic/herb mixture is spread on top of the roast,. The rest of the dough is pulled up and around to enclose the roast completely, placed seam-side down in the hot roasting pan, and baked until crusty and golden. After you cut the top of the bread all around with a bread knife, you can lift it off and then snip the twine and pull it out. The seitan stays moist and tender, and the herb and garlic mixture flavors the crusty bread that you pull off.

It's easy to serve, since the roast is pre-sliced.  I serve it with some of the cooking broth, thinned with a bit of water to taste and then heated (this is the "Jus") and I also thickened some of the cooking broth with some cornstarch and added some Port wine to that for a thin-ish, silky gravy.

**The leftovers make a great vegan "French Dip" sandwich!**

Rounding out the meal: (CLICK ON THE PHOTO FOR A LARGER VERSION)


Clockwise from the top left:

1.) Mike brought Fireweed's beautiful and delicious broccoli salad, with other fruits and vegetables and topped with pomegranate seeds, and I made simple roasted Hubbard squash slices with my homemade vegan palm-oil-free "Buttah", brown sugar, cinnamon and pecans.

2.) I also made roasted German Butter potato wedges with olive oil, rosemary (from my herb garden) and Maldon flake salt.

3.) My friend Holly brought delicious vegan lemon curd tarts.

4.) David and Tanya brought some awesome homemade Dark Chocolate/Almond Butter Cups, and a luscious Arborio rice pudding, which was eaten before I could photograph it!

Yum, yum, yum!

FAMILY BOXING DAY BUFFET 2014:(CLICK ON THE PHOTO FOR A LARGER VERSION)
We had a lovely afternoon get-together in Courtenay, BC at my daughter's Sarah's house with Sullivans, Grogans, McKenzies, and Clarks, and dogs Phoebe and Bessie, of course! My oldest daughter Bethany came from Hornby Island with her husband Parker and my two eldest grandchildren, Levon and Savannah.  Sarah's eldest daughter Kate was home from Vancouver for a couple of weeks, and of course, her younger sisters Hannah and Cleo, as well as my son's daughter Mariah. Joining us were stepson Sean, Kate, Hannah and Cleo's Dad, Ben, and their Grampa Tony.


Clockwise from the top left:

1.) Granddaughter #5, Cleo, and the Boxing Day buffet.

2.) Tofu Pot Pie, roasted cauliflower, No-knead Bran Rolls, sauteed  Brussels sprouts, Seitan "Ham".

3.) My homemade palm-oil-free "Buttah", gravy, mashed spuds, homemade cranberry sauce, Sage, Onion and Celery Bread Stuffing, Seitan "Turkey", No-Knead Bran Rolls, roasted cauliflower, sauteed Brussels sprouts and Tofu Pot Pie.

4.) Homemade cranberry sauce, Sage, Onion and Celery Bread Stuffing, Seitan "Turkey" with gravy, No-Knead Bran Rolls, roasted cauliflower, glazed acorn squash, Tofu Pot Pie, Seitan "Ham" and sauteed Brussels sprouts at the far end.

**Oh, and I forgot to photograph the dessert table, which was consisted of my vegan Coffee Coffee Cake and Triple Ginger Espresso Cake; Sarah's Pumpkin Gingerbread Cookies and Vegan Chocolate Toffee Bars; Bethany's Panetone (Italian Christmas Bread), Candy Cane Shortbread and Chocolate Chip Blondies.**

Full, and happy, tummies all around!

Happy Holidays!


Friday, December 19, 2014

SIMPLE-BUT-DELICIOUS LEEK & GIGANTE BEAN (OR WHITE BEAN) SOUP; & YUMMY VEGGIE SANDWICH ON HOMEMADE SPROUTED WHEAT BREAD


This was our lunch the other day and you could hardly hope for a more delicious, inexpensive and healthful, even though it was made from simple ingredients and leftovers.  The soup is my rendition of an Italian soup and, in true Italian style, the flavor belies the simplicity of the few ingredients.  My husband raved over it and wants me to make it regularly.

The sandwich was made with thin slices of my second batch of homemade sprouted wheat bread made with minimal flour.  (Read about my first trial here.)  I didn't have much to make a sandwich out of, so I spread both sides the last of my homemade Okara/Cashew Ricotta (2 other vegan ricotta recipes here) and sprinkled one side with grated carrots and the other side with thinly-sliced red bell pepper.  Doesn't sound very exciting, does it?  But, surprisingly, the combination of the smooth ricotta, the crunchy fresh veggies, and the nutty sprout bread was scrumptious!

The first batch of my sprouted wheat bread included about 1 cup flour per loaf-- the rest was the ground sprouted wheat, kneaded together with the yeast, salt, etc. (no oil).  The 
loaves rose beautifully, cut well, had a lovely crumb and flavor, and looked like a "normal" loaf of homemade sandwich bread: 
1st batch of homemade sprouted with bread with minimal flour (Here's the final recipe.)
My second batch was made the same way (but I oiled everything the dough touched to avoid having a sticky mess like the first time!), except that I used only 1 cup whole wheat flour for 3 loaves.  As you can see by the photos below, it didn't rise as nicely, but it was easy to slice and smelled and tasted divine.

2nd batch of homemade sprouted wheat bread with minimal flour (but less than the 1st batch)
I want to test the sprouted wheat bread at least one more time, or until I get it to our satisfaction (so close!), before I post the recipe on this blog, but I doubt I'll get it done until January-- too many other things to do  right now! (UPDATE: Here's the recipe!) But we love it so much that we don't mind consuming the experiments!  Happy Holidays, everyone. (I will post again before Christmas.)

So here's that soup recipe:

Printable Recipe

BRYANNA'S SIMPLE-BUT-DELICIOUS LEEK AND GIGANTE BEAN (OR WHITE BEAN) SOUP 

Serves 4


I utilize the leek greens (which are often discarded) as well as the white part. Despite its simple ingredients, this soup is absolutely delicious and soul-satisfying!

1 lb.  leeks, cleaned
4 cups  tasty vegan broth (I like Better than Bouillon No-Chicken Vegan Broth Base)
1/2 teaspoon  dried sage (rubbed, not powdered)
1 tablespoon  olive oil
2 cups  cooked or canned Gigante beans (giant lima beans or butter beans) OR white beans (Great Northern, cannellini, etc.)


salt and freshly-ground black pepper to taste

Trim the roots off the leek tops and discard any tough outer leaves. Cut the leeks in half across the middle and then cut them in half lengthwise. Wash well to get any of the dirt that might be stuck between leaves, etc..  Pat dry and slice thinly (across, not lengthwise), keeping the green parts separate from the white parts.

Place the sliced leek greens in a pot with the broth. Bring to a boil, then turn down to a simmer, cover and cook for 15 minutes.

While that simmers, sauté the white leek tops and the sage in the olive oil over moderate heat until they are softened. (OR, microwave the leeks, sage and olive oil in a covered microwave-safe dish or casserole at high power for about 4 minutes.)

Rinse and drain the beans. Add the beans and sautéed leek tops mixture to the pot. Cover and simmer for 10-15 minutes more. Taste for salt and pepper. Serve hot.

 Nutrition Facts
Nutrition (per serving): 207.2 calories; 17% calories from fat; 4.1g total fat; 0.0mg cholesterol; 714.7mg sodium; 681.9mg potassium; 36.7g carbohydrates; 8.6g fiber; 8.1g sugar; 28.1g net carbs; 10.0g protein; 5.3 points.

Enjoy!


Monday, December 8, 2014

MY SECOND SPROUTED WHEAT BREAD EXPERIMENT: EASY SPROUTED WHEAT TORTILLAS (NO FLOUR)


JAN. 2, 2015: SEE UPDATE IN RECIPE BELOW.

If you read my blog post from 1 week ago about making sprouted wheat bread, you'll know I'm experimenting with making breads from dough made from sprouted hard wheat kernels, with little or no flour.  My first loaf bread came out beautifully, but the dough was so sticky that it took me WAY too long to clean up my food processor and mixer.  I didn't know if I'd try it again (after soaking everything in warm water, it took me about 20 minutes of scrubbing to clean everything, and the sponge had to go into the garbage can!). But after I let the dough rise in an oiled bowl I found that the bowl was easy to clean, and when I cut and rolled the dough and shaped the loaves, I oiled my hands and had no problem with sticking.  So, contrary to what I was thinking while washing those sticky appliance parts that morning, I decided to try the sprout dough once again, but oiling everything the dough touches!  See my final sprouted wheat bread recipe with minimal flour-- delicious!)

I did just that with this tortilla dough, and it worked like a charm! I will definitely be making these tortillas again and trying the loaf bread again.  Here's the tortilla recipe (you'll save lots of money making your own rather than buying them, and they taste so nutty and fresh):


Printable Recipe

BRYANNA'S SPROUTED WHEAT TORTILLAS
Makes 6 tortillas (each about 6 1/2 inches across)


I soaked the wheat kernels in warm water from Friday night until Monday morning, changing the water a couple of times.  If your house is warmer than mine, it may take less time. The sprout should be tiny-- just a baby sprout.  It doesn't even matter if not all the kernels sprout when they soak that long.

1 cup hard wheat kernels (PS: I might try soft wheat kernels next time just to see how it works.)
UPDATE, JAN. 2, 2014:  I DID TRY IT WITH SOFT WHITE WHEAT KERNELS AND THE TORTILLAS WERE LIGHTER IN COLOR AND A LITTLE MORE FLEXIBLE.)
1 tablespoon oil
1 1/2 teaspoons baking powder
1/2 teaspoon salt

Soak the wheat kernels in warm water in a warm spot until they just barely sprout (see text above in intro to recipe).  Drain them in a colander for about an hour before grinding.

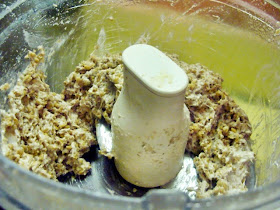
Lightly oil all parts of the food processor which the dough will touch, including the inside of the removable blade and the underside of the lid. Add the well-drained sprouts to your food processor and add the remaining ingredients.  Grind at high speed until a dough forms (you will still see pieces of the kernels covering in the dough)


Remove the dough a form into a ball, placing it on a piece of baking parchment or a baking mat sprayed with a bit of oil.


Divide the dough into 6 equal pieces (I weighed them and they weighed 2 to 2 1/8 oz.), rolling each into a ball with oiled hands.  

Heat an 8-10-inch cast iron skillet over high heat.  While it heats, carefully roll out one tortilla with an oiled rolling pin to about 6 1/2-inches across.  When the pan is hot, carefully loosen the edges of the tortilla with a bench knife, slide your hand under the parchment and use it to carry the tortilla to the pan,  Turn it upside down, carefully easing the tortilla into the pan in one piece.  (It may take a bit of practice if you are new at this!)  Turn the heat down to medium-high.  Cover and cook until the dough is golden brown with a few darker spots on the bottom,  Loosen with a spatula and turn over.  Cook until the other side is done.  Transfer to an open paper bag placed on a rack.


While the 1st tortilla cooks, you can roll out the next one.  The timing worked well for me.  Eat immediately, or cool in the paper bag and then transfer to a zipper-lock bag.  If you can't eat them all by the next day, freeze the leftovers.

Enjoy!


Saturday, December 6, 2014

MY FAVORITE VEGAN BORSCHT


When I published my last post on sprouted wheat bread, I promised to post this soup recipe (it's a little late, I'm afraid!).  This soup has a pretty long history in my life.  Many years ago I read a cookbook by a Russian woman who lived in the United States.  I liked her Borscht recipe very much.  She claimed that it was given to her by someone who had been in the Tsar's army-- thus the name.  Now, this was in my pre-vegetarian days and the soup included beef.  Eventually, in the 1970's, I became more interested in eating vegetarian and I revamped the recipe in a very simple way-- using soy sauce to "beef" up the meatless broth (this was in the days when vegetarian bouillons were not so readily available) and adding 1/2 cup of red split lentils to add protein and body to the soup. I included this recipe in my book "The Fiber for Life Cookbook".

I hadn't changed anything in this recipe since I first "veganized" it, until I made it the other day, when I decided to increase the amount of red split lentils to 1 cup, and I cooked it in my electric pressure cooker, for a change.  It is still as delicious as ever and so simple to make.  Here's the re-vamped recipe, and I hope you like it as much as we do-- it's great for winter meals.

BRYANNA'S MEATLESS “TSAR'S ARMY” BORSCHT
Serves 8   (Can be oil-free)

1/2 tablespoon olive oil (optional)         
1/2 tablespoon dark sesame oil (optional)          
2 large onions, sliced 
2 cloves garlic, chopped        
1/2 cup chopped celery leaves          
8 cups water   
14 ounces canned diced tomatoes and juice (OR about 3/4 cup passata)   
1/2 small head cabbage, cored and shredded or sliced finely (about 4 cups)    
2 beets (fist-size), peeled and diced (about 3 cups)
1 cup split red lentils 
1/2 cup soy sauce or tamari (NOT Bragg's Liquid Aminos-- it doesn't have the umami punch of fermented soy sauce or tamari.)
Finishing:
1 small raw beet, peeled and grated  
salt and freshly-ground black pepper to taste

If you use the oils: Add the two oils to your soup pot over high heat. Add the onions, garlic and celery. Sauté over medium-high heat until the onion softens a bit. If you prefer not to use oil: place the onion, garlic and celery in a Pyrex or ceramic casserole, cover and microwave on high for 6 minutes.  Add to your soup pot.
Add the water, tomatoes, cabbage, diced beets, soy sauce and lentils. Bring to a boil, turn to a simmer and cook for 2 hours, OR pressure-cook for 45 minutes, using quick-release when it's done. Add the grated raw beets (which brings back the pinky-red color to the soup) and taste for salt and freshly-ground black pepper.

Serve with vegan sour cream, store-bought, or try recipe for Tofu Sour Cream.

 Nutrition Facts
Nutrition (per serving, using oil in recipe): 174.9 calories; 12% calories from fat; 2.5g total fat; 0.0mg cholesterol; 701.6mg sodium; 716.9mg potassium; 31.5g carbohydrates; 7.2g fiber; 9.8g sugar; 24.3g net carbs; 9.5g protein.

Enjoy!


Monday, December 1, 2014

TEASER ABOUT SUCCESSFUL SPROUTED WHEAT BREAD (MINIMAL FLOUR)


UPDATE: Here is the final, successful recipe!

This is going to be a short post with no recipe (YET!).  I promise to post a great soup recipe in the next two days to make up for this!  But I just had to post the photos of an experiment I did today (started several days ago).

I prefer not to buy sprouted wheat flour-- it's very expensive.  And, in any case, we grind our whole wheat flour, so we have lots of wheat kernels in the house at all times.  So, because I am interested in bread with a lower glycemic index rating (low-glycemic diets may have a positive influence on my husband's triglyceride levels AND definitely improve blood sugar levels for pre-diabetics and Type 2 diabetics), I did some research on making yeasted sprouted wheat breads with no flour or minimal flour. ("Since particle size influences the glycemic index (the smaller the size the higher the glycemic index), bread made from grain kernels have been shown to be lower GI. Not yet tested but probable, bread made from sprouted grains can be expected to have a similar effect." From http://tinyurl.com/ywve7)  After some rather intensive research as to how to make a sprouted grain bread that looked like the type of bread we are used to-- nicely risen, not flat and brick-like-- I was ready to give it a try.

So, I placed 6 cups of hard wheat kernels in a bowl of warm water to soak and eventually sprout. The sprout is supposed to be tiny.  Unfortunately, our weather is quite cold right now, so it took about 3 days for them to sprout at all-- some didn't.  But I have to go to work tomorrow, so today was now or never.

I took the advice of the blogger in the link above and ground the kernels in my food processor (but I did it in 3 batches). I don't think I drained the kernels sufficiently, though, because the "dough" seemed very wet.  I ended up adding 3 cups of whole wheat flour while kneading in my Bosch mixer for 10 minutes.  It also felt like a lot more dough than two loaves worth, so I added another 1/2 tablespoon salt.  I used 1/3 cup brown sugar. Instead of the 2 loaves mentioned in the recipe, I ended up with dough for 3 loaves, 1 lb., 12 oz. each, plus 9 ounces more, which I used to make 3 flatbreads in a cast iron frying pan on the stovetop. ** Next time I'll drain the kernels for an hour or so before grinding and I hope that will preclude the need for any flour.  And it will probably mean that I won't have 9 oz. extra to deal with (I hope!).**

As you can see by the photos above and below, the recipe was a success-- dough was easy to handle and rose beautifully, baked up nice and crusty (I used my husband's baking method-- 5 minutes at 485 degrees F and 25 more at 375), tastes great, smells heavenly (kind of nutty) and the crumb is lovely. It makes delicious toast!


THE PROBLEM:
But the thing that was NOT so positive was that when I removed the initial ground sprout mixture from the food processor and the kneaded dough from the mixer bowl, I was left with a thin coating of sticky dough that stuck like glue, particularly to the blade (inside and out) of the processor.  After soaking everything in warm water, it took me about 20 minutes of scrubbing to clean everything, and the sponge had to go into the garbage can.

I let the dough rise in an oiled bowl and that bowl was easy to clean (thank goodness!).  When I cut and rolled the dough and shaped the loaves, I oiled my hands and had no problem with sticking. When I rolled out the flatbreads I oiled the counter a little and they rolled out just fine-- no flour needed.

So, contrary to what I was thinking while washing those sticky appliance parts this morning, I WILL try this once again, but I plan to oil everything the dough touches!  I am hoping that this will make cleaning much easier.  So, I will post again when I do the second trial!  Stay tuned!


'Til next time!


Thursday, November 27, 2014

ONE-POT VEGAN PASTALAYA (JAMBALAYA'S COUSIN)


Here's a quick, tasty family meal for a quick blog post!  I love the idea of one-pot pasta dishes (see here) and when I heard about Pastalaya, a modern Cajun/New Orleans dish similar to the rice-based Jambalaya, but using pasta instead, I was intrigued and had it on my list to "veganize".  It's spicy and super-flavorful (even better the next day!) and can be a full meal.  I hope you enjoy it as much as we did!

Printable Recipe

BRYANNA'S ONE-POT PASTALAYA
Serves 4
Some recipes I've seen use rotini pasta in this type of dish.  I used some organic Garofalo brand "casarecce" pasta that I had in the house, but it took longer than it should have to cook, so, the next time I make it I'll use linguine, tagliatelle or fettucine, broken in half. 

2 tsp. dark sesame oil
1 Field Roast Chipotle vegan sausage, thinly sliced (or use vegan chorizo, or a vegan Italian sausage and add some Cajun seasoning
2 cups reconstituted SoyCurls or other vegan chicken sub, or chopped vegan cutlets
6 medium mushrooms, quartered (Oyster mushrooms would be nice, but I just used white mushrooms)
Variation: If you have access to some vegan "shrimp" or "prawns", by all means add them, too!
1 green pepper (1/2 of it chopped, 1/2 of it sliced)
1 red pepper (1/2 of it chopped, 1/2 of it sliced)
1 cup chopped onion
3/4 cup chopped celery
3 cloves garlic chopped
1 teaspoon smoked paprika (hot variety, if you like it spicy)
1/2 tsp. EACH dried thyme leaves, oregano and basil
2 cups vegan broth
1 cup water
1 cup chopped, drained canned tomatoes
12 ounces dried pasta (I would use linguine, tagliatelle or fettucine, broken in half)
salt
4 large green onions, chopped (for topping each portion)


In a large heavy skillet or stirfry pan (flat-bottomed wok), heat the sesame oil over high heat.  Add the vegan sausage and chicken sub and stir over high heat until they are lightly-browned.  Remove them to a cooking pot and return the pan to the heat, spraying with a bit of oil.

Add the mushrooms and the SLICED red and green pepper to the pan and sauté over high heat, adding a squirt of water now and them to keep it moving.  When the vegetables begin to wilt a bit, remove them to the cooking pot.


Add the chopped onions, celery, peppers and garlic to the skillet or stirfry pan and stir-fry over medium-high heat, adding a squirt of water at intervals to keep them from sticking, until they are softened and  starting to brown.  If they seem to be taking too long, you can cover the pan and steam them a bit.


Add them to the cooking pot, along with the paprika, thyme, oregano and basil and toss everything together.


Stir in the broth, water, tomatoes and dry pasta.

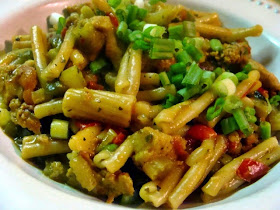
Before the Pasta is cooked
Bring to a boil, turn to just low enough to keep it at a low boil, cover tightly and cook for about 12-15 minutes, or until the pasta is al dente.  If the dish is too liquidy, uncover at the end and cook it down until it is "sauce-y". Taste for salt.

After the pasta is cooked 


Enjoy!


Monday, November 17, 2014

GF & SOY-FREE (OR NOT!) VEGAN SELTZER WAFFLES WITH CRISPY SWEET POTATOES & LIGHT CHIK'N GRAVY


Back in November 2011I was a bit obsessed with waffles. While revising my Vegan Seltzer Waffles (made with club soda, which makes them nice and light), I decided to also develop a gluten-free and soy-free version, so we were eating waffles for breakfast and dinner quite a lot. Finally satisfied with both my gluten-free version and my wheat version (probably to my husband’s great relief!), I began working on a vegan version of “chicken waffles,” a popular, but very high-fat, restaurant dish. It has always intrigued me, but I was never satisfied with my attempts at recreating a lower-fat vegan version. Until I came up with the following recipe that was originally published on a So Delicious coconut milk blog and I'm reproducing here, in a revised (and slightly corrected) format. 

There are two different versions of this dish—the Southern one, which consists of fried chicken pieces on a waffle with hot syrup poured over the whole she-bang (and now sometimes further “enhanced” with bacon, for good measure); and the Pennsylvania Dutch version, which is a waffle topped with strips of boiled chicken and a chicken gravy.

The Southern one sounded a bit over-the-top to me, but I liked the idea of gravy on a waffle (I do love gravy). The very first attempt I made was pretty delicious—I combined the Southern and Northern versions and topped our waffles with some President’s Choice “Meatless Breaded Chicken Strips” (a Canadian product made by Gardein®, similar to their “CrispyTenders”) and a light vegan gravy. Mmmmm-good! (I’m sure that crispy coated tofu strips would be good, too.) The gravy was also delicious with Butler SoyCurls®, reconstituted in a vegan “chicken” broth and lightly browned—a more Northern-style version that would also work with a light seitan or any of the new commercial vegan “chicken” strips and similar products.


But I couldn’t use any of those products in a gluten-free and soy-free version of the dish, so I was racking my brains for something delicious that would be suitable and satisfying. For three days or more I mulled it over. Finally, the light bulb went off in my head—crispy oven-“fried” slices of sweet potatoes or yams; suitably Southern and full of flavor—just the ticket!


For the gravy, I started out with a milky Southern biscuit gravy recipe that I had developed a few years ago, but it seemed too heavy for this recipe. I revised it, substituting some “chickeny” vegan broth for some of the non-dairy milk and adding some herbs and green onions. I used a white-rice-based GF flour mix (you can use a commercial one with similar ingredients,if you prefer) instead of the wheat flour for the thickener, and it made for an exceptionally silky texture—just what I was hoping for.


I used Original So Delicious® Coconut Milk Beverage for the "milk" in the waffles, the gravy, and as part of the coating for Crispy Sweet Potato Slices. It provided just the right amount of richness and flavor, without excessive fat. I hope you’ll enjoy this recipe as much as we did!

***********
This dish may seem complex at first, but as you'll see, with all three components, you'll be creating a stupendously delicious dairy-free (and gluten-free!) meal—or you can enjoy the waffles, crispy sweet potatoes, or chik'n gravy served with your favorite accompaniments. And since most of the recipes can be made well ahead of time, this hearty meal will be a snap to put together when it's time to serve!

BRYANNA'S VEGAN SELTZER WAFFLES WITH CRISPY SWEET POTATOES AND LIGHT CHIK'N GRAVY (GLUTEN-FREE AND SOY FREE—OR NOT!)
Serves 4

For convenience, make the waffles and the gravy ahead of time, and reheat just before serving. If you and your guests have big appetites, use 2 waffles per serving. If not, use one each. It’s a filling and satisfying dish. We like this for supper, but it makes a great brunch dish, as well.

COMPONENT RECIPES:
1.) 4 to 8 Bryanna’s Gluten-Free Vegan Seltzer Waffles (see recipe below)

2.) 1 recipe Bryanna's Light Vegan Southern-Style Chik'n Gravy (see recipe below)

3.) Crispy Sweet Potatoes/Yams (see recipe below)

PUTTING THE COMPONENTS TOGETHER AFTER YOU'VE MADE ALL 3:
While the sweet potato/yam slices bake, you can gently reheat the Chik’n Gravy, either in a saucepan on the stovetop, or in a microwave-proof pitcher in the microwave at no more than 50% power. 

Place the already-made waffles on racks on top of baking sheets. Place them in the oven at the same time you turn the yam/sweet potato slices over to crisp the second side. Watch the waffles so that they do not brown. You just want to heat them up and crisp them a bit.

For each serving, place a waffle (or 2) on a heated plate, top each serving with 5 or 6 hot Crispy Sweet Potato/Yam slices, and drizzle with the hot gravy. Serve immediately.


                                                                 COMPONENT #1:
BRYANNA'S GLUTEN-FREE, SOY-FREE (OR NOT: SEE NOTE) SELTZER WAFFLES 

(Serves: 4-8 Yield: Eight 7-Inch Waffles)

Note: If you don't want or need to make these gluten-free, you can use my original recipe for wheat-based Seltzer Waffles.

I use a regular non-stick waffle iron, not the Belgian type that makes thicker waffles. I have the Cuisinart Traditional waffle iron. These waffles can be made ahead of time and crisped and heated in the oven ahead of time, if you wish.

Dry Mix:
1 cup brown rice flour
1/2 cup tapioca flour (or starch)
1/3 cup potato starch (not potato flour)
1/4 cup chickpea flour (known as besan in South Asian grocery stores)
2 tablespoons coconut flour
1 tablespoon organic granulated sugar, or other sweetener of choice
1 teaspoon salt
1 teaspoon xanthan gum or guar gum
1/2 teaspoon baking soda

Wet Mix:
Flax Seed "Glop": 
1/2 cup So Delicious Original Coconut Milk Beverage + 2 tablespoons golden flax seeds (if using ground flax seed, use 1/4 cup)
Additional Wet Ingredients:
7/8 cup So Delicious Original Coconut Milk Beverage
2 tablespoons vegetable oil
1 tablespoon apple cider vinegar
Seltzer water: 1 1/4 cups (10 oz) club soda
1/2 teaspoon pure vanilla extract (optional)

NOTE: If you are going to eat the waffles immediately after cooking, adjust your oven rack to the middle position and heat the oven to 250º F. Set a wire rack in rimmed baking sheet and place the baking sheet in oven. If they are to be eaten later, simply have some cake racks ready on your counter.

To make:
Whisk the Dry Mix ingredients together in large bowl to combine.

In a blender, whiz together the 1/2 cup So Delicious® Coconut Milk Beverage and flax seeds until the mixture is fluffy, white and "gloppy" like lightly beaten egg whites. (See photo below.)


Add the Additional Wet Ingredients and blend briefly to mix well. Turn the blender off, remove the container from the machine and, with a slim spatula, gently stir in the club soda.

Immediately make a well in center of Dry Mix ingredients and pour in the combined Wet Mix and club soda. Using a small spatula, gently stir until just combined. The batter should remain slightly lumpy with streaks of flour.

Heat your waffle iron, spray with oil from a pump sprayer (or rub with a little coconut oil), and bake each waffle according to manufacturer’s instructions (for a 7-inch round waffle I used 1/2 cup batter). In my Cuisinart Traditional waffle iron, I cook them on the #4 setting until the steam stops pouring from the iron, which takes about 4 minutes.


Transfer the waffles to a rack in warm oven and hold them for up to 10 minutes before serving. Or if they are to be reheated later in the day, place them on cake racks on the counter to cool. To reheat the cooled waffles, place them on racks on top of baking sheets in a 350º F oven for a few minutes, until hot and crisp. Any leftover waffles can be frozen in zipper-lock bags to use as toaster waffles.

***********


COMPONENT #2:
BRYANNA'S LIGHT SOUTHERN-STYLE CHIK'N GRAVY
(soy-free and gluten-free...or not!)
Servings: 6, Yield 3 cups


1/3 cup white GF flour mix (recipe here, or use a commercial version with similar ingredients)
(OR if you don't need to make them GF, use unbleached white flour, but the white-rice-based GF flour mix makes a really silky-textured gravy!)
1/4 cup nutritional yeast flakes
1/2 teaspoon salt
1 1/2 cups water
1 cup So Delicious® Coconut Milk Beverage
1/2 tablespoon low-sodium soy sauce
1/2 tablespoon "chicken-style" vegetarian broth powder or paste
(Use a GF and/or SF version, if necessary—here’s 
my homemade GF & SF broth powder, but you will need to use 1 tablespoon instead of 1/2 tablespoon.)
1 teaspoon dark sesame oil
1/2 teaspoon dried rubbed sage (not powdered)
1/2 teaspoon dried thyme leaves (not powdered)
1/4 teaspoon freshly-ground black pepper
2 green onions, thinly sliced

Place the flour, nutritional yeast and salt in a 2-qt. microwave-proof bowl or pitcher and microwave on high for 2 minutes. Whisk in the water, So Delicious® Coconut Milk Beverage, soy sauce, broth powder or paste, sesame oil and herbs.

Cook in the microwave on High for 2 minutes. Whisk the mixture well. Microwave again for 2 minutes, or until thickened (microwave once more if necessary). Whisk again, taste for seasoning, stir in the sliced green onions and serve hot.

If making on the stovetop, toast the flour, yeast and salt lightly in a DRY heavy skillet or saucepan over medium heat, stirring constantly. Do not brown the flour. Off the heat, whisk in the water, So Delicious® Coconut Milk Beverage, and soy sauce, making sure that there are no lumps. Whisk in the broth powder or paste, sesame oil and herbs. Stir over high heat just until it starts to boil, then reduce heat to medium and stir for several minutes, until thickened. Whisk again, taste for seasoning, stir in the sliced green onions and serve hot. 
****************

COMPONENT #3
CRISPY SWEET POTATOES/YAMS 
(Note: the measurements for the following ingredients are approximate)

1 lb. sweet potato (orange-flesh) or yam (white or yellow flesh)
1/2 cup + 1/2 tablespoon white GF flour mix (Or you can use wheat flour instead, if you like.) 
1/2 cup So Delicious® Coconut Milk Beverage, Original
1 teaspoon Cajun seasoning (homemade recipe here)
1/2 cup brown rice flour
olive oil in a pump sprayer bottle

Preheat your oven to 500ºF.

Cut the sweet potato/yam into 4 equal quarters, slicing it in half horizontally and then slicing the halves again in half lengthwise. You can peel the sweet potato/yam first, or remove the peel after cooking—it’s up to you.

I microwave the sweet potato/yam (without any water) in a covered microwave-safe casserole for about 7 minutes. You can also steam them. Just make sure that you remove them from the heat source when they are just barely cooked—you can stick a fork in the center, but the flesh is still firm.

Let them cool. (If you have not peeled them already, run some cold water over the skin side and the peel should come off easily. If it doesn’t, use a paring knife.) Slice the quarters lengthwise into about 3/8-inch-thick slices.


Assemble 3 shallow bowls (such as soup bowls) and place the 1/2 cup white GF flour mix in one; the So Delicious® Coconut Milk Beverage mixed with the Cajun seasoning and the 1/2 tablespoon white GF flour mix, in the second bowl; and the brown rice flour in the third.


Have ready a large baking sheet (dark baking sheets brown foods better), sprayed with oil from a pump spray bottle. Coat each slice of sweet potato/yam first with the white GF flour mix, then the So Delicious® mixture, and then the brown rice flour. Lay each coated slice on the prepared pan. Place in the preheated oven and bake for about 7 minutes, or until the bottoms are golden and crispy. Turn the slices over and bake for another 4-5 minutes, or until the bottoms are also golden and crispy.


****************

PUTTING THE COMPONENTS TOGETHER AFTER YOU'VE MADE ALL 3:
While the sweet potato/yam slices bake, you can gently reheat the Chik’n Gravy, either in a saucepan on the stovetop, or in a microwave-proof pitcher in the microwave at no more than 50% power. 

Place the already-made waffles on racks on top of baking sheets. Place them in the oven at the same time you turn the yam/sweet potato slices over to crisp the second side. Watch the waffles so that they do not brown. You just want to heat them up and crisp them a bit.

For each serving, place a waffle (or 2) on a heated plate, top each serving with 5 or 6 hot crispy sweet potato/yam slices, and drizzle with the hot gravy. Serve immediately.

Enjoy!