Thursday, November 1, 2018

BRINGING BACK A STAPLE FROM PRE-VEGAN DAYS-- TOFU "COTTAGE CHEESE"


Yesterday I wanted to use up some medium-firm tofu that I had in the refrigerator.  For some reason, my mind dredged up memories of one of my late mother's favorite snacks, or breakfast items-- cottage cheese with pineapple tidbits mixed in.  Not very exciting, I know, but it sounded like a reasonable use for this excess tofu.  I got out my copy of my own book, "Soyfoods Cooking for a Positive Menopause", which contains my old recipe for Tofu "Cottage Cheese"-- I hadn't made that for ages!

It's quick and easy to make, so, in no time I had a container of it chilling in the fridge and went rummaging in the pantry for my last can of sliced pineapple. As soon as the "cottage cheese" was chilled enough, I scooped out 1/2 a cup into a bowl and stirred in two chopped-up slices of pineapple.  It made a great high-protein afternoon snack with some sourdough rye toast-- not exciting, perhaps, but satisfying and filling.

So, if you have been vegan for a while and are craving something from your pre-vegan days, this just might do the trick.  Here are 12 ways to use this recipe:

1.) Make a "Weight Watcher's Danish"-- spread 1/4 cup of my Tofu "Cottage Cheese" on a large slice of whole grain toast (with or without pineapple chunks) and sprinkle with cinnamon sugar.

2.) Spread Tofu "Cottage Cheese", topped with some berries, between slices of vegan French Toast.
3.) Make a healthful "Banana Split" by substituting "Tofu Cottage Cheese" for the ice cream and topping with berries or a lightly-sweetened berry sauce. For a breakfast dish, sprinkle with your favorite granola.

4.) Add some to a smoothie.
5.) Put a scoop on top of fruit salad or a chunky tomato-vegetable salad.
6.) Add some to any creamy pasta casserole.
7.) Use it as a crepe filling with strawberries or other fruit.
8.) Use it instead of sour cream on baked potatoes, etc.
9.) Spread Tofu "Cottage Cheese" on some crusty bread (toasted, if you like), top with sliced ripe tomato, drizzle with a bit of good olive oil, and sprinkle with flake salt and chopped green onion or basil- yum!
10.) Layer in small glasses with chopped melon and granola for breakfast "parfaits".
11.) Blend leftover Tofu "Cottage Cheese" into a vegan fruit popsicle mix.
12.) Use it as a filling for savory crepes topped with sauteed or grilled vegetables.


Printable Recipe

BRYANNA'S TOFU "COTTAGE CHEESE"      
Makes about 2 1/2 cups

1 lb. medium-firm tofu, mashed coarsely and drained well
2/3 cup firm or extra-firm SILKEN tofu
1 Tbsp lemon juice
3/4 tsp. salt
1/4 tsp. sugar 

Sprinkle 1/2 tsp. of the salt on the mashed tofu in a medium bowl.  In a food processor, mix the silken tofu, the remaining salt, sugar and lemon juice until VERY smooth.  Scoop into the bowl with the mashed tofu and mix gently.  Refrigerate in a tightly-covered container. That's it!

Nutrition Facts for 1/2 cup serving: 
Calories 77.50, Calories From Fat 39.20, Total Fat 4.64g, Saturated Fat 0.67g, Cholesterol 0.00mg, Sodium 359.26mg, Potassium 135.47mg, Carbohydrates 2.45g, Dietary Fiber 0.30g, Sugar 0.43g, Sugar Alcohols 0.00g, Net Carbohydrates 2.15g, Protein 8.12g 


Enjoy!


Sunday, October 28, 2018

QUICK & EASY AUTUMNAL BEAN, GREENS AND CARROT SOUP WITH VEGAN SAUSAGE


QUICKIE POST, once again:
I don't know why I haven't posted this recipe before now-- it's one of our perennial favorite soup recipes.  It's not only nutritious and quick and easy to make-- it's adaptable as far as some of the ingredients go, hearty, filling and tasty, and can feed you well for a few days, or feed a small crowd! We love it with vegan apple/sage sausages, but Italian-style are good, too. When I made this the other day, I had no vegan sausages (and I live on an island), so I sliced up a couple of my homemade vegan cutlets  and added that instead.  It worked out well, although I think I prefer the sausage.

About those "white beans"-- I really like Great Northern beans, but you can use small white beans, navy beans (also known as "pea beans"), cannellini beans, or white kidney beans.

I hope you enjoy this soup as much as we do!


Printable Recipe

BRYANNA’S QUICK & EASY AUTUMNAL BEAN, GREENS AND CARROT SOUP WITH VEGAN SAUSAGE 
Serves 8 to 10

2 cups diced carrots
2 medium onions, chopped
4 cloves garlic, crushed or chopped
3 apple/sage OR Italian vegan sausages (such as Field Roast or Tofurky), sliced
(NOTE: If you have no vegan sausage, you can substitute sliced seitan cutlets [as in the photos], or reconstituted Butler Foods’ Soy Curls, or other vegan product that you like.)
8 cups flavorful vegan “chiken-y” broth
3/4 tsp. EACH dried oregano, thyme and basil
3 cups cooked, drained white beans [see above] (OR two 15 oz. cans of white beans, rinsed and drained)
10-12 ounces roughly-chopped fresh greens of your choice, such as chard, kale, or baby spinach leaves
(NOTE: If you have no fresh greens, use a 10 oz. package of frozen chopped spinach or other greens, thawed and squeezed as dry as possible.)
Salt & pepper to taste

In a large, heavy pot sauté the carrots, onion and garlic in a little oil of choice (dark sesame oil is nice and flavorful) over medium heat until they have softened, adding a squirt of water if needed to keep things moving.  Add the garlic and vegan sausage slices and brown a bit. 
(NOTE: If you’re pressed for time, dump the carrots and onion into a microwave-safe casserole with a cover [Pyrex is good] and microwave this for about 6-8 minutes, until the onion and carrots are softened. Then dump it all into your hot, oiled pan with the garlic and sausage slices and stir over medium-high heat until you get the onions ans sausage a bit browned.)

Add the broth, herbs, white beans and greens to the pot, bring to a boil, then turn the heat down to a simmer.  Cover and cook for about 5 minutes.  Taste for salt and pepper.

OPTIONAL ADDITIONAL STEP:  If you want a “creamier” soup, take out 3 or 4 cups of the soup (minus the sausage slices) and process it until smooth in a large Pyrex batter bowl with a hand/immersion blender, then add this mixture back to the soup pot and mix well.

Nutrition Facts for one serving:
Calories   314.68, Calories From Fat  51.95, Total Fat 5.95g, Saturated Fat 1.25g, Cholesterol 2.46mg, Sodium 1812.07mg, Potassium 1071.18mg, Carbohydrates 52.06g,Dietary Fiber 9.60g,   Sugar 3.41g, Sugar Alcohols 0.00g, Net Carbohydrates 42.46g, Protein 15.53g 
  

Enjoy!


Wednesday, October 10, 2018

CRUNCHY VEGAN CORNSTICKS!


We went to the Denman Island Free Store on Saturday and I lucked out-- I came home with two cast iron Lodge cornstick pans (worth about $25 each!).  I love cornbread, and I've always wanted to try making cornsticks.  The cast iron pans were said to be the best because they make a really crunchy crust, so I had to try it immediately.

My recipe is an easy one and the corn sticks came out nice and crispy, as they should be.  They are great for eating with a good chili!


Printable Recipe

BRYANNA'S VEGAN CORN STICKS
Yield: 14 corn sticks  (Can be gluten-free if you use certified GF oat flour-- which you can make out of oat flakes in a dry blender.)

You will need two cornstick pans (preferably cast iron), each with 7 indentations for the batter. (Mine are Lodge, which is an excellent brand.)

DRY MIX:
1 cup yellow cornmeal
1/2 cup oat flour
1 tsp salt
1/2 tsp baking soda
WET MIX:
1 1/4 cups soy milk
1 Tbsp lemon juice
3 Tbsp oil OR 1/4 cup melted vegan butter
1 Tbsp Orgran or Ener-G egg replacer powder
ADDITIONAL:
1 Tbsp oil for brushing on pans
OPTIONALS:
I haven't tried any of these yet, just to let you know.
1.)Some people add corn kernels to the batter (about 1 cup), but toss them in the flour mix first.
2.) Another common addition is cayenne pepper-- about 1/4 tsp. -- or some chopped jalapeño peppers, or a cup of grated vegan "cheddar" or other vegan cheese.
3.) You could also try using 2 Tbsp. of ground golden flax instead of the egg replacer powder.

Directions:
Heat the oven to 450 degrees F. When the oven is heated, heat the pans in the oven for about 5 minutes. Brush the indentations in the hot pans with the 1 Tbsp. of oil.

Mix the Dry Mix ingredients together in a medium bowl, and whisk the Wet Mix ingredients together with a whisk or immersion blender in a 1 qt. pitcher. Set aside separately.

To make the batter:
Pour the Wet Mix into the Dry Mix and stir in an over-and-under fashion just to moisten all of the Dry Mix.. Spoon the batter into the oiled indentations of the warm corn stick pans, to just barely fill to the top of each one.  Immediately place in the hot oven and bake for 18 minutes. Cook the pans on racks for a few minutes before carefully loosening the sticks from the pans and removing the cornsticks to a plate.  They should be nice and crispy on the bottoms. Eat as soon as possible!

Nutrition Facts
Nutrition (per serving): 84 calories, 34 calories from fat, 3.9g total fat, 0mg cholesterol, 195mg sodium, 65.5mg potassium, 10.6g carbohydrates, 1.1g fiber, less than 1g sugar, 2.2g protein, 2.4 points.

Enjoy!


Wednesday, September 12, 2018

UPDATED MOIST & DELICIOUS LOW-GLYCEMIC, LOW-FAT, VEGAN BROWNIES


As you may be aware from reading this blog in the last few months, I am refining my vegan low-glycemic way of eating because of a diagnosis of pre-diabetes (and it's working!).  I've lost some weight, and I'm learning to use some different ingredients and to cook a bit differently from what I was used to, but it's really not been that difficult.  You can read about my research here and see some of my new low-glycemic recipes, discoveries and cooking adventures in my blogs from March 2018 to the present.

The one thing that we haven't been eating very often is dessert, sadly. (My husband is being very patient!)  I have devised a delicious low-sugar apple/rhubarb crumble, and some yummy no-sugar corn muffins, but we've mostly been enjoying the lovely fruits available this summer, and the occasional Chocolate "Nice Cream. (It's made with frozen ripe bananas and no added sweetener-- I'll post my version soon, as well as my newest version of Peruvian Lucuma Ice Cream, made with lucuma powder, which is used as a natural sweetener by some raw foodists, so you don't need to add much sweetener.). But, as  the weather was changing a bit, I thought I'd work on making some LG and low-fat  brownies. (You might have noticed that I love chocolate!)

In my first version, I use a combination of oat, millet and soghum flours (all low-glycemic) and smooth unsweetened applesauce instead of fat and a small amount of agave nectar for the sweetener (you could use maple syrup instead). They weren't bad, but the millet and sorghum flours made the brownies slightly crumbly in the finished product, even though the flours felt very fine to me when raw.  So, I tried  the same recipe again with only oat flour.  The brownies were better, but I still felt that they weren't moist enough. 

The 3rd time I made brownies, I used 2/3rds oat flour and 1/3 bean flour, AND I added 1/4 cup of yellow split pea puree, which I keep in the freezer, frozen in ice cube trays [2 tablespoons per cube] and then popped into freezer bags. This puree is a great as a fat replacer in baking and I thought it might add just that little bit more moisture that I needed. It turned out really well and this is the recipe I'm sharing below.


UPDATE: But, re-reading my post on baking with yellow split pea puree, I noted that I had been adding 1 T. water to the 2 thawed-out cubes of puree for a moist texture in muffins.  So, I did just that today (Sept. 22, 2018) when I made a fourth batch, and the brownies were perfect this time. One more change I made was using 6 tablespoons of agave nectar instead of 1/3 cup (which is 5 1/2 tablespoons). We brought the brownies over to some friends today and they loved them! So I have updated the recipe below and I hope you enjoy it!PS: See about baking with yellow split pea puree, + a yummy fat-free muffin recipe at this link.

Anyway, enough chatter!  If you try these, let me know what you think.  I may try using a date puree for the sweetener next time and, if it works, I'll post it.


Printable Recipe

BRYANNA'S MOIST & DELICIOUS LOW-GLYCEMIC, LOW-FAT, VEGAN BROWNIES (soy-free and gluten-free if you use GF oats; NO added oil)                 
        Servings: 12 bars   
RECIPE UPDATED SEPT. 22, 2018 (See highlighted paragraph above.)
UPDATED on June 21, 2019:
If you cannot have any kind of sugar, you can use your favorite non-sugar sweetener, use sugar-free chocolate chips and use 1 cup chopped walnuts. 
[I dislike the taste of stevia, BTW.] Allulose is a relatively new type of sugar-free sweetener that sounds ideal (I haven't tried it yet, but plan to soon)-- read about it here https://bit.ly/32mD8C8 . Considering that most of the newer sugar subs are quite expensive, this is a pretty good buy, if you're interested.

DRY MIX:
1/2 cup oat flour  (I simply blend rolled oats in a dry blender until fine and fluffy.)
(NOTE: stir the oat flour a bit before measuring.)
1/4 cup chickpea flour, yellow split pea flour, soy flour or white bean flour (You could use a darker bean flour, if you like, as long as the taste is mild.)
(PS: Soy flour is very low-glycemic-- GI 20-25 ; yellow split pea flour and black bean flour are GI 30; chickpea and oat flours ar GI 44.)
1/3 cup dark cocoa powder
1 tsp baking powder
1/2 tsp baking soda
1/2 tsp salt
WET MIX:
1 cup smooth UN-sweetened applesauce
6 tablespoons agave nectar (you can use maple syrup instead, if you prefer)
1/4 cup yellow split pea puree (see Tip below for how to make and store)
1 tablespoon water (to mix with split pea puree)
1 tsp vanilla extract
EXTRAS: (Optional)
1/2 cup semisweet or bittersweet dark chocolate chips (can be minis)
1/2 to 1 cup walnut halves or pecans, roughly chopped

Procedure:

Preheat oven to 350 degrees F. (NOTE: When I use my little counter-top Cuisinart Air Fryer Oven, 325 degrees F works best.)

Oil an 8-inch square baking pan (I use a Pyrex pan). Line with baking parchment, if you wish.

In a medium bowl, mix together the Dry Mix ingredients.

In a small bowl, mix together the Wet Mix ingredients.

Pour the Wet Mix into the Dry Mix and combine briefly but thoroughly. If you are using the chocolate chips and/or nuts, stir them into the batter.

Spread evenly in prepared pan. Bake for 18-20 minutes. Check with a toothpick at 18 minutes. If the toothpick is a bit gooey, bake a few minutes more. A toothpick should come out just about clean, but not really dry.

Cool the pan on a rack. When it has cooled completely, cut into 12 squares. Store in a covered container at room temperature-- they are even better the next day!

TIP- To make and store yellow split pea puree:
Mix 2 cups of dried split yellow peas [they don't have to be soaked first] with 4 cups of water in your Instant Pot or other pressure cooker and cook at high pressure for 10 minutes. (PS: Or, you can simmer them in a pot, covered, for 30 minutes on your stovetop.) Let the pressure come down before opening the pot. The resulting soft mush just needed a few stirs to "puree", and the yield was 5 cups.

I refrigerated the puree for a day or so.  When I removed it from the refrigerator, it had hardened considerably! I pressed some of the the puree into ice cube trays, which made cubes of 2 tablespoons puree, and some in 1/4 cup portions in silicone cupcake liners also in a silicone ice cube tray that made 1/4-cup cubes. Then I  froze them.  Later, I popped out the frozen portions, bagged them up in zipper-lock storage bags and placed them back into the freezer for future use.) Add 1 Tablespoon water to each 1/4-cup portion of split pea puree before adding to a baking recipe for brownies, muffins, etc..

NUTRITION FACTS:
WITHOUT chocolate chips or nuts:
Nutrition (per bar): 64 calories, 6 calories from fat, less than 1g total fat, 0mg cholesterol, 134.1mg sodium, 139.2mg potassium, 14.9g carbohydrates, 1.8g fiber, 7.1g sugar, 1.8g protein, 2.1 points.

WITH semisweet chocolate chips, but NO nuts:
Nutrition (per bar): 98 calories, 23 calories from fat, 2.9g total fat, 0mg cholesterol, 134.9mg sodium, 139.2mg potassium, 19.4g carbohydrates, 2.3g fiber, 7.1g sugar, 2.1g protein, 3.2 points.

WITH 1/2 cup nuts, but NO chocolate chips:
Nutrition (per bar): 96 calories, 33 calories from fat, 4g total fat, 0mg cholesterol, 134.2mg sodium, 160.7mg potassium, 15.6g carbohydrates, 2.2g fiber, 7.2g sugar, 2.6g protein, 3.1 points.

WITH both chocolate chips AND 1/2 cup nuts:
Nutrition (per bar): 130 calories, 49 calories from fat, 6.1g total fat, 0mg cholesterol, 135mg sodium, 160.7mg potassium, 20g carbohydrates, 2.6g fiber, 7.2g sugar, 2.9g protein, 4.1 points.

WITH semisweet chocolate chips AND 1 cup nuts:
Nutrition (per bar): 195 calories, 94 calories from fat, 10.9g total fat, less than 1mg cholesterol, 141.6mg sodium, 198.7mg potassium, 20.1g carbohydrates, 3.5g fiber, 6.5g sugar, 5.3g protein, 5.6 points.

Nutrition Facts for this recipe, using 1/2 cup sucralose instead of agave, and with 1 cup chopped walnuts and no choclate chips, are directly below,

***followed by Nutrition Facts for the recipe 
using 1/2 cup sucralose instead of agave, with 1/2 cup chopped walnuts and 1/2 cup sugar-fee chocolate chips or chunks, and***

Nutrition Facts for the recipe using 1/2 cup sucralose instead of agave, with 1/2 cup chopped walnuts and 1/2 cup sugar-free chocolate chips or chunks.


Nutrition Facts for the recipe using 1/2 cup sucralose instead of agave, with 1  cup chopped walnuts and 1/2 cup semisweet chocolate chips.


Enjoy!!


Saturday, September 8, 2018

PEANUT BUTTER/TOFU "CREME CHEEZE" SPREAD-- EASY, CREAMY, DELICIOUS, PROTEIN-RICH, LOW-FAT


QUICKIE POST!


This is an old recipe of mine that I have just resurrected, and I'm loving it!  Super quick and easy to make, and great on toast (with some low-sugar jam) for breakfast or in a PB&J sandwich, or on apple slices and/or celery sticks for a quick snack.

I'm really enjoying using tofu these days, BTW.  The whole soy scare thing is so unfortunate and is the result of misinformation distributed by groups such as the anti-vegetarian Weston A. Price Foundation, and then blindly re-distributed by people and groups who don't do their homework. (See my research here: http://veganfeastkitchen.blogspot.com/p/are-you-concerned-about-safety-ofsoy.html ) There are many types of tofu easily available these days (have you tried smoked tofu?); you can purchase organic tofu; it's inexpensive and full of protein, but low in fat; it's versatile as an ingredient; it can take on all sorts of flavors and seasonings and be used in recipes from cuisines.  


BRYANNA'S PEANUT BUTTER/TOFU "CREME CHEEZE" SPREAD
Yield: 2 cups/ Servings: 16
 Each serving= 2 T. 
This spread contains a similar amount of protein, 1/3 of the fat and 1/2 of the calories of an equal amount of peanut butter.

Ingredients
12.3 ounces extra-firm silken tofu
(OR press 1 lb. of medium-firm tofu down to 12.3 ounces-- see below)
1/2 cup unsalted peanut butter (smooth or chunky)
4 tsp. lemon juice
1 tsp. agave nectar, maple syrup or organic sugar
1/2 tsp. salt

Process all ingredients in a food processor until smooth. Scoop into a 2-cup container with a lid.  Refrigerate. Easy as that!

How to press tofu: Sandwich your 1 lb. block of tofu between clean, absorbent dish towels (or several folded paper towels, if you must). Place a flat surface on top, such as a small cutting board or baking sheet, and weigh it down-- 28-ounce tomato cans or books work well.  15 to 30 minutes of pressing is usually sufficient.  Weigh the tofu on a small food scale to make sure that it is now about 12 ounces, or slightly more.

Nutrition Facts
Nutrition (per 2 T. serving): 82 calories, 49 calories from fat, 5.8g total fat, 0mg cholesterol, 75.9mg sodium, 121.8mg potassium, 3g carbohydrates, less than 1g fiber, 1.3g sugar, 5.9g protein, 2.4 points.

Enjoy!


Tuesday, August 21, 2018

QUINOA & BULGUR (OR, JUST QUINOA) SALAD WITH FRESH GREEN BEANS, CREMINI MUSHROOMS AND CHICKPEAS


This is the time of year when we often on tasty full-meal vegan salads for lunch or dinner.  Since we live on an island and can't run to a supermarket or natural food store for everything that might be called for in a recipe, I often just have a look in the refrigerator, freezer and pantry to see what I have around that might make a nutritious, delicious and satisfying salad meal all by itself.  

Yesterday, I made this salad for lunch (and there's some leftover for tomorrow!), with some cooked quinoa and bulgur and cremini mushrooms that I had in the refrigerator, plus some gorgeous fresh-picked green beans from our neighbor's garden, a cup of cooked chickpeas from my stash in the freezer, and one lone orange that was left from the last shopping.  Mixed with a piquant, slightly Asian-style dressing, it all became a very tasty and filling low-fat, high-fiber meal, AND one that is low-glycemic, which is what I need to be concerned about because of a pre-diabetes diagnosis. (The diet is working-- my blood sugar levels have improved and I've lost 13 lbs.)  


Cooked Quinoa
Medium (#2) Bulgur Wheat

Both quinoa (which is actually a seed, not a grain, but we use it like a grain) and bulgur wheat are low on the glycemic index.  (Bulgur (the grain used for making tabouleh), because of the ancient way in which it is processed, contains "resistant starch", which is a good thing!  You can read all about it here.) I usually mix quinoa with bulgur because my husband is not fond of quinoa on its own, and bulgur is very inexpensive, so this cuts the cost a bit.  Fortunately, they cook in about the same amount of time, with the same amount of liquid.  I often cook a large-ish pot of them together and freeze portions for future use.


BRYANNA'S QUINOA & BULGUR (OR, JUST QUINOA) SALAD WITH FRESH GREEN BEANS, CREMINI MUSHROOMS AND CHICKPEAS
Servings: 4

A citrus-y dressing, orange zest and little chunks of fresh orange make this full-meal salad refreshing as well as satisfying. NOTE: Both quinoa and bulgur wheat are low-glycemic, so this is a great salad for anyone is on a Low-GI diet.

You might be interested in my article, “Are Vegans Really Hurting South American Farmers by Eating Quinoa?”, at  https://bit.ly/2BACGoE

Ingredients
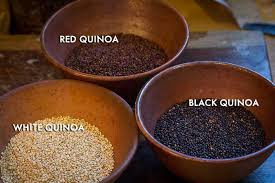
1/2 cup white or red quinoa (pre-washed, such as the Kirkland organic white quinoa from Costco)
1/2 cup medium (#2) bulgur wheat
(For a gluten-free version you can use 1 cup white or red quinoa or a mixture of both, and eliminate the bulgur.)
2 cups water
1/2 tsp. salt
NOTE: You could use 3 cups of pre-cooked quinoa/bulgur mixture, or just quinoa (of any color) if you have some on hand in your refrigerator.
12 oz. fresh green beans, stemmed and cut into 1 to 2" pieces
1 Tbs. dark sesame oil
8 oz. fresh cremini mushrooms (remove any tough stems), sliced about 1/4" thick
1  cup cooked or canned chickpeas, rinsed and drained
1 medium orange, peeled after zesting, and sliced into small chunks
zest from 1 medium orange
Citrus Dressing:
1 1/2 Tbs. plain rice vinegar (not salted)
1 1/2 Tbs. soy sauce or tamari 
NOTE: I urge you NOT to use Bragg's Liquid Aminos, which actually contains more sodium than soy sauce and is unfermented, so lacking umami flavor compounds. See this article: https://bit.ly/2N4LaFD
1  Tbs. dry to medium sherry
1 Tbs. orange juice
1 Tbs. fresh lemon juice
1 Tbs. olive oil

Mix the quinoa and bulgur (or 1 cup quinoa for gluten-free) in a medium saucepan with a tight lid.  Bring to a boil, stir and turn the heat down to Low.  Cook, covered, for 12-15 minutes.  Remove the cover and fluff the grains with a fork.  Scoop into your serving bowl and set aside.

While the quinoa/bulgur mixture is cooking, you can cook your green beans in another pot, just barely covering the beans with water. Bring to a boil, turn down to a simmer, cover and cook for about 5 minutes, or until tender but firm-- not mushy.  Drain immediately in a colander and run cold water over them to cool them down.  Leave in the colander to drain while you finish the recipe.

Heat the sesame oil in a medium-large skillet over high heat. When the oil is hot, add the mushrooms, sprinkle with a bit of salt, and sauté until they are cooked to your liking but still keep their shape.  You can add a bit of water from a kitchen squirt bottle every now and then as you sauté to keep the mushrooms moving well and prevent sticking-- but don't overdo the water! When they are cooked, scrape them into the bowl with the quinoa/bulgur mixture.

Now, add the drained green beans to the hot skillet over high heat and keep the beans moving until most of them are slightly seared. Immediately add them to the bowl with the grains and mushrooms.

Add the drained chickpeas and the orange chunks and zest to the bowl.

In a small bowl or pitcher, whisk together all of the Dressing ingredients, then add the dressing to the bowl of salad ingredients and mix gently with a large spoon.

Nutrition Facts
Nutrition (per ¼ recipe serving): 333 calories, 82 calories from fat, 9.5g total fat, 0mg cholesterol, 482mg sodium, 907.5mg potassium, 55.4g carbohydrates, 11.7g fiber, 7.8g sugar, 12.2g protein, 10.2 points.


Enjoy!


Saturday, July 28, 2018

MOIST & DELICIOUS LOW-GLYCEMIC/NO-ADDED-SUGAR CORN MUFFINS


As you might have noticed, I've been on vacation from blogging for almost a month. However, I haven't been idle.  You might remember me mentioning back in April that I was diagnosed as pre-diabetic, so I have been adjusting my vegan diet to a low-glycemic vegan diet, which means also adjusting some recipes, totally revamping others, or even starting from scratch, and tossing some out, as well. (You can read a bit about this in this blog post and this one. And, PS: I've dropped 13 lbs without even trying, and my blood tests are definitely improving. )

We mostly eat fresh fruit (often with homemade soy yogurt) when we want a dessert, but occasionally I make Chocolate "Nice Cream", made with 3 sliced frozen ripe bananas, 1/3 cup dark unsweetened cocoa powder, 1/4 cup soy milk, a pinch of salt, a little vanilla extract, and sometimes a dollop of nut butter, blended until creamy-smooth in the food processor, then frozen-- no sugar or sweetener of any kind needed! So delicious!  

I've been eating only sprouted grain or whole rye breads, and also investigating other low-glycemic grains and flours. Quinoa, teff, and amaranth are all very well, but they are expensive (as is commercial sprouted grain flour), difficult for some people to find, and often too strong in taste to use in many recipes. My favorite quartet of LG flours is comprised of oat flour, barley flour, millet flour (all can be ground from grain to flour in a dry high-speed blender if you do not have a grain mill) and chickpea flour. (White bean flour can be used in place of chickpea flour.) Buckwheat and rye are also excellent, and I always have some in my freezer, but their strong flavors make them less useful.

Lately, I've been working on a low-glycemic, low-fat vegan brownie-- can you tell that we love chocolate? I'm not there yet, but will report back. Another recipe that 
I've been working on is a low-fat, but moist, low-glycemic vegan cornbread or corn muffin. Cornbread is a particular favorite of mine. I've tried many recipes from online sources and cookbooks, but, in the end I successfully revised one of my own corn muffin recipes and it's easy, quick, and inexpensive, as well as delicious.

The following recipe is based on a recipe from my book "The Fiber for Life Cookbook" (Book Publishing Co., Summertown, TN; © 2002). It has been a favorite of ours for many years, because we love anything corn-y, and these are double-corn-y! The canned cream-style corn in the recipe (which contains no cream or dairy whatsoever) adds more fiber, and makes the muffins moist and sweet. If you don't have a can in your pantry, or prefer not to use it, you will need some thawed and drained frozen sweet corn-- see note at the end of the Ingredient List in the recipe.

In this close-up,  you can see the nice moist crumb of the muffin.

Printable Recipe

BRYANNA'S MOIST & DELICIOUS LOW-GLYCEMIC/NO-ADDED-SUGAR CORN MUFFINS 
Makes 12     

(This recipe also happens to be gluten-free, can be soy-free, and contains no sugar or syrup of any kind, and no artificial sweeteners.)


DRY MIX:
1 cup yellow cornmeal 
1/2 cup oat flour
1/4 cup barley flour
1/4 cup millet flour
1/2 T. baking powder
1/2 tsp. salt
1/4 tsp. baking soda
WET MIX:
3/4 cup non-dairy milk
2 T. oil
2 tsp. powdered egg replacer (such as Ener-G or Orgran)
ADDITIONAL:
14 oz. can cream-style corn (This product does NOT contain dairy products.) OR, in place of canned cream-style cornyou can mix 14 oz. of thawed frozen sweet corn (do not drain) with the Wet Mix ingredients in a blender or food processor for about 5 seconds-- some lumps of corn should remain. See photos below to judge texture.


Instructions:
Preheat the oven to 375 degrees F.  Oil 12 muffin cups.   Mix the Dry Mix ingredients together well in a medium bowl.  Mix the Wet Mix ingredients in another (2 to 4-cup) bowl or pitcher with a whisk or with a hand/immersion blender.  Pour the contents of the can of "cream-style" corn into the Wet Mix and stir well. 

Pour this mixture into the Dry Mix and mix briefly.  Spoon evenly into the muffin tin.  Bake 15-20 minutes. (Test one of the muffins with a toothpick after 15 minutes, to see if the toothpick comes out clean-- if it dies not, bake for a few minutes more.).

Loosen them carefully with a table knife and turn them on edge.  Place the muffin tin on a rack, cover the muffins with a clean tea towel and cool for a few minutes before serving.  Cool thoroughly before storing.  These freeze well.

Nutrition Facts
Nutrition (per serving): 126 calories, 30 calories from fat, 3.4g total fat, 0mg cholesterol, 211.5mg sodium, 185.4mg potassium, 22.5g carbohydrates, 2.1g fiber, 1.6g sugar, 3g protein, 3.7 points.

Enjoy!


Friday, June 1, 2018

EASY, VERSATILE OAT & OKARA-OR-BEAN-ENHANCED SEITAN CUTLETS


This is my new favorite seitan recipe.  It's easy to make, has more fiber than most seitan, is tender and flavorful, and is very versatile.  The finished cutlets can be cut into cubes for stews and into strips for stir-fries.  I haven't tried this yet, but I think it would also make great sausages-- in fact, when my friend Tanya tasted this seitan in an Italian roasted stew (p. 172 in my vegan Italian cookbook, "Nonna's Italian Kitchen" ) that I made for a birthday potluck, she thought it was chunks of vegan Italian sausage!


So that will be my next experiment, maybe with the addition of some different or additional  seasonings.  If it turns out well, I'll post about it, for sure.


Enough said-- here's the recipe!

Cutlets ready to cook, or to cut up for stews or stir-fries


Cutlet coated with Seasoned Flour, browned in a little oil and served with vegan gravy and sauteed mushrooms and onion
Printable Copy

BRYANNA'S EASY, VERSATILE OAT & OKARA-OR-BEAN-ENHANCED SEITAN CUTLETS (Updated on Sept. 15, 2018)
Servings: 9
Yield: Makes 9/ 4 oz cutlets, or 36 oz. of seitan in total

I usually make 3 times this recipe (makes 27 cutlets-- see below for 3 x the recipe) and freeze them.  They can be used as cutlets for a quick meal, or they can be cut into chunks for stews, or into slices for stir-fries and sautéed dishes, etc.

Dry Mix:
1 1/2 cups vital wheat gluten
3/4 cup quick oats
1/4 cup nutritional yeast flakes
1  tsp onion powder
1  tsp garlic granules or powder
1/2 tsp dried thyme or sage (or a mixture)
Wet Mix:
1 3/4 cups water
1 Tbs vegan broth powder (use a tasty one)
2 Tbs soy sauce or tamari
1  Tbs olive oil
1 cup cooked or canned (rinsed and well-drained) white beans OR fresh (or thawed frozen) okara (pulp from making soymilk or tofu) 
NOTE: you could use other types of beans, if you wish.
Cooking Broth:
2 1/4 cups water
4 tsp mushroom powder
NOTE: I grind dry, stemmed Chinese black mushrooms or shiitake mushrooms in a dry blender to make the powder.
4  tsp tasty vegan broth powder
4 tsp soy sauce or tamari
4 tsp minced garlic
1 Tbs ketchup (can be an organic brand)
1 Tbs olive oil or dark sesame oil (or a mixture)
1 tsp onion powder
1/2 Tbs dried sage
1/2 tsp paprika

Mix the Dry Mix ingredients together in a medium-sized bowl.

Mix the Wet Mix ingredients together in a pitcher.  Pour into the Dry Mix and combine with a spoon.  Knead for a few minutes by hand, or for about 5 minutes with the dough mixer attachment of your stand mixer, until a cohesive dough results.  Cover and let it rest for 30 minutes.

In the meantime, mix your Broth ingredients in a large pot and bring to a boil. Turn the heat off and cover.

Remove the dough from the bowl and flatten it out into a more-or-less even rectangle.  Cut with a bench knife/dough scraper or a knife into 9 fairly even chunks.  

It's preferable to weigh the chunks, so, if you have a kitchen scale, use that to make 4 oz. chunks.  If there is any dough left over after weighing, divide it evenly between the chunks and knead it in.


To form the cutlets, pat out each chunk on a silicone mat or clean counter (dampen your hands with water) until you have a fairly thin rectangle. Fold it in half one way and in half the other way.  Pat it again to make a cutlet about 1/4" thick.  It doesn't have to be an even shape, but even thickness is preferable.

On the left is the cutlet before folding; on the right is after folding and patting out again.
Simmered cutlets
Bring the Broth to a boil and slip the cutlets into the Broth one at a time.  It's okay if they overlap a bit and if you have more than one layer.  Turn the heat down to Low, cover and simmer for 30 minutes. Turn off the heat, uncover and let it cool for a bit.

Carefully remove from the pot-- you may have to use a small spatula or table knife to gently pry some of them apart.  

Finished cutlets
Store in single layers between sheets of baking parchment in a large, flat freezer container with a tight lid.

These will keep for about a week in the refrigerator, or for several months in the freezer.

To cook and serve the cutlets:

You can coat the fresh or thawed-out cutlets in Seasoned Flour (see below for recipe) OR panko (Japanese dried breadcrumbs) and sauté in a little oil in a heavy frying pan until golden and crunchy on both sides, OR coat with Seasoned Flour, then dip in soy or hemp milk that has been curdled to thicken by adding a bit of lemon juice (so that it's like buttermilk), then coated with whole grain dried breadcrumbs, such as panko breadcrumbs.  Shallow-fry in a frying pan until golden and crunchy, or air-fry.  Serve either way with a sauce of your liking, or plain with your favorite accompaniment.

The cutlets can also be cut into chunks and sautéed briefly to use in a stew.  They can also be cut into slices for stir-fries, or into thinner pieces (cut horizontally) for scallopine, sautéed and cooked in a sauce.

Nutrition Facts
Nutrition (per cutlet): 158 calories, 21 calories from fat, 2.5g total fat, 0mg cholesterol, 366.9mg sodium, 261.3mg potassium, 15.1g carbohydrates, 3g fiber, 1g sugar, 20.5g protein, 4.2 points.


ADDITIONAL INFO:

FOR 3 TIMES THE RECIPE (108 OZ. OR 27/ 4 OZ CUTLETS):


Dry Mix:
4 1/2 cups vital wheat gluten 
2 1/4 cups quick oats
3/4 cup nutritional yeast flakes
1 Tbs. onion powder
1 Tbs. garlic granules or powder
1/2 Tbs. dried thyme or sage (or a mixture)
Wet Mix:
5 1/4 cups water
3 Tbs. vegan broth powder (use a tasty one)
6 Tbsp. soy sauce or tamari
3 Tbsp. olive oil
3 cups cooked or canned (rinsed and well-drained) white beans, OR fresh (or thawed frozen) okara (pulp from making soymilk or tofu)   
NOTE: You could use other types of beans, if you wish.
Cooking Broth:
7 cups water
1/4 cup mushroom powder
NOTE: I grind dry, stemmed Chinese black mushrooms or shiitake mushrooms in a dry blender to make the powder.
1/4 cup tasty vegan broth powder
1/4 cup soy sauce or tamari
1/4 cup minced garlic
3 Tbsp. ketchup (can be an organic brand)
3 Tbsp. olive oil or dark sesame oil (or a mixture)
1 Tbsp. onion powder
1/2 Tbsp. dried sage
3/4-1 tsp. paprika

Proceed as directed in main recipe (use a large bowl), making 27/ 4 oz. cutlets. Cook in 2 large pots, each with a metal rack at the bottom of the pot.

SEASONED FLOUR FOR DREDGING CUTLETS IF THEY ARE PLAIN, UN-COATED:
(This mixture is also useful for coating tofu, tempeh and seitan before pan-frying or broiling.)

2 cups whole wheat flour 
1/4 cup nutritional yeast flakes
1 tsp salt
1 tsp onion powder
OPTIONAL: 
1 tsp garlic granules or powder
1 tsp paprika or smoked paprika

 Mix well and store in a tightly-covered container in your pantry.

Enjoy!