
I'm sure many of you have read all the posts buzzing around late last year about the amazing no-knead bread recipe (often called "pot bread" now!) posted in Mark Bittman's "Minimalist" food column in the NY Times. Well, I belatedly tried it yesterday. (I've been doing the WW Core Plan, so not baking bread very often-- I'm going off it for a few days as I'm in a bread-baking mood!) I was intrigued not only by the success of this very simple, and seemingly resilient, recipe, but by the promise of amost no labor, good flavor, large holes like a real European brick-oven bread, and a super-crispy crust. Crumbs all over the place!
Sounds too good to be true, but many, many bloggers and posters had great success with it, even using slightly different amounts of water, and salt, and a variety of cooking vessels. The science behind it-- Harold McGee author of “On Food and Cooking” (Scribner, 2004-- a book I have on my personal shelf!), says: “It makes sense. The long, slow rise does over hours what intensive kneading does in minutes: it brings the gluten molecules into side-by-side alignment to maximize their opportunity to bind to each other and produce a strong, elastic network. The wetness of the dough is an important piece of this because the gluten molecules are more mobile in a high proportion of water, and so can move into alignment easier and faster than if the dough were stiff.” As well, the long rise produces umami flavor compounds which give the bread outstanding flavor.
In addition to this, the baking in a heavy, covered pot acts like a miniature brick oven, creating steam inside to help the crust get crispy.
So, I started the bread at 7 PM on Friday night. All you do is mix the dry ingredients, including the yeast, and then pour in tepid water, stir briefly until a "shaggy" dough results:

Cover and keep in a warm place for 12-18 hours. I opted for 18 hours, and, since it's not always even heat in our wood-heated house.
So, about 1 PM on Saturday, I took the dough out, and it was quite wet and bubbly, as advertised:

After scooping it out onto floured parchment paper, I let it rest and then shaped it into a "ball" of sorts. There was alot of discussion about rising it the second time. I used a heavy tea towel, well-floured and dusted also with bran, inside of a bowl.

Dough before 2nd rise
I think next time I'll line the vessel I'm rising it in with floured parchment instead of plastic wrap, because it stuck a bit getting it out into the pan. Or, I might get some of those round baskets for raising bread.
I let it rise for 3 hours. half an hour before you put the dough in the pot, you heat the oven with the pot and cover in it, to 450-500 degrees F. Then you up-end the dough into the UNgreased pot (no, it really does not stick!), cover and bake as directed.
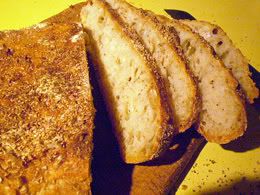
It really is simple and easy. You just have to be around during the last part of the process. And the bread is delicious, has holes like an artisan bread, and the best crust I've ever had in 40 years of bread-making, aside from the short time I had a wood-fired outdoor oven! It stayed crispy after it cooled, and I have found that often you'll get a crispy crust in your home oven, after using steam, etc., but then it softens as it cools. Not this time!
I used less water than called for, more salt (many other cooks agreed with me that the salt content was too low), a tiny bit of wholewheat flour, and I used regular dry active yeast, since I didn't have any of the instant yeast called for. I find buy Fleischman's dry active baking yeast in 1 Kg cans for about the same price as one littel jar of yeast. You just use about 1/4 more than you would instant yeast, so I used 1/3 of a tsp. of yeast instead of 1/4 tsp. in this recipe. It worked fine. (Don't be tempted to use more yeast or speed this bread up! The long rising gives it the flavor and texture you want, and makes up for the lack of kneading, as Harold McGee stated above.)
I used a 475 degree oven, but I might try 450 next time. I used a big enameled cast iron pot that I found for $3 at a garage sale:

It worked fine, but was a bit large , so the bread was a bit flat. But that's okay-- I love the crust!
I plan to experiment alot with this method! Last night I put on a version using 1/2 fresh-milled wholewheat bread flour and 2 tsp. salt, and I plan to make a small loaf in a ceramic pot, and some pizza or focaccia with the rest. I want to try doubling and tripling it, experimenting with addition of other grains, herbs, etc; using sourdough starter in place of yeast; making rolls, baguettes and other shapes, and experimenting with different vessels for baking. I will blog the results! Thank you Jim Lahey, of NY's Sullivan Street Bakery, Mark Bittman, and many bloggers who posted their results!
Anyway, here's the recipe, with a few more comments and pictures:

November 8, 2006
NO-KNEAD BREAD
Adapted from Jim Lahey, Sullivan Street Bakery. My comments in italics.
3 cups all-purpose or bread flour, more for dusting (I used unbleached flour, and I used 3 T. of wholewheat flour in place of 3 T. of unbleached
¼ teaspoon instant yeast (I used 1/3 tsp. regular dry active baking yeast)
1¼ teaspoons salt (I used 1 3/4 tsp. sea salt; next time I will use 2 tsp.)
Cornmeal or wheat bran as needed.
1. In a large bowl combine flour, yeast and salt. Add 1 5/8 cups water (I used 1 1/2 cups-- alot of people who tried this did the same) , and stir until blended; dough will be shaggy and sticky. Cover bowl with plastic wrap (I put the bowl inside a small white plastic garbage bag and twist-tied it.). Let dough rest at least 12 hours, preferably about 18 (I raised it 18 hours), at warm room temperature, about 70 degrees. (I placed it in the oven of my well-insulated stove with the oven light on. I had previously heated the oven up just a little, and placed a tea towel on the rack.)
2. Dough is ready when its surface is dotted with bubbles. Lightly flour a work surface and place dough on it; sprinkle it with a little more flour and fold it over on itself once or twice.


(It's quite sticky-- keep your hands and the surface floured; maybe used a bench scraper.) Cover loosely with plastic wrap and let rest about 15 minutes.
3. Using just enough flour to keep dough from sticking to work surface or to your fingers, gently and quickly shape dough into a ball.

Generously coat a cotton towel (not terry cloth) with flour, wheat bran or cornmeal (I used flour and bran, see comments above); put dough seam side down on towel and dust with more flour, bran or cornmeal. Cover with another cotton towel and let rise for about 2 hours. When it is ready, dough will be more than double in size and will not readily spring back when poked with a finger.

Dough ready for oven
4. At least a half-hour before dough is ready, heat oven to 450 degrees (I used 475 this time, but might use 450 next time-- some folks went up to 500; might depend on your oven.). Put a 6- to 8-quart heavy covered pot (cast iron, enamel, Pyrex or ceramic) in oven as it heats. When dough is ready, carefully remove pot from oven. Slide your hand under towel and turn dough over into pot, seam side up; it may look like a mess, but that is O.K. Shake pan once or twice if dough is unevenly distributed; it will straighten out as it bakes. Cover with lid and bake 30 minutes, then remove lid and bake another 15 to 30 minutes, until loaf is beautifully browned. Cool on a rack.
Copyright 2006 The New York Times Company
Servings: 12
Yield: One 1 1/2-pound loaf.
Nutrition Facts (using 2 tsp. salt)
Nutrition (per slice 1/12th of loaf): 120.4 calories; 2% calories from fat; 0.3g total fat; 0.0mg cholesterol; 314.7mg sodium; 42.7mg potassium; 25.2g carbohydrates; 1.1g fiber; 0.1g sugar; 24.1g net carbs; 3.5g protein; 2.2 points.


Happy baking!


